• Notice for iPhone users: DO NOT use the image size reduction option when uploading photos to the forum. This causes portrait images to post as landscape. We have added a warning to the image insert pop-up as well.

Cab Repairs, Rock-Hard Cage Install

CJ7Pilot

18436572
BENEFACTOR
Gold Member
Lifetime Member
SOA Member
City
Yuba City
State
CA
I decided to take a break from engine work this weekend, since I can't do much more until my exhaust is built next week.

So... I decided to tackle some projects that have been on my short list for about a year and a half, now. :rolleyes:

The plan was to remove the top, repair some mounting nuts, paint the inside of the cab, replace my 3-wire wiper motor with a 4-wire wiper motor, and install a Rock-Hard interior cage.

I got started around noon, and set the cab back on around 7:30pm, so not a bad afternoon!

With no roll bar, and no cab, the Scrambler really reflects its roots:
cab - 1.jpg

cab - 2.jpg

I've been intrigued by Quadratec's "reinforcement strips" for years, and since my windshield hard-top mounting holes are mostly stripped out, I decided to give them a try. I ran out of daylight (and energy) before I could screw the top down, so I'll revisit this part tomorrow.

cab - 3.jpg

I should have taken more photos of the cage install. It wasn't quite the plug-n-play affair I was hoping for, but it still wasn't too bad. I painted the pieces last weekend, and figured they would just bolt in. I'll take some photos of the problem areas tomorrow, and describe how I decided to deal with them.

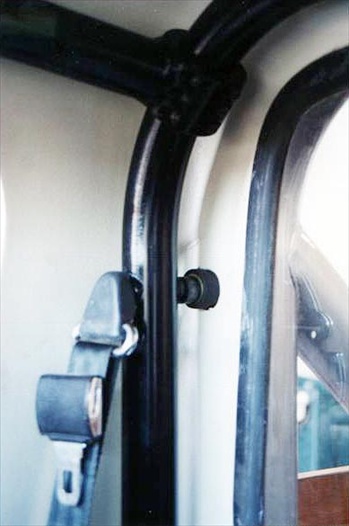
Here are a few shots of the cage installed, and the top in place:

cab - 4.jpg

cab - 5.jpg

cab - 6.jpg

As you can see, I drilled holes along the back of the cab to access the mounting nuts. The original nuts had come loose, and I had previously replaced them with riv-nuts. Well, the riv-nuts spun when I went to remove the cab, so I drilled the holes, and now I can put nut plates in there when I bolt it back down. The holes will be covered with the same 1" body plugs that are used everywhere else on these Jeeps.

The worst part of this project (and it would have been a deal-breaker, if I'd have realized it ahead of time), is that I had to remove the prototype leather-wrapped padded grab bar that Kim Dawson sent me! No worries though, I'm going to drill new holes and re-mount it a little to the left. :thumbsup:
 
Last edited:

Belizeit

CJ-8 Member
Gold Member
City
River Ridge
State
La
Does the cage use the existing roll bar ? Is it bolted to the floor or framework ? What brand ? Thanks
 

CJ7Pilot

18436572
BENEFACTOR
Gold Member
Lifetime Member
SOA Member
City
Yuba City
State
CA
Does the cage use the existing roll bar ? Is it bolted to the floor or framework ? What brand ? Thanks

There are two versions of the cage. One clamps directly to the stock roll bar, but it can't be used with the pickup cab. The one I got comes with an interior rear hoop, that bolts to the lower body brace, which bolts though the stock roll bar mount under the bed. The hoop is also intended to be bolted to the stock bar via extra long seat belt bolts, but my roll bar does not have seat belt mounts. Part of my rationale for installing this cage, was the ability to install three-point seatbelts inside the cab.

Here's a link to the manufacturer: http://www.rockhard4x4.com/Jeep_CJ8_Sport_Cages_s/306.htm

I'll add some more pictures today, showing how it actually mounts to the body. I believe they also have a kit to tie the whole thing to the frame, but I'm not going to incorporate that, for now.
 

Spieg

Scrambler Junkie
Lifetime Member
City
Aurora
State
CO
I've been on the fence about getting one of these. A couple of questions if you don't mind;

Ive used this style of pipe clamp before but they have all been designed to work with straight sections of pipe. Does this kit use a special clamp to work on this curved section at the rear hoop?
RH-1005-7T.jpg


Also curious if you used the a-pillar support?
RH-1003-F-2T.jpg
 

CJ7Pilot

18436572
BENEFACTOR
Gold Member
Lifetime Member
SOA Member
City
Yuba City
State
CA
I've been on the fence about getting one of these. A couple of questions if you don't mind;

Ive used this style of pipe clamp before but they have all been designed to work with straight sections of pipe. Does this kit use a special clamp to work on this curved section at the rear hoop?

No, it's a straight clamp. I was curious about that too, but the bend has a large enough radius that the clamp fits on okay, and when you tighten it down, it all squishes together.

Also curious if you used the a-pillar support?

Not for now... I think that makes sense if you want to tie it to the frame, but I don't think there's much extra support to be had just by connecting to the floor pan. If I change my mind, it can be added pretty easily.
 
  • Like
Reactions: SKT

CJ7Pilot

18436572
BENEFACTOR
Gold Member
Lifetime Member
SOA Member
City
Yuba City
State
CA
I have two main pieces of advice for those who decide to install one of these cages:

1. Leave everything loose until all the pieces are in place... I mean really loose, like just a couple of threads to keep the fasteners in place! It will all come together in the end, but you need plenty of movement to get everything lined up.

2. Have someone help you. An extra pair of hands would have saved me a lot of scuffed paint (and swearing).

Here are some other points to keep in mind:

The biggest flaw in this kit shows up when you set the rear hoop in place, and discover that it interferes with the rear wiring harness grommet. That grommet is a huge chunk of rubber inside the cab, but fairly flat on the outside. Following some advice I found on this forum, I pulled the grommet out, sliced it longwise so I could remove it from the wiring, flipped it end for end, wrapped it back around the wiring, and shoved the chunky side out through the hole, leaving the flat side inside the cab. Now the rear hoop fits in place, although it still squishes the harness a little bit. Being a known issue, I'm surprised that Rock-Hard doesn't notch the tube for clearance in that area. The tube doesn't go all the way to the floor anyway, so it wouldn't hurt anything strength-wise. If I'd been aware of this ahead of time, I'd have notched it myself.

cage - 1.jpg

I had to extend the adjustment notches in my angle supports to compensate for the thickness of the hoop mounting plate. Apparently not everyone has to do this, but be prepared for it just in case. You can see that the hoop is welded to a plate that is sandwiched between the angle support and the bulkhead. On the other side of the bulkhead is a support bracket for the factory roll bar, so it's all tied together at that point.

cage - 2.jpg

Where the side hoop attaches to the rear hoop, I was a little confused about where exactly to place the clamp. It can actually slide a couple of inches around that bend when everything is loose... but as everything gets tightened down, there's only one spot it can really end up. Unfortunately, that leads to more paint scratches as things settle in.

cage - 3.jpg

The bar across the windshield gave me the biggest fits... this is where you'll be happy to have a helper. You have to get one side hoop installed, then hold this bar in place while you install the other side hoop. Also, as it turns out, the side hoops aren't vertically parallel! They taper slightly inward toward the top, to match the contour of the windshield. So... the cross-bar clamps are welded on with the same slight taper! At first glance, it looks like the clamps are welded on square, but they're not. It would be very easy to put the cross-bar in upside down, and then have to take it apart and re-do it.

Fortunately, I got lucky and installed it correctly the first time. However, that slight taper led to another problem. The cross-bar is designed to be installed right above the dash pad (if you have one). I don't have a dash pad, so I wanted to attach the cross-bar a little lower, so it would just clear the wiper motor cover. Well, since the upright tubes are angled, if you move the cross-bar up or down, it changes the distance between the tops of the side hoops, and the top brace won't fit right when you put it on (it's the last piece to be installed). That's why you leave everything super loose, then jiggle it in to place as you're tightening it down. Again, this left me plenty of scuffed paint as all those clamps found their proper locations! :banghead:

cage - 4.jpg

In the end, I like the way it turned out. I haven't put my seats back in yet, so I still don't know if I'm going to have head-room issues, but I'll cross that bridge when I come to it.

Regarding the Quadratec "reinforcement brackets," please don't waste your money. It's a good idea, but the truth is there's no one-size-fits-all solution when it comes to mounting the hard-top to the windshield frame, and the holes didn't line up. I finally got them to work, but with all the cutting/grinding/fitting I had to do, I could have (and should have) just made my own.

cage - 5.jpg

Here's the back of my cab with the body plugs installed. This idea worked out great! I was able to use regular nuts inside those holes, and there's enough room for a swivel-socket to reach in there and hold them in place while I tighten the bolt from below.

cage - 6.jpg

Finally, I mentioned that part of my project was to swap in a 4-wire wiper motor in place of my 3-wire motor. I did that, and it was pretty easy. I have not wired it up yet, but when I do, I'll update my YJ steering column swap thread from a couple of years ago.

Cheers! :cheers:
 
Last edited:

Belizeit

CJ-8 Member
Gold Member
City
River Ridge
State
La
Thanks for the nice write up and pictures ! Looks pretty good in there. Look forward for your report on when you get the seats in, and how the head room and leg room is. If you get a chance to take a picture when you get the time, where the front bar connects to the floor inside and below would be really appreciated. Thanks
 

CJ7Pilot

18436572
BENEFACTOR
Gold Member
Lifetime Member
SOA Member
City
Yuba City
State
CA
Thanks for the nice write up and pictures ! Looks pretty good in there. Look forward for your report on when you get the seats in, and how the head room and leg room is. If you get a chance to take a picture when you get the time, where the front bar connects to the floor inside and below would be really appreciated. Thanks

Thanks! I'm looking forward to getting the interior put back together.

I didn't get the floor bracket kit for the front. This cage just attaches to the sides of the dash, using the factory a-pillar for strength. I may look in to it in the future though, especially if I decide to tie it to the frame.
 

CJ7Pilot

18436572
BENEFACTOR
Gold Member
Lifetime Member
SOA Member
City
Yuba City
State
CA
Well, I put the driver's seat in for a test fit. The side of the seat presses up against the rear hoop, but it still slides all the way back (thank goodness).

Sitting in it, I have plenty of headroom... except when I tilt my head back, the button on my hat hits the rear hoop of the roll cage. Fortunately, I've removed most of the buttons on my hats (for aviation headset comfort), but if I were driving a bouncy road, I could see a real head-banger happening here....

It looks like a seat bracket lowering project may be in my future. It'll be good for now, though. :thumbsup:

Edit: By the way, I'm 6'4", and everything about a Scrambler cab is on the verge of being too small for me. I love having a CJ pickup though, and I'm determined to make it work! :crazy:
 
Last edited:

Cmath

Scrambler Enthusiast
Lifetime Member
City
Woodstock
State
Ga
Looking good! I have struggled with what to go with for a full roll cage/bar. Have looked at the RockHard4x4 cages but not sure how I feel about the bracket vs. other weld together options.
If you did this again would you still go with RockHard cage?
Do you feel that the brackets are bulky?
Is it that much better than a pre cut weld together package?
 

John N

Addicted....Ex-SOA VP
BENEFACTOR
Gold Member
Lifetime Member
SOA Member
City
Rockville
State
VA
Looking good! I have struggled with what to go with for a full roll cage/bar. Have looked at the RockHard4x4 cages but not sure how I feel about the bracket vs. other weld together options.
If you did this again would you still go with RockHard cage?
Do you feel that the brackets are bulky?
Is it that much better than a pre cut weld together package?
I’ve got the same Rockhard cage, I’ve had it in for years now, I’d do it again.
 

CJ7Pilot

18436572
BENEFACTOR
Gold Member
Lifetime Member
SOA Member
City
Yuba City
State
CA
Looking good! I have struggled with what to go with for a full roll cage/bar. Have looked at the RockHard4x4 cages but not sure how I feel about the bracket vs. other weld together options.
If you did this again would you still go with RockHard cage?
Do you feel that the brackets are bulky?
Is it that much better than a pre cut weld together package?

Sure, I'd buy it again. It fits nicely inside the cab, it's relatively easy to install, and I don't think it's too bulky.

The clamp system has been pretty well proven, but I think a welded cage would be stronger.

It all depends on your intended use. I'm not going to be doing any serious off-roading, but I want something sturdier than a fiberglass top... I think this is a great solution for my needs!
 
Last edited:
  • Like
Reactions: SKT

sdsupilot

CJ-8 Member
Member
City
OKC
State
OK
Looks good! Do you have any pictures of how the cage ties to the dash? Are you still able to fold the windshield forward?
 

CJ7Pilot

18436572
BENEFACTOR
Gold Member
Lifetime Member
SOA Member
City
Yuba City
State
CA
Looks good! Do you have any pictures of how the cage ties to the dash? Are you still able to fold the windshield forward?

I'll get a photo of that today. Essentially, each side uses the three bolt holes previously used by the triangle piece with the windshield release knob, as well as the three bolts down the side of the dash. To fold down the windshield, you can remove the upper two bolts from each side. Those upper bolt holes are also slotted, so you can make windshield angle adjustments for whatever kind of top you have.

The brackets do cover up part of the speaker grilles, and on the passenger side, I had to remove the grab bar.
 

spankrjs

Scrambler Junkie
Lifetime Member
SOA Member
City
Biloxi
State
MS
I’ve got the same Rockhard cage, I’ve had it in for years now, I’d do it again.

Me too :thumbsup:

The red Scrambler pictures on Rockhard's website are mine LOL :rotfl:

I remember leaving everything loose until it was all roughly put together, minor issue with the wire harness, but all in all, pretty easy install :thumbsup:

I installed the front reinforcement legs, but never did tie them to the frame. The DS is very slightly in the way of the emergency brake pedal, but barely.
 

AK-RWC

Legacy Registered User
Gold Member
City
south central
State
AK
Me three. I'm 6'3", and would also do this cage again. I've only hit my head on the left side bar once when wheeling hard enough that I noticed it, and I've never hit the back. I believe both spankrjs and I also installed the A-pillar supports to the floor. Either way, I echo the other comments about leaving it loose, and the minor issue with the wire harness.
 

CJ7Pilot

18436572
BENEFACTOR
Gold Member
Lifetime Member
SOA Member
City
Yuba City
State
CA
My interior is finally put back together... I'm very happy with the way this turned out!

final - 1.jpg

final - 2.jpg

I finally have shoulder belts! I also used 6" floor mounted extensions for the lap-belt buckles... this will come in handy when I eventually install a center console.
 

tower210

Scrambler Junkie
Lifetime Member
City
Olathe
State
KS
That looks great!! I bet Kim could get you an OEM colored steering wheel with new leather and it would look amazing!!!
 
Top