• Notice for iPhone users: DO NOT use the image size reduction option when uploading photos to the forum. This causes portrait images to post as landscape. We have added a warning to the image insert pop-up as well.

Project Purple People Eater ('81)

wewjr32

CJ-8 Member
City
Franklin
State
TN
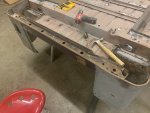
Been a while since my last post. I have the new spring perches on the AMC 20 tacked on. I need to get axles installed so I can mount the disc brake caliper brackets and then I'll be ready to paint it up.

IMG_9106.jpg

IMG_9108.jpg

IMG_9109.jpg


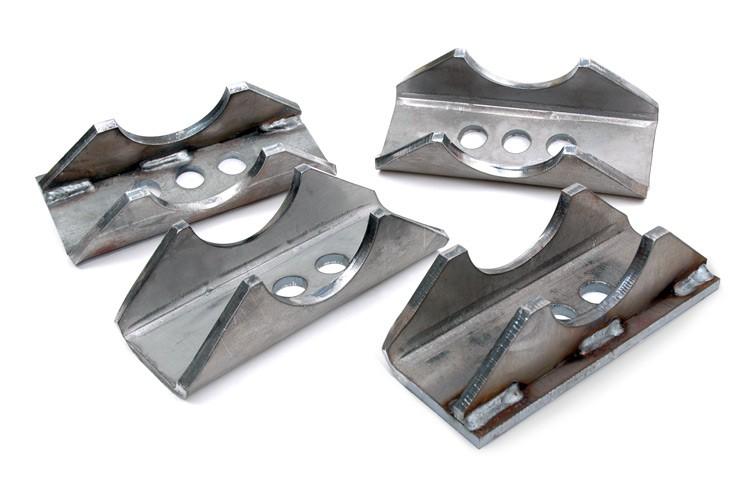
I have a bit of a problem on the Dana 30 spring perches. The passenger side spring perch needs to be mounted with the center pin hole so close to the carrier that this heavy duty spring perch won't fit as is. I'm thinking I am going to have to open up one side of the perch to allow it to sit on top of the carrier housing and just weld it to that. The pictures are probably easier to understand than my description.

IMG_9110.jpg

IMG_9111.jpg

IMG_9112.jpg

Anyone have any other suggestions to fix this?
 

jammer1

Scrambler Junkie
Lifetime Member
City
Maple Hts.
State
Oh
I would take the new perch and cut the side that you have hanging over the differential even with the flat piece that the spring rides on. Move it closer to the holes and re-weld it back on. Essentially making it more narrow. The flat part (where the springs rest on) would be hanging over the differential. If the differential is too high that it's not in the proper alignment cut out that section. The more metal you leave the more surface for the spring to sit on. This looks like what the factory did. Left the ears so the spring is better supported. With you skill, shouldn't be a hard fix. It's looking good.
 

wewjr32

CJ-8 Member
City
Franklin
State
TN
I would take the new perch and cut the side that you have hanging over the differential even with the flat piece that the spring rides on. Move it closer to the holes and re-weld it back on. Essentially making it more narrow. The flat part (where the springs rest on) would be hanging over the differential. If the differential is too high that it's not in the proper alignment cut out that section. The more metal you leave the more surface for the spring to sit on. This looks like what the factory did. Left the ears so the spring is better supported. With you skill, shouldn't be a hard fix. It's looking good.

Thanks @Jammer1. Much better and easier fix than what I was originally going to do. I'll give that a try.
 

Randyzzz

Blown Budget
BENEFACTOR
Gold Member
Lifetime Member
SOA Member
City
Redmond
State
OR
How about a perch like these? This is a Rough Country but I know there are others-
jeepliftkit_699base-1.jpg
 

wewjr32

CJ-8 Member
City
Franklin
State
TN
How about a perch like these? This is a Rough Country but I know there are others-
jeepliftkit_699base-1.jpg

Yep, that's exactly what I'm going for when I modify the current ones that I got from Barnes 4WD. They are really well made and robust. Its the same set for the AMC 20 and the Dana 30. I just wish they made the Dana 30 one like the photo of the one above so it would have the clearance without modification needed.

On another note, disassembled one of my brake calipers tonight. I was going to replace the rubber seal and the dust boot on the caliper piston but apparently most auto stores don't stock those parts anymore because people just assume to buy reman calipers (at least that's what the guy at Napa told me when I called him with the part number). Luckily they are still in pretty good shape and I don't think they were leaking so I'll just reuse them and hope for the best :fingerscrossed:.

Cleaned up the caliper a bit and gave it a fresh coat of paint. Pretty big improvement from where it started (look at the bracket on the table in the bottom left of the photo to see how it originally looked).

IMG_9120.jpg
 

jammer1

Scrambler Junkie
Lifetime Member
City
Maple Hts.
State
Oh
How about a perch like these? This is a Rough Country but I know there are others-
jeepliftkit_699base-1.jpg

That's what I was talking about. It would take less than 5 mins with a cut off wheel to make the cut, and another few to weld. You can weld to almost what ever size you need.
 

wewjr32

CJ-8 Member
City
Franklin
State
TN
Time flies…can’t believe its been two years since I posted on here.

I’ve managed to continue to get work done on the jeep here and there. Starting to see some notable progress.

Picking up from where I left off, I got the axles finished up (new gears, Tru Trac and disc conversion in the rear) and painted. I had to install longer studs in the rear AMC 20 with the disc brake conversion. There is a little play between the studs and the rotor holes so I think I am going to have to get some sleeves to fill that gap. I’ll have to go back and measure but the OD of the studs and the ID of the rotor holes is different enough that the rotor would have some play when the brakes are applied.

IMG_0281.JPG

IMG_0166.JPG

IMG_0345.JPG

IMG_0290.jpg

IMG_0297.JPG
 

wewjr32

CJ-8 Member
City
Franklin
State
TN
Then finally, after 3 years of tearing it all apart, I had a rolling chassis the first week of January this year.

New BDS YJ Spring conversion suspension on the frame. Went with the 3.5” YJ Springs and 1/2” shackles. I did have to trim the new spring perches back about 1/2” on either end. They were too long and the spring wasn’t sitting flush against the base.
IMG_0356.JPG

IMG_0358.JPG

IMG_0365.JPG

After getting a rolling chassis, I shifted focus to the body repair. There was a lot more rust than I originally anticipated. I’ve been patching the worst panels and filling in any unnecessary holes from the PO. I think at this point I am leaning towards spraying line-x on the interior of the tub once I have all the repairs made.

The patches aren’t always “pretty” but my welding is improving. Not easy to learn on old rusty sheet metal.

IMG_0309.JPG

IMG_0312.JPG

IMG_03142.JPG


And another one...

IMG_03152.JPG

IMG_03182.JPG

IMG_03192.JPG
 

wewjr32

CJ-8 Member
City
Franklin
State
TN
I haven’t done as good of a job documenting all my body patches with photos. I tend to get in a groove and forget to take photos.

Four of the capture nuts broke from the tub when I originally removed it. One in each of the supports under the cab area and both from the rear tailgate support member. All of those supports had rust and stress fractures so I decided to order replacements from Classic Enterprises. It has been a significant amount of work, but I think I’ll be happy that I did it right when its all said and done.

Here are some photos of the broken capture nuts...

IMG_03032.JPG

IMG_03042.JPG

IMG_03242.JPG

I had little to no welding skills before I started this project, so some of these repairs take a little bit longer, but it’s been a fun learning process (for the most part).

Right now I’m in the process of replacing the structural supports that had some of the body mount capture nuts. LOTS of spot welds to drill out and then a bit of prying. I’ve managed to get the rear tailgate support removed and one of the front cab supports.

The front structural support looked to be in decent shape from the outside. Once I got it off, the tab holding the seat nut was cracked in half and there was a good amount of surface rust on the sheet metal.

IMG_03382.JPG

IMG_03392.JPG

IMG_03412.JPG

IMG_03422.JPG
 

wewjr32

CJ-8 Member
City
Franklin
State
TN
Has anyone ever replaced the “rear tailgate support” (at least I think this is what it is called). See the photo below to give you reference of what I am referring to (the tub is upside down).

IMG_032422.JPG

I got it off the body but I did have to cut it in half to remove it after I drilled out countless spot welds.

IMG_03252.JPG

In the picture below you can see that I cut it off in a straight line horizontally from where the capture nuts for the tailgate hinges are located.

IMG_03272.JPG

In this picture you can see how it fits back. I have to somehow get the bottom floor of the bed to slot into the grooves on the new support. I believe that when the CJ's were originally assembled the bed floor was first, then this support and then the rear quarter panels were added. If I didn’t have the rear quarter panels to contend with, this would be a much easier fix. Rather than remove the full quarter panel, I am thinking about cutting a line through the quarter panel to give me enough room to bend the body out of the way. Then I can install this rear tailgate support properly with the bed floor inside of the support. Once that is in, I’ll just bend the body back up on the rear quarter panel and weld the seam back.

IMG_03322.JPG

IMG_03332.JPG

IMG_03342.JPG

Has anyone else ever replaced one of these? Any insight?
 

Attachments

  • IMG_032422.JPG
    IMG_032422.JPG
    112.8 KB · Views: 2

wewjr32

CJ-8 Member
City
Franklin
State
TN
I got one of the front supports mounted last night. Will have to clean up the holes on the top of the floor pan from the old factory spot welds when I flip the tub back over.

IMG_14293.jpg

I need to remove / replace the floor pan on the drivers side before I can mount the new support over there.

IMG_14313.jpg
 

certifiablejeep

Definitley Certifiable
Lifetime Member
City
Bedford
State
NH
Has anyone ever replaced the “rear tailgate support” (at least I think this is what it is called). See the photo below to give you reference of what I am referring to (the tub is upside down).

View attachment 84111

I got it off the body but I did have to cut it in half to remove it after I drilled out countless spot welds.

View attachment 84112

In the picture below you can see that I cut it off in a straight line horizontally from where the capture nuts for the tailgate hinges are located.

View attachment 84113

In this picture you can see how it fits back. I have to somehow get the bottom floor of the bed to slot into the grooves on the new support. I believe that when the CJ's were originally assembled the bed floor was first, then this support and then the rear quarter panels were added. If I didn’t have the rear quarter panels to contend with, this would be a much easier fix. Rather than remove the full quarter panel, I am thinking about cutting a line through the quarter panel to give me enough room to bend the body out of the way. Then I can install this rear tailgate support properly with the bed floor inside of the support. Once that is in, I’ll just bend the body back up on the rear quarter panel and weld the seam back.

View attachment 84114

View attachment 84115

View attachment 84116

Has anyone else ever replaced one of these? Any insight?

Forward and backward from this page... https://www.cj-8.com/threads/tjscrambler-getting-started.31047/page-8

cb
 

wewjr32

CJ-8 Member
City
Franklin
State
TN

Thanks for sharing. Interesting thought to put the bed floor over the top of the support and just cut out the portion of that roll over that would interfere with the tailgate hinge.

Very impressed by your body work and skill at replacing so many panels.

I think I'm going to try to get the bed floor pan to fit back inside the rear support like they had it from the factory but I'm going to have to do some trimming on the floors, we'll see if it works. If I was replacing the bed floor I would probably use your method but the back lip of my bed doesn't look as nice so I think it's better off being tucked away and hidden.
 
Top