• Notice for iPhone users: DO NOT use the image size reduction option when uploading photos to the forum. This causes portrait images to post as landscape. We have added a warning to the image insert pop-up as well.

1984 Alaskan Postal Scrambler Build

JeepScrambler

CJ-oholic
Lifetime Member
SOA Member
City
Claflin
State
KS
Well I figure it is about time I stop slacking and get a build thread started on one of my '84 AK postal Scramblers. As some of you probably remember last summer I bought a pair of Postal CJ8's and had them shipped from Homer, AK; to Seattle, WA; and from there to Denver, CO where I picked them up and finished bringing them home to central Kansas. The white postal has less than 26k original miles and runs great. It will eventually be getting restored back to its original glory with the correct postal parts. The green postal on the other hand was in worse shape; the tub has rust, the cylinder head is missing from the 258, the left rear leaf spring pack has several leaves broken, etc. making it an ideal candidate for me to build upon without to much remorse for modifying a rare Jeep. What will make the build easier is the postal has a solid rust free frame and the body mounts and support channels are all solid so the rust on the tub should be relatively easy to repair.

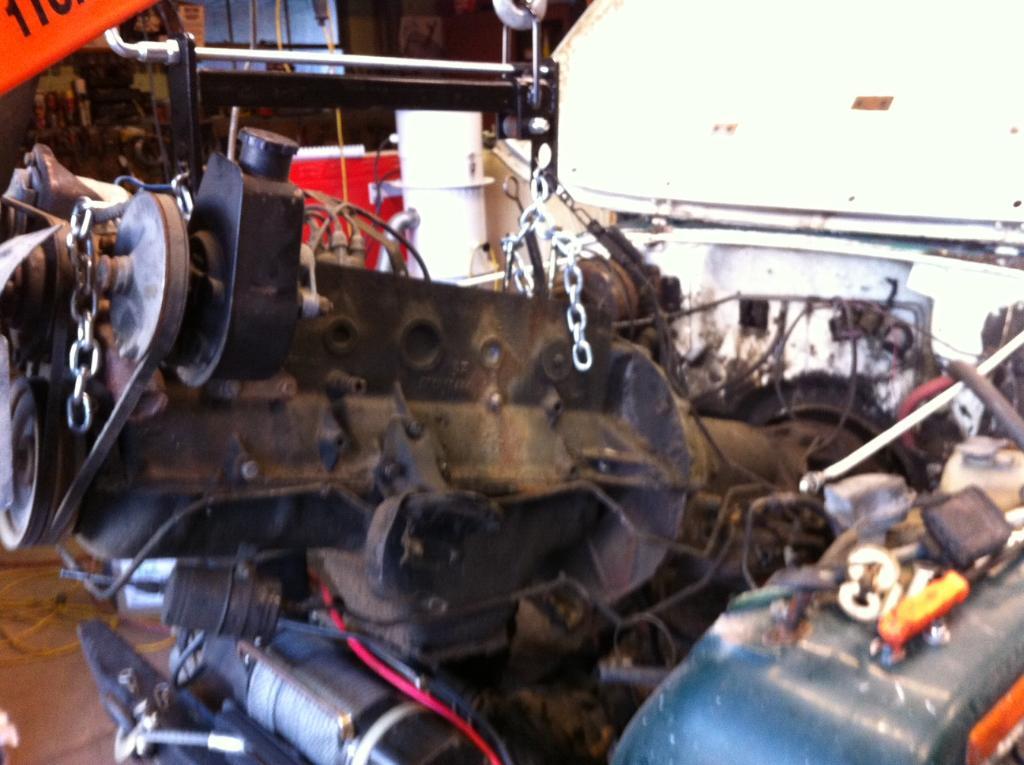
This build is intended to be fairly budget friendly so I will be reusing many parts from previous Jeep builds. The plan for the drivetrain in the Jeep as of now is to install a 4.0/aw4/dana 300. I have already installed the 4.0 from an early 90's cherokee so it will be OBD1. I am still trying to locate a decent AW4 (anyone have one for sale?) and I will be reusing the original dana 300. The stock axles have already been pulled and replaced with a set I had from my first scrambler build. They are a dana 30 front with 4.88's, detroit true trac, and mile marker hubs. The rear is an AMC model 20, 4.88's, detroit locker, 1-piece axle shafts, and a crane differential cover. The suspension is 4" SUA with the rear springs being hell creek and the front springs being rough country (thanks Chiefwaho!). The reason for the different springs is one of my original Hell Creek fronts broke the main leaf near the spring hanger when the axle/suspension combo was previously under my '84 CJ7. The tires from the previous build as well and are 35"x12.5"-R15" Pro Comp M/T's.

The postal is now down south with me in Houston where the build will be taking place. I will not be pulling the tub at this time since I have limited space, tools, and time. I only have two single car garages in our town home on the west side of down town Houston, no shop like back in KS which is already proving to be a real challenge. I am going to be in Houston until December before I get to move back to Kansas for good so I am ideally planning to have the Jeep "completed" before then. Hopefully by the end of September it will be moving under its own power; I will be traveling a great deal between Houston, Denver, and central Kansas over the next two months so I am trying to factor that in! Once the CJ8 is running the rust repair and body work will start. For paint I will be going with a flat tan so touching it up will be easy from the inevitable scratches that will occur since I plan to use it for a partial DD/trail rig. The postal top and doors have been removed and stored away and i will be going with a STC full length soft top, one of the new BD Company tops I have (full length and half soft top with tonneau), haven't decided yet.

I know I will have plenty of questions along the way, particularly for those of you who have done the 4.0/aw4 conversion (already have a few). I have a bunch of pictures from when I first got them in the original for sale thread (https://www.cj-8.com/forum/showthread.php?30707-Two-84-Postal-s-in-AK&highlight=2+ak+postals) when I bought them so I will keep those to a minimum. I will stop tying now, pictures on the way!

Postals are home!
Home2-1.jpg


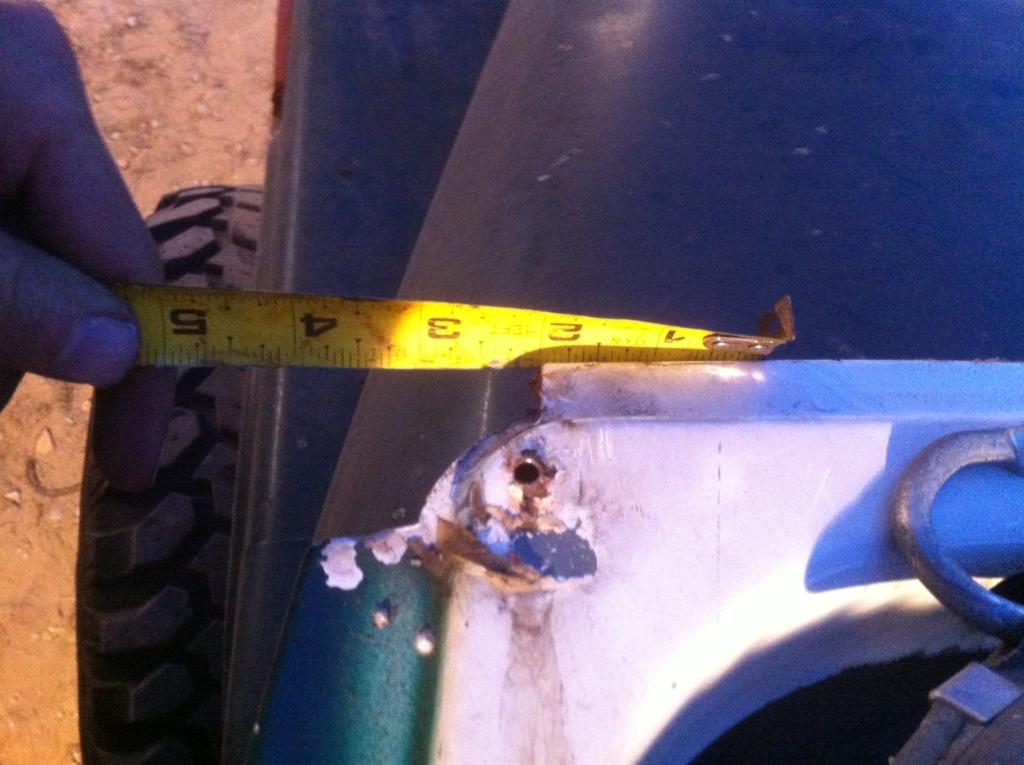
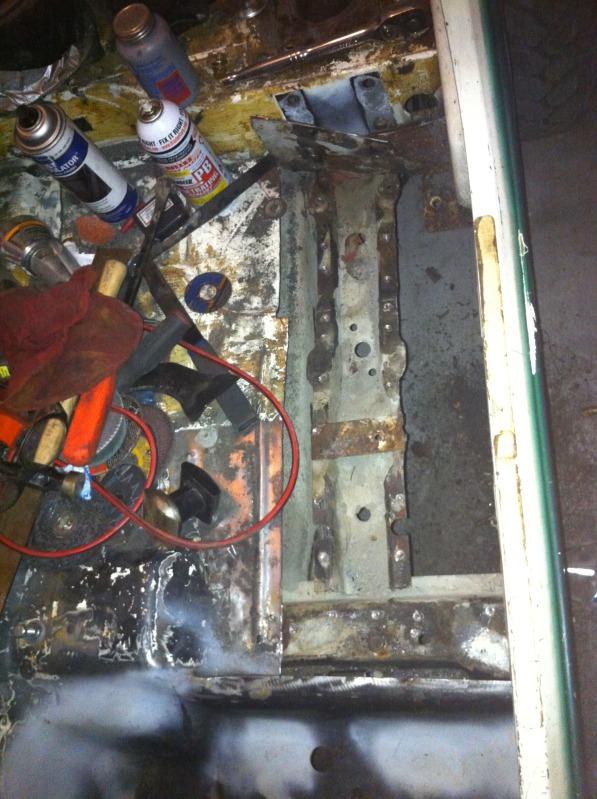
Starting Point, notice the rust, especially around the wheel wells, once the insulation is removed it is apparent much of the rusted metal was held on by the insulation itself, thus making the rusted areas really open up:
005-1.jpg

003-1.jpg

photo47-1.jpg


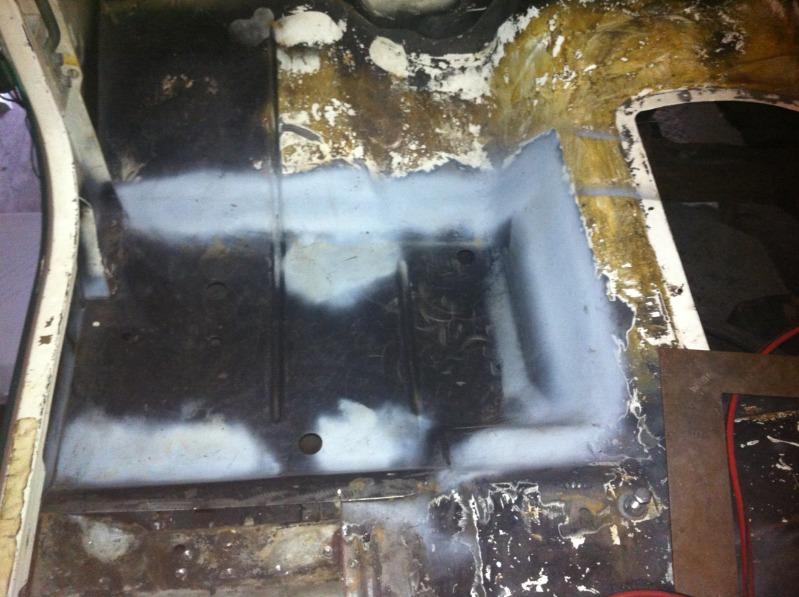
One of the absolute worst jobs ever; removing the insulation.
photo48-1.jpg


Springs and axles installed
photo20-1.jpg

photo23-1.jpg


New pictures will be loaded and posted tomorrow!
 

revho

$9.00 vanilla malt
Lifetime Member
City
beaverdam
State
MI
Nice work so far. its amazing what a lift, tires, and axels can do to change the look of a vehicle. I agree, scraping postal foam has to be one of the worst jobs known to man.

Stop on out at the Ragin Cajun for me down on Richmond in Houston. Ive been jonesing for that for quite awhile now..
 

JeepScrambler

CJ-oholic
Lifetime Member
SOA Member
City
Claflin
State
KS
Nice work so far. its amazing what a lift, tires, and axels can do to change the look of a vehicle. I agree, scraping postal foam has to be one of the worst jobs known to man.

Stop on out at the Ragin Cajun for me down on Richmond in Houston. Ive been jonesing for that for quite awhile now..

I was actually at the Rajun Cajun at the end of march when the crawfish were in season! Unlike me, my wife isn't big on seafood or really spicy food so I don't get to go as often as I would like!

Here is the postal from late spring right after I removed the top. I soaked every bolt I could see several times a day for a few days before even trying to break them loose. The torx bolts that attach the front of the top to the windshield frame would be impossible to remove if the torx bolts were stripped. Luckily all of mine came out without any problems. The bolts attaching the top to the top rails are standard hex head bolts. These were easy to remove. You can really see how bad the wheel well rust is in these pictures after the foam insulation was removed. Also, in front of the right rear wheel you can see where there was about a 1/2" thick layer of bondo. This is the only spot on the Jeep I have found any. Not sure why they put that much there but I ground most of it out. Any remaining will be coming out when the metal is replaced in that area.
photo124-1.jpg

photo125-1.jpg

photo127-1.jpg


I have yet to try and separate the top panel from the side panels. There are numerous torx bolts attaching them together and the bolts do have some surface rust on them so I would need to take my time on these before attempting to break the top down; I just didn't have the energy to try it so for now the top is stored away with the top and sides still together.
photo134-1.jpg


You can see the orange staining on inside the top where I have been spraying PB blaster onto the bolts holding the panels together. Surprisingly the top is relatively light!
photo131-1.jpg

photo133-1.jpg

photo129-1.jpg


For anyone that will be installing a postal/overlander top, the windshield frame has to be notched in the corners to allow the top to sit all the way down on the windshield frame. I took two quick pictures with a tape measure next to it for reference later on.
photo122-1.jpg

photo121-1.jpg
 

JeepScrambler

CJ-oholic
Lifetime Member
SOA Member
City
Claflin
State
KS
Sorry for the crappy pictures, they are all from my Iphone!

Next step while I was still in Kansas and had access to my engine hoist and other tools before heading back to Houston was to removed the old 258/TF999 and install the 4.0.

Out with the old 258/tf999:
photo118-1.jpg

photo116-1.jpg

photo114-1.jpg

photo113-1.jpg


In with the 4.0. The install was very straight forward, just use the old 258 mounts and get a 12mm - 1.25 x 25mm bolt 1" long. you will have to drill the hole larger in the engine mount for this bolt to work, but that is it! :
photo111-1.jpg

photo110-1.jpg


I absolutely hate wiring! Now that the Jeep is in Houston most of my time has been spent on the wiring. I have a few more questions on it but I will ask the questions in another post with some updated pictures.
photo109-1.jpg


You can also see in the pictures I removed the original rusted windshield frame and replaced it with another one I had from one of the other Scrambler projects. The glass is broke but the frame is rust free. I also pulled the original white roll bar that is in really good shape and replaced it with another one from yet again another Scrambler project. The brown roll bar in it now is from a Scrambler that had been rolled so it is slightly bent and has significant road rash across the top. The reason for this is the original white roll bar with 3 point shoulder mounts will be going into another Jeep and the postal will be getting a full cage; the brown roll bar is only temporary. I wanted to go ahead and have all of the roll bar bolts removed before I brought the Jeep down to Texas since I would have no way of getting those stubborn torx bolts removed with my limited tools and lack of a torch to heat them. I only have a few hex head bolts holding the roll bar in now so I can easily remove them and get the roll bar out of the way to replace the rusted bed corner panels.
photo106-1.jpg


Shot of the interior. Before installing the 4.0, I spent several hours power washing every square inch of the Jeep so working on it in Houston would be somewhat cleaner. I was also able to power wash out what foam insulation I couldn't remove by scraping. You can kind of see the right side floor panel that had been crudely repaired prior to me owning the Jeep. The left panel isn't very bad but there is some rust through so two replacement front pans are on order.
photo107-1.jpg


On a side note, I thought it was weird the original 4.0 mounts still had "AMC" stamped on them!
photo112-1.jpg
 
Last edited:

JeepScrambler

CJ-oholic
Lifetime Member
SOA Member
City
Claflin
State
KS
I am!!! I'll take yours.. THANKS!!! :D

Ha! Well we may be able to work something out down the road! I have three postal tops counting the one still on my white postal. It will be staying on there and on of the others will be going on my '85 CJ8 "Spring Special" I am also building (will be the metallic red color offered, have the correct "Spring Special seats and stripes, '86 dana 44 rear, 4.6 inline stroker, undecided on transmission, will either be a TF999, AX5, or NVG3550). I am still unsure if I want to keep the extra top and rear barn doors for extras or not. If/when I decide to sell I can let you know!
 

JeepScrambler

CJ-oholic
Lifetime Member
SOA Member
City
Claflin
State
KS
Postal In Houston - Let the wiring begin

Back in May/June, before I had to go to Montana for 5.5 weeks, I was able to bring the postal down to Houston and bring my '84 CJ7 I had here back home to KS. Here is a picture of the postal in the garage where it will be spending the next couple of months in while being worked on; working in a single car garage will definitely be a change and take some getting use to. At least the Scrambler fits in the garage unlike the CJ7.
photo90-1.jpg


For my power steering hoses, I was able to reuse both of my CJ hoses. I only had to bend the pressure hose slightly to clear the front of the XJ power steering reservoir. In the picture the hose is not tight but it is threaded down all the way.
photo137-1.jpg


Wiring removed to start the splicing process between the XJ and CJ harnesses:
photo135-1.jpg


I am starting to get the feel for this wiring thing....I think. Thanks to the help of many on this board, I believe I can at least get the Jeep wired enough to run. The "5 wire to fire" actually makes it pretty simple. I will make another post with some of the diagrams I used. One thing I have noticed is there is some slight differences between my postal bulkhead connector wiring and those of similar CJs. For example, on the postal firewall connector, DU - Red w/ white tracer wire that ran to the ignition module; CU - light blue that also ran to the ignition model; BV - tan to heater blower motor. I will be running the two green /w brown tracer wires from the XJ harness to the fuel pump and eliminate the ballast resistor. The reason for the two wires is one is the primer wire that kicks the pump on when the key is in the ignition hot position(this runs the pump only for a few seconds prior to the Jeep being started) and the other is the constant feed wire that runs the pump while the key is in the run position. There is a relay mounted on the PCM that is used for the fuel pump feed. It is my understanding this relay is still required to control the primer wire, correct?

One question I do have is with the twisted purple and white w/black tracer wires. There was two sets of these wires which used to come from the bulkhead connector; one set ran to the ECU (purple wire to pin 26 and the white w/ black tracer to pin 46), the other set ran to the transmission diagnostics port which was originally mounted in the cab of the XJ below the dash near where your right leg would be by the front of the console. Since the bulk head connectors will no longer be used, do I need to splice the purple wire from pin 26 and the white w/black tracer wire to the other set running from the transmission diagnostics port?

In this picture you can see the transmission diagnostics port and the twisted purple and white /w black tracer wires
photo1361-1.jpg

Other set of these wires running from the ECU connector. Do I need to connect these from the ECU to those running from the transmission diagnostics port since their connection at the bulkhead has been eliminated?
photo98-1.jpg


Also, does anyone know what these plugs do from the stock XJ harness do and if I need them? They were all three inside the cab of the XJ and ran through the firewall near the gas pedal. I know the top plug is the transmission diagnostics port. The smaller square one at the bottom I am pretty sure ran to the gas or brake pedal though I don't know what it controlled. The more rectangular plug in the middle I have no idea what it is for! Anyone have any insight?
photo931-1.jpg
 
Last edited:

timo439

Scrambler Junkie
BENEFACTOR
Gold Member
Lifetime Member
City
Portsmouth
State
NH
Count me in line for the top and barn door if you decide to sell.
 

JeepScrambler

CJ-oholic
Lifetime Member
SOA Member
City
Claflin
State
KS
Does anyone who has done the OBD1 4.0/AW4 swap know about my question with the purple and white w/black tracer twisted wires or what the plugs are for that I posted above?
 

bigwalton

Alaskan Postal nutjob
FORUM MANAGER
SOA Member
City
Dexter
State
MI
How did I miss this thread??? Can't help on OBDI, sorry. Great to see this happening!
 

CHIEFWAHO

SOA VP
Lifetime Member
SOA Member
SOA Board Member
City
Thayer
State
KS
Does anyone who has done the OBD1 4.0/AW4 swap know about my question with the purple and white w/black tracer twisted wires or what the plugs are for that I posted above?
We have been working on this same swap. Dad is tackling the wiring I'll ask him? I know he has mention something about some extra wires deailing with the AW4.
 

JeepScrambler

CJ-oholic
Lifetime Member
SOA Member
City
Claflin
State
KS
Bigwalton,
I do have a question for you about the fuel pump. How are you liking the E2000 pump so far? I know you have had it on your Postal for a little while now, any issues? Back home where the Jeep will be in Kansas after I move back we have been two months of consistently 100+ degree days and we are just now into August, I am a little concerned that vapor lock may be an issue. Also, there may be circumstances where my Postal may sit for a month at a time without being started, will I have any issues with having to re-primp the pump or should that not be a problem? I know yours is a single line system but I figured the way the pump works should be roughly the same. I prefer the external pump for the simplicity of it and being able to change it without having to drop the pump. Plus there is no drop-in pump/sender for the 20 gallon tanks that I am aware of that do not require cutting a hole in the top of the tank or some sort of modification. I have read the pros and cons to both, still just trying to weigh my options.

Chiefwaho,
That would be great! I basically was needing to know if I could eliminate the two XJ under dash plugs and associated wiring. And with the remaining transmission diagnostics port, if the twisted purple and white w/black tracer wires are connected to the same wires from the ECU (which both went to the same ports on bulkhead connector), will the transmission diagnostics port be functional or am I wasting my time trying to get it to work and it can be eliminated too? I am trying to clean up as many of the un-used plugs/wires as possible! Are y'all going with the E2000 external pump on your build?
 

Bad Karma

Captain Sarcasm
BENEFACTOR
Lifetime Member
Member
City
Cobourg, Ontario, Cana
State
da
I had the e2000 on my 4.0l conversion and it worked great with no issues.


Sent from my Illudium Q-36 Explosive Space Modulator
 

JeepScrambler

CJ-oholic
Lifetime Member
SOA Member
City
Claflin
State
KS
So it has been about a month since I last updated this thread. Unfortunately, I haven't had much time to work on the Jeep. Almost my entire month of August was full of traveling so I didn't really have an opportunity to work on the Jeep; plus it was way to humid and hot in Houston to work in my garage so I don't feel so bad about my lack of progress over the past month (at least that is what I am telling myself)! I'm back in Houston now and have gotten back to work on the AK Postal.

As in one of my previous posts I was still looking for an AW4. I was able to find a completely rebuilt unit with a new torque converter for a very reasonable price. The transmission was in Austin but I was able to have the seller bring it 40 miles north of Houston while he was visiting family over Labor Day weekend. Here is the rebuit AW4 in the back of my Grand Cherokee after I picked it up on Friday evening.
AW4-1.jpg


I made a trip to one of the pull-your-own-parts salvage yards this morning for a few parts but did manage to get some work done on the Scrambler. My plan is to have all of the rust repaired in the front section of the tub before I install the transmission; that way I have easy access to both sides of the panels. I started the process of replacing the rusted sections of the front floor. The right hand side had been patched previously but it was done very poorly. It almost took me as long to get the old repair panel out with numerous sheet metal screws and whatnot all over the place as it did for me to cut and fit the new panel! Before I began any cutting on the floor boards, I removed the steering column, pedal assembly, dash, wiring, and heater box. This will allow me to treat any hidden that would have otherwise been over looked and it cleared up some room in the area I am working. Hopefully by tomorrow at this time I will have some updated pictures of actual progress!

photo1692-1.jpg


photo1702-1.jpg


Anyone who is familiar with the AW4 or has done the swap, do you know if a CJ style transmission mount will work in place of the XJ mount? Also, what size of bolts are used to attach the mount to the transmission (my transmission is missing the mount and hardware). Also, does for those of y'all that have done the AW4 swap, did you retain the stock XJ lines and just cut the rubber portions off of the ends and flare the metal ends; or did you cut them at the rubber lines to connect them?

I am also needing a few parts still since I was not able to buy a complete donor vehicle for the swap; if anyone has these or knows of a cheap source please let me know!
-AW4/4.0 dust shield, transmission spacer (piece that goes between the engine and transmission bell housing)
-AW4 transmission mount w/ hardware to mount to transmission (do any of you XJ guys know if an AX15 or CJ style transmission mount wil bolt up to the AW4?)
-AW4 transmission lines with fittings that mount on the transmission
-AW4 flex plate/flywheel with shim and bolts
-torque converter bolts
-transmission bell housing to engine bolts
 

CHIEFWAHO

SOA VP
Lifetime Member
SOA Member
SOA Board Member
City
Thayer
State
KS
We are working on a trans mount right now.
We are clocking the D300, just enough to cut the factory drop out of the stock CJ skid plate.
Then plan to graft part of the stock XJ cross member to the CJ skid and use stock XJ trans mount.

I'll try to get some pictures posted. Been pretty slow cause of the heat but it's starting to get tolerable in the evenings lately so maybe we will make better progress.

Still haven't done much on the trans wiring.

We got AN fittings for the trans and will run push lock fittings and hose to dedicated cooler.
 

JeepScrambler

CJ-oholic
Lifetime Member
SOA Member
City
Claflin
State
KS
Chiefwaho,
Hey just curious if you know the spacing between the two bolts that attach the mount to the bottom transmission on a stock CJ? I am trying to find out if the distance between the two bolts holes on the transmissions is the same between the AW4 and the CJ transmission. I have my AW4 here so I can measure the distance between the bolt holes. I would prefer to run the stock style CJ transmission mount with the 2 stud mount intead of the 4 stud mount used on the AW4's. Doing this would allow all of my CJ's to have the same transmission mount; thus allowing me to only have to keep one extra type of transmission mount on hand. Plus the CJ style mounts are cheaper! On my postal I will be clocking the Dana 300 as well and running a Barnes plate belly skid plate/crossmember https://barnes4wd.com/Jeep-Skid-Plates_c_50.html so my transmission mounting options are open, that is why I am wanting to stick with the CJ type mount.

Keep me posted on what you and your dad find on the AW4 wiring, I am doing so rust repair on my postal so I am putting the wiring on hold for a little while. Looks like its finally cooling off back home in Kansas so hopefully y'all can get some work done!

Also, per Bad Karma's and others advice, I will be going with the E2000 pump. The simplicity of it and the fact I can carry a spare pump and quickly/easily change the pump out without having to drop the tank if the pump fails is too appealing.

I should have some more updates on the rust repair tonight. I was going to get some work done last Sunday but of course my grinder decided to quick working after 30 seconds of use so I had to get a new one.
 

bigwalton

Alaskan Postal nutjob
FORUM MANAGER
SOA Member
City
Dexter
State
MI
Sorry, I missed this somehow, you should have PMed me!

No issues yet with my cheapo eBay fuel pump. I actually gave my spare to Jake when his crapped out back at the National in TN, we had it swapped in in no time flat and it completely vindicated my decision to use an external pump. Of course I got another as a spare that I keep in the Jeep at all times. Mine sat still all winter and when I would go out to run it a bit, it never had an issue starting up/priming.

I just drilled holes for the XJ mount in the stock CJ cmember, so no help there.

I think I used the XJ hard lines and cut/flared at the cooler end. Need to redo that and do a better job sometime. I really want to redo all my lines with AN fittings like Jason mentioned to do it all "right". :banghead:

Am I missing the wiring question? What's the issue? The wiring/computer is exactly per stock as far as I remember, just ran the wires into the cab under the dash and mounted the computer next to the ECU. I did the Rail Shifter (http://www.radesignsproducts.com/Rail.html) to add manual control (AWESOME in the dunes!) but even that was really simple.

Let me know if there's anything else you wanted me to answer.
 

JeepScrambler

CJ-oholic
Lifetime Member
SOA Member
City
Claflin
State
KS
Been a few weeks since I have updated this thread so I figured it was due. Not a whole lot exciting happening since I have been traveling so much between Houston, Denver, and Kansas. There is a whole stack of parts, repair panels, etc waiting to go on the Jeep, I just need the time now! Since my last update I did get the rusted out left hand passenger side floor board repaired and have removed the left rear front floor and am getting it ready to put the new pan in. For the front floor I have been using the Key Parts Inc. floor pans. They are 18 gauge and the fitment have been excellent. On to the crappy cell phone pictures!

Rusted floor removed:
photo1802_zpsf32dea66-1.jpg


Test fitment for the butt welds, it takes me a while to get the pieces fitted but the better the fit the less clean up on the welds I have to do later! Before any of the replacement panels are installed I clean up all the accessible areas and either use Eastwood's rust encapsolator or a weldable primer to prevent any future rust.
photo1812_zps0988d0e9-1.jpg


I probably test fit the panel 20 or more times before I feel it is ready to be installed. You can also see the holds I drilled for the spot welds on the toe support and the heel support area. if you look close you can also see the smaller holes I use to put screws through to ensure the panels are very tight against each other before I spot weld them. After I finish the spot welds I remove the screws and weld the holes shut:
photo1832_zpsd34c38a2-1.jpg


Welded in! I prefer to spot weld the panels and move around to dissipate the head. I also use a piece of copper with a few magnets in it to place on the backside of the area to be welded to help with heat and prevent distortion. The weld won't stick to the copper so I can weld up areas where the butt weld gap may be a littler larger than I prefer without blowing through:
photo1822_zps6b299a6b-1.jpg


Welds cleaned up and primed for now. I also cleaned up what I could on the backside of the welds on the underside of the tub (I can't stand seeing rust repaired improperly or a halfa$$ job done doing it). My ultimate goal is to have the repair panels appear to have never been installed so my plan is to pull the tub again in a few months once I'm back in Kansas for good to finish the work. At the time this is done I will also go ahead and media blast the whole tub and sand blast the frame so I can do a thorough rebuild and with properly applied paint, new seam sealer, etc to the whole entire Jeep including the underside. For now my time in Houston will be focused only on rust repair and getting the Jeep running/driving.
photo1862_zps0df0f5d1-1.jpg


photo1872_zps27b16b27-1.jpg


Rusted area of left side rear-front floor removed. There were a ton of spot welds holding this area on! Before I began cutting out the old floor I chose the area to mark my cutting line that ensured I wasn't near any rust on the surface or underside. You may also notice my cuts are near the ribbed sections of the floor. These areas are much more rigid and prevent less warpage when cutting out the old panels, installing the new, and cleaning up the welds. The portion of the floor and support that ran under the step up area to the rear bed floor was kind of a pain to get to; the area I am referring to is where the 3rd body mount for the tub is located. Right near this body mount and the floor step up area the support is held to the floor pan with two spot welds and two weld beads (about 1/2" long) on either side of the body mount. The spot welds were easy enough to drill out but I had to use my dremel in awkward positions to cut the welds.
photo1882_zpsa2c54793-1.jpg


Started to clean up the channel inside the under floor support but before I got to much further I noticed where the step up area meets the B-pillar and quarter panel that the step up piece had some rust through. At this point I decided to go ahead and brace the B-pillar before I got to cutting out the rusted parts of the step up area. For the brace I just used two of the existing holes for the door striker mount and drilled two holes through a piece of scrap metal I had and mounted it to the B-pillar. Form there I welded a piece of 3/4"x3/4" square stock to it down to the bed floor near where the roll bar is mounted. I will be replacing the bed floor corners with some pieces from Classic Ent. so I wasn't to concerned with welding to them.
photo1905-1.jpg


You can see how much of the step of area I had to remove do to rust. I had to take out the section that has the large diameter hole where the rear wiring harness passes through the tub. Should be fun trying to recreate that hole without a hole saw.
photo1893-1.jpg


Another shot from underneath. Since this picture was taken, I have removed the rusted areas of the B-pillar and have formed a new piece to repair the B-pillar and the step up piece.
photo1922-1.jpg
 
Last edited:
Top