

You are using an out of date browser. It may not display this or other websites correctly.
You should upgrade or use an alternative browser.
You should upgrade or use an alternative browser.
Repli-tub deficiencies
- Thread starter walkerhoundvm
- Start date
Thank you. I purchased some plastic epoxy 2-part solution from JB weld, and got it back together. It's now installed...OMG this whole thing is a nightmare. I'm glad I'm building it for me and not a resale because someone will think I really F'd things up when it comes to the HVAC system.I have an extra air box if you need one-
Alright, why don't we go ahead and add yet another. The holes in the floor do not align with the original seat mounts. I'd say the passenger side one is off on one side almost a full inch. The seat is cocked based on one set, and ok based on the other, so I'll be using the good side and then redrilling the floor. I don't know about the driver side yet as somehow I misplaced my slider so I didn't reassemble the mount. I'm just going to assume its wrong.

- City
- Redmond
- State
- OR
Alright, why don't we go ahead and add yet another. The holes in the floor do not align with the original seat mounts. I'd say the passenger side one is off on one side almost a full inch. The seat is cocked based on one set, and ok based on the other, so I'll be using the good side and then redrilling the floor. I don't know about the driver side yet as somehow I misplaced my slider so I didn't reassemble the mount. I'm just going to assume its wrong.
Before redrilling let us post some pics. I doubt the holes in the floor are off, more likely a tweaked seat base. The holes in the floor have weld nuts and reinforcements so drilling new holes will be in a weaker area. I'll take a couple of pics after lunch.
- City
- Redmond
- State
- OR
Oops. I forgot you're using a MD tub. I"ll still get pics just in case.Before redrilling let us post some pics. I doubt the holes in the floor are off, more likely a tweaked seat base. The holes in the floor have weld nuts and reinforcements so drilling new holes will be in a weaker area. I'll take a couple of pics after lunch.
Randy, I'm going to go ahead and admit being wrong on the seat mounts. They are slightly off, but I can move the seat mounts enough to get them to work. They are not straight mind you, as half of them have the bolt going in on an angle, but it's close enough that the seats will mount. I've got a different issue with the seats that i'll start a seperate thread, as I know someone must have solved that one.
However, I'll swap that one out with the body mount. The second to last set of body mounts are not aligned...no way, no how. I will need to redrill those out and make up a welded nut plate so that it anchors them inside that portion of the body .
However, I'll swap that one out with the body mount. The second to last set of body mounts are not aligned...no way, no how. I will need to redrill those out and make up a welded nut plate so that it anchors them inside that portion of the body .

- City
- Cave Creek
- State
- AZ
However, I'll swap that one out with the body mount. The second to last set of body mounts are not aligned...no way, no how. I will need to redrill those out and make up a welded nut plate so that it anchors them inside that portion of the body .
That's where the rotted frame mounts were a lucky benefit for me; the shop could install them where needed to match the tub.
- City
- Redmond
- State
- OR
And I got so involved with Easter at our house that I didn’t get around to taking pictures. I’ll go snap a few right now. But it soundsRandy, I'm going to go ahead and admit being wrong on the seat mounts. They are slightly off, but I can move the seat mounts enough to get them to work. They are not straight mind you, as half of them have the bolt going in on an angle, but it's close enough that the seats will mount. I've got a different issue with the seats that i'll start a seperate thread, as I know someone must have solved that one.
However, I'll swap that one out with the body mount. The second to last set of body mounts are not aligned...no way, no how. I will need to redrill those out and make up a welded nut plate so that it anchors them inside that portion of the body .
Like you’ve got it figured out anyways.
- City
- Redmond
- State
- OR
And I got so involved with Easter at our house that I didn’t get around to taking pictures. I’ll go snap a few right now. But it sounds
Like you’ve got it figured out anyways.
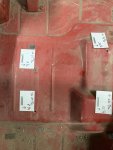
Heres a pic with measurements. Hope they’re legible. I measured from the base of the step down for the backside measurement, and from the tub side for the side measurements.

- City
- Bedford
- State
- NH
When I replaced the current project floor, I found that the seat mounting holes were off on the driver side... rear most one.
It wasn't so far off, but I did wallow out all 4 seat bracket holes fabout another 3/16 each and then I could get all the bolts in... passenger side didn't require anything, but some kind of went in at a strange angle.
cb
It wasn't so far off, but I did wallow out all 4 seat bracket holes fabout another 3/16 each and then I could get all the bolts in... passenger side didn't require anything, but some kind of went in at a strange angle.
cb
I think mine are within a 1/4 inch here. I think just generally, the MD Juan tub is a hunk of junk and I simply cannot recommend it for anyone for any reason. There has to be a another option.Heres a pic with measurements. Hope they’re legible. I measured from the base of the step down for the backside measurement, and from the tub side for the side measurements. View attachment 82212
- City
- Bedford
- State
- NH
I think mine are within a 1/4 inch here. I think just generally, the MD Juan tub is a hunk of junk and I simply cannot recommend it for anyone for any reason. There has to be a another option.
Unfortuantely there isn't another good steel option short of finding one tucked away for a previous owner project somewhere... and they are getting harder and harder to find.
cb
Well, here's YET ANOTHER ISSUE! I am also using the MD Juan windshield. I disassembled the old windshield yesterday to install the wiper assembly and motor. Turns out that the wipers fit correctly but the motor is too far to the left by about 3/8" and there is no way to wedge it over that far. I did force it and the whole motor bucks left and right. When I unbolt it and slide it to the right it runs nice and smooth, but then we're way off. To fix this one, I am going to make my own shaft that goes from the motor over to the first wipe mount. I may cut the one that's there and weld in a little extender or just make a new one from some flat stock.
- City
- Bedford
- State
- NH
Well, here's YET ANOTHER ISSUE! I am also using the MD Juan windshield. I disassembled the old windshield yesterday to install the wiper assembly and motor. Turns out that the wipers fit correctly but the motor is too far to the left by about 3/8" and there is no way to wedge it over that far. I did force it and the whole motor bucks left and right. When I unbolt it and slide it to the right it runs nice and smooth, but then we're way off. To fix this one, I am going to make my own shaft that goes from the motor over to the first wipe mount. I may cut the one that's there and weld in a little extender or just make a new one from some flat stock.
Before going through all that work... see if the glass/gasket even fit, as well as the windshield hinges on the new frame AND the tub and make sure all that works or perhaps toss it in the trashcan an get another... just my $.02 from wasting tons of time with it.
cb
Good call on the glass and gasket. I guess I better go give that a shot. The windshield is mounted up and painted and was fine for alignment purposes. I did have to cut my own defroster slots in it both top and bottom but the rest was pre drilled.
The glass appears to fit but it is not yet installed. The gasket seems ok too...that will be on the agenda soon. For the windshield wiper I had a genius idea that worked out great. It was about 3/16" off on the length of that first bracket to the wiper arm from the motor. I ended up chucking the bracket in the vice, and then hooking up a slide hammer to the other side. Then I heated the bracket up cherry red and nailed it with the slide hammer. It made it a little bit dog bone in that spot, but I got the length I needed and now it works just fine.Before going through all that work... see if the glass/gasket even fit, as well as the windshield hinges on the new frame AND the tub and make sure all that works or perhaps toss it in the trashcan an get another... just my $.02 from wasting tons of time with it.
cb
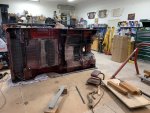
Randyzzz, are the bolt hole patters offset from the side of the tub the same on both sides of a stock jeep? My MD Juan is off by a lot in terms of then being away from the side of the tub the same distance! But before I call this a deficiency, I figured I'd ask here to see.
- City
- Redmond
- State
- OR
I’ll go check. Getting ready for paint!Randyzzz, are the bolt hole patters offset from the side of the tub the same on both sides of a stock jeep? My MD Juan is off by a lot in terms of then being away from the side of the tub the same distance! But before I call this a deficiency, I figured I'd ask here to see.
Attachments
- City
- Redmond
- State
- OR
Well, went out to the shop, got busy, and forgot. You probably already figured this out, but the drivers side is 7” from the side, passenger side is 8 1/2”.I’ll go check. Getting ready for paint!
I'll tell you what the owner of W-O told me...they're like snowflakes (no two are alike) and they're built by teenagers in a third world country. Set your expectations accordingly.
Look a little closer & you'll realize that it's basically assembled out of patch panels. Mock up the entire thing before you paint or fully commit to any other aftermarket parts. I bought the hood too...TERRIBLE & I regret not bailing on it at the first sign of trouble. I ended up going out to Rudy's when I flew back in to finish emptying out my outbuilding & bought 3 used OEM hoods (one is a wall hanger Scrambler hood the same color as my CJ-7) & 2 used OEM windshield frames. Cost me a healthy chunk of change, but worth it. My body guy worked wonders on that tub...only those of us who know where to look would know that it's aftermarket.
Look a little closer & you'll realize that it's basically assembled out of patch panels. Mock up the entire thing before you paint or fully commit to any other aftermarket parts. I bought the hood too...TERRIBLE & I regret not bailing on it at the first sign of trouble. I ended up going out to Rudy's when I flew back in to finish emptying out my outbuilding & bought 3 used OEM hoods (one is a wall hanger Scrambler hood the same color as my CJ-7) & 2 used OEM windshield frames. Cost me a healthy chunk of change, but worth it. My body guy worked wonders on that tub...only those of us who know where to look would know that it's aftermarket.