


- City
- Dexter
- State
- MI
Put this in my build thread, but thought it was worth a separate post.
For my stroker, I'm going in tank with a Tanks Inc pump in a new Genright tank and I got their fuel tank access hatch for the bed (since I adamantly refuse to drop the tank to deal with a pump/sender after putting three pumps in my Postal on the side of the road/parking lot of the part store -- yes, I know it may be because it was external, but even if it would have been one internal, it was worth it.)
This is a CJ/YJ unit and the directions are for a -7 or YJ and they want you to cut right at the tailgate opening. Clearly not a CJ-8 location. I immediately realized that in a Scrambler the hatch BARELY fits between two bed stiffeners. Glad I did a lot of measuring before cutting (it was really easy thanks to the two screws I had in from a tie-down, they gave me an easy point of reference top and bottom, I'd drill a hole center-ish for the same reason if I was installing this on a clean bed just for that reason--you're cutting that steel out anyway)
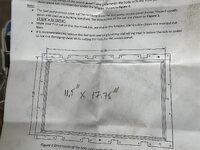
I also realized that the full "length" (meaning fore-aft) of hole they suggest in the instructions isn’t really needed and I only did 11.5” to clear the inside “lip” of the frame. Then I trimmed back the very ends of the ribs just enough to let it drop in flush. (The hole they said to cut would have been the full size of where I cut the ribs back to and would have gotten into both frame stiffeners or a good bit of one if I decided not to cut the other.)
I’m debating not bothering with ALL of the rivet holes and opening up four or eight of them and countersinking some stainless screws/nuts. I don’t really love the idea of rivets and the trim job I did was amazing because the frame does not move in the slightest when dropped in place.
Thinking about just putting anti skid tape stuff on the hatch, paint is just going to get beat straight to hell.
Would you believe that this is the first (and only) time the stock tank has been dropped in my ownership? (2002!)

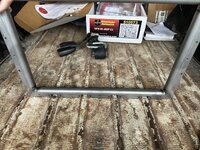
Before the carnage begins. Remarkably good thanks to the World Cab never being off before I owned it.

I figured out that using the frame this way was the best way to mark the cut line. The notches for the ribs were perfect.
Marked… deep breath. I used a step bit to put 3/4” holes in the corners to get room for my hackzall blade.

Dread turned to excitement when I saw that I got the measurements dead nuts and now had easy access for everything. You can see the bed stiffener under the ribs on the front side of the hole.

This shows the trimming on the ribs. You can see the edge of the bed reinforcement below it that is left by doing the hole this way. It wouldn’t have cut much, but I didn’t want to take any more than absolutely necessary.
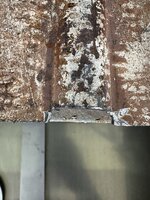
Dropped in. It fits exactly between the two ribs on the outside with VERY little wiggle room. The frame is basically locked in, with no wiggle at all, unusually good work for me.
Can see what I did versus the instructions.
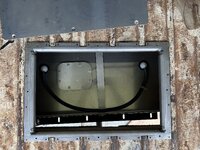
So as soon as I had it sitting in place, I had to jam the tank in to see what the view/access was like… the tank isn’t fully in place and the pic isn’t directly above the hole but this will be absolute perfection as you’ll see when the pump goes in.

And with the cover in place.

It sits barely proud of the ribs.
I am STOKED about this now after being scared to death of the idea of getting this installed knowing how much I had to cut.
For my stroker, I'm going in tank with a Tanks Inc pump in a new Genright tank and I got their fuel tank access hatch for the bed (since I adamantly refuse to drop the tank to deal with a pump/sender after putting three pumps in my Postal on the side of the road/parking lot of the part store -- yes, I know it may be because it was external, but even if it would have been one internal, it was worth it.)
This is a CJ/YJ unit and the directions are for a -7 or YJ and they want you to cut right at the tailgate opening. Clearly not a CJ-8 location. I immediately realized that in a Scrambler the hatch BARELY fits between two bed stiffeners. Glad I did a lot of measuring before cutting (it was really easy thanks to the two screws I had in from a tie-down, they gave me an easy point of reference top and bottom, I'd drill a hole center-ish for the same reason if I was installing this on a clean bed just for that reason--you're cutting that steel out anyway)
I also realized that the full "length" (meaning fore-aft) of hole they suggest in the instructions isn’t really needed and I only did 11.5” to clear the inside “lip” of the frame. Then I trimmed back the very ends of the ribs just enough to let it drop in flush. (The hole they said to cut would have been the full size of where I cut the ribs back to and would have gotten into both frame stiffeners or a good bit of one if I decided not to cut the other.)
I’m debating not bothering with ALL of the rivet holes and opening up four or eight of them and countersinking some stainless screws/nuts. I don’t really love the idea of rivets and the trim job I did was amazing because the frame does not move in the slightest when dropped in place.
Thinking about just putting anti skid tape stuff on the hatch, paint is just going to get beat straight to hell.
Would you believe that this is the first (and only) time the stock tank has been dropped in my ownership? (2002!)
Before the carnage begins. Remarkably good thanks to the World Cab never being off before I owned it.
I figured out that using the frame this way was the best way to mark the cut line. The notches for the ribs were perfect.
Marked… deep breath. I used a step bit to put 3/4” holes in the corners to get room for my hackzall blade.
Dread turned to excitement when I saw that I got the measurements dead nuts and now had easy access for everything. You can see the bed stiffener under the ribs on the front side of the hole.
This shows the trimming on the ribs. You can see the edge of the bed reinforcement below it that is left by doing the hole this way. It wouldn’t have cut much, but I didn’t want to take any more than absolutely necessary.
Dropped in. It fits exactly between the two ribs on the outside with VERY little wiggle room. The frame is basically locked in, with no wiggle at all, unusually good work for me.
Can see what I did versus the instructions.
So as soon as I had it sitting in place, I had to jam the tank in to see what the view/access was like… the tank isn’t fully in place and the pic isn’t directly above the hole but this will be absolute perfection as you’ll see when the pump goes in.
And with the cover in place.
It sits barely proud of the ribs.
I am STOKED about this now after being scared to death of the idea of getting this installed knowing how much I had to cut.
Attachments
Last edited:


