

You are using an out of date browser. It may not display this or other websites correctly.
You should upgrade or use an alternative browser.
You should upgrade or use an alternative browser.
Meet Red, my 81 Restomod Build
- Thread starter Randyzzz
- Start date


- City
- Redmond
- State
- OR
Your cover is awesome, Dennis. But I’d have to do something a bit different...can’t copy you too much! I was thinking about maybe something like this-I think you might like this engine cover
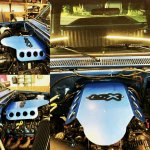
Powdercoating black with some red pin-stripingwould look great. So would red MSD coils to set it all off, but $500 for good looking coils isn’t worth it right now...
Last edited:

- City
- Gonzales
- State
- La
I like it.Your cover is awesome, Dennis. But I’d have to do something a bit different...can’t copy you too much! I was thinking about maybe something like this-
View attachment 86948
Powdercoating black with some red pin-stripingwould look great. So would red MSD coils to set it all off, but $500 for good looking coils isn’t worth it right now...

gpassida
Basic User
- City
- Redding
- State
- Ca
Absolutely beautiful work! Love all the pics.
The fires are really devastating. Such a terrible year and we are not even in the peak fire season yet. We're choking in smoke here in Northern California and its raining ash. I'm in Redding and we had over 1,600 structures destroyed in the 2018 Carr Fire. Then followed quickly followed by the Camp Fire in nearby Paradise with over 18,000 structures burned. All of the National Forests are now closed in CA. Many Jeep trails have burned up. It's going to take some rain to settle things down. The fire fighters are coming in from all over and all of them are dealing with some extremely difficult and dangerous to work in conditions. They are true Heroes. If they weren't out there, many more lives would be lost. Be safe everyone.
The fires are really devastating. Such a terrible year and we are not even in the peak fire season yet. We're choking in smoke here in Northern California and its raining ash. I'm in Redding and we had over 1,600 structures destroyed in the 2018 Carr Fire. Then followed quickly followed by the Camp Fire in nearby Paradise with over 18,000 structures burned. All of the National Forests are now closed in CA. Many Jeep trails have burned up. It's going to take some rain to settle things down. The fire fighters are coming in from all over and all of them are dealing with some extremely difficult and dangerous to work in conditions. They are true Heroes. If they weren't out there, many more lives would be lost. Be safe everyone.
- City
- Redmond
- State
- OR
Everything except the roll bar is home.
 So- a question for everyone. Trying to decide on screws for all the hinges. Evidentially I only gave the painter 16 torx heads to paint. My bad. So...here’s a pic and let’s hear your opinions. The color scheme for Red is red and black. But- I’m using stainless fasteners on everything. All black accessories, all stainless fasteners. Plus black door handles and lock cylinders. (I might even replace all the fake bead lock bolts with stainless.) So- red hinge screws, stainless hinge screws, or black hinge screws. I’m sorta leaning towards black.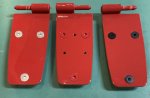
So- a question for everyone. Trying to decide on screws for all the hinges. Evidentially I only gave the painter 16 torx heads to paint. My bad. So...here’s a pic and let’s hear your opinions. The color scheme for Red is red and black. But- I’m using stainless fasteners on everything. All black accessories, all stainless fasteners. Plus black door handles and lock cylinders. (I might even replace all the fake bead lock bolts with stainless.) So- red hinge screws, stainless hinge screws, or black hinge screws. I’m sorta leaning towards black. 
- City
- Redmond
- State
- OR
I like the black, but I would imagine the painter would not gouge you that much to do a fast paint job, and if you go that route get some extras done
I doubt my painter would charge at all. My two thoughts are - I don’t know if I really like the red with my overall color scheme. And more importantly- I worry about rust. The painted ones have been blasted and then painted on the head only. So the backside and threads are bare metal- rust prone. For black I would either blast the top of stainless screws and paint only the top, or send stainless screws off to be blackened. I know there is a hot process to do it yourself, but I’m rather wary of that.
I guess I could always do the black and if I wanted red I could have them shot at a later date. Or powder coated to match if I can get a color close enough.
- City
- Redmond
- State
- OR
Well, after much thought, and a very “to the point” post by Jeepskate- I am going with black screws. Actually, I figured a guideline for most visible fasteners-
If it’s against red, use a black fastener. If it’s against black, use a stainless fastener.
If it’s against red, use a black fastener. If it’s against black, use a stainless fastener.
- City
- Gonzales
- State
- La
After having My Scrambler painted I ran a threaded tap through every threaded hole on my Jeep. I also used stainless steel fasteners and painted most of those black. I found the S/S torx heads were too soft for the door hinges and replaced those with painted steel.
- City
- Redmond
- State
- OR
Interesting. I’m going to try and find grade 8 stainless for the hinges and blast and paint them. Haven’t found a blackening process that is durable or non-oxide based. If I could I’d have them nitrocarburized, like a gun barrel (Melonite). But haven’t found anyone to do that yet. Might try Cerakote on them. Maybe I’m just overthinking it as usual and I should probably just use VHT satin black epoxy.After having My Scrambler painted I ran a threaded tap through every threaded hole on my Jeep. I also used stainless steel fasteners and painted most of those black. I found the S/S torx heads were too soft for the door hinges and replaced those with painted steel.

- City
- Redmond
- State
- OR
I think I’ll go talk to them. I don’t want it too thick...plus I have a bunch of other stuff to do-Powder coating? That's how Kentrol does their black stainless steel stuff.
- City
- Redmond
- State
- OR
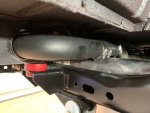
Took a week off to finish some home improvement projects- but now I’m back at it. Fitted and finalized the fuel fill and vent lines. 1 3/4” fill and 5/8” vent. Hope that fixed any slow fill issues! It will be interesting to see how much fuel this 25 gallon tank can actually hold!

- City
- Redmond
- State
- OR
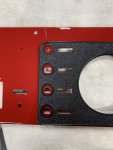
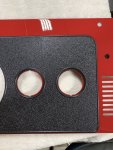
Thought I would try a quick afternoon project. Thought I’d install the dash appliqué, and the gauges and vents. Trying to make some room. Well, this is not what I wanted to see. I had noticed a bit of shift- off center holes compared to the embossed portion. Figured I could fix that fairly easily. But- the holes for the indicator lamps- the holes that the rest lines up off of- are way off. It becomes most noticeable on the HVAC controls. I guess I’ll look into a metal one and hope...
Actually, has anyone “mapped” out a CJ dash? I’m thinking a drawing that could be read by a machinist- make one out of aluminum and then finish it.
Actually, has anyone “mapped” out a CJ dash? I’m thinking a drawing that could be read by a machinist- make one out of aluminum and then finish it.
Last edited:

- City
- Redmond
- State
- OR
Well, not being one to give up so easily, and primarily because I like the look of the stock overlay, I went to work. I installed the gauges temporarily and got to measuring. 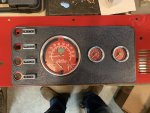
Turns out the holes were off almost .050. So I got out my Xacto knife set and trimmed about .035 off the top of the dash indicator holes. They were the main hold-up. Everything else could be adjusted. I reinstalled the gauges and indicators, and was pleased with the outcome. I also removed some of the excess molding flash from the drivers side of the overlay. Then for the install. I removed the backing paper from the left side, folding it over mid-point of the Speedo. Using a small spacer, I pushed the indicator lamps through to use as an alignment tool. Then I reinstalled the oil and volt gauge to lock in the position. Removed the spacer and slowly lowered the drivers side into position. Pressed it down firmly. Then I removed the oil and volt gauges, and carefully reached under the unstuck part of the overlay to grab the backing paper that I had folded under. I carefully pulled and removed the rest of the backing. Putting the spacer under the right side, I set the oil and volt gauges in position. Happy with the placement, I removed the spacer and stuck it down. Perfect!
Whew!
But... I had forgotten to cut for the A/C vent. I really wanted to do that away from the dash, but now that’s not possible. Measures about 10 times. Then masked off for surgery.

Using the Dremel with a thin cutting wheel, I cut the opening. Once done I removed the tape and dressed the edges with a file.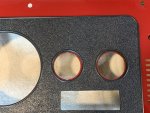
I reinstalled the gauges hopefully for the last time. I love how it looks with the in- dash vents! I just have to paint the bezels on the indicators aluminum silver and I should be ready to call this step done!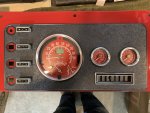

Turns out the holes were off almost .050. So I got out my Xacto knife set and trimmed about .035 off the top of the dash indicator holes. They were the main hold-up. Everything else could be adjusted. I reinstalled the gauges and indicators, and was pleased with the outcome. I also removed some of the excess molding flash from the drivers side of the overlay. Then for the install. I removed the backing paper from the left side, folding it over mid-point of the Speedo. Using a small spacer, I pushed the indicator lamps through to use as an alignment tool. Then I reinstalled the oil and volt gauge to lock in the position. Removed the spacer and slowly lowered the drivers side into position. Pressed it down firmly. Then I removed the oil and volt gauges, and carefully reached under the unstuck part of the overlay to grab the backing paper that I had folded under. I carefully pulled and removed the rest of the backing. Putting the spacer under the right side, I set the oil and volt gauges in position. Happy with the placement, I removed the spacer and stuck it down. Perfect!
Whew!
But... I had forgotten to cut for the A/C vent. I really wanted to do that away from the dash, but now that’s not possible. Measures about 10 times. Then masked off for surgery.
Using the Dremel with a thin cutting wheel, I cut the opening. Once done I removed the tape and dressed the edges with a file.
I reinstalled the gauges hopefully for the last time. I love how it looks with the in- dash vents! I just have to paint the bezels on the indicators aluminum silver and I should be ready to call this step done!