• Notice for iPhone users: DO NOT use the image size reduction option when uploading photos to the forum. This causes portrait images to post as landscape. We have added a warning to the image insert pop-up as well.

The Descrambler Project

W.R.Buchanan

Legacy Registered User
City
Ojai
State
CA
E-Brake Complete!

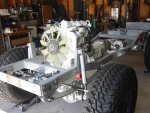
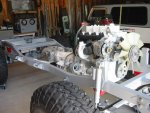
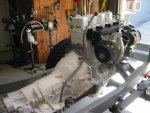
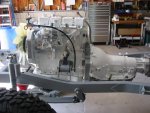
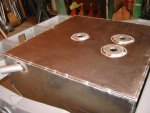
Here's the completed E-Brake assembly.

You'll notice that the cable does a loop. That is because it doesn't have any kinks in it like that. The actual attachment for the lever end is about half way up the Overdrive unit under the trans tunnel.

I might have to add a return spring later if the thing hangs up, but right now it works pretty freely.

We tried racking the mount back and forth but it is SOLID, so I'm not going to put a web inbetween the spacers for stiffness right now. I can always do this later if needed. The spacers are 1"dia 12L14 with 7/16-14 threads in both ends. G8 bolts. Both the E-Brake Plate and the Transfer Case mount are 1/4" CRS. So I don't see much movement here.

If it holds the vehicle in neutral on the slope of my driveway, then that will be good enough.

I can finally say something is finished!!! :D Woopee!

Here's pics.

Randy
 

W.R.Buchanan

Legacy Registered User
City
Ojai
State
CA
Designing the Traction bar.

PF: Thanks , I think it will work trouble free for along time. I hope. :fingerscrossed:

Moving right along,,,,

I got the Jonny Joints for my traction bars today from Currie enterprises..

They come in pieces, I guess so you don't have to take them apart to weld them in place.

I can now get serious about building my rear and front traction bars.

Rear first since I actully have an idea of what it should look like. Kind of.

Front is still a mystery, but it must exist sooner or later. The jeep won't climb worth hoot without it.

This is a place where I really wish I had 3D modeling capibilities, but I don't, so I just have to make it up as I go. :D

Randy
 
Last edited:

W.R.Buchanan

Legacy Registered User
City
Ojai
State
CA
Traction Bar Complete

This particular project is finally done, and only took 3 months to complete. Mind you work got in the way and it was very cold in the shop, and I don't do well in the cold. It's nice now so maybe some progress will ensue.

Whatever, Here it is.

The biggest problem in designing this piece is there is nothing square or strait about the thing. It is completely Skew. :confused: But the cool thing about it is that it is "removable". It bolts to the top of the Curry Pumpkin and then the large split clamp, attaches to the axle tube for the other connection. I didn't have to weld anything to the axle.

Believe me, it is Hell for stout!!! :thumbsup:

Next is to cut and weld a piece of 2 X 4 in between the frame rails in such a position that I have room to stand off the top anchor for the shackle that hooks to the Jonny Joint.

I should be able to complete this task this week some time, unless something comes up. :evil:

Things come up alot around here. :banghead:

Randy
 
Last edited:

Randyzzz

Blown Budget
BENEFACTOR
Gold Member
Lifetime Member
SOA Member
City
Redmond
State
OR
Great solution! Looks like a fine piece of engineering. I like it! :bow:

Cold in Ojai? Come on now...you saw my snow pics from last weekend. We had hail and a little snow this weekend. Now that's cold. :D
 

W.R.Buchanan

Legacy Registered User
City
Ojai
State
CA
My bones creak when it's below 60. It's hard to motivate when it's painful.

In a few weeks it'll be too hot, so I have a very narrow window to get it done. :shrug:

Randy
 

W.R.Buchanan

Legacy Registered User
City
Ojai
State
CA
Taking a new tack on the Traction Bar

I decided after cycling the rear suspension that my original idea that has worked in the past for anti wind up bars wasn't going to get it on this one.

My current solution is to mount a small Air Spring above the Jonny Joint and then be able to load and unload the anti wind up bar as needed. It won't need much if any preload on the street but will definately need to be just about hard up while climbing.

The fiberglass springs do not function exactly like regular leaf springs do, so having a shackle tied to a hard up mount to the frame would only serve to bind up the suspension during articulation.

The Air Bag won't do this. It will act as a damper during normal operation, a helper spring, to lift the rear end when loaded heavy, and then when fully pressurized, prevent the wind up bar from moving upwards. I hope:shrug:

You can make anything work in your mind, the trick is to bring it out of your mind and into the real world and have it work there.

I'll post pics as soon as I fab the mounts for the air bag.

Randy
 
Last edited:

W.R.Buchanan

Legacy Registered User
City
Ojai
State
CA
Here's pics of the finished air bag mount for the traction bar. The more I look at it the less it looks like it will work so I have left room to go back to the original idea which was a hard mounted shackle,All I will have to do is fab a new upper mount and by the time the Jeep is loaded I'll know how long the shackles need to be. I'll buy another air bag and use them both to suspend the trailer. I have a bunch of extra shocks from over the years. Independent Trailing Links with air bags to control the load.

Spent the weekend taking stuff off the engine and pulling it all apart. Going to pull the engnine and drive train tomarrow and then separate the frame from the axles so I can lfip it over and start closing the holes and finishing weld out and painting all the steel fab work.

I also built the front shock towers and tacked them on the frame. They ended up being a simplified version of my origianal design ,,, Much easier to fab.

Randy
 
Last edited:

Randyzzz

Blown Budget
BENEFACTOR
Gold Member
Lifetime Member
SOA Member
City
Redmond
State
OR
Looks interesting. Hope it works out because the idea sure is cool.
 

W.R.Buchanan

Legacy Registered User
City
Ojai
State
CA
Teardown

Here's pics of the engine teardown.. I chose to remove as much as possible while the engine was still in the frame as it is supported better than it will be when on the enigine stand.

Still going to have to beef up the engine stand for this chunk. going to put a cross bar on the front of the stand instead of the single wheel arraingement it has now. 4 better than 3.

We will probably pull the drive train tonite, and separate the tranny and all the piece parts.

The Roomy is taking his Bike to live at the Harley shop for the next 2 weeks while he is gone to work, so that will break loose extra room for the resulting cluge that scattering a car ultimately creates.

I plan on having the frame welded out and detailed during that time and ready to paint. All I have to do to the axles before paint is weld the spring perches in position, and weld a couple of tabs for locating brake lines.

As soon as all those pieces are painted I can start going back together.

I also have to do some cleanup and painting work on the engine before it goes back in, as well as regasketing, and dealing with the KDP. (Killer Dowel Pin). All that will be done on the engine stand.

Lots left to do but now the projects are small and easy to do with no design work. Just doing things and getting things done is the order of the day. As as I go there are less and less considerations to deal with and the order of the operations left is not so contingent on other things, so things can progress much faster because I don't have to do this, before I can do that...

I just filled up my disk on my Hi res Camera (not the pics you see here) 421 pics, but the date stamp on the pics got to me a little. Deliberate fab work this Jeep started on Dec 11 of 07! I'm in just over 3.5 years! Not counting design and procurement time which was about 4 years prior.

Time marches on! :woot:

Randy
 
Last edited:

W.R.Buchanan

Legacy Registered User
City
Ojai
State
CA
All apart

So it is all apart now, and the frame will be on saw horses in a day or so. :thumbsup:

A word of caution to all you chinese tool users (like me) Beware of those cheap engine stands when hanging your 4BT hunk of iron on them. Mine won't take it! Yours probably won't either.. In the pic you'll notice the crane is still hooked up. Well it needs to be hooked up because as I lowered the weight onto the engine stand it just kept tilting more and more down in the front until I decided it wouldn't take any more.

I think the 750lb rating of that stand is in Chinese pounds which are much smaller than English pounds! :shrug: Note the engine is level but the pivot on the rear mounting is tilted up at about 10 degrees. Well with almost all the weight on the stand the engine is tilted down another 10 degrees. So I lifted it back up! The mounting flange on the stand had flexed that much!

I'd shoot somebody at Harbor Freight if it failed and dumped my nice motor on the ground.

Randy
 
Last edited:

Randyzzz

Blown Budget
BENEFACTOR
Gold Member
Lifetime Member
SOA Member
City
Redmond
State
OR
Looking good!

I have sworn off Harbor Freight in all but the most dire of circumstances...
 

Bad Karma

Captain Sarcasm
BENEFACTOR
Lifetime Member
Member
City
Cobourg, Ontario, Cana
State
da
Looking good!

I have sworn off Harbor Freight in all but the most dire of circumstances...

me too... i try to buy good used tools instead of cheap new tools...
 

W.R.Buchanan

Legacy Registered User
City
Ojai
State
CA
Up dates!

Sorry to have negliected this forum, but it got to be too much work to post everything I was donig on two forums and since the build started on www.4BTSWAPS.com I have been posting most of my progress over there.

You all are certainly welcome to visit that site and if you take the time to sign up you can see the pictures of which there are literally hundreds.

I just got done painting the frame last Thursday 12/29/11 after a siginificant amount of cleanup after weldout.

I faired all the welds in with bondo so they would look a little better.

I started reassembling the frame today and got a bunch of stuff hung on the frame.

The frame is still on the rotisserie so working on it is relatively easy.

Also the engine is painted and ready to be installed as soon as the frame is back on wheels.

Still have to weld out the axles and paint them before I can reinstall them.

As soon as the frame is on wheels then the drivetrain can be reinstalled and then the frame will be plumbed and wired. It will run at that point! :fingerscrossed:

Then it is on to the body installation and paint.

Here's some pics that update to today 12-31-2011

Happy New Year :woot:

Randy
 
Last edited:

trust

PITA
City
White Rock
State
NM
anything new (I hope I hope!)? An amazing build, I dont know how I missed out on this until now
 

W.R.Buchanan

Legacy Registered User
City
Ojai
State
CA
Just an update. We are now painted and on wheels, just finshed the fuel tank 36.6 gallons and made of aluminum.

Plumbing the frame next.:thumbsup:

Randy
 

Attachments

  • Scrambler 809.JPG
    Scrambler 809.JPG
    70.7 KB · Views: 222
  • Scrambler 810.JPG
    Scrambler 810.JPG
    68.1 KB · Views: 223
  • Scrambler 812.JPG
    Scrambler 812.JPG
    61 KB · Views: 220
  • Scrambler 808.JPG
    Scrambler 808.JPG
    66.8 KB · Views: 221
  • Scrambler 838.JPG
    Scrambler 838.JPG
    55 KB · Views: 221
Top