

You are using an out of date browser. It may not display this or other websites correctly.
You should upgrade or use an alternative browser.
You should upgrade or use an alternative browser.
Voodoo Blue 82 Complete Refresh
- Thread starter gpassida
- Start date

- City
- Redding
- State
- Ca
Yeah. And they also got stimulus checks while they were serving time.There shouldn't be any shortage of prisoners in California to make them....oh, wait. Newsome released them all.
- City
- Redding
- State
- Ca
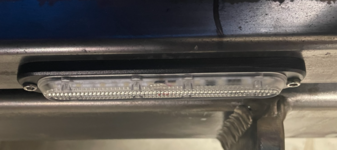
I sourced these backup lights on Amazon. I will use them as my reverse gear backup lights AND my dashboard switched "Rear Lights". They are pretty bright - probably too bright for the reverse lights.
My plan is to use a diode to run both circuits to the lights and prevent back feed to the other circuit when one is on. And if I get it out at night and it looks way to bright in reverse, I will add a resister to the reverse side to dim it down a bit. The dash switch would remain full power.

Mounted them on the tire carrier instead of the bumper. I can swing them out when camped and light up either the back or passenger side of the Jeep. For the price they see like great quality. Metal housing, sealed well and they put out great light.
Once I am done drilling into the bumper/tire carrier, I will pull it off and paint it. They will look better when it is black.
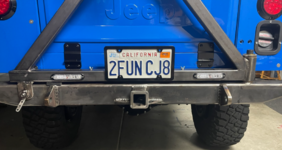
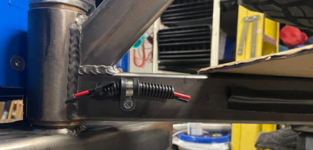
I'll run the wires for the lights and a license plate light along the back side like this:
I took it out for a 15 mile drive on Saturday. It was tremendously fun. Running great. The Magnaflow exhaust sounds sweet!
I will get it aligned but I am shocked how straight it tracks with zero wander. The wolf steering bearing, new Borgeson shaft and PSC Big Bore steering box are huge improvements. I don't even have a steering stabilizer on at this point.

My plan is to use a diode to run both circuits to the lights and prevent back feed to the other circuit when one is on. And if I get it out at night and it looks way to bright in reverse, I will add a resister to the reverse side to dim it down a bit. The dash switch would remain full power.
Mounted them on the tire carrier instead of the bumper. I can swing them out when camped and light up either the back or passenger side of the Jeep. For the price they see like great quality. Metal housing, sealed well and they put out great light.
Once I am done drilling into the bumper/tire carrier, I will pull it off and paint it. They will look better when it is black.
I'll run the wires for the lights and a license plate light along the back side like this:
I took it out for a 15 mile drive on Saturday. It was tremendously fun. Running great. The Magnaflow exhaust sounds sweet!
I will get it aligned but I am shocked how straight it tracks with zero wander. The wolf steering bearing, new Borgeson shaft and PSC Big Bore steering box are huge improvements. I don't even have a steering stabilizer on at this point.

Chamba
Not obsessed: focused.
- City
- Vero Beach
- State
- FL
So my shock towers turned up yesterday. I thought that would be a fun project this weekend.....
But, as if we need proof that Murphy was an optimistic SOB, I was out in the Jeep today when I lost all oil pressure in my 351. I was only a couple blocks from home so I limped home gently but by the time I got it into the garage it was quite loud.....
So the Cummins R2.8 conversion I had planned for late next year has just moved up a norch or 6.
On the positive side, it means that it will be really easy to put those shock towers on, as now I'll have the whole front clip off. On the negative side my 87 IROC just moved back down the list......
So I may finally start a thread for this conversion. I'll keep you posted George. You have inspired me somewhat however.
But, as if we need proof that Murphy was an optimistic SOB, I was out in the Jeep today when I lost all oil pressure in my 351. I was only a couple blocks from home so I limped home gently but by the time I got it into the garage it was quite loud.....
So the Cummins R2.8 conversion I had planned for late next year has just moved up a norch or 6.
On the positive side, it means that it will be really easy to put those shock towers on, as now I'll have the whole front clip off. On the negative side my 87 IROC just moved back down the list......
So I may finally start a thread for this conversion. I'll keep you posted George. You have inspired me somewhat however.
Last edited:

FLCJ8
Legacy Registered User
- City
- Palm Bay
- State
- FL
Sorry to hear of the engine problemsSo my shock towers turned up yesterday. I thought that would be a fun project this weekend.....
But, as if we need proof that Murphy was an optimistic SOB, I was out in the Jeep today when I lost all oil pressure in my 351. I was only a couple blocks from home so I limped home gently but by the time I got it into the garage it was quite loud.....
So the Cummins R2.8 conversion I had planned for late next year has just moved up a norch or 6.
On the positive side, it means that it will be really easy to put those shock towers on, as now I'll have the whole front clip off. On the negative side my 87 IROC just moved back down the list......
So I may finally start a thread for this conversion. I'll keep you posted George. You have inspired me somewhat however.

(but we'll all be looking forward to the Cummins conversion thread)
- City
- Redding
- State
- Ca
Wow. That's not good. The R2.8 would definitely be cool. A lot of work...but really cool.So my shock towers turned up yesterday. I thought that would be a fun project this weekend.....
But, as if we need proof that Murphy was an optimistic SOB, I was out in the Jeep today when I lost all oil pressure in my 351. I was only a couple blocks from home so I limped home gently but by the time I got it into the garage it was quite loud.....
So the Cummins R2.8 conversion I had planned for late next year has just moved up a norch or 6.
On the positive side, it means that it will be really easy to put those shock towers on, as now I'll have the whole front clip off. On the negative side my 87 IROC just moved back down the list......
So I may finally start a thread for this conversion. I'll keep you posted George. You have inspired me somewhat however.
- City
- Redding
- State
- Ca
So I spent a little time on a diversion. Wasn't in the plan but seeing all the tailgate tables the JK/JL Overlander's are using, I decided to make on for my Scrambler. I've one-upped them now - I have a real tailgate AND a tailgate table!
I drilled into my bumper/tire carrier and put a few eye hooks in. Had to position them in far enough so they fell within the inset portion of the tailgate. Almost missed that. The first time I slammed the tire carrier shut would have dented the tailgate!
I used RivNuts for the eyehooks and also the "Star Knobs" in the carrier's cross member.
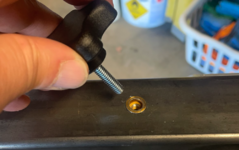

Then I sourced a commercial cutting board that is 30" wide and 1/2" thick. I cut it down to 12 inches deep.
Drilled some holes for the Star Knobs and used 1/16" plastic wrapped steel cable and carabiners for the supports.
All they had was green plastic wrapped cable. If I can source blue or black, I will remake those cables.
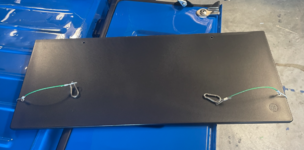
Now I have a quick to setup kitchen counter. Here is the finished product:
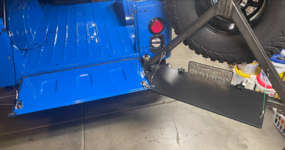

When traveling, the Star Knobs will just remain in their holes.

I was going to design it as a flip-up table but since it is on the outside it would always get really dusty/dirty. So I will have to store it inside.
I did size it so it can lay flat on the tailgate. I might come up with a way to attach it on the tailgate using Velcro or something. That way it doesn't take up any room in the back. And since I HATE rattles, I might make a Velcro sleeve to hold the cables and carabiners when stored. Or even a sleeve for the whole thing.

I think I am done drilling into the bumper and tire carrier. I will pull it off soon, clean it up and paint it.
This is the first mod that my wife actually took some time looking at! She was impressed.
I drilled into my bumper/tire carrier and put a few eye hooks in. Had to position them in far enough so they fell within the inset portion of the tailgate. Almost missed that. The first time I slammed the tire carrier shut would have dented the tailgate!
I used RivNuts for the eyehooks and also the "Star Knobs" in the carrier's cross member.
Then I sourced a commercial cutting board that is 30" wide and 1/2" thick. I cut it down to 12 inches deep.
Drilled some holes for the Star Knobs and used 1/16" plastic wrapped steel cable and carabiners for the supports.
All they had was green plastic wrapped cable. If I can source blue or black, I will remake those cables.
Now I have a quick to setup kitchen counter. Here is the finished product:
When traveling, the Star Knobs will just remain in their holes.
I was going to design it as a flip-up table but since it is on the outside it would always get really dusty/dirty. So I will have to store it inside.
I did size it so it can lay flat on the tailgate. I might come up with a way to attach it on the tailgate using Velcro or something. That way it doesn't take up any room in the back. And since I HATE rattles, I might make a Velcro sleeve to hold the cables and carabiners when stored. Or even a sleeve for the whole thing.
I think I am done drilling into the bumper and tire carrier. I will pull it off soon, clean it up and paint it.
This is the first mod that my wife actually took some time looking at! She was impressed.
Last edited:

- City
- Molalla
- State
- Or
Might try shrink tubing to make the cables black.So I spent a little time on a diversion. Wasn't in the plan but seeing all the tailgate tables the JK/JL Overlander's are using, I decided to make on for my Scrambler. I've one-upped them now - I have a real tailgate AND a tailgate table!
I drilled into my bumper/tire carrier and put a few eye hooks in. Had to position them in far enough so they fell within the inset portion of the tailgate. Almost missed that. The first time I slammed the tire carrier shut would have dented the tailgate!
I used RivNuts for the eyehooks and also the "Star Knobs" in the carrier's cross member.
View attachment 106840
View attachment 106841
Then I sourced a commercial cutting board that is 30" wide and 1/2" thick. I cut it down to 12 inches deep.
Drilled some holes for the Star Knobs and used 1/16" plastic wrapped steel cable and carabiners for the supports.
All they had was green plastic wrapped cable. If I can source blue or black, I will remake those cables.
View attachment 106842
Now I have a quick to setup kitchen counter. Here is the finished product:
View attachment 106843
View attachment 106844
When traveling, the Star Knobs will just remain in their holes.
View attachment 106845
I was going to design it as a flip-up table but since it is on the outside it would always get really dusty/dirty. So I will have to store it inside.
I did size it so it can lay flat on the tailgate. I might come up with a way to attach it on the tailgate using Velcro or something. That way it doesn't take up any room in the back. And since I HATE rattles, I might make a Velcro sleeve to hold the cables and carabiners when stored. Or even a sleeve for the whole thing.
View attachment 106846
I think I am done drilling into the bumper and tire carrier. I will pull it off soon, clean it up and paint it.
This is the first mod that my wife actually took some time looking at! She was impressed.

- City
- East Norriton
- State
- PA
Are the rivnuts open or closed? Will the be a spot for water to get into the carrier tubes, more specifically the ones on the horizontal bar. I realize the Starknobs will always be in but couldn't water get past the threads?So I spent a little time on a diversion. Wasn't in the plan but seeing all the tailgate tables the JK/JL Overlander's are using, I decided to make on for my Scrambler. I've one-upped them now - I have a real tailgate AND a tailgate table!
I drilled into my bumper/tire carrier and put a few eye hooks in. Had to position them in far enough so they fell within the inset portion of the tailgate. Almost missed that. The first time I slammed the tire carrier shut would have dented the tailgate!
I used RivNuts for the eyehooks and also the "Star Knobs" in the carrier's cross member.
View attachment 106840
View attachment 106841
Then I sourced a commercial cutting board that is 30" wide and 1/2" thick. I cut it down to 12 inches deep.
Drilled some holes for the Star Knobs and used 1/16" plastic wrapped steel cable and carabiners for the supports.
All they had was green plastic wrapped cable. If I can source blue or black, I will remake those cables.
View attachment 106842
Now I have a quick to setup kitchen counter. Here is the finished product:
View attachment 106843
View attachment 106844
When traveling, the Star Knobs will just remain in their holes.
View attachment 106845
I was going to design it as a flip-up table but since it is on the outside it would always get really dusty/dirty. So I will have to store it inside.
I did size it so it can lay flat on the tailgate. I might come up with a way to attach it on the tailgate using Velcro or something. That way it doesn't take up any room in the back. And since I HATE rattles, I might make a Velcro sleeve to hold the cables and carabiners when stored. Or even a sleeve for the whole thing.
View attachment 106846
I think I am done drilling into the bumper and tire carrier. I will pull it off soon, clean it up and paint it.
This is the first mod that my wife actually took some time looking at! She was impressed.
Great idea also

- City
- Redding
- State
- Ca
Great idea! I was able to find some blue or black coated cable. But they are 50' rolls. Around $13.Might try shrink tubing to make the cables black.
- City
- Redding
- State
- Ca
The rivnuts are open ended. Good point. I will add a rubber seal to the star knobs. And maybe even drill a couple of small drain holes.Are the rivnuts open or closed? Will the be a spot for water to get into the carrier tubes, more specifically the ones on the horizontal bar. I realize the Starknobs will always be in but couldn't water get past the threads?
Great idea also
When I paint the entire bumper/carrier, I am going to shoot Eastwood Internal Frame Coating in the tubes. (same stuff I used on my frame)
The end of the horizontal piece has a plastic end cap. So I can keep an eye on it.
- City
- Redding
- State
- Ca
The rubber seal, drain hole and internal frame coating should be the ticket. You never know, I may want to move out of California at some point!You live in California, not PA, Florida or New England. With a drain hole and the occasional squirt of CorrosionX it would take decades to rust through in California.
- City
- Redding
- State
- Ca
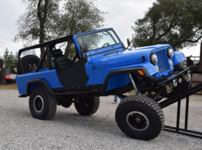
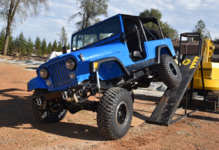
I am working through my list to get it back on the trail. One of the items was to "flex test" it to make sure my bump stops are setup correctly and that the shock lengths are correct.
I was able to get it to a friends place where he has an RTI ramp. I think his is 30 degrees or even steeper because he has built serious rock crawlers with King coil overs etc.
Overall the Scrambler did great. I had an inch or so of compression travel left on the front shocks. So I could get slightly shorter bump stops to maximize it but the Energy Suspension bump stops I have do compress some so I think I will leave them where they are for a buffer if I am fully flexed and drop off a large rock. Plus the springs were pretty much flat. Don't want to go into negative arch.
Brake lines were good, the 4" longer emergency brake lines I had made also were perfect. My last set was too short with the spring over.
I also got it up to 75 MPH on the highway. Other than a LOT of air blasting me, it did great and tracked well.
Below are some pics with the sway bar disconnected and tires at 15 PSI:


I was able to get it to a friends place where he has an RTI ramp. I think his is 30 degrees or even steeper because he has built serious rock crawlers with King coil overs etc.
Overall the Scrambler did great. I had an inch or so of compression travel left on the front shocks. So I could get slightly shorter bump stops to maximize it but the Energy Suspension bump stops I have do compress some so I think I will leave them where they are for a buffer if I am fully flexed and drop off a large rock. Plus the springs were pretty much flat. Don't want to go into negative arch.
Brake lines were good, the 4" longer emergency brake lines I had made also were perfect. My last set was too short with the spring over.
I also got it up to 75 MPH on the highway. Other than a LOT of air blasting me, it did great and tracked well.
Below are some pics with the sway bar disconnected and tires at 15 PSI:

Shark Bait
CJ-8 Member
- City
- Charleston
- State
- WV
NICE!
- City
- Redding
- State
- Ca
I decided to copy Chris (RUBCLT) and cut up a bed mat for my Scrambler. (Thanks Chris!) I used the Dee Zee DZ 86794 from Summit Racing - $105.00.
Made a cardboard template and traced it on the new mat.
Cutting it was not fun. But I'm glad to say I still have all my fingers. I used a carpet cutting blade and went through four blades.
I still have some fine tuning to do but I'm really happy how it turned out. It needs to sit in the sun for a bit as it still has some bends from being rolled up. Unlike Chris, I just cut the front flat across. I did not spend the time to make the little angled ends.
You can see that my bed is not perfect to start with:

Here is the cardboard template laid on top of the Dee Zee bed mat:

And here it is after I cut it:
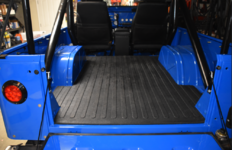
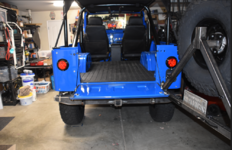
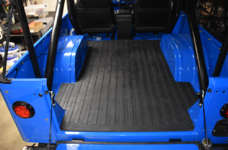


I may cut some holes for mounting the back seat at some point. I don't have the seat in very often.
Getting thinks checked of the list. Will be ready soon to get on some test runs.
Made a cardboard template and traced it on the new mat.
Cutting it was not fun. But I'm glad to say I still have all my fingers. I used a carpet cutting blade and went through four blades.
I still have some fine tuning to do but I'm really happy how it turned out. It needs to sit in the sun for a bit as it still has some bends from being rolled up. Unlike Chris, I just cut the front flat across. I did not spend the time to make the little angled ends.
You can see that my bed is not perfect to start with:
Here is the cardboard template laid on top of the Dee Zee bed mat:
And here it is after I cut it:
I may cut some holes for mounting the back seat at some point. I don't have the seat in very often.
Getting thinks checked of the list. Will be ready soon to get on some test runs.

- City
- Charlotte
- State
- NC
Looks good @gpassida … I had an original bed mat to trace, if I used the cardboard template technique I would have made straight cut for bulkhead.

Another idea would be to make cardboard template before installing bulkhead.
Here is a measurement photo from internet in case someone needs it… I didn’t use it so measure twice beforehand

Another idea would be to make cardboard template before installing bulkhead.
Here is a measurement photo from internet in case someone needs it… I didn’t use it so measure twice beforehand
Chamba
Not obsessed: focused.
- City
- Vero Beach
- State
- FL
Just be really careful with that mat George. A lesson I learnt from many, many years of owning FJ40s is that rubber mats hold condensation, even in New Mexico and Australia. Make sure you pull it out and let it dry underneath very regularly.
Even in the cold, dry high desert; floors rot out on 40s when people don't remove the mats regularly: mostly in the winter from the condensation. In Australia, I've seen perfect 40s with the floors a rotten mess simply from those mats.
I think they look great, just make certain you don't bolt it in with seats or anything which will make it less likely you'll remove it every so often. Another good time to remove it is after wheeling in the dust. Dust gets under the mat and acts like sandpaper. Eventually it'll wear through the paint in high spots. That's the killer in Australia.
Even in the cold, dry high desert; floors rot out on 40s when people don't remove the mats regularly: mostly in the winter from the condensation. In Australia, I've seen perfect 40s with the floors a rotten mess simply from those mats.
I think they look great, just make certain you don't bolt it in with seats or anything which will make it less likely you'll remove it every so often. Another good time to remove it is after wheeling in the dust. Dust gets under the mat and acts like sandpaper. Eventually it'll wear through the paint in high spots. That's the killer in Australia.
Last edited:
- City
- Redding
- State
- Ca
Good info! I have had a similar mat in my 1999 F350 since it was new. I have seen the moisture under there and other stuff that gets trapped. So I will definitely be keeping an eye on it.Just be really careful with that mat George. A lesson I learnt from many, many years of owning FJ40s is that rubber mats hold condensation, even in New Mexico and Australia. Make sure you pull it out and let it dry underneath very regularly.
Even in the cold, dry high desert; floors rot out on 40s when people don't remove the mats regularly: mostly in the winter from the condensation. In Australia, I've seen perfect 40s with the floors a rotten mess simply from those mats.
I think they look great, just make certain you don't bolt it in with seats or anything which will make it less likely you'll remove it every so often. Another good time to remove it is after wheeling in the dust. Dust gets under the mat and acts like sandpaper. Eventually it'll wear through the paint in high spots. That's the killer in Australia.