• Notice for iPhone users: DO NOT use the image size reduction option when uploading photos to the forum. This causes portrait images to post as landscape. We have added a warning to the image insert pop-up as well.

Voodoo Blue 82 Complete Refresh

I found that without carpet installed, after about 30 minutes of high speed driving, heat from the floor became too much for the air conditioning to compensate for. Carpet fixed this issue.
Good to know. I'm hoping that is my experience as well!
 
If you go the Bedrug route I'd be interested in your opinion of the product. I bought a used 2007 JKU from a buddy of mine that has the full bedrug kit. He bought the bedrug in 2011. I've never seen one in person and was expecting much more.

I will say it cleans up quickly and nicely. It just feels and looks cheap to me for lack of a better word.
 
In an effort to drop the heat coming through the floor of the Scrambler, I am doing a few things.

First, I had the exhaust shop add some heat shields above exhaust pipe under the footwell and seat areas. I did that only on the drivers side to see how much it helped. I also had to use header wrap on the downpipe where it comes out of the exhaust manifold on my 350 TBI since a shield would not work there. That works well but I didn't want to wrap the entire exhaust pipe in these areas in case of any future fluid leak. It would soak into the wrap material and if it were to catch on fire, it would be a torch. The short section of wrap and the heat shield worked well. It dropped the temperature above that area by 25-30 degrees. I used my IR temp gun to check that. So, I will be doing the same on the passenger side.

Next, I will address the top side.

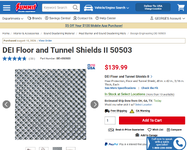
I just ordered the BedRug carpet kit for the front section of the Scrambler. And also, some DEI Heat Shield material to put under the BedRug.

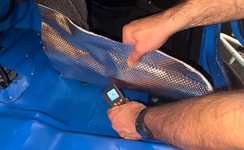
I tested a 10"x10" piece of the heat shield under the floor mat directly on the bare steel floor. This stuff is designed to go under the floor and above the heat source like your exhaust pipes and transmission etc. The silver side goes toward the heat source. The other side is a peel off sticky material to attach to the bottom of the floor. I am going to try something different. I will put the heat shield in the inside of the Scrambler with the silver side down on the bare steel. And I'll put the BedRug on top of that. That will keep it removable in case water leaks in under all that. I can remove it and let everything dry and hopefully avoid rust forming. I'm sure it will work better under the jeep, but I didn't want to create a moisture trap under there either.

Here's the test piece of heat shield. Note: The picture is just showing what it looks like. I flipped it over and placed it under that floor mat.

1787170194471.png

The result was good. That section of the floor mat was 20-25 degrees cooler. The BedRug on top of that should help with some additional insulation as well.

Hopefully when I get it all installed, I will have cut a lot of heat from coming into the cab and let the AC keep everything nice and cool under the hard top.

I also bought a "wind jammer" and put that up to keep the air in the cab section only. I have no back seat, so this is a good option for really hot days and made a noticeable difference. With the Jeepair kit, on a 105-degree day, the air blows really cold for around 20 minutes until the engine warms up and the heat soaks through the bare steel floor. At that point, the air going into the evaporator unit from the drivers footwell is so hot it can only take out so much heat. I'm hoping all of these changes will keep that manageable and let the AC remain cool on long drives on hot days.

On a side note: In the rear section of the Scrambler, I already have the cut down Dee Zee F-150 bedliner. That cuts the heat noise down a good amount back there. The heat from under the floor is not nearly as hot as the front section. In the future, I may add BedRug type bulk material back there and up on the wheel wells to cut the noise down. But that will be down the line.

Here is the BedRug kit. Looks like Husky Liner owns it now:

1787171879528.png

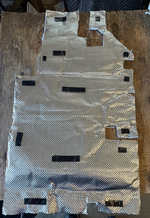
And here is the Heat Shield I chose after doing some research - I bought two:

1787171814600.png

I'll post pics and results once I get all this in. I want it done soon as I have a killer 5-day, 4-night Overlanding trip set for the third week of September to the Owyhee Canyonlands in Eastern Oregon. There have been bad fires near there, but they have a good handle on them so hopefully it will be clear when we go. I have a good backup if needed: Mammoth Backcountry Discovery route in the Sierra Nevada mountains.
 
Last edited:
The Owyhee area is on my to do list of places to see. Made it out to the Steens Mountains 15 years ago from the Medford area. Amazing overlook of that dry lake below. I’ll be looking forward to your trail report.
 
The Owyhee area is on my to do list of places to see. Made it out to the Steens Mountains 15 years ago from the Medford area. Amazing overlook of that dry lake below. I’ll be looking forward to your trail report.
We've never been there either. Hoping we can get this in.

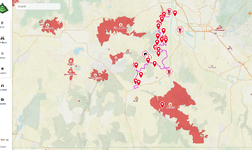
You can see the fires in the image below. Our route is the purple line. As of today, the "Coleman Creek" fire is 95% contained after burning 308,863 acres. The "Big Grass" fire is 85% contained after burning 579,008 acres. Smoke is still impacting the area but not as bad as it was in the past. It's a very rough year for fires in many states and Canada.

1787265118356.png
 
Following this George. My ankle was on fire going over the passes in Ouray this summer :ROFLMAO: :ROFLMAO:
Yeah. In 2024 when we drove the Scrambler to Silverton through the heat in Nevada and Utah, we were slowly cooking our bodies and getting dried out from the wind at 75 mph. Our iPad and phones kept dimming the screen, then stopping the charge process and then completely shutting down from the heat. I use the iPad to stream music and podcasts and to navigate. Found that putting it in the Dometic refrigerator for 15 minutes would get us 2-3 hours of driving before repeating the process. Meri got good at swapping it! However, I was happy my Garmin GPSMAP 67i stayed working through everything and I was able to use the on-board maps on that. Goes to show how a true rugged device works when the delicate electronics fail!

I'm really hoping all this work along with the AC and full-length hardtop makes it a cooler and quieter ride for the longer trips on hot days!
 
I use to be able to handle the summer heat, but I think those days are over. I can handle the trail heat of the day to day driving on the trail. It’s the 2 days through Louisiana and Texas getting to the trail that’s the problem. My new to me tow vehicle has now solved that problem. The lazy boy seat and ac make a completely different experience going to and getting home.
 
Here's a quick update on the heat shield and BedRug temperature testing.

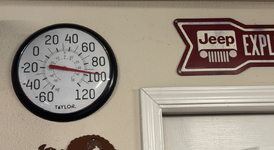
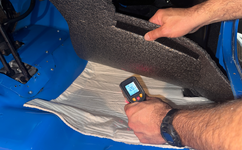
The starting point in the test is my garage ambient temp was 96 degrees. Everything in the garage is 96 degrees including the BedRug carpet pieces, the DEI Heat Shield material and the Scrambler's metal floor. I cut a piece of the heat shield for the driver and passenger floors in the footwell area. Then I put the BedRug piece on top of that. I ran the engine up to full temp and let it get a good heat soak going. It was HOT inside the Scrambler! You could feel the heat rising off the floor. Here are some temps I measured:

1789226096064.png

1789226164952.png

1789226211945.png

1789226240724.png

The DEI Heat Shield cut 52 degrees out and the BedRug cut another 18 degrees out. That's a total of 70 degrees cooler than the bare metal floor. And this was on the passenger side where I do not yet have the metal shield from the exhaust shop on the exhaust pipe. That cuts another 20-25 degrees.

Keep in mind, the starting temperature was 96 degrees and there is no air flowing under the Scrambler as I was just sitting in my garage. The heat just keeps building up under the floor.

So I'm happy with these numbers and am working on installing it on the entire floor area forward of the step-up/bulkhead section of the body tub.

I can tell you that I'm not enjoying this install - I just want to get it done! Cutting the Heat Shield material is not fun. But it should help the AC work much better.
 
Here's a quick update on the heat shield and BedRug temperature testing.

The starting point in the test is my garage ambient temp was 96 degrees. Everything in the garage is 96 degrees including the BedRug carpet pieces, the DEI Heat Shield material and the Scrambler's metal floor. I cut a piece of the heat shield for the driver and passenger floors in the footwell area. Then I put the BedRug piece on top of that. I ran the engine up to full temp and let it get a good heat soak going. It was HOT inside the Scrambler! You could feel the heat rising off the floor. Here are some temps I measured:

View attachment 123091

View attachment 123092

View attachment 123093

View attachment 123094

The DEI Heat Shield cut 52 degrees out and the BedRug cut another 18 degrees out. That's a total of 70 degrees cooler than the bare metal floor. And this was on the passenger side where I do not yet have the metal shield from the exhaust shop on the exhaust pipe. That cuts another 20-25 degrees.

Keep in mind, the starting temperature was 96 degrees and there is no air flowing under the Scrambler as I was just sitting in my garage. The heat just keeps building up under the floor.

So I'm happy with these numbers and am working on installing it on the entire floor area forward of the step-up/bulkhead section of the body tub.

I can tell you that I'm not enjoying this install - I just want to get it done! Cutting the Heat Shield material is not fun. But it should help the AC work much better.
What a great thread. I think this is gonna be my next project. I have a full hard top with “Jeep Air” air-conditioning. While the air conditioner works well, ILive in the central Valley, California. 95 to 110 days are common in July and August. This heat shield material is gonna be a tremendous help. Thank you for sharing this research.
 
that's awesome, thank you for sharing the heat gun pics. What DEI stuff are you using? is it the peel and stick stuff and are you sticking it to the underside of the carpet?
I NEEEED to do the same thing but I don't want to stick anything to the floor. I want the carpet to come out easily for cleaning and drying, etc.
I have to wear work boots when I drive anywhere longer than an hour or I literally burn my feet.
 
that's awesome, thank you for sharing the heat gun pics. What DEI stuff are you using? is it the peel and stick stuff and are you sticking it to the underside of the carpet?
I NEEEED to do the same thing but I don't want to stick anything to the floor. I want the carpet to come out easily for cleaning and drying, etc.
I have to wear work boots when I drive anywhere longer than an hour or I literally burn my feet.
@Bad Karma Scroll up to post 223. I show the heat shield there. (DEI Floor & Tunnel Shield II) On my phone now but when I get on the computer soon, I will post a good update with pics. This was a PITA project for sure but I'm done and its working great. I too wanted to be able to remove it. That definitely complicates things as you'll see when I post.

Leaving for a 6-day, 5-night Overlanding trip Saturday. I think I'm set now with the AC and interior mods. Doing the Mammoth Backcountry Discovery Trail - 310 miles in the Mammoth Lakes, June Lake area of California.
 
@Bad Karma Scroll up to post 223. I show the heat shield there. (DEI Floor & Tunnel Shield II) On my phone now but when I get on the computer soon, I will post a good update with pics. This was a PITA project for sure but I'm done and its working great. I too wanted to be able to remove it. That definitely complicates things as you'll see when I post.

Leaving for a 6-day, 5-night Overlanding trip Saturday. I think I'm set now with the AC and interior mods. Doing the Mammoth Backcountry Discovery Trail - 310 miles in the Mammoth Lakes, June Lake area of California.

guess I should pay attention more. :ROFLMAO: Have a good trip!
 
Looking forward to full review of the insulation upgrades. Do you think adhering the DEI material to the underside of the Bedrug carpet would be possible/beneficial? Or is that part of the moisture trapping potential your concerned about? I have the same worries about water, rain, etc causing issues too.
 
Back from the Mammoth BDT trip. It was awesome. I'll do a quick writeup and post some pics soon. For now, here is more information on the floor insulation project. Scroll up to see the specific materials I used.

Executive Summary: It was a pain in the ass but well worth it! The AC can now work its magic on the really hot days, the floor looks great compared to the bare metal, you don't burn your feet any longer and its significantly more quiet paired with the full length hard top. I can actually have a conversation with my wife running at highway speeds. Plus the stereo sounds much better and you can actually make out the GMRS radio comms and listen to podcasts while driving up to 75 MPH.

My goal was to make the heat shield and the BedRug removable in case water got underneath and I wanted to dry the steel floor out.

The hardest part was determining how many pieces of the DEI heat insulation I needed to cut and where they would be positioned on the floor. With the pieces I bought, I could not just use the BedRug carpet pieces as a template as it wouldn't make good use of the DEI 48" x 42" pieces. I would need to purchase an additional sheet.

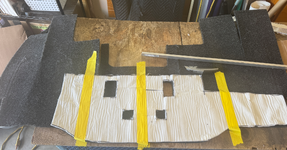
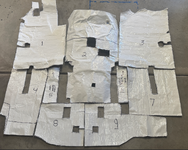
I basically made the layer of heat shield first. That took MUCH more time than putting the BedRug in. I used the BedRug pieces to trace templates onto cardboard. Luckily I still had the box that the Xtreme Hard Top shipped in. That is the largest cardboard box I've ever had. So I had plenty to use. Then I figured out how to get all the pieces from the two rolls of DEI Floor and Tunnel Shield. I had to cut some of the cardboard templates down to maximize use of the heat shield rolls.

Essentially I have two independent layers. The heat shield silver side is held to the floor with Velcro strips. And the white sticky side of the heat shield still has the plastic on it. I did not peel it back to stick it to the BedRug. I added Velcro to the white side, on top of the clear plastic layer, and that is what is attached to the BedRug. I used some of the BedRug sewn in Velcro but also added strips where I needed it.

After my rebuild, and the hard top, my Scrambler is sealed pretty well. But I'm sure if I remove all of it, I will need to replace lots of the Velcro. And some of the plastic on the sticky side of the heat shield will come up. I'll just have to deal with it. I needed to get this initial pass done for my Mammoth BDT trip! Also, I am concerned with how hot it will get between the metal floor and the silver side of the heat shield. That Velcro may melt! Or at least the glue sticking it down will melt.

Once I had those, I started cutting the heat shield pieces and then cutting any necessary holes in the pieces for the roll cage, seat mounts, seat belt mounts, center console bolts etc.

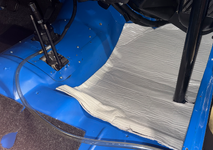
Here is one piece going in on the passenger floor: (in case you're wondering, the tube is a temporary drain for the AC evap unit)

1791860439853.png

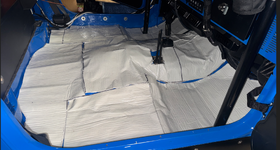
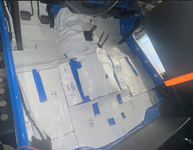
Here is a shot of all the pieces in place. The tunnel with the shifters was the hardest piece of course. The heat shield does not like to bend to conform to dimples and ribs on the floor.

1791860975418.png

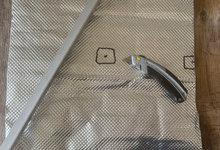
I marked the holes mostly from underneath with a Sharpie pen or paint pen. I cut it using a utility knife and a piece of angled aluminum to avoid removing any fingers. I went through six blades - both sides. A sharp blade works well. A dull one, not so much. It takes a lot of pressure to get a clean cut. I cut it on top of some old plywood. Once cut, the sides of the metal layer are sharp. So you need to use gloves and be careful. They sell some metalized tape for this but I did not use it. You can tape the pieces together where they meet or tape the edges to reduce cuts.

1791861068623.png

For some pieces, I needed to cut holes through both the heat insulation AND the BedRug. Mostly for my Tuffy Center Console and the seat belt attachments to the floor.

1791861405754.png

1791861478072.png

1791861756469.png

Here is a shot with the Velcro pieces. I put the pieces down carefully to get them in the right spot on the first try so the Velcro would stick to the floor in the right spot.

1791861571795.png

Now with that done, I could move on to the BedRug kit.
 
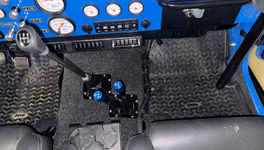
The BedRug kit is nice and the material should hold up well. The issue I had is the thickness of the heat shield layer, particularly at the transmission tunnel, made the coverage of the BedRug have some gaps. You could see the white side of the heat shield in these gaps. I went to Home Depot and Lowes and found some material that is very close to the BedRug material and cut pieces and put them under the BedRug to cover the white heat shield. The material was a lighter grey than the BedRug. But it would do the job for the upcoming trip. Ultimately, I will likely find a closer color match and replace it. The gaps are mostly under the floor matts so you don't see it anyway.

I also screwed up one of the measurements for the transmission shifter hole and cut too much. I had to use a piece of the BedRug like material to fill that gap. I called Husky Liners, who now own BedRug, and they don't sell just the one piece. It's not bad and one of those things that will only bother me as I know it's there...

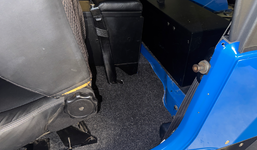
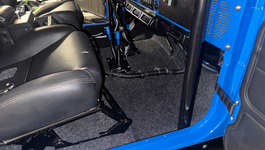
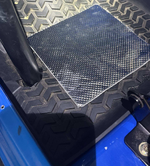
Here are some completed shots.
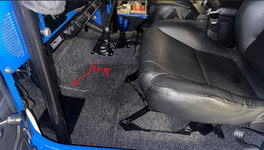


1791862366437.png

1791862410480.png

1791862491700.png

1791862540574.png

In this pic, I still needed to attach my center console stereo wiring to the tunnel.
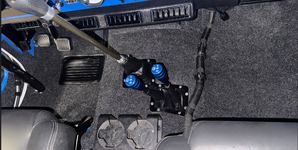
1791862749370.png

With my old(dirty) floor matts. I will clean them good so they look better after our trip...
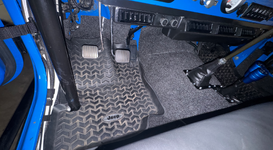
1791862869545.png

1791862943584.png

There you go. A very worthwhile project that will get a lot of use. I retire in TWO MONTH'S and SIX DAYS...but who's counting...

I will run my Scrambler in two modes: Fully buttoned up for Overlanding type trips with the full hard top and full doors. OR just the custom Bikini top I had made and YJ half doors for Rubicon trips and other rock crawling trails. I can tow it if needed in that configuration.

A few more comments after our week-long Mammoth BDT trip:

With the full hard top and AC, very little dust gets inside. The full Kayline soft top lets in a lot of dust particularly at the rear window where the dust kicks up. I was surprised at how rattle free the Scrambler is now. Even on bumpy washboard roads, its tight and rattle free. The soft top bows and other hardware made a lot of noise compared to this.

The hard top lift gate not only seals great but opening and closing it it is MUCH easier than dealing with dusty zippers and the plastic window. In freezing weather, that is nearly impossible with the soft top.

The AC, even with this flooring, is good for maybe up to 100 degree days if the Scrambler is empty. There is just a LOT of cubic feet of air under the full hard top. I have a bed mat in the back but the sides and fender wells are still bare metal. I will probably add the "BedRug" like material back there at some point. The heat coming through the floor is not bad back there compared to the front. This was not a problem on our trip as the back section was FULL and there was 1/15 the space that needed cooling. If empty or nearly empty, I think a Wind Jammer behind the font seats will block off the back enough to let the AC cool the front nicely on up to 110+ days. I will test that next summer here in Redding. I have the Wind Jammer for a CJ-7 and it did work well when I tried it.

The floor, even after a good heat soak on a 100 degree day, remains just warm to the touch versus burn quality heat as it was before.

The extra thickness of both layers plus the floor matts created an issue with the throttle pedal. It would get stuck down which was fun...for a bit... I ended up shaving off the floor matt lugs where the medal meets the matt. That worked fine.

I also thought I had a wind noise coming from the gap between the door and the windshield frame. I got some rubber door seal strip and it sealed that nicely. However, the wind noise turned out to be the vent wing window! I used new ones when I rebuilt the hard doors. The seal is not covering the gap enough along the front edge. On our trip, that was the only wind noise and it was annoying. I stopped and got a roll of masking tape and put it over the front edge of the vent wing seal and it cut nearly all the noise out. With that, the inside of the Jeep was a little louder than my wife's new JL but not by much. The tire hum and Magnaflow exhaust was all you heard. I will need to deal with the vent wings or just replace them with solid versions at some point.

This nearly completes "Phase 2" of my build: Full Hard Top, AC, heat and noise shielding. I still may add cruise control or at least a hand throttle for the long highway drives that are now possible. Since getting it back on the road, I have 13K miles on it. The Mammoth BDT trip was 1,200 of that.

My wife definitely likes the difference. She had a much easier time on this trip compared the Colorado-Idaho trip we did in the summer of 2024 with no AC and the soft top. (that's a few pages up in this build thread)

I'll post a summary and pics of the Mammoth BDT trip soon....

 
Last edited:
Awesome write up! Thank you! Now I need to start buying stuff...
 
Back
Top