• Notice for iPhone users: DO NOT use the image size reduction option when uploading photos to the forum. This causes portrait images to post as landscape. We have added a warning to the image insert pop-up as well.

‘82 SL, “Clyde”

Jeepn-n-TX

Member
City
Whitehouse
State
TX
Well, like I really needed another project going in the shop, but yet ... here. we. are.

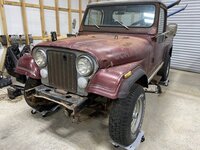
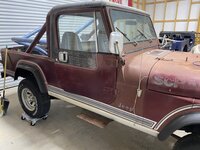
I picked up and brought home this one-owner (well, now two) 1982 Scrambler Laredo. It spent all its life down near San Antonio, TX before taking a brief “vacation” over to AZ, which is where I picked it up from a friend. They got ahold of it, but soon lost interest in it due to the amount of work it needed. I was VERY lucky, I’ll admit, to get ahold of it for what I paid. This SL model was bought brand new in July of 1982 at a dealership in Pleasanton, TX by a Mr Clyde Bruce. From records, the SL was last registered in 2015, which I have to assume is when it was possibly parked and just left. From what I understand of the story, a family friend of Mr Bruce offered to rebuild the SL, but it never happened.

When I first brought the SL and brought it back home to TX, I got it parked in my shop where I could get a really good look at everything. That’s when I quickly realized it was a “little” rougher than I was really expecting. While I friend was over for a beer (or four) we deemed her “Annie ... the red-headed, bastard, stepchild”. I was kind of sick honestly. I let it sit for a few days while I went back to work ... and so I thought on it. Figured at the least, I’d clean it up a bit and it would either grow on me or I’d flip it and just sell it.

The thing I love most about these old Jeeps (I have 3x other CJ-7s) are the stories behind them. At some point, someone bought these Jeeps brand new off the lot and left there with a huge smile on their faces. ... and then everything in between until we get ahold of them. When I finally got back to the SL I had a plan in mind. It would stay rough, but I’d get it running and driving again and then work to polish/ clean it up a bit. I’m not interested in repainting things, or really fixing rust holes except where safety concerns need to be addressed (under the roll bar and in the floor pans). Other than that, I plan to enjoy it just as the previous owner did for 33yrs. ... I don’t know anything about Mr Clyde Bruce, but I know he loved this Jeep Scrambler enough that he drove it home, probably with huge smile on his face, and then drove it for decades in between ... and now I have it.
And so ... meet “Clyde”. It seemed much more fitting than “Annie”.
BEC095A6-3691-4E4E-AFD7-5D0005875FC8.jpeg

0F44001D-2F0D-49C7-B749-166375F4802F.jpeg

I’m sure I’ll have tons of Scrambler related questions as I’ve never owned one before. So stick around and stay tuned for the fun.

My intention with this thread is to document my findings and my progress. To keep a log for my own personal reasons and reflections. I also plan on keeping a running list of links below, to act as a quick reference, to help keep track of what work has been done and to quickly access the post/ page it was documented.
 
Last edited:
Beautiful. Nice looking shop you've got too. I may be biased, but I believe you'll love the 8; it's everything the 7 is but more.
 
Working a little bit here and there over the last few days, I've laid out what I think is a decent game plan. While I REALLY want to do quick things like take the wheels off, strip the clear coat and shine them up, new tires, sand/ buff the paint out, etc, I'm saving all that stuff for later. ... or at least for when I get tired of working on important things and need a break.

First off, I plan on getting Clyde running. It's been sitting for a good minute, but I don't think this will be a HUGE challenge. The engine easily turns by hand and it's also, from what I can tell, was a replacement/ rebuilt engine at some point. It has a "Four Star Engines" sticker on the block as well as a "reman" sticker, but the lettering/ print isn't readable anymore. Quick google searches of the company doesn't really turn up much. Best I can tell, they did engines back in the early 2000's but that's about all I got. If anyone can fill in more of the story, please chime in. Other than replacing fluids, etc, it looks like I might need to do a full re-wire of the engine. Mice have done their damage on almost every wire you can see and it's not worth chancing a short. Luckily, I have a few spare OEM harnesses I saved just for a reason like this. However, I'm trying to imagine the whole process right now. ... do I lay the "new" harness in and unplug/ plug in one thing at a time? Or should I just rip everything out and toss the new one in?? Never done something like this before, but I'm trying not to over think it. .... but I'm not trying to under-think it either. I'm also planning on pulling the dash out and checking all the wiring behind the dash as well. I'm also considering a Sniper EFI for a more modern turn-key upgrade. Lastly, I'm also planning on dropping the fuel tank and cleaning it out as well as all new rubber fuel lines. ... plus, of course, new spark plugs, wires, etc. I don't have to get it done to get the engine started, but to keep it running, I'm going to have to get the coolant system flushed, new t-stat, hoses, and possibly replace the radiator. The PO had bypassed the heater core, so I'm curious if previously sprung a leak. Will have a address that when I have the dash out checking wiring ... and if I do that I may as well rebuild the heater box. (Aaaaaaand so it goes with owning one of these things!)

Then, after I've got it running decently, I plan on changing my focus to "safety". It's an early '82, so it has lap belts only. A later roll bar with bungs for the shoulder belt was included when I bought it, so I plan on swapping this in as well as drilling the necessary hole in the hardtop. I have a lead on some of the rubber spacers needed for this conversion, but I need to follow up on this. I'll also be going with an all new brake master cylinder and brake booster set-up. I keep seeing one Collins Bros offers, but I'm pretty sure this same set-up can be had off Amazon. Checking the full suspension, new shocks, replacing bushings, checking ball joints, u-joints etc will all be in order. New tires are also a must. For lights, I plan on using the old halogen headlights, but plan on wiring in relays to help brighten things up. The OEM tail lights were crushed and broken, but I have a replacement set.

Lastly, once we're running and driving, I plan on accessing and addressing things as needed. Possibly pull the trans and transfer case for a rebuild or at least a reseal. I know the D300 is covered in crap indicating a leak of some sort. The axles will get the same treatment. Open them up to at least check things out and at least get new fluids and seals. I have a long laundry list of things to address when the time comes. There's plenty of work to do.

Then, after ALLLLL that ... I want to gently sand out the paint. It looks like Clyde sat out in the sun his whole life. The paint is heavily weathered and at some point, it looks like someone tried to spray paint over things. There's at least paint over the factory stickers. I have tested some spots with 600 grit, medium steel wool, etc and have gotten decent results. As I said before, I'm not interested in repainting or taking this back to a showroom floor status. Once the paint is cleaned up, I'll possibly entertain my options as far as protection/ clear coating goes. Other creature comforts to look into include replacing the A/C with a JeepAir system.

There's a lot of work to do here, and I'm sure I'll find more as I go. I'll do my best to take lots of pictures and document things as I go.
 
With all that have you thought about a frame off complete rebuild. :shrug: :rotfl:
Yeeeeaaaah ... that’s not gonna happen. This Jeep has a story and it took 40yrs to get here. I want to preserve that. ... and maybe keep Clyde driving for a little while longer. A full frame off restore, imo, just starts the story all over.
 
Nice find ! Looks stock except for maybe the rear bumper. Have to like the survivors. I agree with cleaning up the paint and maybe some CC.
 
Nice find ! Looks stock except for maybe the rear bumper. Have to like the survivors. I agree with cleaning up the paint and maybe some CC.
Thanks. It had a matching front bumper before I cut it off. Otherwise, it’s 99% original. I’ll work on posting some more pictures of when I got it ... I’ve already started on gutting the wiring.

I’m also hesitant of the price tag after just buying this, but I reeeeeally want to throw down for a Sniper EFI kit.
 
After adjusting the idle screw on my sniper EFI, it is running great. It still has a lot of learning to do, running pig rich right now.

Highly suggest the investment for ease of starting and drivability.
 
I don't know what the under carriage and frame looks, but she doesn't really look ruff. I've never got a jeep that clean, body looks like a typical, desert vehicle (wind and sand wears the paint. Nice find.
 
I don't know what the under carriage and frame looks, but she doesn't really look ruff. I've never got a jeep that clean, body looks like a typical, desert vehicle (wind and sand wears the paint. Nice find.
The frame is in dang near perfect shape. It has some rust issues under the footer of the roll bar in the bed, a couple of holes in the side panels and some in the drivers floor pan. I haven’t cracked the windshield seal yet to look at the dash or the cowl, but it’s coming, so we’ll see.
 
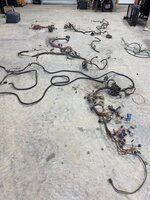
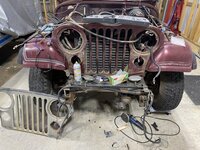
So last night after work, I decided to start working the engine bay wiring. I have a couple of wiring harnesses I’ve saved from other projects, so I started by laying them out on the floor.

7CD837CA-26A9-48EF-8F10-289627405F31.jpeg

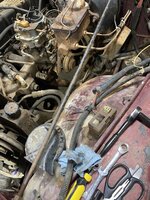
I know one of them is from an '85 and has all the computer and emissions connections etc. I'm sure that I could trim this one down, but I'll probably save this one. The other I have is from an earlier Jeep, so I'll probably be using this one. However, the one thing I did notice (I decided it was probably best to be methodical about this rather than just ripping everything out) was that Clyde has one of the terminal "test" connectors attached to the driver's side fender. I've never seen one there before, always attached to the battery tray, so I figured the PO may have moved it. But, the harness isn't long enough to reach to the other side of the engine bay. So, I figure two things happened here, 1) this is just another AMC-ism, or 2) it was moved/ shortened when the reman engine was set. I find the latter less likely since when setting in a new engine all you're really going to do is plug and play. (You can also see the Duraspark ignition box hanging there at the top. It's all melted out and nasty, so I'm considering doing a stealth HEI module here.) There's a few other discrepancies I'm finding while comparing harnesses and deciding which one to use and which direction to go. I may have to turn to another harness altogether, so I'm also hunting and comparing some harnesses on ebay.

128C9207-9197-4123-82E8-240805D688A8.jpeg

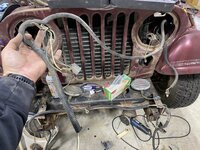
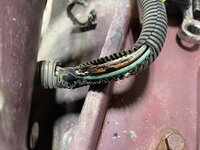
Since I'm on the driver's side, I decided to go ahead and pull out the front lighting harness. Although the mice have gotten after parts of it too it's still in decent shape. I should be able to either patch it or at the worst, but able to keep and reuse terminals/ plugs later. (The 85 harness I have is completely missing the front lighting harness.)

8177D61C-25FE-4B56-B013-61657D610EEA.jpeg

AEEA26A9-FED5-4D3F-8DDD-61C605FE49BB.jpeg

Shortly after getting the front lighting harness out, the kids came out to the shop and told me dinner was ready. Time to head in. ... How do you eat and elephant??? .... So this is where we sit for now ...

A09BCF9B-3CE3-405A-B8A8-5EE8DE9F14A3.jpeg

Stay tuned for more. I'll do my best to keep things updated. (I'm having to constantly remind myself to take pictures as I go....) (y)
 
Last edited:
Best and easiest investment I ever made was to purchase the Painless wiring harness. I wish that I had done it years ago as it would have saved me countless hours of frustration in hunting down electrical gremlins. The wiring harness was a plug and play godsend. Best bang for the buck ever invented AND is made in America.
 
Best and easiest investment I ever made was to purchase the Painless wiring harness. I wish that I had done it years ago as it would have saved me countless hours of frustration in hunting down electrical gremlins. The wiring harness was a plug and play godsend. Best bang for the buck ever invented AND is made in America.
I’ve heard both outstanding and horror story reviews. For now, I'd like to try and use the harnesses I already have.
 
I’m about to start wiring mine with an EZ Wire 21 circuit harness. It’s only $189, and although it’s universal, a lot of it is the same as our Jeeps. I’ve used them before and they are good quality. Color coded wires labeled every 5 inches. I’ll try and do my best to document the install in my build thread.
 
I’m about to start wiring mine with an EZ Wire 21 circuit harness. It’s only $189, and although it’s universal, a lot of it is the same as our Jeeps. I’ve used them before and they are good quality. Color coded wires labeled every 5 inches. I’ll try and do my best to document the install in my build thread.
I’ll keep that in my back pocket, Randy, thanks. Can you tell me if they offer partial harnesses? Like separate headlight/ engine/ interior? (I’m being lazy without looking them up.)
 
I’ll keep that in my back pocket, Randy, thanks. Can you tell me if they offer partial harnesses? Like separate headlight/ engine/ interior? (I’m being lazy without looking them up.)
EZ Wiring only supplies a universal harness. I don’t think they make separate individual harnesses. The harness kit is basically one huge piece with all the sun- harnesses connected to/through the fuse panel, which is a standard looking GM/AMC panel. You could add connectors to have individual harnesses. I’m never planning on having to remove mine so I’m leaving it one piece. So far.
 
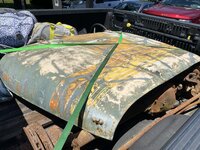
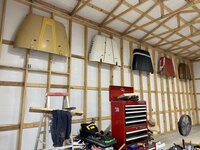
Not really Clyde related, but kinda ended up Clyde related ... I made a quick trip down to Houston to pick up a set of 3.54 axles for a different build and ended up with this hood as well. I could see the OEM paint and decaling under a rattle can paint job and thought I might be able to bring it back ... at least as a wall hanger for the shop.

F3E5D48E-B345-4839-8328-6B41DE136256.jpeg

After a really good pressure washing, A good bit of the spray paint came off without really hurting the decaling, although I did my best to stay away from it anyway. Seems like a lot of the lighter colors broke down after being beat by the sun, but the darker "striping" is still pretty stuck on there.

0970FDC6-F6F8-4AB5-BC00-B5648F387991.jpeg

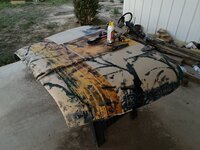
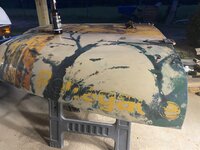
The next evening, I turned to a little lacquer thinner. It seemed to do well, again, with some of the thinner stuff, but it also seemed to make the OEM paint a like soft/ thin where I really tried to scrub on things. It worked like a charm on most of the spray paint on the decals without seeming to hurt the decals themselves. It didn't really do anything at all for the dark striped areas. For these, I found that LIGHTLY sanding with small bits of sandpaper and soapy water worked well to break these down. I worked small as to not get into the OEM paint and I stopped with the OEM paint started to show through. I figure once I get all this knocked down, I'll go back with the lacquer thinner to get things cleaned up.

ED105F54-1570-464C-A196-F0C22928BDD7.jpeg


So, what's this got to with Clyde ... Well, as I cleaning up, I looked over at ol' Clyde and got to thinking about the paint sprayed over the OEM Laredo decaling. I bet with a little, gentle love, this method with lacquer thinners will clean things right up. It's at least worth a try.

This Rene hood will never be perfect again, but it'll clean up nicely and will look good hung up with the others. 8-) (y)

24DEE832-1404-4789-B02E-EE3F7227DAB7.jpeg
 
Last edited:
Back
Top