• Notice for iPhone users: DO NOT use the image size reduction option when uploading photos to the forum. This causes portrait images to post as landscape. We have added a warning to the image insert pop-up as well.

Wet plugs

Wayne

Legacy Registered User
City
Cape Coral
State
FL
Hello:
Looking for some guidance / advice please.
Got a 258 with a Carter BBD
The carb was just professional refurbished.
I just installed a new coil. I have tested the plugs and have good sparks on all 6 plugs.
The engine will not crank. - it just turns over .
After a few attempts, if I take all the plugs out - they have carbon on them and plugs 1-2-3 are wet with gas. I was going to replace the duracraft ignition module - but I’m not sure I need to if I have sparks on all the plugs?
I am trying to figure out my next move - any help would be appreciated.
Cheers.
Wayne.
 
AI has helped me troubleshoot, I dropped your question into Grok…

1982 CJ-8 with the 258 is the first-year feedback BBD. That carb has a stepper motor on the back, an MCU under the dash, and a DuraSpark module on the driver fender. Spark at the plugs does not rule the module or the computer out, and it also does not mean the rebuilt carb is delivering a mixture the engine can light.

Do not replace the Duracraft module first. Work this order.

1. Stop flooding it

You already know 1-2-3 are wet. More cranking just washes the rest.

• Pull the plugs, dry them or put in a cheap set.

• Crank with the throttle held wide open and do not pump the pedal. WOT opens the choke and dumps the extra fuel.

• Look down the carb while cranking. If fuel is pouring or dripping from the booster nozzles, the bowl is overfull. That is float/needle, fuel pressure, or the stepper motor parked rich — not the ignition module.

2. Check the 1982-specific flood sources

On this year three things flood a freshly rebuilt BBD:

Stepper motor (rear of carb)

If it is stuck with the metering pins retracted, the carb runs rich even with a good rebuild. Unplug it. If the engine suddenly tries to fire, the motor or the MCU is holding it rich. A lot of people Nutter-bypass 82–86 CJs for exactly this.

Choke pull-off (vacuum break)

A leaking diaphragm will not open the choke after start cranking. Engine stays choked, plugs go wet, you get carbon. Apply vacuum to the can with a hand pump; it should hold and pull the choke open.

Float / needle after the rebuild

Most common shop miss: float set high, Viton needle nicked, or a speck of debris in the seat. BBD wants about 4–5 psi. A new mechanical pump at 7–9 psi will hold the needle off the seat and flood the front cylinders first.

3. Prove spark is happening at the right time

Firing order is 1-5-3-6-2-4, rotor clockwise, #1 at the front (radiator).

• #1 plug out, bump to TDC on the compression stroke (finger over the hole, you feel pressure as the mark comes up).

• Rotor must point at the #1 tower. One tooth off or 180° out gives you spark and a dead engine.

• Base timing on these is typically around 8° BTDC with vacuum advance unplugged once it will idle. If the distributor was loosened for the carb job, that alone will do this.

Open-air spark can still be too weak in the cylinder. You want a fat blue snap with the plug grounded on the head, not a thin orange one.

4. When the module actually matters

Replace the Duracraft if:

• spark is weak/orange

• you get one spark then nothing

• the module connectors are green or the potting on the back is cooked

• the black ground from the module to the distributor body is rusty

Clean those connectors and the distributor hold-down ground before you buy another box. Bad grounds kill these modules and the new coil you just installed.

On an 82 the MCU can also sit in the pickup-to-module circuit depending on how original the harness still is. If everything above is correct and it still only cranks, jumping the orange/violet pickup wires around the computer (the ignition half of a Nutter) is the next diagnostic, not another coil.

Start with WOT flood-clear, look down the carb, then rotor-at-#1 / TDC. That trio finds most “rebuilt BBD, new coil, good spark, wet 1-2-3” 82 CJ-8s. If you can say whether the stepper motor is still plugged in and whether the distributor was pulled, the next step gets narrower.

 
Is it not doing anything close to firing, even if it's misfiring? No pops at all?

Was this engine running before the carb rebuild/ignition work? If so, I would doubt it's compression. Also worth visiting every ground for the ignition and engine and adding more, temporary or permanent (big fan of extra grounds.)
 
Is it not doing anything close to firing, even if it's misfiring? No pops at all?

Was this engine running before the carb rebuild/ignition work? If so, I would doubt it's compression. Also worth visiting every ground for the ignition and engine and adding more, temporary or permanent (big fan of extra grounds.)
Thanks for all that info:
I have done all the basics from that AI source.
Yes, the motor was running prior.
The reason why I installed a new coil was because, I would park the vehicle (after running it) and it would not start after.
I would pull the plugs and they would be black from soot or carbon - after I changed the coil I noticed that the plugs near the fire wall 6-5-4 were wet.(I am not pumping the accelerator).
The coil part # is compatible with the 258 and a 1982 inline 6
 
Try putting the old coil back? Spark can be too weak and I’ve gotten bad coils out of the box.
 
You can check the coil with a multi meter, FSM has pretty good diagram. Check it hot and cold, sometimes they spec out fine cold but once hot they are out of spec.
 
You can check the coil with a multi meter, FSM has pretty good diagram. Check it hot and cold, sometimes they spec out fine cold but once hot they are out of spec.
Thanks I believe I have a good reading on it.
 
Would anybody have any photos and wires coming of the coil cap on an 82 258 please?
I was about to do what BigWalton said and take the new coil off and put the old coil back on.
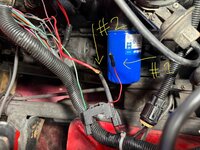
I took the cap off the coil, did some more digging and found a red wire tucked behind the wire harness - wire #2.
I have taken the coil cap of half a dozen times and it’s the first time I’ve noticed it.
There is another red wire - wire #1 that I always see with a black cap/fitting on the end of it. I’m wondering if wire #2 is supposed to connect to wire number #1 ?.
I’m not familiar with that fitting on #1.
I’ve looked down inside and it looks like it’s capped off inside? - so I’m not really sure if it’s supposed to connect to anything?
( I actually thought that it may be a ground wire and would go over the long screw on the coil bracket that holds the actual coil tight and in place?
I’m not the sharpest tool in the shed when it comes to electrical stuff, as always any help would be greatly appreciated so I can get this Jeep running.
 

Attachments

  • IMG_3795.jpeg
    IMG_3795.jpeg
    853.5 KB · Views: 4
Would anybody have any photos and wires coming of the coil cap on an 82 258 please?
I was about to do what BigWalton said and take the new coil off and put the old coil back on.
I took the cap off the coil, did some more digging and found a red wire tucked behind the wire harness - wire #2.
I have taken the coil cap of half a dozen times and it’s the first time I’ve noticed it.
There is another red wire - wire #1 that I always see with a black cap/fitting on the end of it. I’m wondering if wire #2 is supposed to connect to wire number #1 ?.
I’m not familiar with that fitting on #1.
I’ve looked down inside and it looks like it’s capped off inside? - so I’m not really sure if it’s supposed to connect to anything?
( I actually thought that it may be a ground wire and would go over the long screw on the coil bracket that holds the actual coil tight and in place?
I’m not the sharpest tool in the shed when it comes to electrical stuff, as always any help would be greatly appreciated so I can get this Jeep running.
Okay this may explain a lot of the no-start issue...

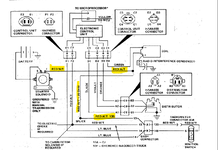
So two red wires should connect to the positive terminal on the coil, one goes to the "I' terminal on the starter solenoid to supply full battery voltage to the coil to aid a hot spark for starting. Once the starter is disengaged the full battery voltage drops out and the coil is now fed from the ignition switch passing through a resistance wire to provide a reduced voltage for the coil while running.

Coil.png


I'll get a picture of mine shortly, I'm not sure if anything was changed as I converted the ignition to a larger cap and coil.
 
Thank you very much, I’ll print this and take it out to the garage this evening.
After I sent that last post and after I cleaned the ends of the red wire (#2) and keyed up the ignition, I checked voltage and saw 12 V and change. I also checked the end of #1 that has the black cap on it and there was no voltage

Would you think that wire #2 is a ground?
I wondering that when I unbolted the coil bracket that is mounted to the block it was grounded one of those bolts?

I cannot see or find anywhere else that it would have been attached to - within the length of the the end of the wire!
 
Okay this may explain a lot of the no-start issue...

So two red wires should connect to the positive terminal on the coil, one goes to the "I' terminal on the starter solenoid to supply full battery voltage to the coil to aid a hot spark for starting. Once the starter is disengaged the full battery voltage drops out and the coil is now fed from the ignition switch passing through a resistance wire to provide a reduced voltage for the coil while running.

View attachment 123184


I'll get a picture of mine shortly, I'm not sure if anything was changed as I converted the ignition to a larger cap and coil.
Thanks again:
I was eyeballing that diagram and followed that red wire (#2 ) and it might got to the coil and maybe came of when I removed the coil cap?
I need to take more of the harness apart and see if it goes to the solenoid starter?
 
Thanks again:
I was eyeballing that diagram and followed that red wire (#2 ) and it might got to the coil and maybe came of when I removed the coil cap?
I need to take more of the harness apart and see if it goes to the solenoid starter?
So I'll have to look to see what the wire with the connector goes to in the wiring diagram.
As I said, I had updated my ignition system years ago so the coil is different as well as the connector to it, however the wire with the connector is not connected to anything and mine worked better than ever.

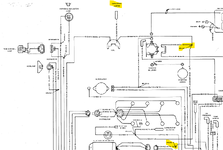
I wasn't able to upload my pic but it doesn't really matter, here's the wiring diagram.
Apparently the connector is for a capacitor to help control static on the radio, I don't beleive mine ever had a radio from the factory as the antenna was an aftermarket.

You should be able to check the voltage at the wire connecting to the "+" terminal at the coil and get 12v when the key is turned to start (I would recommend disconnecting the lead from the solenoid to the starter so the engine doesn't try to turn over, and then check voltage with the key in the "Run" position, it should be less than battery voltage.
Also confirm that the "-" lead to the coil is actually seeing ground. I would confirm the positive leads to the battery or engine ground first and then check them again to the "-" lead to the coil as a simple confirmation test.


coil wiring.png
 
Back
Top