• Notice for iPhone users: DO NOT use the image size reduction option when uploading photos to the forum. This causes portrait images to post as landscape. We have added a warning to the image insert pop-up as well.

FINALLY!!! A Build Thread of My '82 Scrambler!

The brake fluid usually takes a couple of days to work. Your liner sounds like Herculiner, with the uneven texture/grit. I know brake fluid will soften Herculiner. You might have to soak a towel, spread it out, and then but a trash bag over it to keep it from drying too quickly.

I'll bet the TalStrip or any aircraft paint remover will work too...just be careful of the fumes.
 
I had luck with xlyene, but it was for undercoating, not bedliner.. made it come off in a snap tho'.... worth a couple bucks shot....
 
Sorry for not updating this lately. Lots of stuff going on! The project is still making slow headway. I tried the coarse wire cup in the drill on the bedliner and it works but is slow. I'm still experimenting with other options for getting it all out. I also welded up the hole where the old antenna was in the cowl and located and drilled the holes for the stock antenna. I also pulled the Laredo dash out of the Scrambler carcass I picked up and I'm planning on using it so I can have the tach in the dash rather than adding one on the column. Speaking of columns, I did finally get the steering column fixed. If you recall I had a broken part in my column called a "rack" that connects the key cylinder to the actuating rod that allows the key to start the engine. I had to completely tear the column down to get that part out. This is the write-up I used to figure out how to tear the column down: http://www.bc4x4.com/tech/2009/jeep-steering/. I couldn't have done it with out the help of that write-up so thank you to BC4x4.com and whoever wrote it! I sourced an original "rack" from the column out of the '84 Waggy I parted out. How someone ever breaks that part is beyond me!

On another note, my soon-to-be father-in-law's health has been going downhill. He has recently been diagnosed with Chronic Obstructive Pulmonary Disease (COPD). He was a 30+ year smoker on top of breathing all the stuff from doing body work for many years. Just last week he started having a lot of difficulty breathing which got worse and worse until he finally went to the hospital where he was admitted with pneumonia on Thursday night. He is doing better now and should be getting out tomorrow but it looks like he will have to be on Oxygen most of the time now. He just turned 60 this month. All this on top of wedding planning and switching internet providers at my house (which has been a nightmare of it's own) has kept me offline for a while now. I will be headed back up to the shop on Tuesday to try to get a bit more work done and hopefully I can get some pics!
 
Last edited:
I am glad you are taking pictures of your work. You are getting close to where I am at with mine and it helps for reference. Great job so far.
 
Well, another delay. The air tank for the shop compressor is dead. It was an old tank and it finally developed a hole in the bottom of it. It is an 80gal tank that was manufactured in 1977. I was able to find a brand new 250gal tank still on the pallet on craigslist about 3 hours from me. The guy was asking $500 OBO. I offered him $350 cash and he jumped on it (I should have offered lower!). I went and picked it up today. I will be headed back up to the shop on Saturday so I can get the compressor back up and running. Hopefully at some point I will actually get some work done on the Jeep!
 
Sorry to hear about your future father-in-law's health. If only we knew when we were young what damage we were doing...

Good to hear your rebuild is progressing!
 
Also sorry to hear about your father-in-laws health. Sounds like you have a great relationship and hopefully you get to spend many years working on cool projects together. Your initial pics and enthusiasm inspired me to go a bit deeper into my resto project. Keep up the great work and, of course, the PICS:popcorn:
 
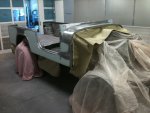
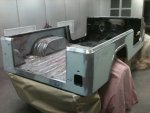
So with everything going on (father-in-laws health issues, fixing the shop compressor, a wedding coming very soon, and planning a honeymoon), the Jeep has taken a back seat and will probably stay there until I get back from the honeymoon. That being said, there is still progress being made. The body work on the tub has been completed and it is now in the paint booth awaiting the first coat of primer! I'm still working on getting all the bed liner out of the cab area of the tub but I needed to go ahead and get the body in primer so it dosen't get covered in surface rust while I'm gone. Some other items such as the windshield frame and dash panel have already been primed but I didn't get any pics of them. The plastic body filler you see is just a skim coat to make the body nice and smooth. I debated letting the weld spots show but since this is not a true "restoration" it didn't really matter plus, I don't think my father-in-law would let it roll out of his shop without it at least looking smooth if not show ready!
5-23-12 Body Ready for Primer (2) small.jpg
5-23-12 Body Ready for Primer (3) small.jpg
 
Last edited:
I love the pix and updates Polar!! That slate top looks soooooooo familiar!!!!!! That was the first of 5 1/2 tops I had. I had Slate (yours), White (Joe West has it now) Black, Nutmeg, Levis Denim blue.
 
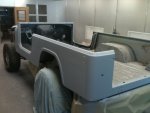
So, obviously there has been a delay with this project, however, there is some slight progress. My father-in-law was able to spray the first coat of primer on the tub a few days before the wedding. I still need to sand it but before I do that we are going to take it off the frame and sandblast the underside of the tub. I am going up this week and should get that accomplished. While the tub is off I am going to throughly inspect the frame and all other components and replace anything that may need it as well as paint the frame with some epoxy paint. I will also be stripping the engine down and replacing the old headers with new ones and getting new plugs, wires, valve covers, air cleaner and other parts. I hope to get this project moving forward with weekly updates again!

6-7-2012 First Coat of Primer (1) small.jpg
 
I wish. It has just been too hot in the shop to get much accomplished. I have also had to do some work on the J10. I had to replace the power steering hoses and I need to replace the entire exhaust form the manifolds back in order for it to pass State safety inspection. I've been busy ordering new Magnaflow muffler and cat and will be ordering a new y-pipe tomorrow. Then I have to get in to the exhaust shop to get it welded up. It is currently my only vehicle so it is the top priority. I have also found a '91 Grand Wagoneer that was in a wreck that I might be able to pick up real cheap. According to the owner the engine and tranny are both still good and other then the passenger side front being bashed in and the frame bent (also accoring to the owner) it dosn't look too bad. Stay tuned, just because I haven't done any physical work on the Scrambler lately doesn't mean I haven't been doing a lot of planning/building in my head!
 
PF: hot tip on your header replacement:

Get rid of them!

Headers are a pain in the butt, they leak, they crack, they transmit a horendous amount of heat to everything in the engine compartment and they just don't do that much for your power.

Get a set of stock Chevy exhaust manifolds and be done with it.

I have been down this road to headers many times and it always ends up in disappointment.

They just can't take the beating a Jeep dishes out.

My .02

Randy

PS that was a pretty nice looking Scrambler before you took it apart. Are you painting it the same color?
 
Last edited:
Thanks for the tip! I already have the new headers so I'm not looking back now, plus they will bolt right up with the existing dual exhaust that is already on the Jeep so I don't have to spend more on that. If I have to replace them down the road I will probably go with stock manifolds but in the interest of keeping the build at a resonable cost I will go with what I have at the moment.

And, yes, it was pretty decent before I started. It had been redone once before by the previous owner. I was lucky that is was a southern Arkansas Jeep and had near zero rust on it as well. It looked good in pictures and from about 10 feet but the paint job was pretty poor with drips and runs and fish eye spots and the doors were a slightly different shade of red. Also, the wiring was a complete mess! Tons of extra usless wire under the dash and 3 different switches to flip just to start the thing and no working switch in the column! The new color with be the original Silver Mist Metallic with the correct '82 blue stripes and Slate Blue interior and OEM 1/2 soft top.
 
Last edited:
Sounds good to me. I assume that your F in L is a body man? This would come in handy. Good luck on your project, it looks like you are doing everything right which is the biggest challenge we all face when doing this type of project.

Randy
 
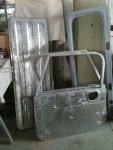
So I finally got back to doing some ernest work on the Scrambler. Today I went to the shop and spent most of the day sandblasting a lot of the small parts and edges of the doors and bulkhead. I still have to get the firewall and edges of the hood and tailgate but I ran out of sand. I also labeled and removed the engine wiring harness so I can start cleaning it up and prep for the new headers, valve covers and air cleaner. The body is ready to come off but I'm waiting on the dolly that is currently being used by my father-in-laws project. I will be going back to the shop again early next week and trying to get moving on this again. I have set a new goal of having it done by Christmas so I have to keep up a pretty good pace!

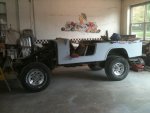
Awaiting body removal:
9-28-12 Primer (2) small.jpg

Sandblasted parts:
9-28-12 Sandblasting small.jpg
 
Done by Christmas...what year? :evil::thumbsup: Just kidding, I made and missed so many deadlines on mine that I have to give you a hard time...

That will be a great Christmas present to yourself!
 
Back
Top