

You are using an out of date browser. It may not display this or other websites correctly.
You should upgrade or use an alternative browser.
You should upgrade or use an alternative browser.
my new scrambler..and first one for me
- Thread starter jeepinjosh
- Start date


- City
- Biloxi
- State
- MS
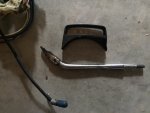
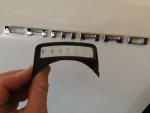
Would any of these bits from my '81 factory auto non-tilt column help ya?
View attachment 50572
View attachment 50573
Maybe so

I think Josh got his parts back, so I will let you know


- City
- Biloxi
- State
- MS
Took all day Saturday to fix the TJ Rubicon rear axle, football Sunday, not too much accomplished this past weekend But, finally finished cleaning all the steering column components, hope to get it put back together by the end of this weekend

The past two weeks have been spent cleaning out the steering column, and installing the roll bar. Two weeks spent correcting the body shop's screw ups
Quick Summary:
Tuesday, September 15 (1hour) - JB welded roll bar nuts/gathered up steering column parts/oiled forward underbody roll bar bracket nuts
Thursday, September 17 (2.5 hours) - paint underbody at roll bar mounting points/install fuel and vent hoses/start installing roll bar
Friday, September 18 (3 hours) - finished remaining gas tank hook ups/removed and straightened front roll bar supports
Saturday, September 19 (7 hours) - roll bar support bracket, straighten/weld/prime/paint
Tuesday, September 22 (1.5 hours) - clean/disassemble steering column parts
Wednesday, September 23 (1.5 hours) - clean/disassemble steering column parts
Thursday, September 24 (1.5 hours) - clean/disassemble steering column parts
Sunday, September 27 (1 hour) - roll bar installation
Monday, September 28 (1 hour) - roll bar installation
Tuesday, September 29 (2 hour) - roll bar installation
I plan on reassembling the steering column next, then I am going to pull the dash to check all of that wiring.
That's it for now
But, finally finished cleaning all the steering column components, hope to get it put back together by the end of this weekend The past two weeks have been spent cleaning out the steering column, and installing the roll bar. Two weeks spent correcting the body shop's screw ups
Quick Summary:
Tuesday, September 15 (1hour) - JB welded roll bar nuts/gathered up steering column parts/oiled forward underbody roll bar bracket nuts
Thursday, September 17 (2.5 hours) - paint underbody at roll bar mounting points/install fuel and vent hoses/start installing roll bar
Friday, September 18 (3 hours) - finished remaining gas tank hook ups/removed and straightened front roll bar supports
Saturday, September 19 (7 hours) - roll bar support bracket, straighten/weld/prime/paint
Tuesday, September 22 (1.5 hours) - clean/disassemble steering column parts
Wednesday, September 23 (1.5 hours) - clean/disassemble steering column parts
Thursday, September 24 (1.5 hours) - clean/disassemble steering column parts
Sunday, September 27 (1 hour) - roll bar installation
Monday, September 28 (1 hour) - roll bar installation
Tuesday, September 29 (2 hour) - roll bar installation
I plan on reassembling the steering column next, then I am going to pull the dash to check all of that wiring.
That's it for now

- City
- Biloxi
- State
- MS
I don't know there's no photo proof of this stuff.. 😂
Sent from my SM-N910P
Just for you
The passenger side bracket had less "body shop damage", it bolted up pretty easy.
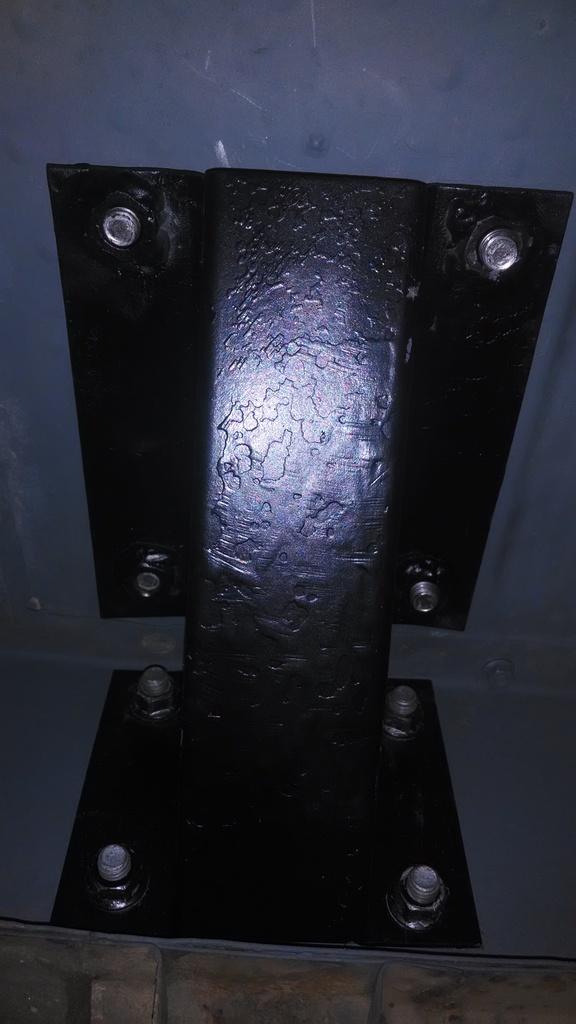
The driver side bracket was pretty mangled. Even after straightening it, to the best of my ability, and welding one new nut on it, I couldn't get everything to line up perfectly. I ended up drilling out the bracket holes that slide over the floor riser studs one size larger. I also had to use the Dremel to slightly enlarge the corner of one of the round holes in the floor. After this, the bracket slid on and all four roll bar bolts threaded in. Since I slightly enlarged the holes in the bracket, I added washers behind the mounting nuts. Probably not necessary, but............
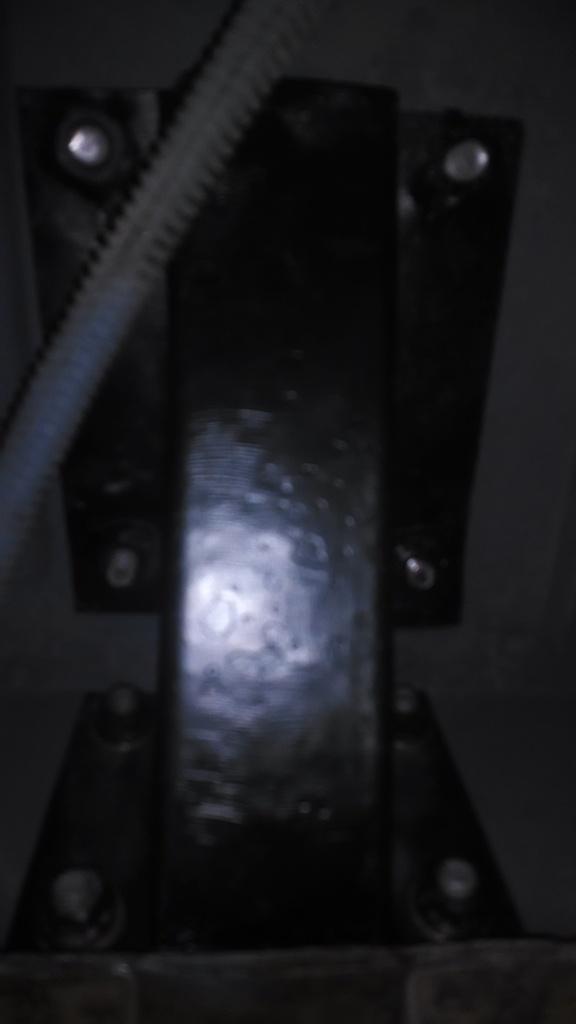
And, all of the freshly cleaned steering column parts. Don't mind the flower pot dirt that got added to the clean parts in one of the oil drain pans

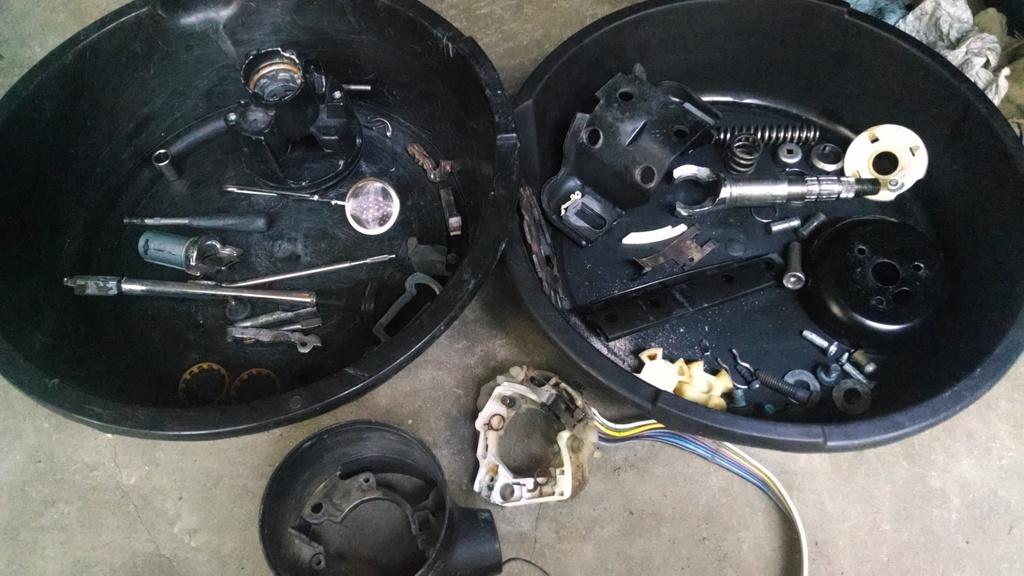
That's it for now

- City
- Biloxi
- State
- MS
I was able to get the steering column reassembled this weekend, about 90% happy with it.
I took a few pictures and will describe some of the work, but this wont be a step by step guide. The steering column is not terribly tricky, and I only used one special tool (lock spring compressor) to do all this work, but I highly suggest you have a FSM in front of you, and patience. In regards to the FSM, I am using a 1982 (with 83 supplement) as reference. Only one minor difference I found with regards to the '81 steering column I am working on: the '81 sector shaft does not use a retaining clip, it is just a press fit. Even with the FSM, I had to look at some of the instructions for FS Jeeps to get all the relevant information. The FSM CJ section does not have too much info with regards to the column shift. Not the end of the world, is what it is.
Don't let this scare you, steering column work isn't too difficult, actually kind of fun, in a weird puzzle kind of way. IMO, the worst part was disassembling/reassembling the tilt lock prawl thingy's, not technically hard, just a PIA. Anyway, here we go:
This is as far as I tore the column down. I cleaned this part of the column with it in place. I had no need or desire to go deeper then this. If I would have removed the under hood steering shaft/shift linkage, I could have pulled this part out, but I had no reason to. This is the actual "joint" that allows for the tilt function. You will also see four screws. These are notorious for loosening,and these four didn't disappoint:
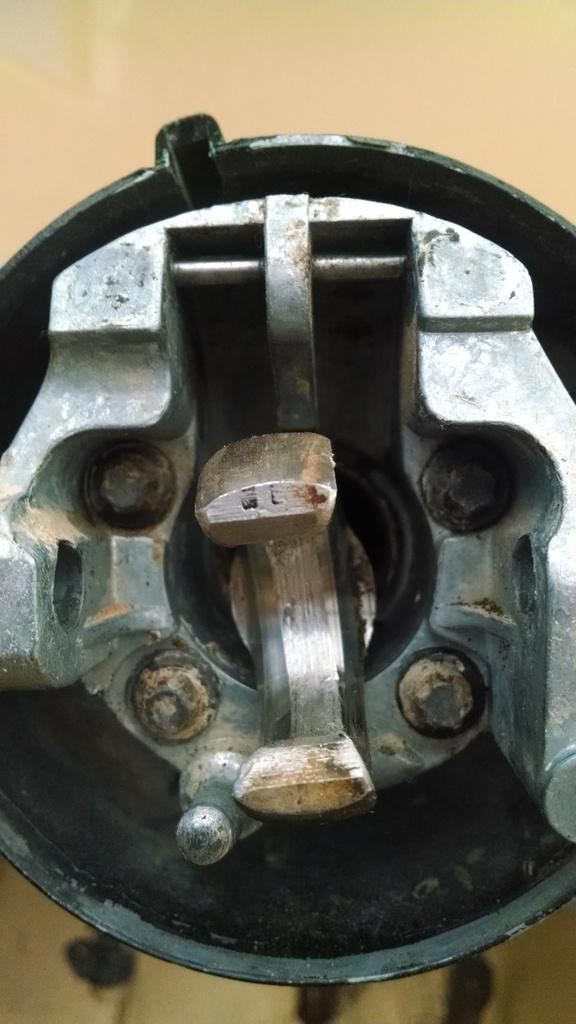
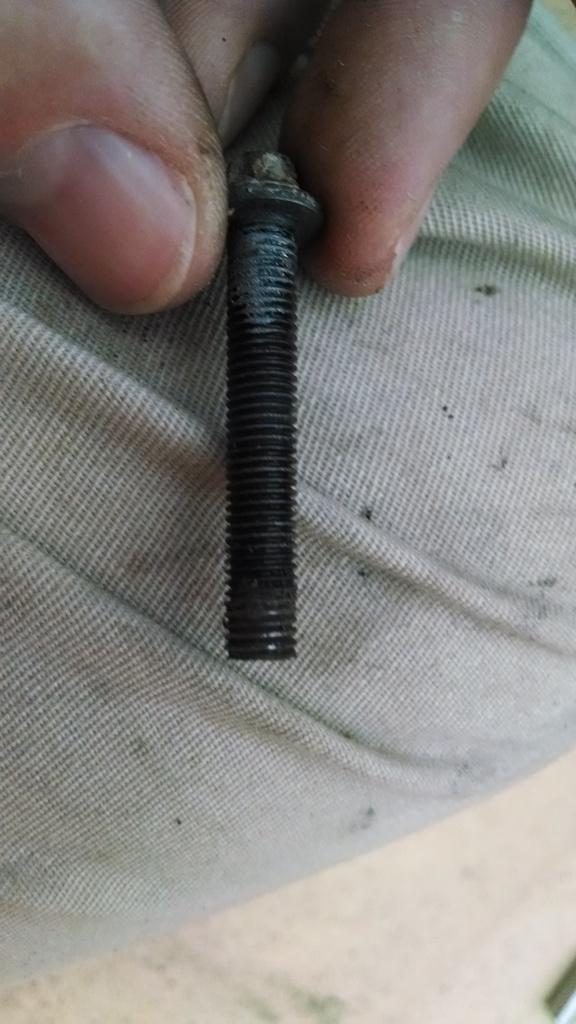
I used a 1/4" 12 point socket to remove these screws, what the FSM recommends, worked perfect. The internet/other sources say to use a 6mm socket, that would not work on these. Anyway, all four were loose. I pulled them out one at a time, cleaned them, applied red lock-tite, then reinstalled them. Quick picture, no thread lock from the factory:
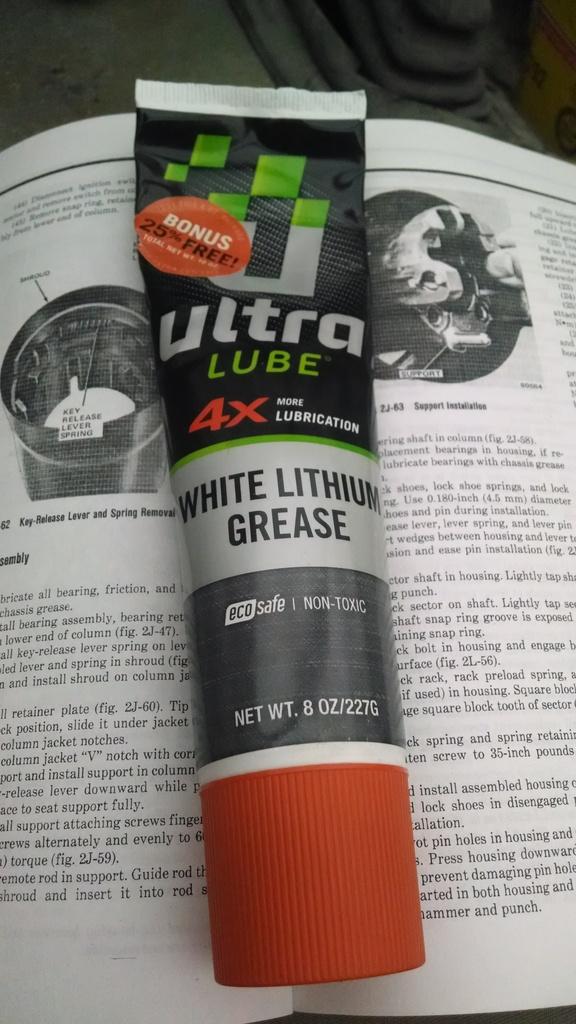
Quick picture showing the FSM/grease I used. The FSM mentions using chassis grease, that will work, but I imagine the column would be stinking like wheel bearings. So, I used this stuff. Another benefit, it is plastic compatible. Some chassis grease will attack plastic, so be careful choosing a lubricant, as the column contains lots of plastic parts.
Part one of the "worst part". The two pictured "prongs" have stiff springs beneath them. So, you have to push them inward while simultaneously driving a cross pin through at a different direction. I worked one prong at a time, still a PIA.
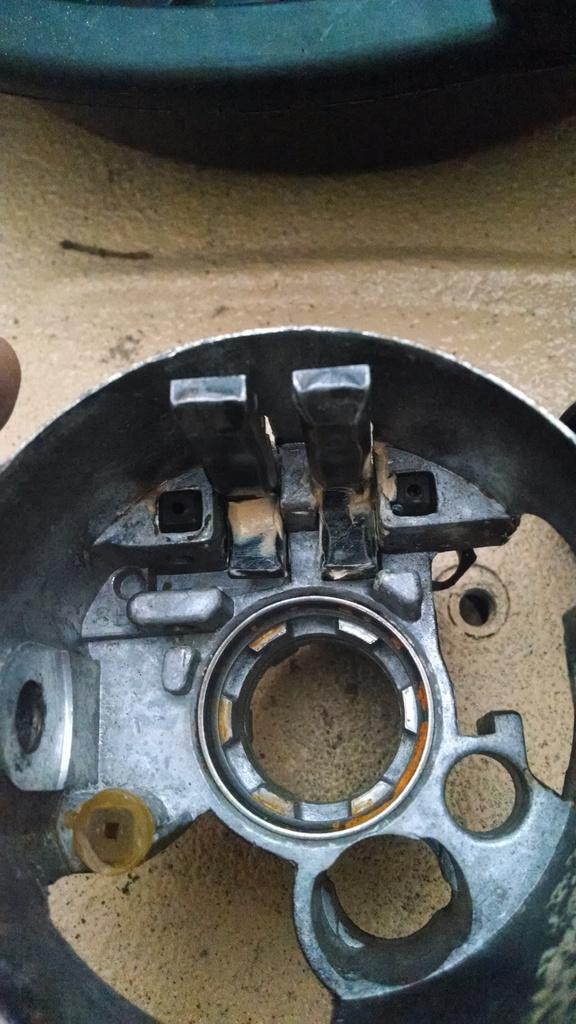
Part two of the "worst part", installing the release arm. This arm is spring loaded with a small spring, which is easy to lose. Also, the previously installed prongs must be wedged open so that you can place the arm/small spring in place, hold it in position while you drive another cross pin in, all the while the spring loaded prongs want to snap back. Fun!!!!!!!!!
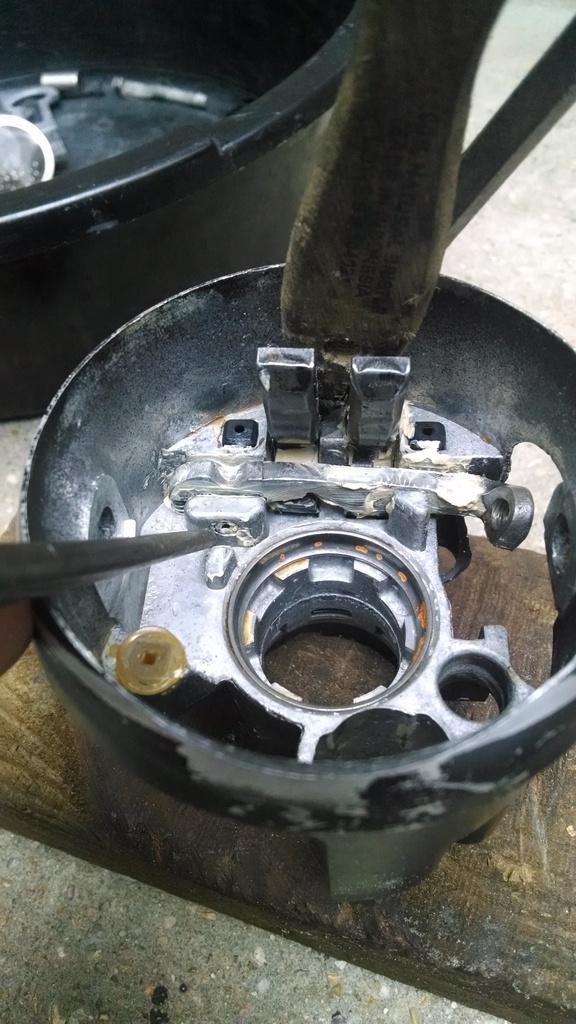
Next picture shows the sector shaft/gear/rack installed. These are the parts that move when you turn the key, which slides the remote rod for the ignition switch, and locks the steering wheel in place with the key removed. Not too tough, the stuff will really only go together one way.
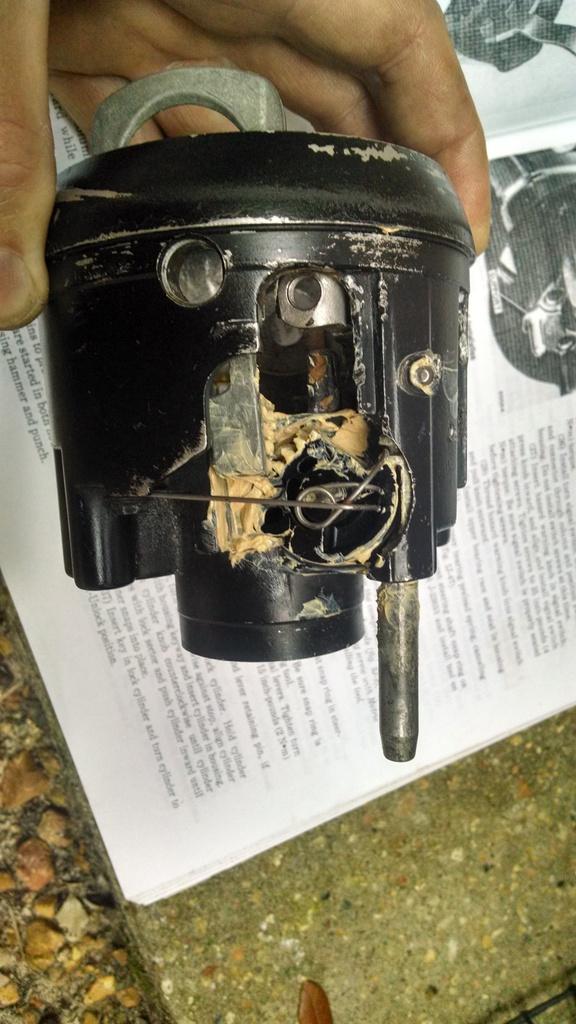
Now, the FSM mentions installing the two sets of bearings in the above mentioned part before doing all the other work. I would not do this!!!! You have to press and pry and tap on the above column piece to get all the doo-dads in. With the bearings installed, the little balls could easily fall out. There are two bearings in the above component that support the upper steering shaft. I re-used the original bearings, they were fine. When I say bearing, I mean a plastic cage with 14 loose metal balls. Two of those. The balls are like BB's. They will fall out every chance they get if you are not careful!!!!!!!
I installed the inner bearing ONLY at this time, then installed the above column component. I used the tilt lever to make it easier slide this part on. Before this part goes on, the outer steering shaft has to be installed onto the inner steering shaft. I did not take a picture of this. There is a plastic block that connects the two shafts together and allows for the tilt function. I took this plastic piece out and reinstalled it. At first, I couldn't figure out how to get the plastic part out. Don't pry on it. After playing with it for a bit, you will figure it out. Wish I could be more helpful, but once you do it, you will see why its hard to explain how to do it. When you slide this component on to the shaft/column, be mindful of the bearing, easy to knock the little balls out, and be gentle when you slide the rack on to the remote rod. Took me three tries to get this together without some ball bearing falling out. I "think" replacement bearings are one piece deals, might be a worthwhile expenditure to preserve your sanity!!!!!
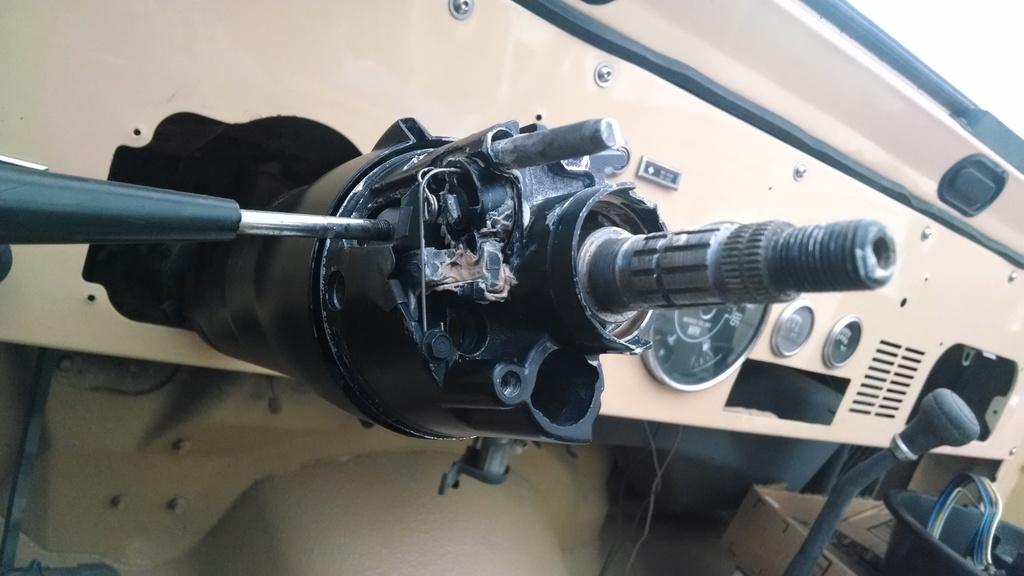
Once the above piece is slid on, get the two set of holes on each slide lined up and reinstall the pivot pins. You just tap them in with a hammer and punch. When the holes are lined up, the pins will drive in very easy. If you have to beat on them, you have a problem.
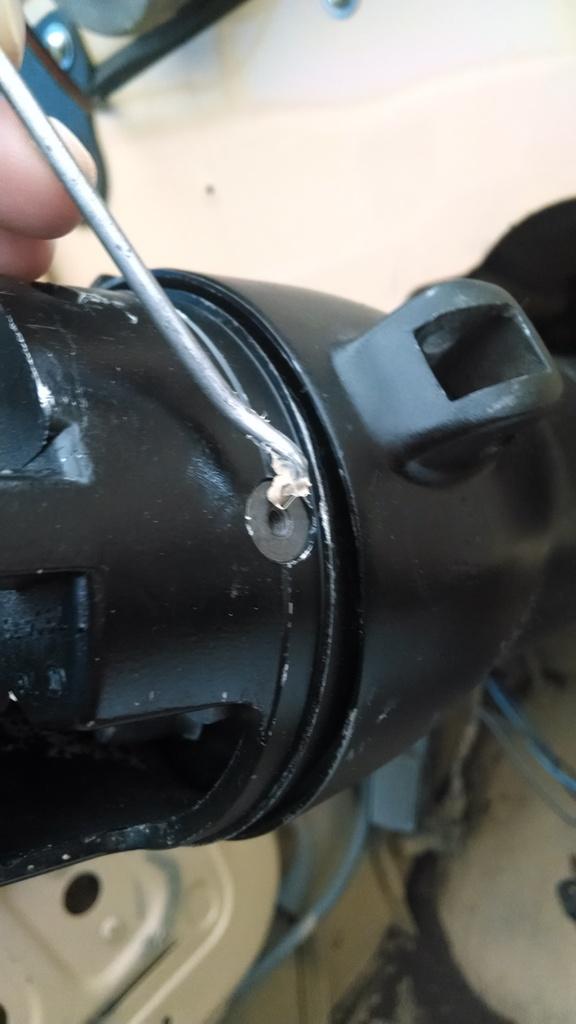
Next, I installed this lower spring/guide/retainer. Pretty easy. Not sure why you have to grease this part, but that's how they are/FSM says to do.
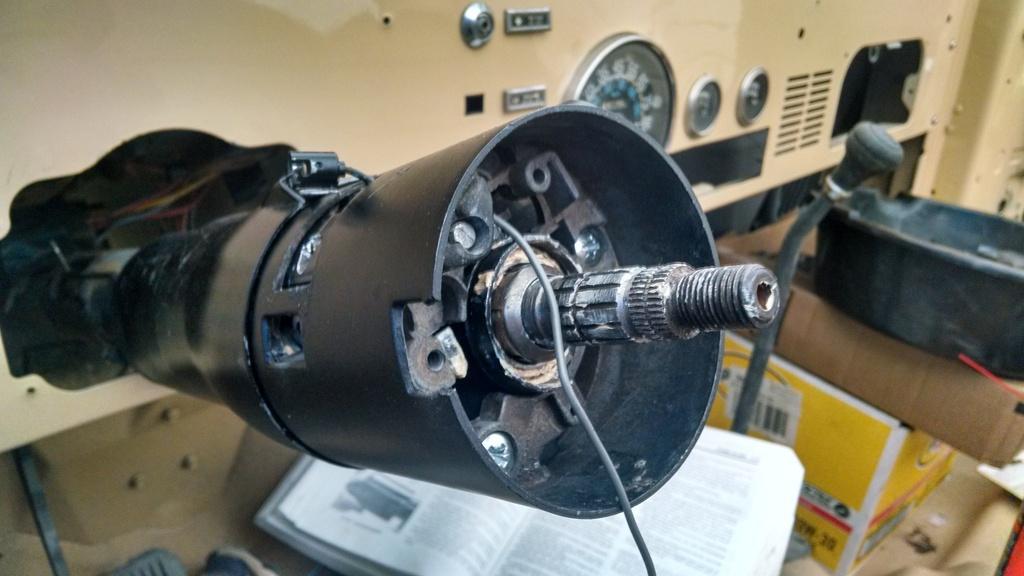
Next, I installed the column jacket. It slides right on, three screws hold it on. Since this is a factory column shift column, there is light bulb/grey wire that needs to be routed. The light is for the column mounted gear indicator.
I took a few pictures and will describe some of the work, but this wont be a step by step guide. The steering column is not terribly tricky, and I only used one special tool (lock spring compressor) to do all this work, but I highly suggest you have a FSM in front of you, and patience. In regards to the FSM, I am using a 1982 (with 83 supplement) as reference. Only one minor difference I found with regards to the '81 steering column I am working on: the '81 sector shaft does not use a retaining clip, it is just a press fit. Even with the FSM, I had to look at some of the instructions for FS Jeeps to get all the relevant information. The FSM CJ section does not have too much info with regards to the column shift. Not the end of the world, is what it is.
Don't let this scare you, steering column work isn't too difficult, actually kind of fun, in a weird puzzle kind of way. IMO, the worst part was disassembling/reassembling the tilt lock prawl thingy's, not technically hard, just a PIA. Anyway, here we go:
This is as far as I tore the column down. I cleaned this part of the column with it in place. I had no need or desire to go deeper then this. If I would have removed the under hood steering shaft/shift linkage, I could have pulled this part out, but I had no reason to. This is the actual "joint" that allows for the tilt function. You will also see four screws. These are notorious for loosening,and these four didn't disappoint:
I used a 1/4" 12 point socket to remove these screws, what the FSM recommends, worked perfect. The internet/other sources say to use a 6mm socket, that would not work on these. Anyway, all four were loose. I pulled them out one at a time, cleaned them, applied red lock-tite, then reinstalled them. Quick picture, no thread lock from the factory:
Quick picture showing the FSM/grease I used. The FSM mentions using chassis grease, that will work, but I imagine the column would be stinking like wheel bearings. So, I used this stuff. Another benefit, it is plastic compatible. Some chassis grease will attack plastic, so be careful choosing a lubricant, as the column contains lots of plastic parts.
Part one of the "worst part". The two pictured "prongs" have stiff springs beneath them. So, you have to push them inward while simultaneously driving a cross pin through at a different direction. I worked one prong at a time, still a PIA.
Part two of the "worst part", installing the release arm. This arm is spring loaded with a small spring, which is easy to lose. Also, the previously installed prongs must be wedged open so that you can place the arm/small spring in place, hold it in position while you drive another cross pin in, all the while the spring loaded prongs want to snap back. Fun!!!!!!!!!
Next picture shows the sector shaft/gear/rack installed. These are the parts that move when you turn the key, which slides the remote rod for the ignition switch, and locks the steering wheel in place with the key removed. Not too tough, the stuff will really only go together one way.
Now, the FSM mentions installing the two sets of bearings in the above mentioned part before doing all the other work. I would not do this!!!! You have to press and pry and tap on the above column piece to get all the doo-dads in. With the bearings installed, the little balls could easily fall out. There are two bearings in the above component that support the upper steering shaft. I re-used the original bearings, they were fine. When I say bearing, I mean a plastic cage with 14 loose metal balls. Two of those. The balls are like BB's. They will fall out every chance they get if you are not careful!!!!!!!
I installed the inner bearing ONLY at this time, then installed the above column component. I used the tilt lever to make it easier slide this part on. Before this part goes on, the outer steering shaft has to be installed onto the inner steering shaft. I did not take a picture of this. There is a plastic block that connects the two shafts together and allows for the tilt function. I took this plastic piece out and reinstalled it. At first, I couldn't figure out how to get the plastic part out. Don't pry on it. After playing with it for a bit, you will figure it out. Wish I could be more helpful, but once you do it, you will see why its hard to explain how to do it. When you slide this component on to the shaft/column, be mindful of the bearing, easy to knock the little balls out, and be gentle when you slide the rack on to the remote rod. Took me three tries to get this together without some ball bearing falling out. I "think" replacement bearings are one piece deals, might be a worthwhile expenditure to preserve your sanity!!!!!
Once the above piece is slid on, get the two set of holes on each slide lined up and reinstall the pivot pins. You just tap them in with a hammer and punch. When the holes are lined up, the pins will drive in very easy. If you have to beat on them, you have a problem.
Next, I installed this lower spring/guide/retainer. Pretty easy. Not sure why you have to grease this part, but that's how they are/FSM says to do.
Next, I installed the column jacket. It slides right on, three screws hold it on. Since this is a factory column shift column, there is light bulb/grey wire that needs to be routed. The light is for the column mounted gear indicator.
- City
- Biloxi
- State
- MS
Some more column shift specific parts/assembly that are not really called out in the CJ section of the FSM. This little metal plate/bulb retainer plate screw to the column.
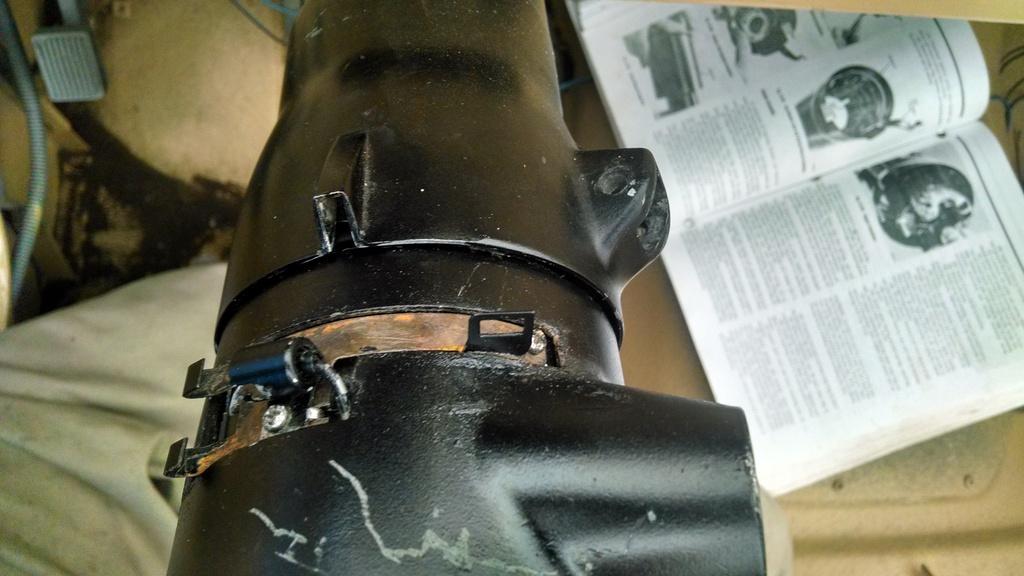
I will probably pull the metal plate off and paint it. Be careful screwing this part down, easy to pinch the wire. I am assuming the column mounted gear indicator snaps on this metal piece. Since I don't have one in my hands, I will leave it like this for now. Note the square slot/raised boss on the top of the column. I will reference it in a second.
The body shop people broke the plastic gear indicator arm on Josh's column. It is a plastic arm that slides into the above referenced column slot/boss. Inside this boss there is a thin piece of metal. When you push in the stock plastic arm, it slides above the thin piece of metal. A square notch on the plastic arm then keys into this piece of metal once the arm is pushed in the correct depth. The internet/FSJ people say the below pictured part is a replacement:
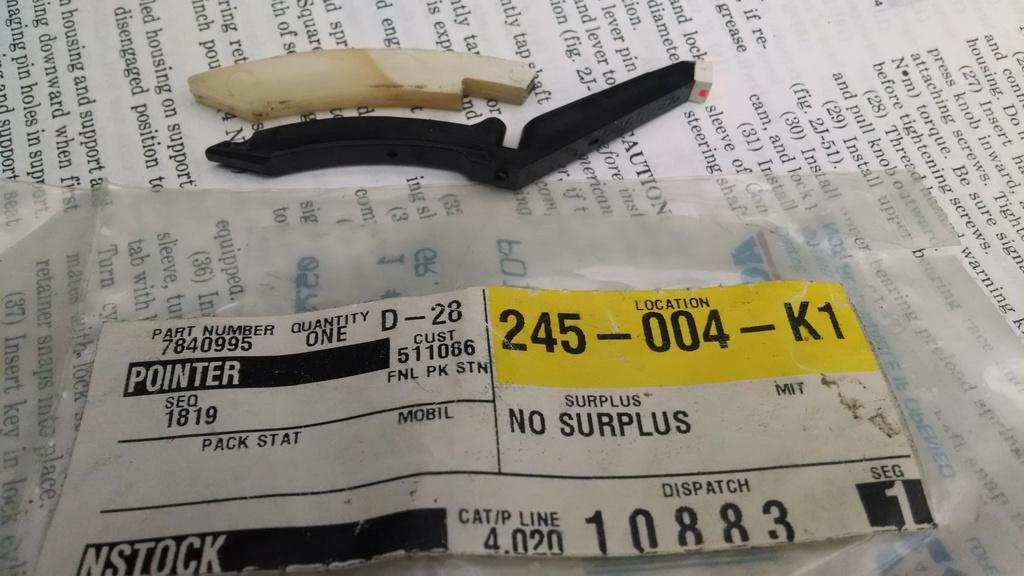
In the above picture, the black part is the replacement, the white part is the broke stock arm. You can see the rectangular notch in the white arm, at the bottom, right before the break. The replacement arm is made different at this important location. It might work, not sure yet. I need to get the gear indicator housing first, then I can see if the black arm will work. Once you slide the plastic arm in, and the notch locks on to the metal strip, you cant just pull it back out. And, to get the arm back out, you have to remove the column jacket. I went ahead and reassembled the column for now. Once I get the column mounted gear indicator, I can see if the black arm will work. If it wont, I will some how connect part of the new arm to the original white piece and get it to work. Only problem, I will probably have to pull the column back apart. Oh well......... Damn body shop people!!!!!!!!!!!!!!!!!!!!!
Moving on, up next, install the turn signal switch/wires. It slides in, three screw hold it down. And of course, this one is broke right where the turn signal stalk attaches.
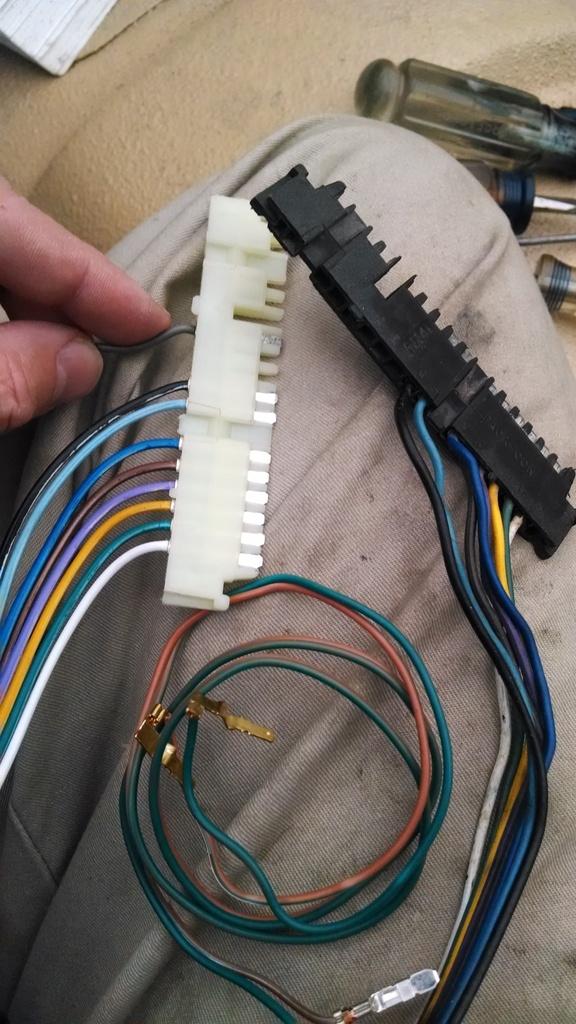
I bought a replacement from NAPA, BUT, there were some issues:
1) It came with two extra wires. These parts fit a million different cars, so not every vehicle needs all the wires, so I pulled the two unused wires/metal contactor off the turn signal switch.
2) The new switch was not wired for the gear indicator bulb. So, I removed this wire from the old harness connector and slid it into the correct slot on the new one, problem solved. In the below picture, the grey wire (with my finger on it) is the bulb wire, and it is in the correct slot on the new harness connector.
And again, be careful routing the bulb wire, it can be easy to pinch it!!!!!!!!!!!!! You can also see the cream colored grease around the steering shaft. I installed the upper bearing/associated race/retainer at this time, too.
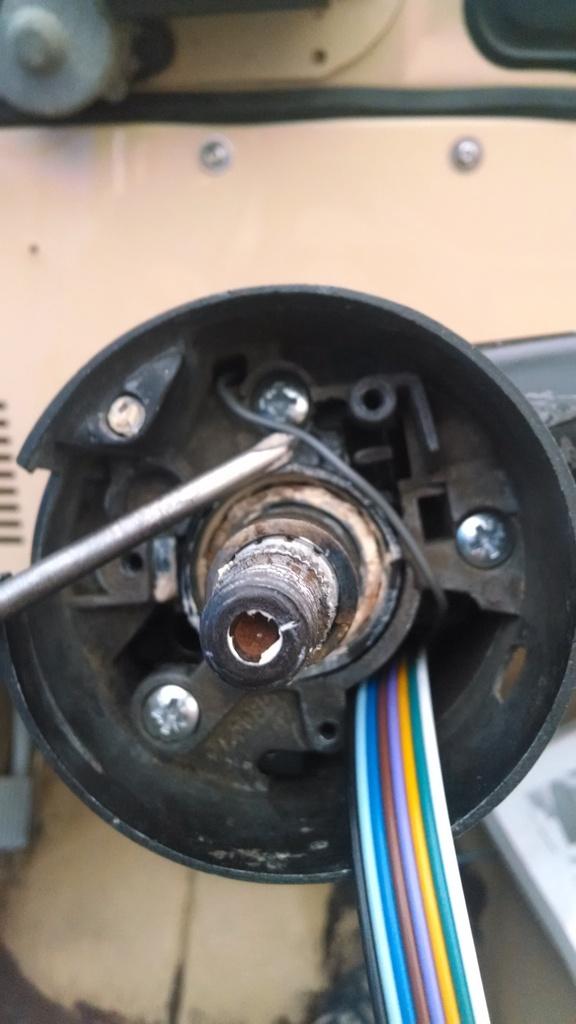
ONE IMPORTAT NOTE - The FSM tells you to put the turn signal switch, lock plate, etc. on before putting in the ignition lock cylinder. I would put the cylinder in first. Once you install all the other stuff, if you have an issue with the key cylinder and need to remove it, you have to remove all kinds of other stuff first. So, do yourself a favor, install the key lock cylinder BEFORE everything else.
Once the turn signal stuff is in, reinstall the lock plate/horn contactor.
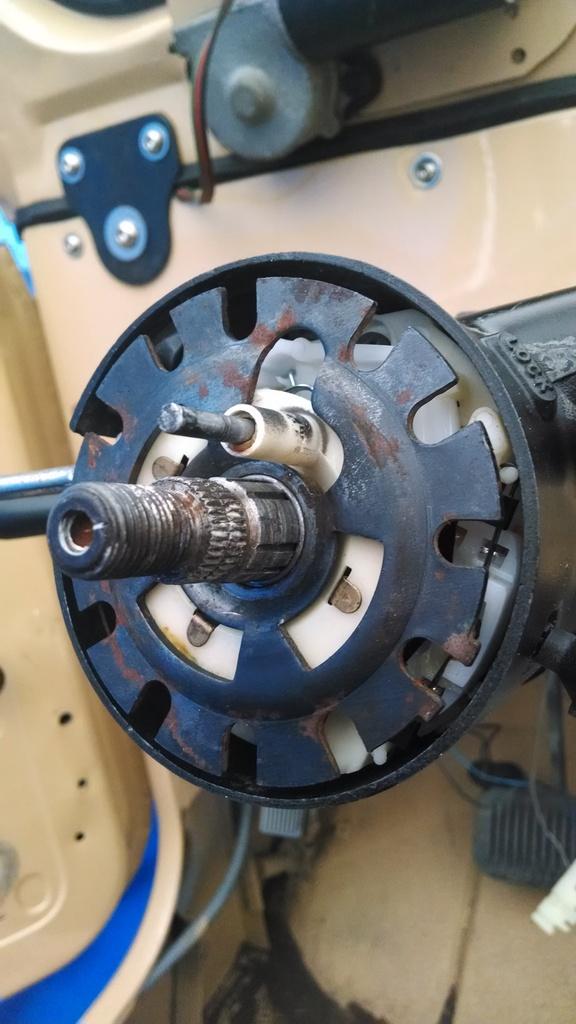
Then the cover, and the ignition lock cylinder, and you are finished!!!!!!!
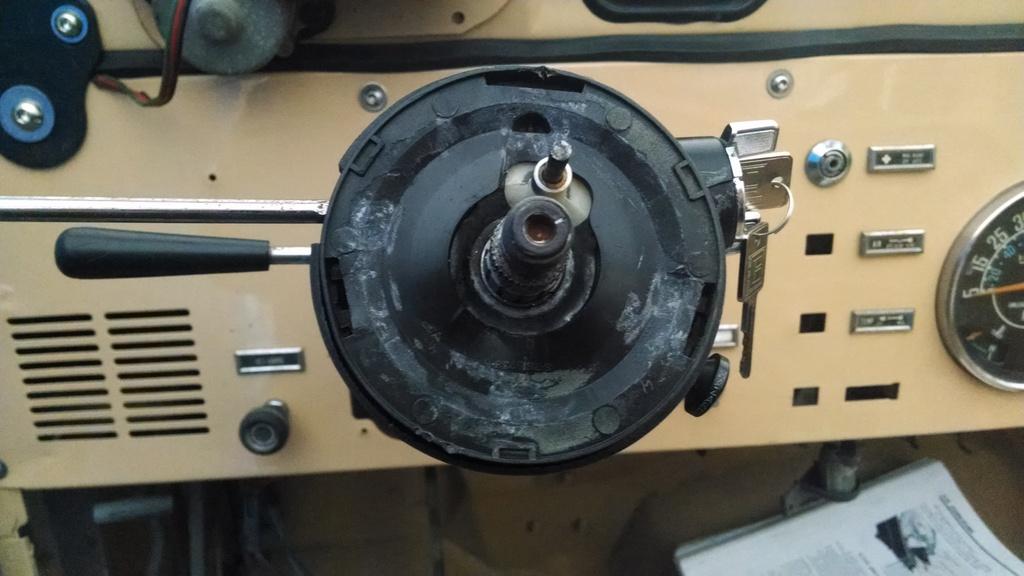
The body shop lost Josh's original Jeep lock cylinder. They installed a GM replacement, and kept a key for themselves. It did not fit right, and I don't trust them, so I installed another lock cylinder. But, this is my 10% not happy.
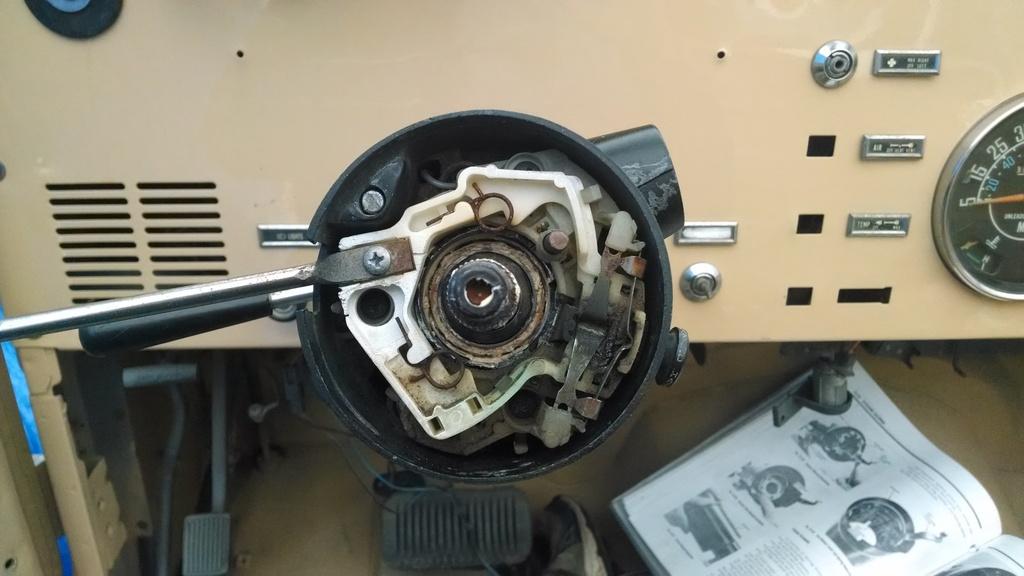
With the cylinder installed, it has a bunch of in/out play, like the cylinder body is too long. Look at the gap inside the column, between where the lock cylinder pop out retainer is/shoulder of the column:
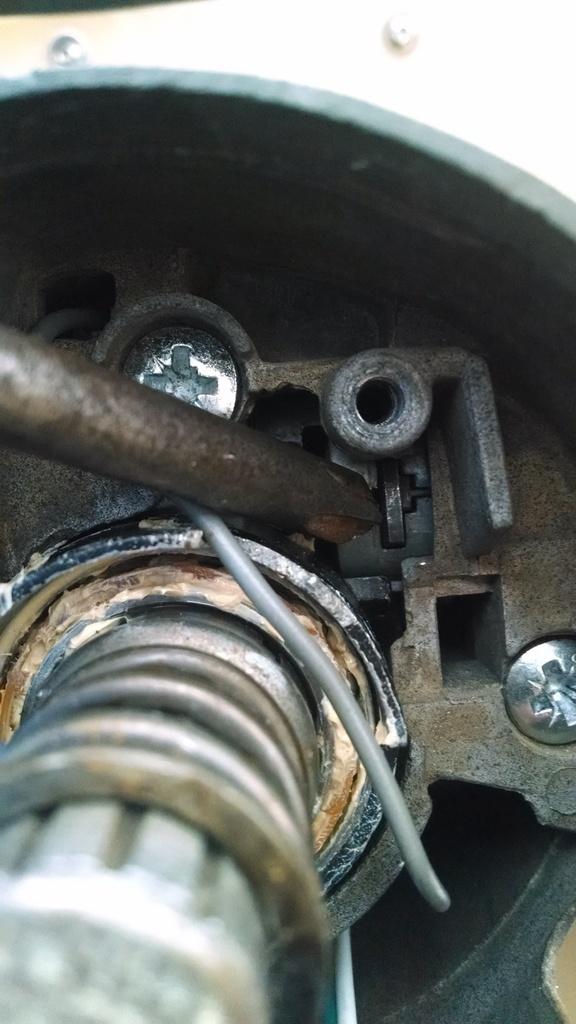
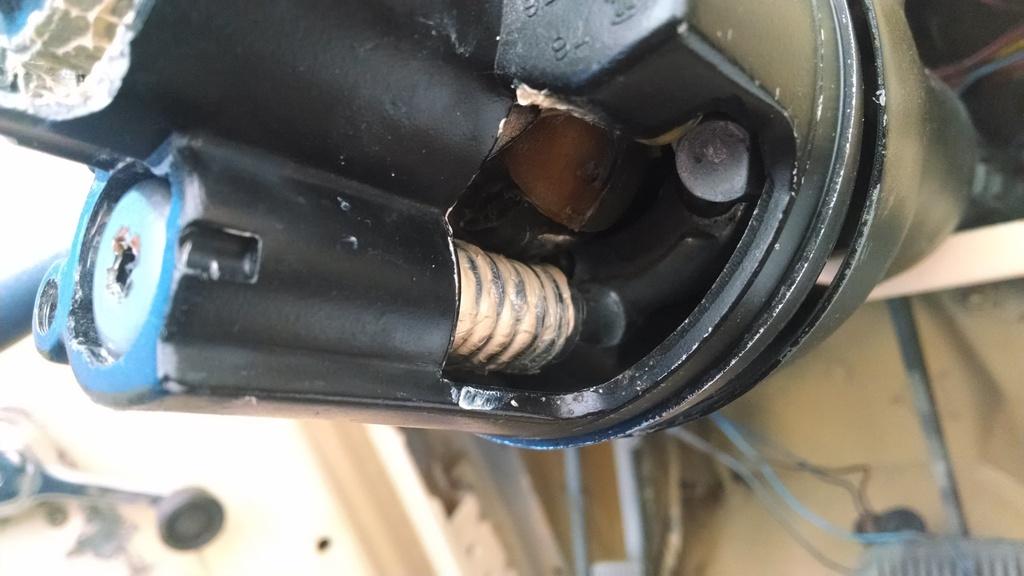
The screw driver is pointing at the "pop out retainer". There is almost a 1/4" gap between the retainer and the shoulder of the housing it should be bearing against. This gap causes this:
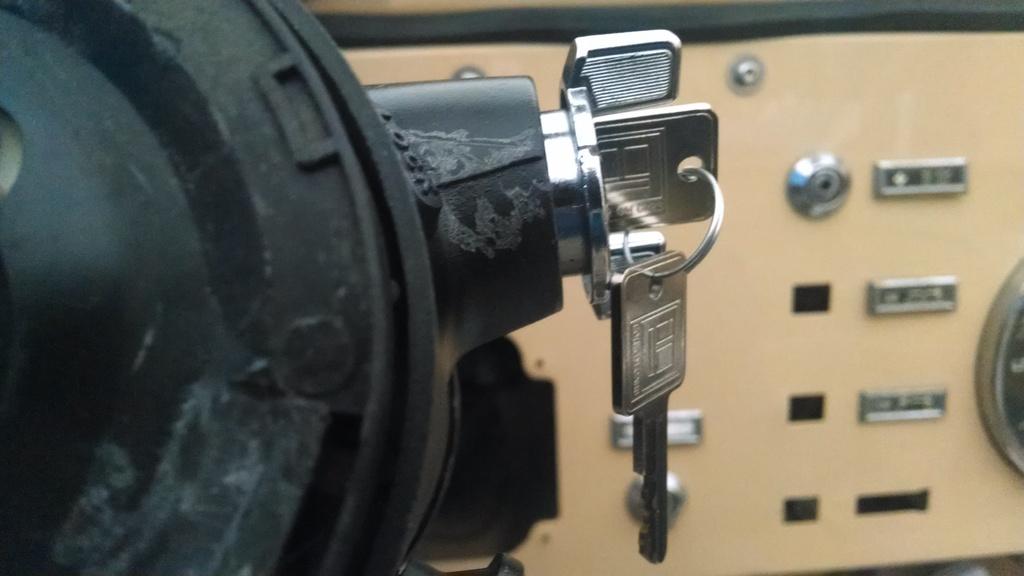
That can't be correct. The cylinder wont come out, and it functions fine, but this is crappy. I haven't lost any parts, and I have not seen any reference for a shim to go here to prevent this, so I am assuming GM/Jeep lock cylinders are different??
None of my other Jeeps have this "cylinder play/gap". So, I will pull a lock cylinder out of one of my Jeeps and compare it to the NAPA replacement.
That's it for now
I will probably pull the metal plate off and paint it. Be careful screwing this part down, easy to pinch the wire. I am assuming the column mounted gear indicator snaps on this metal piece. Since I don't have one in my hands, I will leave it like this for now. Note the square slot/raised boss on the top of the column. I will reference it in a second.
The body shop people broke the plastic gear indicator arm on Josh's column. It is a plastic arm that slides into the above referenced column slot/boss. Inside this boss there is a thin piece of metal. When you push in the stock plastic arm, it slides above the thin piece of metal. A square notch on the plastic arm then keys into this piece of metal once the arm is pushed in the correct depth. The internet/FSJ people say the below pictured part is a replacement:
In the above picture, the black part is the replacement, the white part is the broke stock arm. You can see the rectangular notch in the white arm, at the bottom, right before the break. The replacement arm is made different at this important location. It might work, not sure yet. I need to get the gear indicator housing first, then I can see if the black arm will work. Once you slide the plastic arm in, and the notch locks on to the metal strip, you cant just pull it back out. And, to get the arm back out, you have to remove the column jacket. I went ahead and reassembled the column for now. Once I get the column mounted gear indicator, I can see if the black arm will work. If it wont, I will some how connect part of the new arm to the original white piece and get it to work. Only problem, I will probably have to pull the column back apart. Oh well......... Damn body shop people!!!!!!!!!!!!!!!!!!!!!
Moving on, up next, install the turn signal switch/wires. It slides in, three screw hold it down. And of course, this one is broke right where the turn signal stalk attaches.
I bought a replacement from NAPA, BUT, there were some issues:
1) It came with two extra wires. These parts fit a million different cars, so not every vehicle needs all the wires, so I pulled the two unused wires/metal contactor off the turn signal switch.
2) The new switch was not wired for the gear indicator bulb. So, I removed this wire from the old harness connector and slid it into the correct slot on the new one, problem solved. In the below picture, the grey wire (with my finger on it) is the bulb wire, and it is in the correct slot on the new harness connector.
And again, be careful routing the bulb wire, it can be easy to pinch it!!!!!!!!!!!!! You can also see the cream colored grease around the steering shaft. I installed the upper bearing/associated race/retainer at this time, too.
ONE IMPORTAT NOTE - The FSM tells you to put the turn signal switch, lock plate, etc. on before putting in the ignition lock cylinder. I would put the cylinder in first. Once you install all the other stuff, if you have an issue with the key cylinder and need to remove it, you have to remove all kinds of other stuff first. So, do yourself a favor, install the key lock cylinder BEFORE everything else.
Once the turn signal stuff is in, reinstall the lock plate/horn contactor.
Then the cover, and the ignition lock cylinder, and you are finished!!!!!!!
The body shop lost Josh's original Jeep lock cylinder. They installed a GM replacement, and kept a key for themselves. It did not fit right, and I don't trust them, so I installed another lock cylinder. But, this is my 10% not happy.
With the cylinder installed, it has a bunch of in/out play, like the cylinder body is too long. Look at the gap inside the column, between where the lock cylinder pop out retainer is/shoulder of the column:
The screw driver is pointing at the "pop out retainer". There is almost a 1/4" gap between the retainer and the shoulder of the housing it should be bearing against. This gap causes this:
That can't be correct. The cylinder wont come out, and it functions fine, but this is crappy. I haven't lost any parts, and I have not seen any reference for a shim to go here to prevent this, so I am assuming GM/Jeep lock cylinders are different??
None of my other Jeeps have this "cylinder play/gap". So, I will pull a lock cylinder out of one of my Jeeps and compare it to the NAPA replacement.
That's it for now
- City
- Biloxi
- State
- MS
Would any of these bits from my '81 factory auto non-tilt column help ya?
View attachment 50572
View attachment 50573
PM sent
- City
- Biloxi
- State
- MS
After last weekends "JeepAddict Colorado Vacation", I finally got back to work on Josh's Scrambler
Not an exciting update, but forward progress. I am turning my attention to the interior/dash board area now, mainly replacing missing/broken parts. I am also rechecking all the wiring, since the body shop re-hooked up all the dash wiring.
Anyway, two quick pictures.
Since I am working on the interior, the walnut shell blasted/1/2 covered in bed liner transmission inspection plate was bugging me, so I also decided to paint the transfer case shifter, and since I was painting, the under hood plates that support the windshield frame hold down doo-hickies needed paint, too:
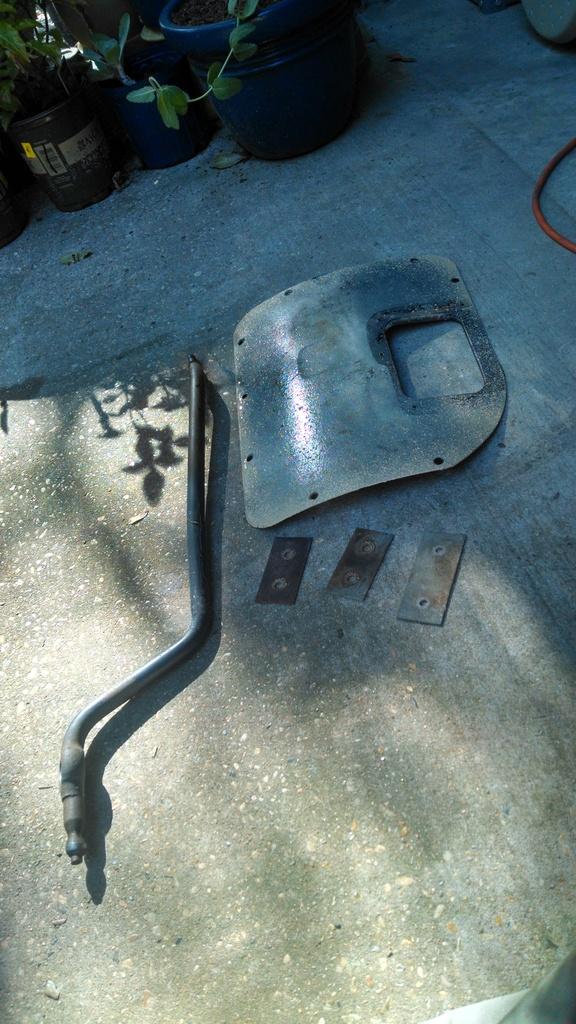
Just a "before" picture, forgot to take an "after" picture
Anyway, I installed all new dash lights, checked the headlight and wiper switch wiring, still need to check the speedometer wiring. I ordered a new heater fan switch, which of course didn't come in, so I couldn't install the new heater control cables
I also ran a tap through all the seat mounting bolt holes, and installed some more of the "Totally Stainless Fastener Kit" hardware. I also washed out about 5 pounds of walnut shell dust/powder:
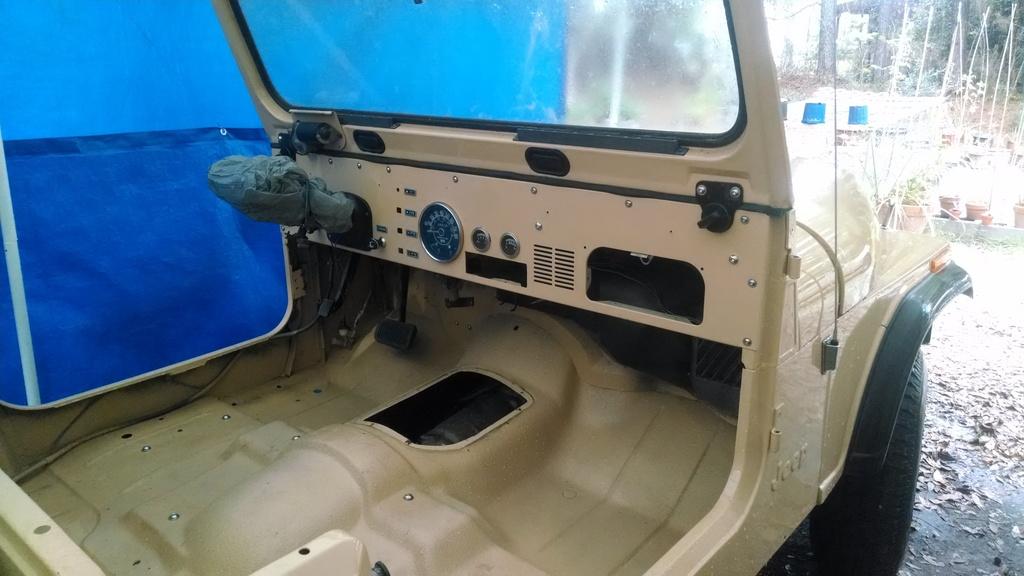
After I finish with the interior wiring/dash stuff, I plan on turning my attention back to under hood and chassis maintenance.
A quick summary of how much/where I have spent time:
Tuesday, September 15 (1 hour) - JB weld roll bar nuts, gather steering column parts, oil forward roll bar bracket bolts
Thursday, September 17 (2.5 hours) - paint roll bar nuts, bolt roll bar in, install gas tank fill/vent hoses
Friday, September 18 (3 hours) - finish gas tank plumbing, remove and straighten forward roll bar brackets
Saturday, September 19 (7 hours) - forward roll bar brackets, straighten/weld/prime/paint
Tuesday, September 22 (1.5 hours) - clean steering column parts
Wednesday, September 23 (1.5 hours) - clean steering column parts
Thursday, September 24 (1.5 hours) - clean steering column parts
Sunday, September 27 (1 hour) - roll bar installation
Monday, September 28 (1 hour) - roll bar installation
Tuesday, September 29 (2 hour) - finish roll bar installation
Friday, October 2 (2 hours) - reassemble steering column
Saturday, October 3 (6 hours) - finish reassembling steering column
Wednesday, October 14 (1 hour) - install tailgate/door weather stripping
Thursday, October 15 (1 hour) - finish door weather stripping install, install hood catches
Saturday, October 17 (8 hours) - prep/prime/paint parts, dash wiring, interior work
That bring me up to date on work/progress, hopefully on track for late November early December return to Josh, that's it for now
Not an exciting update, but forward progress. I am turning my attention to the interior/dash board area now, mainly replacing missing/broken parts. I am also rechecking all the wiring, since the body shop re-hooked up all the dash wiring.
Anyway, two quick pictures.
Since I am working on the interior, the walnut shell blasted/1/2 covered in bed liner transmission inspection plate was bugging me, so I also decided to paint the transfer case shifter, and since I was painting, the under hood plates that support the windshield frame hold down doo-hickies needed paint, too:
Just a "before" picture, forgot to take an "after" picture
Anyway, I installed all new dash lights, checked the headlight and wiper switch wiring, still need to check the speedometer wiring. I ordered a new heater fan switch, which of course didn't come in, so I couldn't install the new heater control cables
I also ran a tap through all the seat mounting bolt holes, and installed some more of the "Totally Stainless Fastener Kit" hardware. I also washed out about 5 pounds of walnut shell dust/powder:
After I finish with the interior wiring/dash stuff, I plan on turning my attention back to under hood and chassis maintenance.
A quick summary of how much/where I have spent time:
Tuesday, September 15 (1 hour) - JB weld roll bar nuts, gather steering column parts, oil forward roll bar bracket bolts
Thursday, September 17 (2.5 hours) - paint roll bar nuts, bolt roll bar in, install gas tank fill/vent hoses
Friday, September 18 (3 hours) - finish gas tank plumbing, remove and straighten forward roll bar brackets
Saturday, September 19 (7 hours) - forward roll bar brackets, straighten/weld/prime/paint
Tuesday, September 22 (1.5 hours) - clean steering column parts
Wednesday, September 23 (1.5 hours) - clean steering column parts
Thursday, September 24 (1.5 hours) - clean steering column parts
Sunday, September 27 (1 hour) - roll bar installation
Monday, September 28 (1 hour) - roll bar installation
Tuesday, September 29 (2 hour) - finish roll bar installation
Friday, October 2 (2 hours) - reassemble steering column
Saturday, October 3 (6 hours) - finish reassembling steering column
Wednesday, October 14 (1 hour) - install tailgate/door weather stripping
Thursday, October 15 (1 hour) - finish door weather stripping install, install hood catches
Saturday, October 17 (8 hours) - prep/prime/paint parts, dash wiring, interior work
That bring me up to date on work/progress, hopefully on track for late November early December return to Josh, that's it for now
- City
- Biloxi
- State
- MS
Daylight savings time has really cut into "work on Jeep in yard time" Basically, its too dark outside when I get home to work on the Scrambler. But, I have been working on it on Saturdays, Sundays have been spent at the Super Dome

Anyway, bad news first. AdamH sent me his no longer used steering column mounted gear indicator. Unfortunately, his is for a non-tilt column, Josh's Scrambler has a tilt column.
You can see the difference here, note the gap between the bottom of the plastic housing and the top of the steering column.
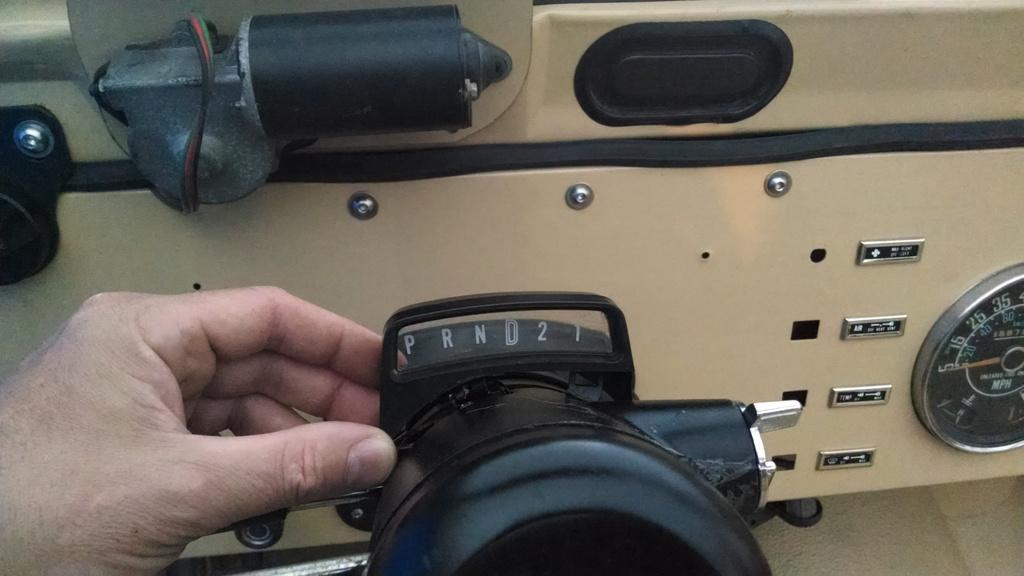
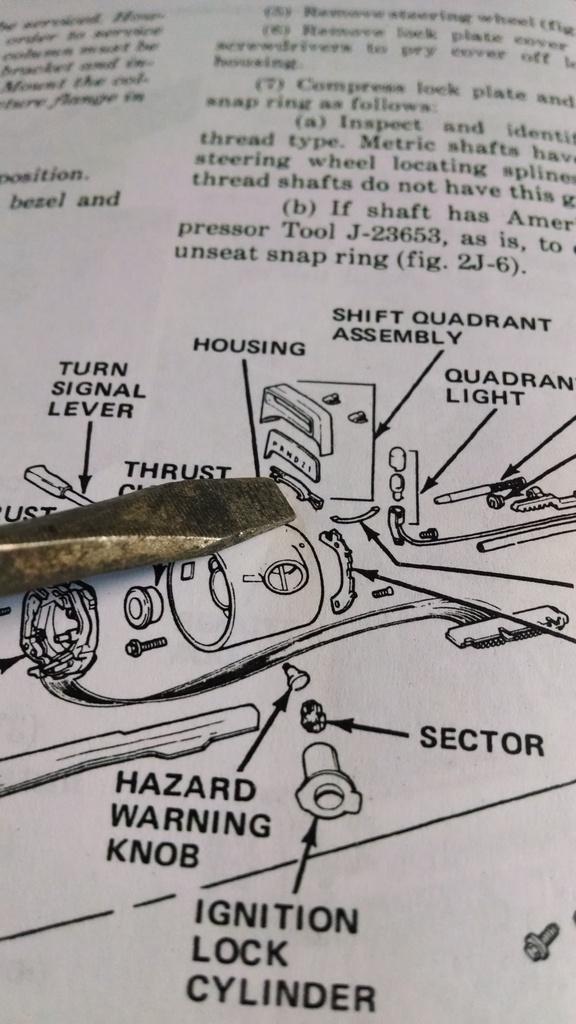
The different style column mounted indicators must attach to the column different, too. This is a close up of the tilt column bracket/clip:
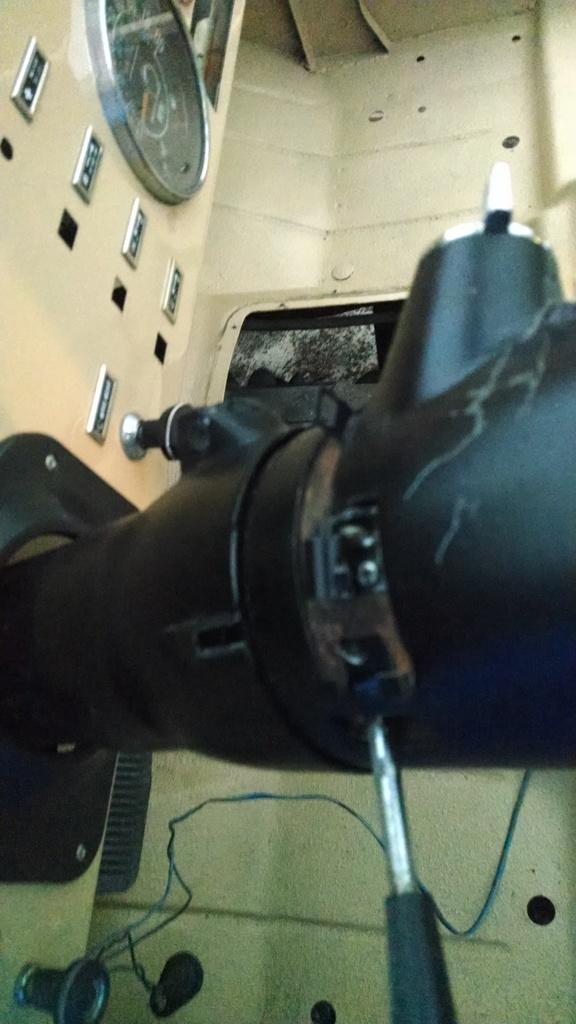
FSM picture, showing the non-tilt column version.
I had no idea the different columns used different indicators, it took some pictures/texts to Baton Rouge to figure it all out. Hopefully, Josh will get the right part from the painters. If not, I will have to see if I can trade the non-tilt part I have for a tilt column part.
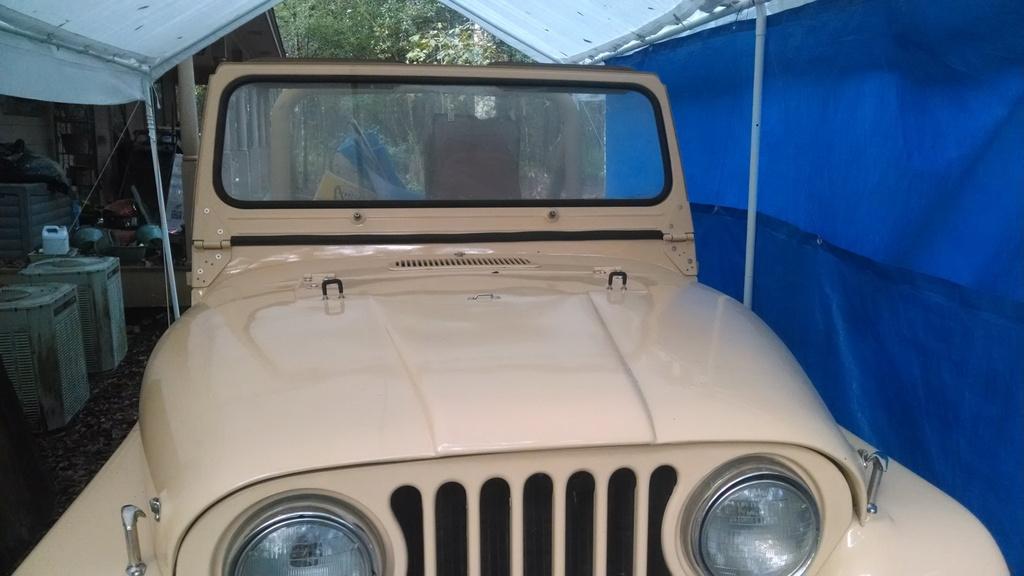
I installed all the hood loops/catches. This is normally easy work, but of course, the body shop filled in most of the mounting holes!!!!
I also installed the cowl mounted windshield squirter thingy, which is always fun to install after the dash/heater have been installed!!!!!!!!!!
I installed a new heater switch, some used bezels for the headlight and wiper switch, all new heater cables, worked on gauges, installed a gas pedal assembly, and installed the transmission cover/transfer case shifter/shifter boot.
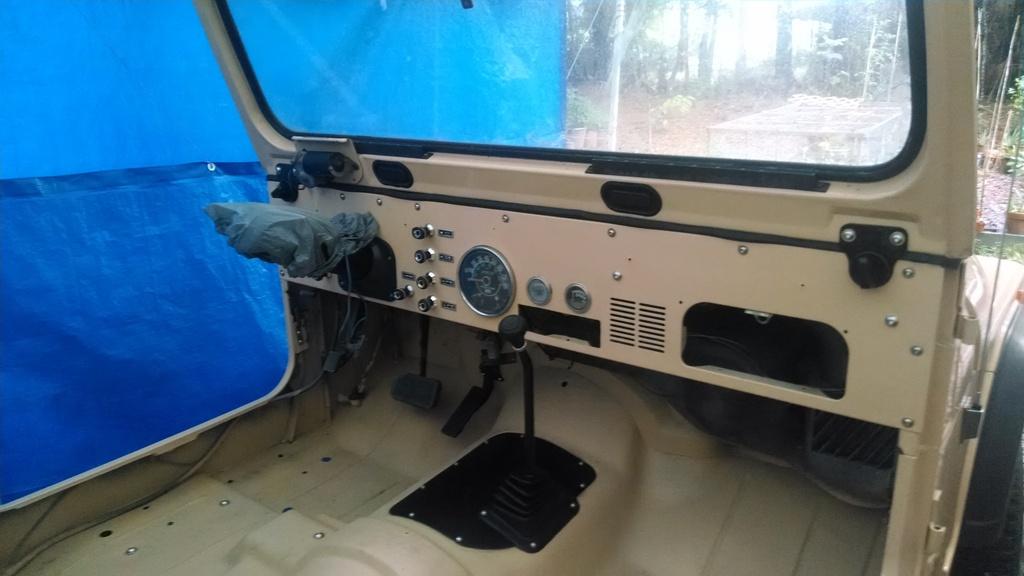
I still have a few more dash board items to address - glove box door and some lighting issues.
I also worked on the under hood fuel lines. I installed new metal fuel lines from the fuel pump to the carb, and from the fuel filter return port to the frame mounted fuel return line. Not pictured, finished installing some vent/fuel lines down under the body on the driver side, down by the proportioning valve. I ran all new rubber fuel hoses under the hood, new filter, etc.
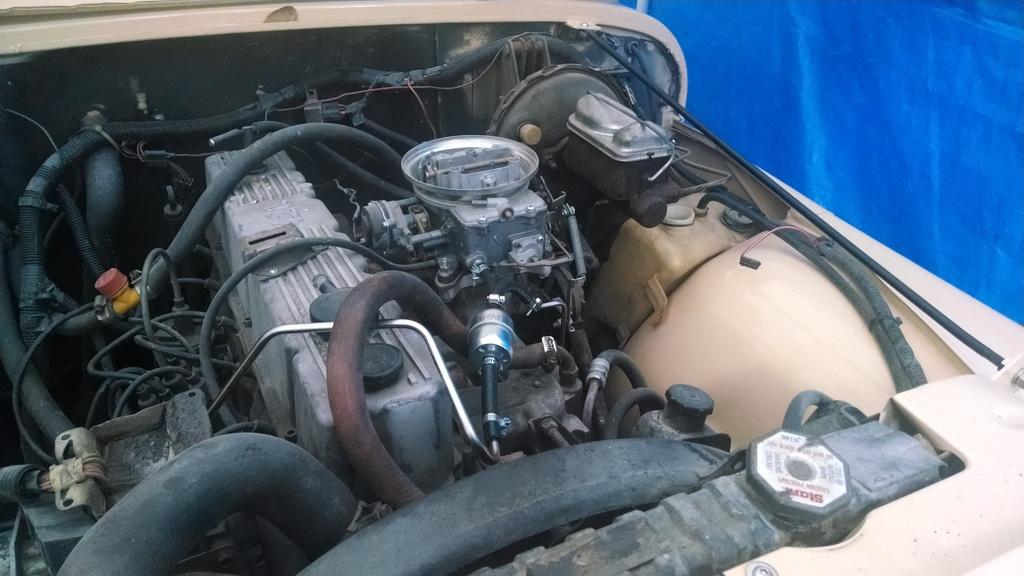
After finishing with the fuel/vent lines, I dumped 10 gallons of gas in the Scramblers gas tank. Hooked up the battery, dumped a little bit of fuel in the carb, hit the key, the engine fired right up. And, all the gauges work!!!!!!!!
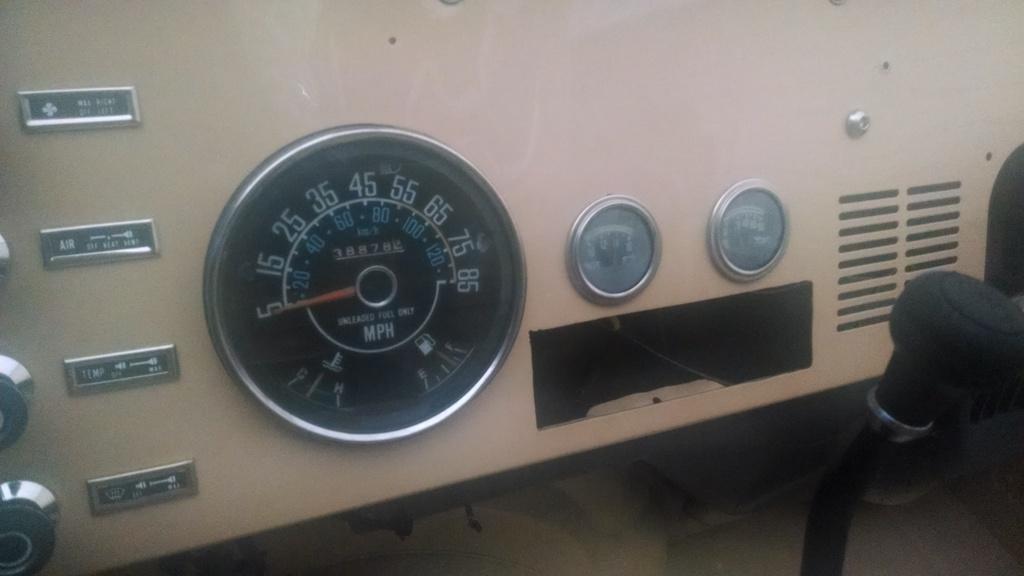
After letting the engine warm up, I changed the engine oil and filter, and installed new spark plugs. So far, the engine has been running great, pretty happy with this Motorcraft carb.
So, I still have a bunch of boring under hood work to do (clean up wiring/flush cooling system/change vacuum lines/ect.), finish up the dash, finish the steering column, change all the gear oil/grease driveshafts/steering linkage, install seats and seat belts..........................
But, it is coming along nicely IMO.
Plan on going to Hot Springs this weekend, but I should start back to work on this one during Thanksgiving
Basically, its too dark outside when I get home to work on the Scrambler. But, I have been working on it on Saturdays, Sundays have been spent at the Super DomeAnyway, bad news first. AdamH sent me his no longer used steering column mounted gear indicator. Unfortunately, his is for a non-tilt column, Josh's Scrambler has a tilt column.
You can see the difference here, note the gap between the bottom of the plastic housing and the top of the steering column.
The different style column mounted indicators must attach to the column different, too. This is a close up of the tilt column bracket/clip:
FSM picture, showing the non-tilt column version.
I had no idea the different columns used different indicators, it took some pictures/texts to Baton Rouge to figure it all out. Hopefully, Josh will get the right part from the painters. If not, I will have to see if I can trade the non-tilt part I have for a tilt column part.
I installed all the hood loops/catches. This is normally easy work, but of course, the body shop filled in most of the mounting holes!!!!
I also installed the cowl mounted windshield squirter thingy, which is always fun to install after the dash/heater have been installed!!!!!!!!!!
I installed a new heater switch, some used bezels for the headlight and wiper switch, all new heater cables, worked on gauges, installed a gas pedal assembly, and installed the transmission cover/transfer case shifter/shifter boot.
I still have a few more dash board items to address - glove box door and some lighting issues.
I also worked on the under hood fuel lines. I installed new metal fuel lines from the fuel pump to the carb, and from the fuel filter return port to the frame mounted fuel return line. Not pictured, finished installing some vent/fuel lines down under the body on the driver side, down by the proportioning valve. I ran all new rubber fuel hoses under the hood, new filter, etc.
After finishing with the fuel/vent lines, I dumped 10 gallons of gas in the Scramblers gas tank. Hooked up the battery, dumped a little bit of fuel in the carb, hit the key, the engine fired right up. And, all the gauges work!!!!!!!!
After letting the engine warm up, I changed the engine oil and filter, and installed new spark plugs. So far, the engine has been running great, pretty happy with this Motorcraft carb.
So, I still have a bunch of boring under hood work to do (clean up wiring/flush cooling system/change vacuum lines/ect.), finish up the dash, finish the steering column, change all the gear oil/grease driveshafts/steering linkage, install seats and seat belts..........................
But, it is coming along nicely IMO.
Plan on going to Hot Springs this weekend, but I should start back to work on this one during Thanksgiving

- City
- Biloxi
- State
- MS
Wow you are thorough. Excellent work and writing-up
Appreciate it
Trying to treat this one like its one of mine, trying to keep Josh updated, too

- City
- Biloxi
- State
- MS
As slow as my build is going I'm tempted to ship it down to you too! Great work!
PS. I moved this to the "Build Threads" section.
I think I have 15 in baton Rouge headed this way next
I figured this thread should be in the builds, just wondering when it would get moved
I did some work on this one this past weekend, I will have to post an update

- City
- Biloxi
- State
- MS
I was able to a bit more work on Josh's Scrambler this past weekend. It was a rain out Saturday, but I was able to make some forward progress on Sunday.
Besides some under hood/chassis maintenance I need to do, most of the remaining work on this Scrambler wont be too exciting. I am mainly trying to finish up a bunch of minor, simple projects. But, since I didn't take this Jeep a part, I am always having to search for missing parts, and having to make minor repairs to things that were damaged by other people.
For example, I installed the driver seat. Usually pretty simple, but in this case this task involves:
Using seat brackets that I had previously painted for another Scrambler, too cold to try to paint Josh's original brackets
Painting the little cross brace that runs from one bracket to the other on the DS non-tilt frame
Repairing damaged threads on the slider studs
Looking for the special stock bolts that hold the seats to the sliders (I was missing one)
Missing one spacer, so I used a nut that was the same height as the stock spacers
Cleaning/re-lubing the sliders
So, something that should take about 20 minutes ends up taking 2 hours, 1/2 that time spent looking for parts. I'm not complaining, that's how these things go. The seat example above pretty much describes all the little "projects" that complete the big "project". Now you know why I use all those zip lock bags when I take things apart
Besides installing the driver seat, I also installed the column mounted transmission shifter (after finding the missing roll pin), cleaned out/installed the seat belt bolts (after finding he bolts), and spent an hour going through the coffee can container of hardware that came with the Scrambler. I "think" I have found most of the missing screws/fasteners so I can finish up some interior work.
After that less then exciting progress, I decided to do some mechanical work. Josh had mentioned that the steering was loose, and I had noticed that the driver side front tire moved when I jacked up the front end. Since I next plan on putting the Scrambler on jack stands and running it for about 20 minutes with the tires off the ground to warm up the gear oil before changing it, figured I would investigate.
It was nice to do some simple mechanical work for a change:
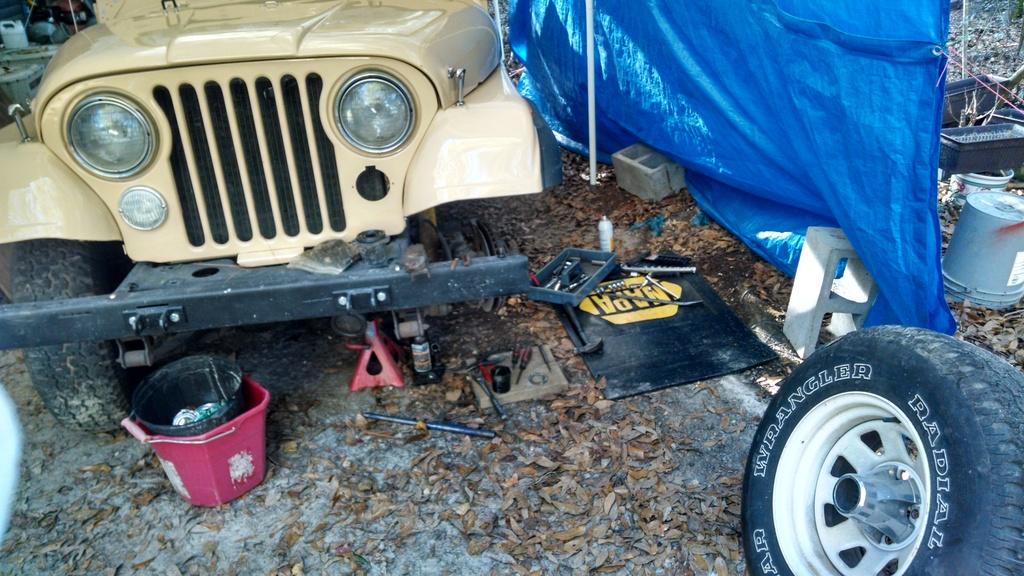
After pulling the tire, caliper, lock in hub, and the outer lock nut, I found that the inner wheel bearing nut was loose.
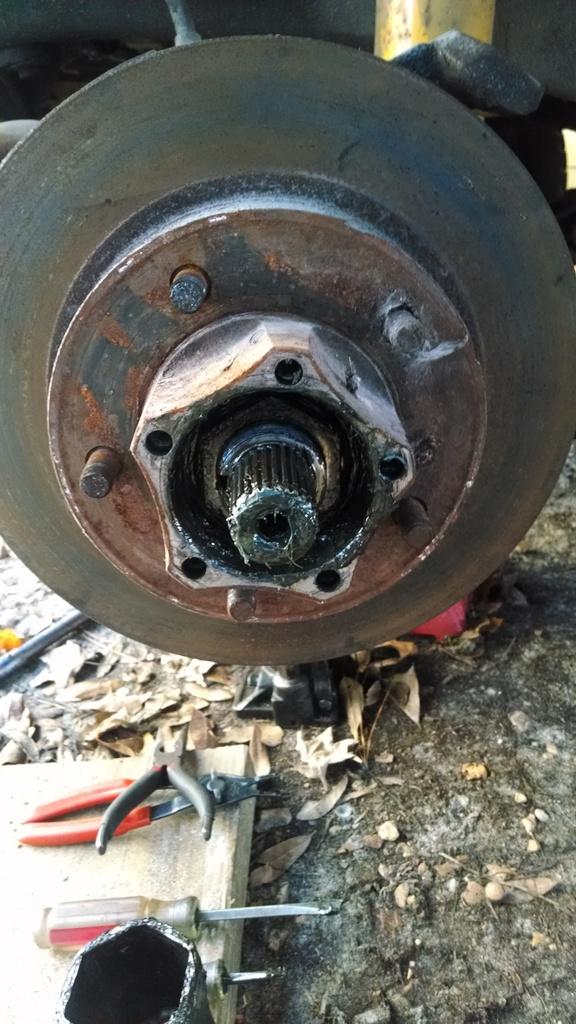
I readjusted the bearings on this side and reassembled the wheel hub. The grease looked fresh, so I decided not to investigate anything else. I have enough existing "tasks" to finish on this one before I start looking for more work to do
After bolting the tire back on, I decided to go for a little drive. I still don't have a steering wheel, but I started the Scrambler up and drove it forwards/backwards a couple of feet. Glad it moves under its own power
I plan on doing a bunch of chassis maintenance during Thanksgiving, and I need to start to organizing/tackling all the remaining little "jobs" that remain.
That's it for now
Besides some under hood/chassis maintenance I need to do, most of the remaining work on this Scrambler wont be too exciting. I am mainly trying to finish up a bunch of minor, simple projects. But, since I didn't take this Jeep a part, I am always having to search for missing parts, and having to make minor repairs to things that were damaged by other people.
For example, I installed the driver seat. Usually pretty simple, but in this case this task involves:
Using seat brackets that I had previously painted for another Scrambler, too cold to try to paint Josh's original brackets
Painting the little cross brace that runs from one bracket to the other on the DS non-tilt frame
Repairing damaged threads on the slider studs
Looking for the special stock bolts that hold the seats to the sliders (I was missing one)
Missing one spacer, so I used a nut that was the same height as the stock spacers
Cleaning/re-lubing the sliders
So, something that should take about 20 minutes ends up taking 2 hours, 1/2 that time spent looking for parts. I'm not complaining, that's how these things go. The seat example above pretty much describes all the little "projects" that complete the big "project". Now you know why I use all those zip lock bags when I take things apart
Besides installing the driver seat, I also installed the column mounted transmission shifter (after finding the missing roll pin), cleaned out/installed the seat belt bolts (after finding he bolts), and spent an hour going through the coffee can container of hardware that came with the Scrambler. I "think" I have found most of the missing screws/fasteners so I can finish up some interior work.
After that less then exciting progress, I decided to do some mechanical work. Josh had mentioned that the steering was loose, and I had noticed that the driver side front tire moved when I jacked up the front end. Since I next plan on putting the Scrambler on jack stands and running it for about 20 minutes with the tires off the ground to warm up the gear oil before changing it, figured I would investigate.
It was nice to do some simple mechanical work for a change:
After pulling the tire, caliper, lock in hub, and the outer lock nut, I found that the inner wheel bearing nut was loose.
I readjusted the bearings on this side and reassembled the wheel hub. The grease looked fresh, so I decided not to investigate anything else. I have enough existing "tasks" to finish on this one before I start looking for more work to do
After bolting the tire back on, I decided to go for a little drive. I still don't have a steering wheel, but I started the Scrambler up and drove it forwards/backwards a couple of feet. Glad it moves under its own power
I plan on doing a bunch of chassis maintenance during Thanksgiving, and I need to start to organizing/tackling all the remaining little "jobs" that remain.
That's it for now
Last edited:
- City
- Biloxi
- State
- MS
crap - hate that piece wouldn't work for ya
That's ok, and we greatly appreciate your generous gift

Josh was able to locate his missing part, and I believe it is undamaged

- City
- Baton Rouge
- State
- La
Hurry up you're running out of room over here.