

You are using an out of date browser. It may not display this or other websites correctly.
You should upgrade or use an alternative browser.
You should upgrade or use an alternative browser.
Retitled: 83 Scrambler resto-mod finally gaining momentum
- Thread starter Bushmaster6
- Start date


- City
- Dexter
- State
- MI
Sounds about normal to me. 
You have to figure out how to get the rest of the bolts out, sometimes that requires cutting access to get to the mount plate in the body, getting them out and dealing with them or making new ones. There's a lot on here and on the web about how to get at the different locations, they're particular to the specific mount location. I got lucky and only had to cut into the "box" where the rearmost mounts are, which is pretty simple.
When they're spun, it's tough. You can try to drill through the sheetmetal and the nut/plate and get a screw in it to hold it still, otherwise you're looking at cutting access to get in somehow and get the plate out. Then you have to figure how to keep it in place when you reinstall. Again, I was lucky not to have to go there and just reused the stock "cage" that holds the plate in place, bent back into shape (the plate is also too long to twist in that "box" in my case.
The nuts/plates are just flat steel, 1/4" I think, cut to size and drilled/tapped.
I used anti-sieze on mine and just check them fairly often to hopefully keep from having a repeat performance later.
You have to figure out how to get the rest of the bolts out, sometimes that requires cutting access to get to the mount plate in the body, getting them out and dealing with them or making new ones. There's a lot on here and on the web about how to get at the different locations, they're particular to the specific mount location. I got lucky and only had to cut into the "box" where the rearmost mounts are, which is pretty simple.
When they're spun, it's tough. You can try to drill through the sheetmetal and the nut/plate and get a screw in it to hold it still, otherwise you're looking at cutting access to get in somehow and get the plate out. Then you have to figure how to keep it in place when you reinstall. Again, I was lucky not to have to go there and just reused the stock "cage" that holds the plate in place, bent back into shape (the plate is also too long to twist in that "box" in my case.
The nuts/plates are just flat steel, 1/4" I think, cut to size and drilled/tapped.
I used anti-sieze on mine and just check them fairly often to hopefully keep from having a repeat performance later.

Bushmaster6
Legacy Registered User
- City
- the Springs
- State
- CO
6 hours in the shop today
and made some pretty good progress on this weekend's project.. shackle replacement..
learned a few details today and also used a sandblasting cabinet for the first time, which was really handy..
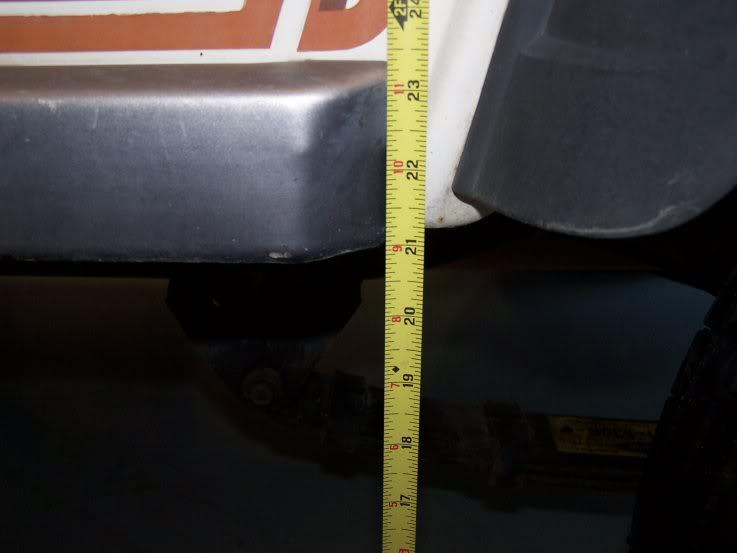
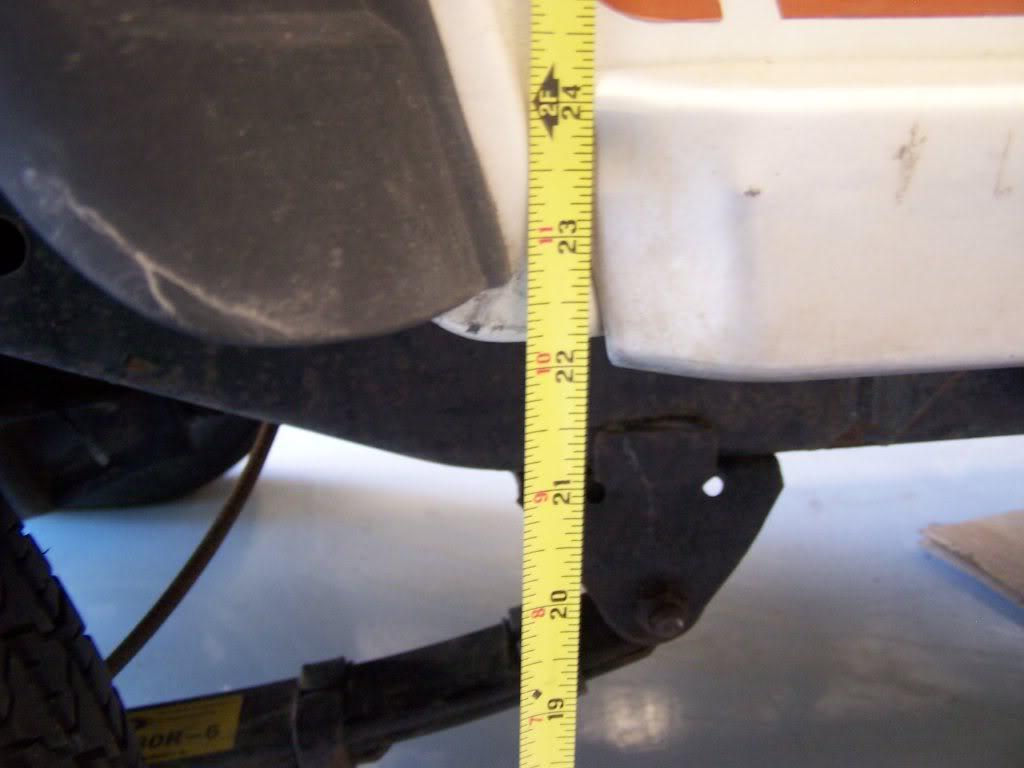
I took photos and measurements of the body from the floor before I got started just to guage the difference, will post a shot when I'm done of the whole thing, but all 4 tires need a bit of air right now.. will leave them that way til I'm done and see teh "delta" for my 1/2 inch lift kit..
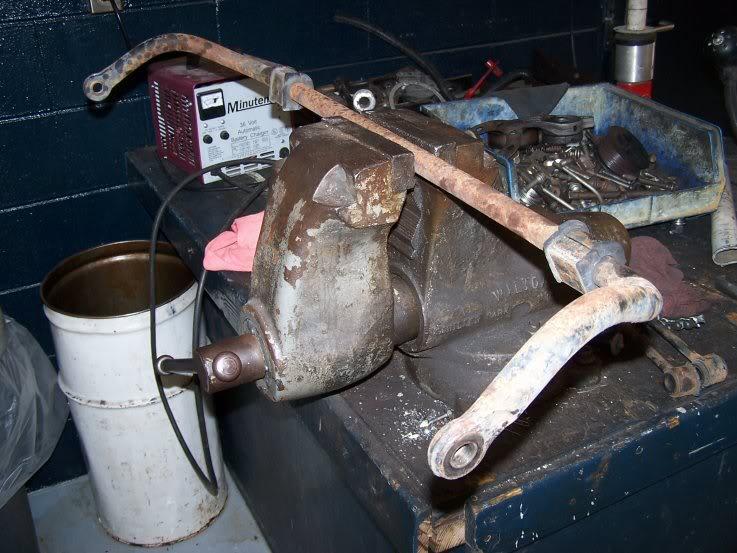
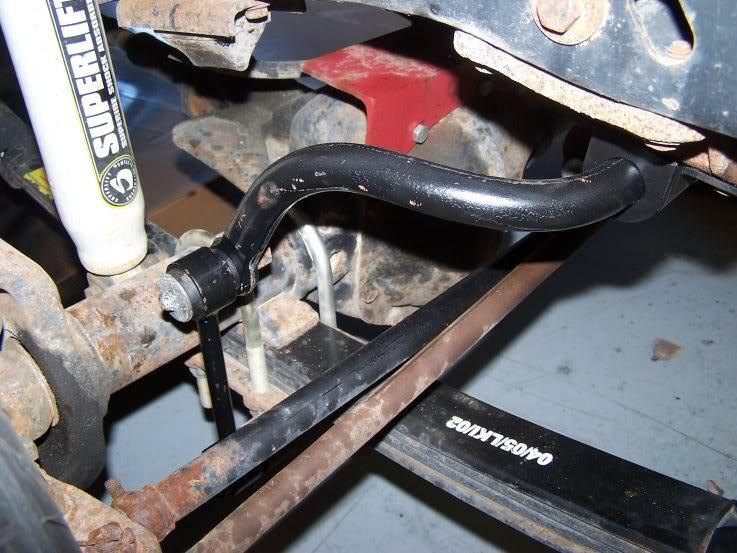
front sway bar came out/off pretty easily.. my only disappointment was that each side has 1 of the 2 frame mounting nuts that requires you to get a wrench (i think it was a 7/16) inside the frame to hold it to get the bolt out.. the other 2 had captured nuts and worked out easily.. I didn't have the time or patience to mess with the other ones so I left the cast frame mounts on.. wish I was able to get them off and sandblasted/painted as well..
here's the roll bar in a big handy vise at the shop.. had to use a gear puller to get the sway bar links out, which may or may not be normal..
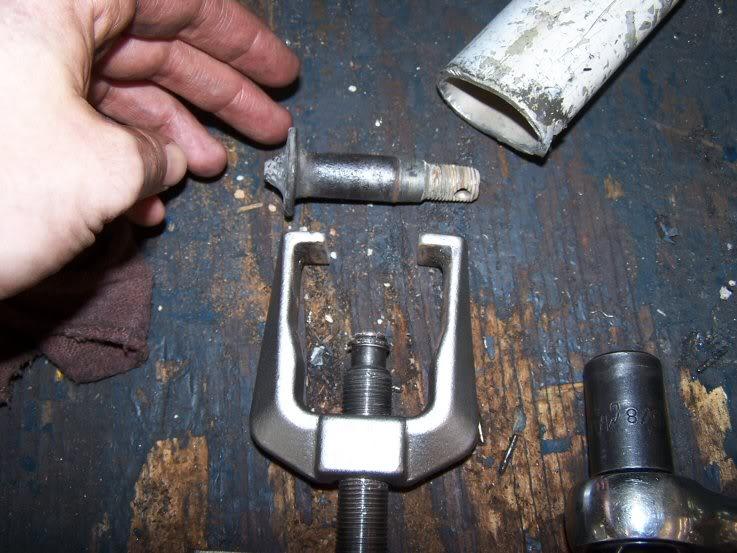
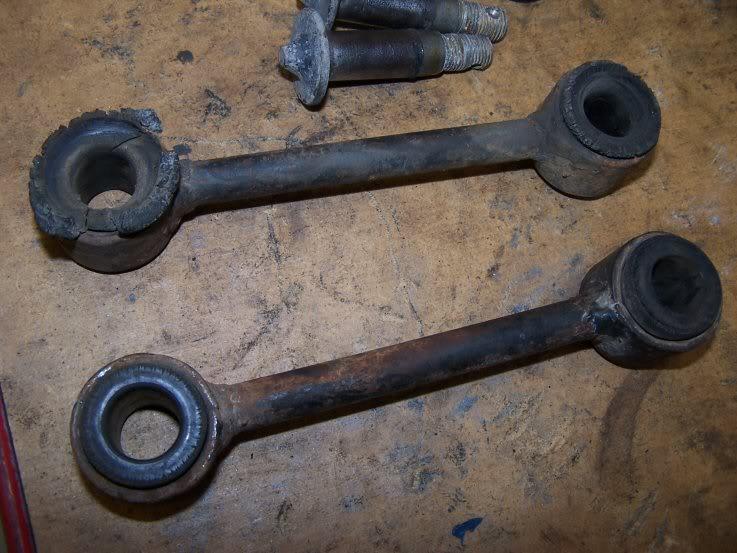
I'm sure the collective connections and dry rotted bushings weren't helping my overall steering feel...
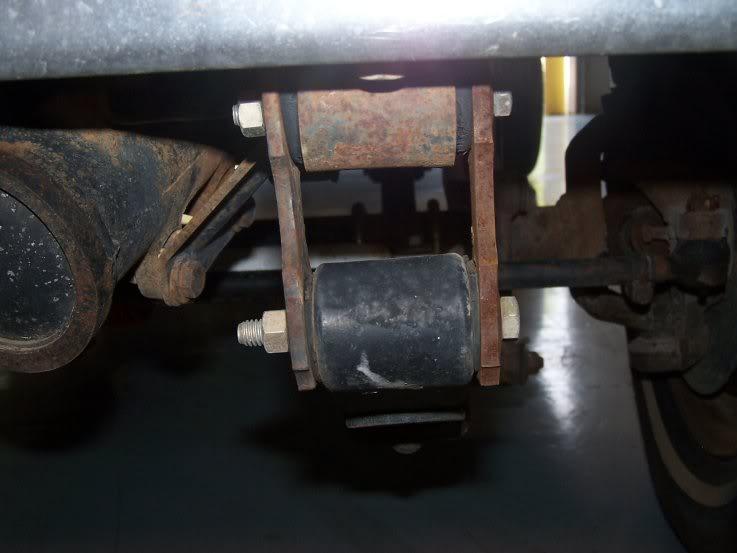
and made some pretty good progress on this weekend's project.. shackle replacement..
learned a few details today and also used a sandblasting cabinet for the first time, which was really handy..
I took photos and measurements of the body from the floor before I got started just to guage the difference, will post a shot when I'm done of the whole thing, but all 4 tires need a bit of air right now.. will leave them that way til I'm done and see teh "delta" for my 1/2 inch lift kit..
front sway bar came out/off pretty easily.. my only disappointment was that each side has 1 of the 2 frame mounting nuts that requires you to get a wrench (i think it was a 7/16) inside the frame to hold it to get the bolt out.. the other 2 had captured nuts and worked out easily.. I didn't have the time or patience to mess with the other ones so I left the cast frame mounts on.. wish I was able to get them off and sandblasted/painted as well..
here's the roll bar in a big handy vise at the shop.. had to use a gear puller to get the sway bar links out, which may or may not be normal..
I'm sure the collective connections and dry rotted bushings weren't helping my overall steering feel...
Bushmaster6
Legacy Registered User
- City
- the Springs
- State
- CO
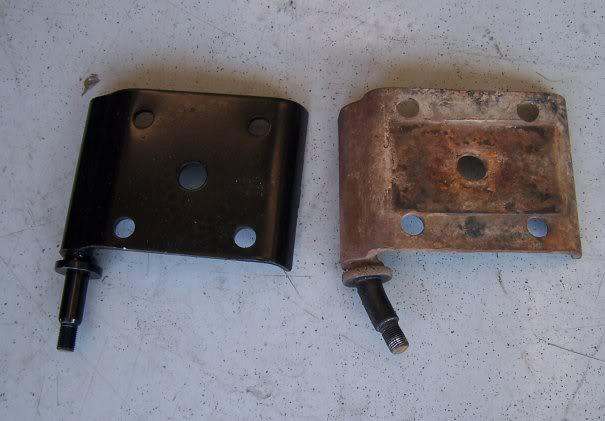
old shackle vs new
in addition to being shiiiny.. definitely looks beefier and taller..
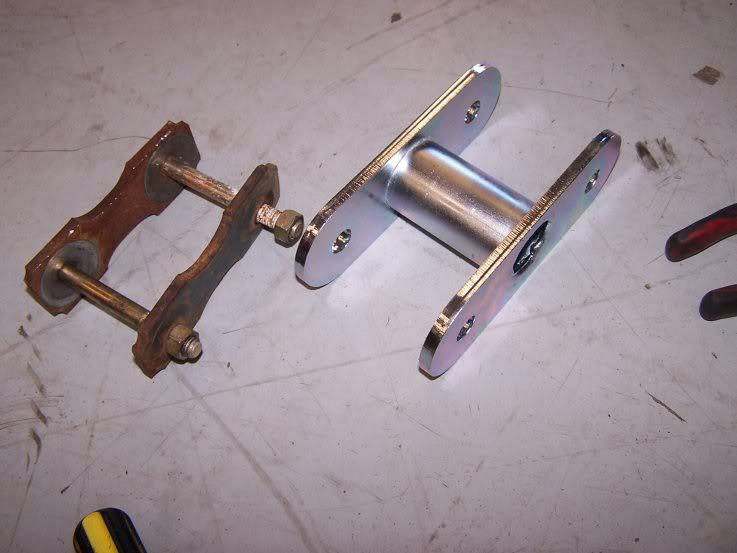
in addition to being shiiiny.. definitely looks beefier and taller..
Bushmaster6
Legacy Registered User
- City
- the Springs
- State
- CO
results of sandblasting
I know it sounds simple, but I've never used one of these booths before and frankly, it kicks ***.. I'm used to using a drill and a wire brush to clean up my junk.. the results of about ten minutes on my sway bar and brackets was gratifying.. I later painted them with Napa chassis black paint.. pics of finished product tomorrow..
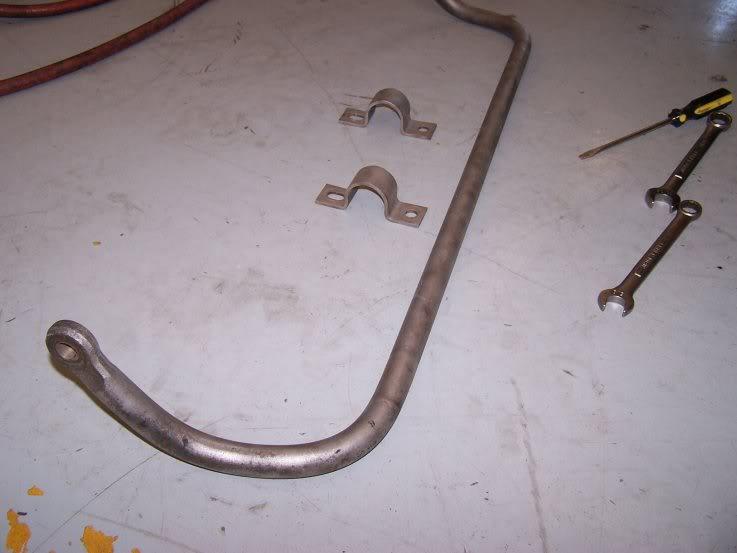
I'd like to figure out a way to do this at home, but it may be space/cost prohibitive.
I know it sounds simple, but I've never used one of these booths before and frankly, it kicks ***.. I'm used to using a drill and a wire brush to clean up my junk.. the results of about ten minutes on my sway bar and brackets was gratifying.. I later painted them with Napa chassis black paint.. pics of finished product tomorrow..
I'd like to figure out a way to do this at home, but it may be space/cost prohibitive.
Bushmaster6
Legacy Registered User
- City
- the Springs
- State
- CO
removing rear springs
you'd think removing the rear springs would be easier than the front, as there isn't all the steering and suspension linkage jammed under there but... each side presented it's own challenge..
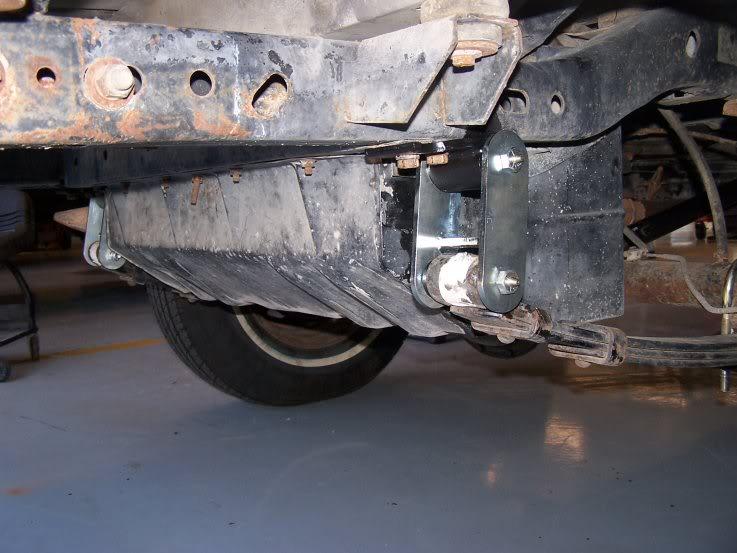
no pics but, on the driver's side, the rearmost exhaust hangar is immediately next to the spring shackle so, when you're trying to remove the bolts or the spring, you have that in the way.. also, both sides of my rear springs were done with the LONG side of teh bolt inserted from the gas tank side.. see pic.. the bolt/shackle plate run out of room at the gas tank for you to get them out, and I had to use a pry bar and put pressure on the spring to get it low enough to extract.. the gas tank cover proivded enough leverage..
I also found removing the rear shackle was easier by dropping the shackle mount from the frame.. two bolts per side and mine came free without much effort.. just standard hand tools
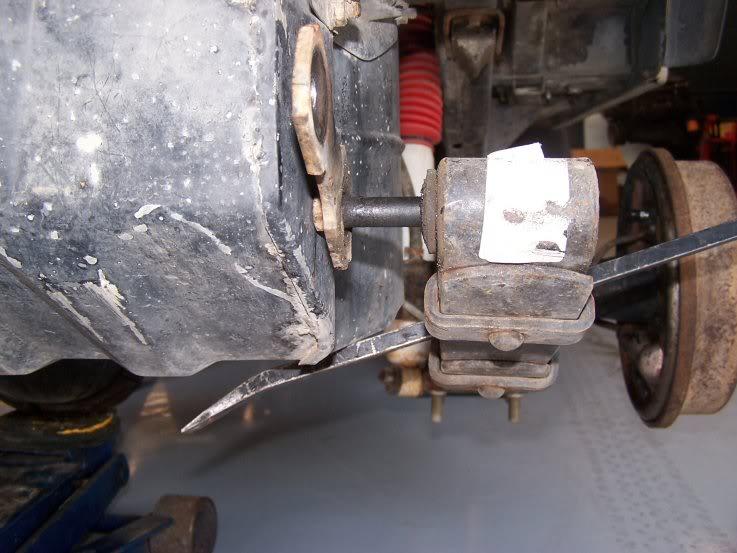
I had 1 spring plate on the PS rear that had a bent shock mount, so I replaced that today too..
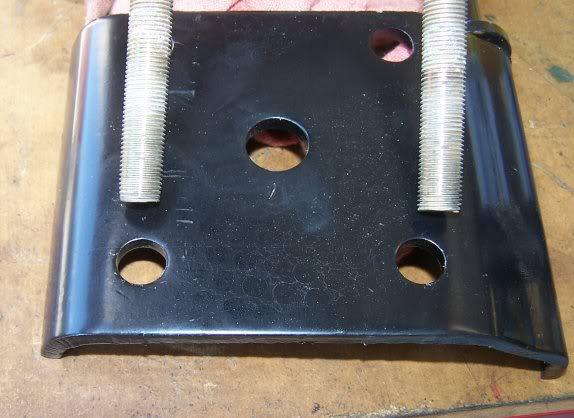
each time I pull a spring plate I've run into this.. the u bolts don't match up with the spring plate holes, so you need a pretty good sized slip joint pliers to put pressure on the u bolt and get it through the holes.. PITA, not sure if it's suppossed to be that way, but that's how it worked out..
I've got to re-hang the rear shackles tomorrow.. will post pics of the completed project when I'm done..
you'd think removing the rear springs would be easier than the front, as there isn't all the steering and suspension linkage jammed under there but... each side presented it's own challenge..
no pics but, on the driver's side, the rearmost exhaust hangar is immediately next to the spring shackle so, when you're trying to remove the bolts or the spring, you have that in the way.. also, both sides of my rear springs were done with the LONG side of teh bolt inserted from the gas tank side.. see pic.. the bolt/shackle plate run out of room at the gas tank for you to get them out, and I had to use a pry bar and put pressure on the spring to get it low enough to extract.. the gas tank cover proivded enough leverage..
I also found removing the rear shackle was easier by dropping the shackle mount from the frame.. two bolts per side and mine came free without much effort.. just standard hand tools
I had 1 spring plate on the PS rear that had a bent shock mount, so I replaced that today too..
each time I pull a spring plate I've run into this.. the u bolts don't match up with the spring plate holes, so you need a pretty good sized slip joint pliers to put pressure on the u bolt and get it through the holes.. PITA, not sure if it's suppossed to be that way, but that's how it worked out..
I've got to re-hang the rear shackles tomorrow.. will post pics of the completed project when I'm done..
Bushmaster6
Legacy Registered User
- City
- the Springs
- State
- CO
Sunday progress
got the rear springs re-hung today and put the truck back on all four tires to do torgue-ing, which brought some questions of its own..
on to pics..
the rear shackles, unlike the front, are both offset (ie: the cross bar is not evenly placed between the mounting holes, this makes a "long" end and a "short" end).. the instructions said the long end goes to the frame.. the cross bar itselt is welded onto only one half of the shackle (it doesn't go all the way across the vertical bars).. no insight in the instructions on why/how that affects mounting, but some dry fitting answered most of that, at least I think I got it right.. see pics..
notice the offsets..
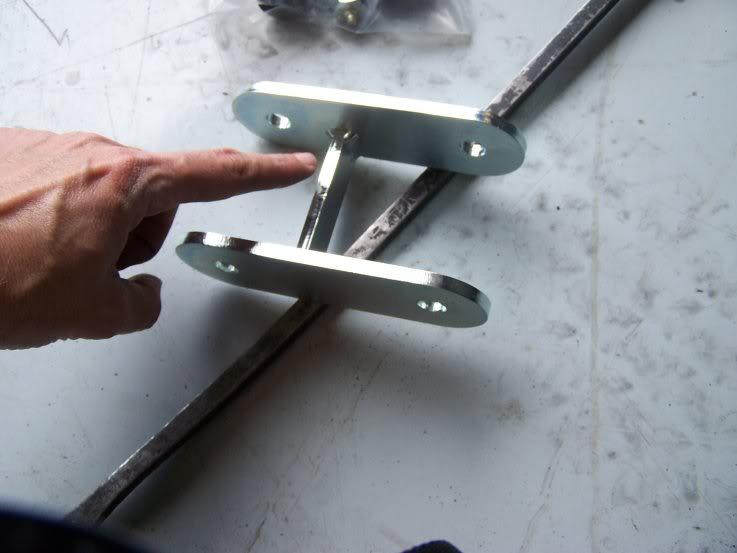
some dry fitting..
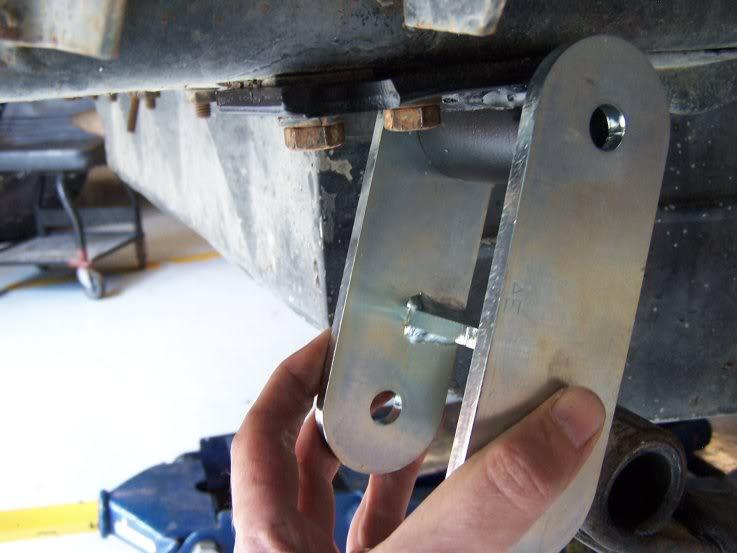
thinking through the motion of the shackle as the spring is compressed, figured the cross bar had to provide some space for the vertical portion of the shackle to get around teh size of the frame.. pic should explain..
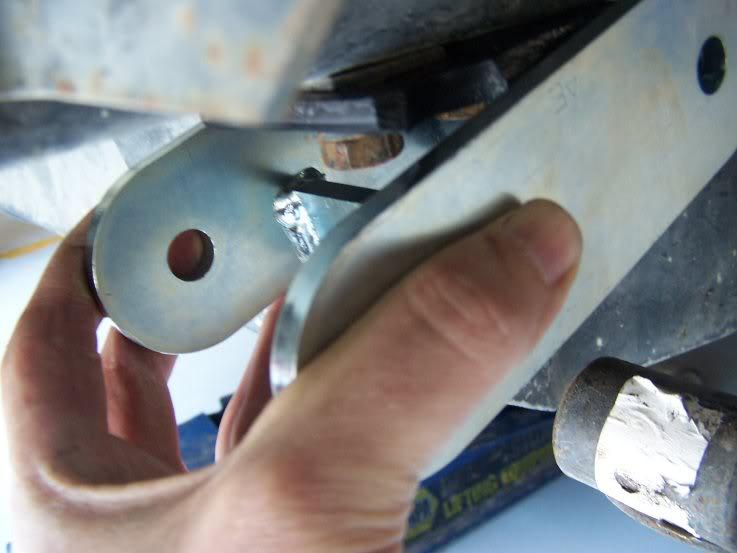
got the rear springs re-hung today and put the truck back on all four tires to do torgue-ing, which brought some questions of its own..
on to pics..
the rear shackles, unlike the front, are both offset (ie: the cross bar is not evenly placed between the mounting holes, this makes a "long" end and a "short" end).. the instructions said the long end goes to the frame.. the cross bar itselt is welded onto only one half of the shackle (it doesn't go all the way across the vertical bars).. no insight in the instructions on why/how that affects mounting, but some dry fitting answered most of that, at least I think I got it right.. see pics..
notice the offsets..
some dry fitting..
thinking through the motion of the shackle as the spring is compressed, figured the cross bar had to provide some space for the vertical portion of the shackle to get around teh size of the frame.. pic should explain..
Bushmaster6
Legacy Registered User
- City
- the Springs
- State
- CO
neither rear spring lined up with it's shackle
on both rear springs, I had to apply some pressure to the spring to move it into the shackle and get it lined up with the frame.. not terribly difficult to overcome, but begged the question, "is this right".. seems to me that if the frame, the mounts, and the springs are not bent, these should fairly easily line up? both springs tended to bee too far outboard (ie: wide in opposite directions), so that makes me think it isn't a frame alignment issue..
anyone else run into this? loosening the spring plate and the pivot bolt had no effect on this.. bottom line.. had to tourque it together with a pry bar to get it mounted..
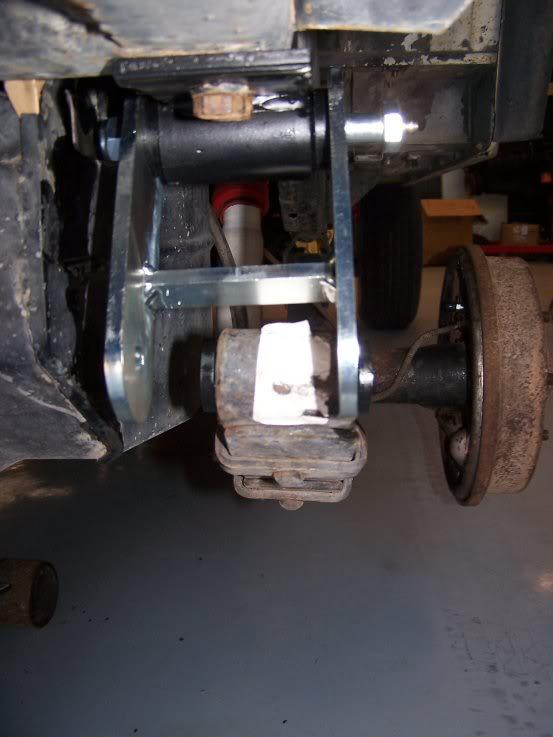
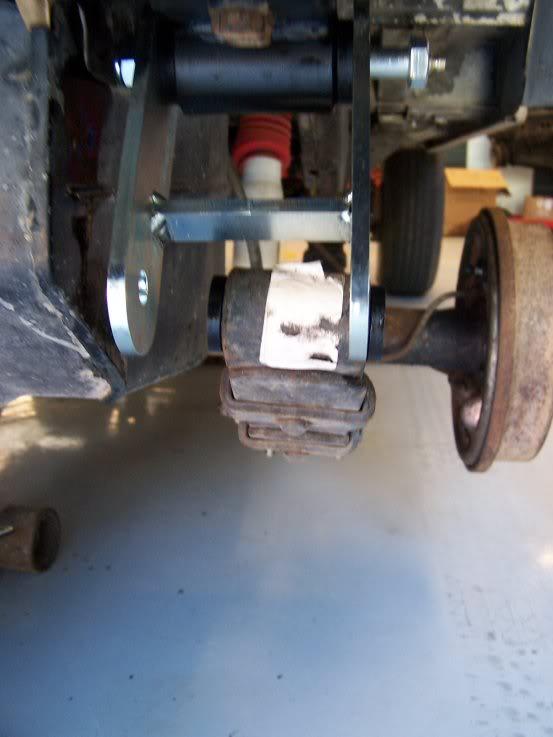
on both rear springs, I had to apply some pressure to the spring to move it into the shackle and get it lined up with the frame.. not terribly difficult to overcome, but begged the question, "is this right".. seems to me that if the frame, the mounts, and the springs are not bent, these should fairly easily line up? both springs tended to bee too far outboard (ie: wide in opposite directions), so that makes me think it isn't a frame alignment issue..
anyone else run into this? loosening the spring plate and the pivot bolt had no effect on this.. bottom line.. had to tourque it together with a pry bar to get it mounted..
Bushmaster6
Legacy Registered User
- City
- the Springs
- State
- CO
after pics
some pics of the final product..
front
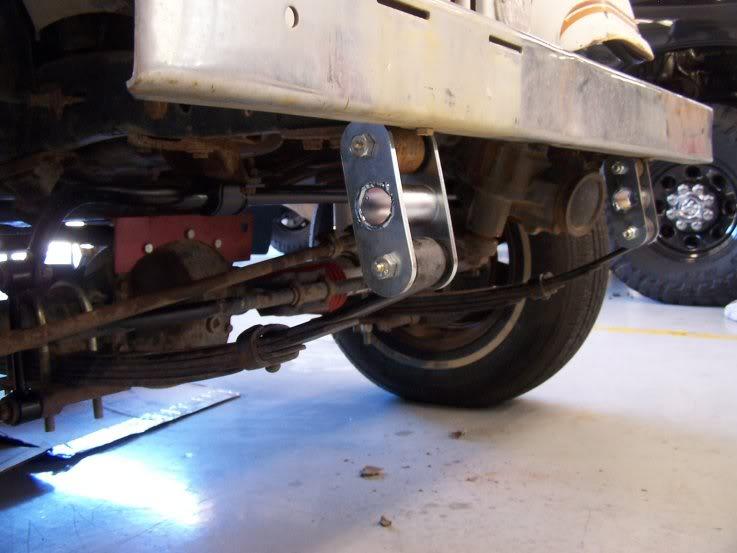
rear
sway bar painted and mounted (lipstick on a pig.. perhaps what I should name this truck, or this thread)...
some pics of the final product..
front
rear
sway bar painted and mounted (lipstick on a pig.. perhaps what I should name this truck, or this thread)...
Bushmaster6
Legacy Registered User
- City
- the Springs
- State
- CO
and the dismount
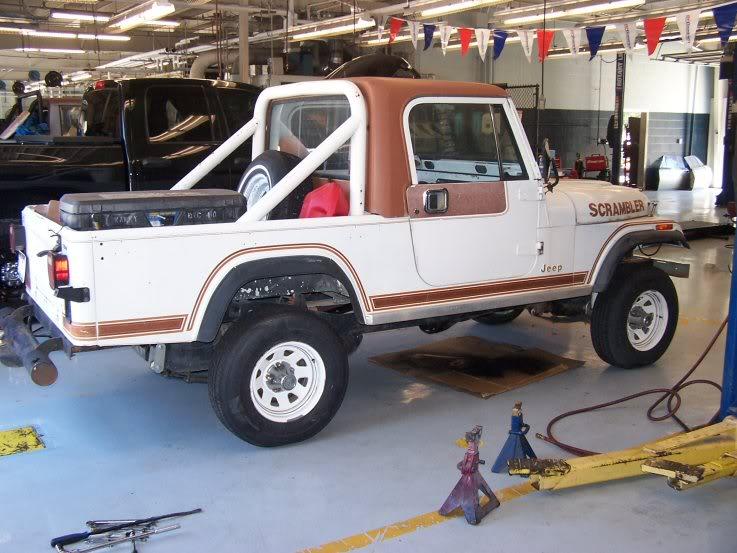
here's the final stance.. it's noticeable (to me), and my unscientific measurements at four points around the truck revealed an even 1/2" lift at all four corners..
calibrated eyball...
here's the final stance.. it's noticeable (to me), and my unscientific measurements at four points around the truck revealed an even 1/2" lift at all four corners..
calibrated eyball...
Bushmaster6
Legacy Registered User
- City
- the Springs
- State
- CO
before and after, and a question
old shackle vs new.. and a question..
so hopefully this, along with other projects, add up to a pretty "tight" setup for my suspension, steering, and braking once I get her on the road.. she used to be like driving a fish..
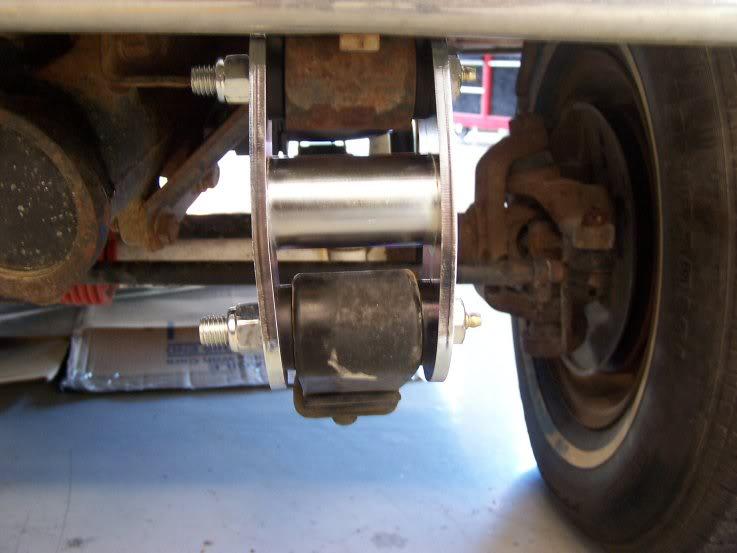
the question.. once I torqued the shackle bolts to a (relatively light) 24 ft lbs, I noticed that the shackle was starting to compress, or bow in (see above pic).. I don't think it's crushing the bushings yet, but have I already gone too far? do I need to back these off a bit? I tend to err on the side of too little and am always concerned about over-doing things.. seems odd to me that there's that much travel between a spring that is the stock width and a shackle designed to hold it..
old shackle vs new.. and a question..
so hopefully this, along with other projects, add up to a pretty "tight" setup for my suspension, steering, and braking once I get her on the road.. she used to be like driving a fish..
the question.. once I torqued the shackle bolts to a (relatively light) 24 ft lbs, I noticed that the shackle was starting to compress, or bow in (see above pic).. I don't think it's crushing the bushings yet, but have I already gone too far? do I need to back these off a bit? I tend to err on the side of too little and am always concerned about over-doing things.. seems odd to me that there's that much travel between a spring that is the stock width and a shackle designed to hold it..
Last edited:
Bushmaster6
Legacy Registered User
- City
- the Springs
- State
- CO
another torque wrench oddity..
there's an old joke in that postulates, "what's the most dangerous thing in the Army?".. and there are a variety of answers..
I tend to be the dangerous "Private with a torque wrench".. I'm never sure I've got this right..
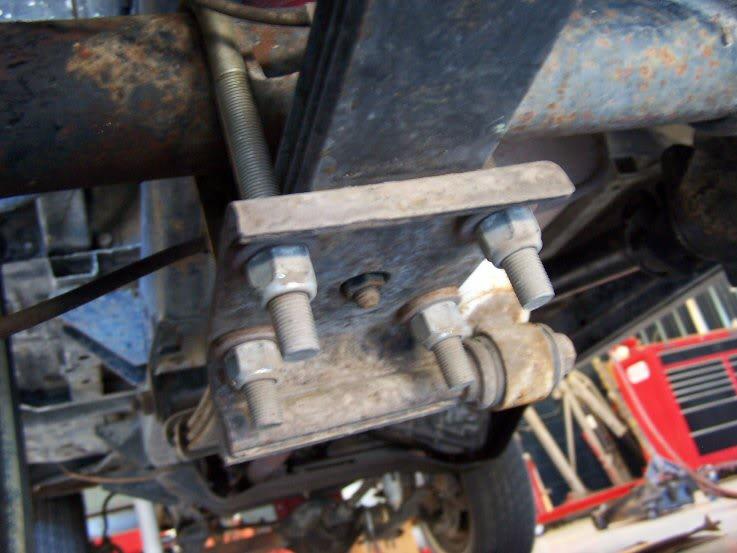
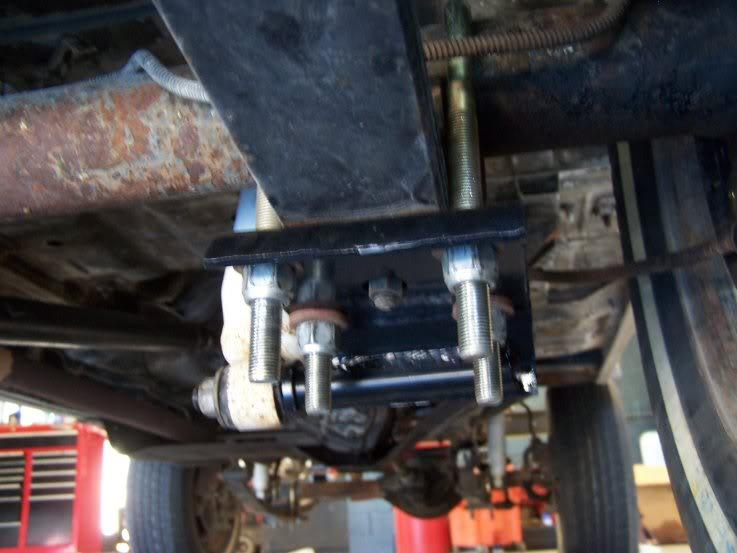
so another question.. the torgue settings in the manuals for the spring plates were based on what size nuts they are.. and none of them were for a 3/4 in nut so I struck a medium and went for 75lbs..
as I didn't remove the driver's side spring plate, I only verifity the torque on these nuts/bolts.. notice the lenght of exposed bolt
then on the plate I jsut replaced, I applied the same torque.. 75 lbs, and notice the length of the remaining bolts..
have I overdone them, or is there much of a risk of that.. or am I just overthinking all of this.. seems to me that equal torque settings would reveal a relativley similar amount of pressure, and therefore, travel, before you stop?
there's an old joke in that postulates, "what's the most dangerous thing in the Army?".. and there are a variety of answers..
- a LT with a map
- a CPT that says "I have a plan"
- a staff officer that says "I've been thinking.."
- an NCO that says "trust me"
- a Warrant Officer that says "watch this"
- a private with a grease gun
I tend to be the dangerous "Private with a torque wrench".. I'm never sure I've got this right..
so another question.. the torgue settings in the manuals for the spring plates were based on what size nuts they are.. and none of them were for a 3/4 in nut so I struck a medium and went for 75lbs..
as I didn't remove the driver's side spring plate, I only verifity the torque on these nuts/bolts.. notice the lenght of exposed bolt
then on the plate I jsut replaced, I applied the same torque.. 75 lbs, and notice the length of the remaining bolts..
have I overdone them, or is there much of a risk of that.. or am I just overthinking all of this.. seems to me that equal torque settings would reveal a relativley similar amount of pressure, and therefore, travel, before you stop?
Last edited:
Bushmaster6
Legacy Registered User
- City
- the Springs
- State
- CO
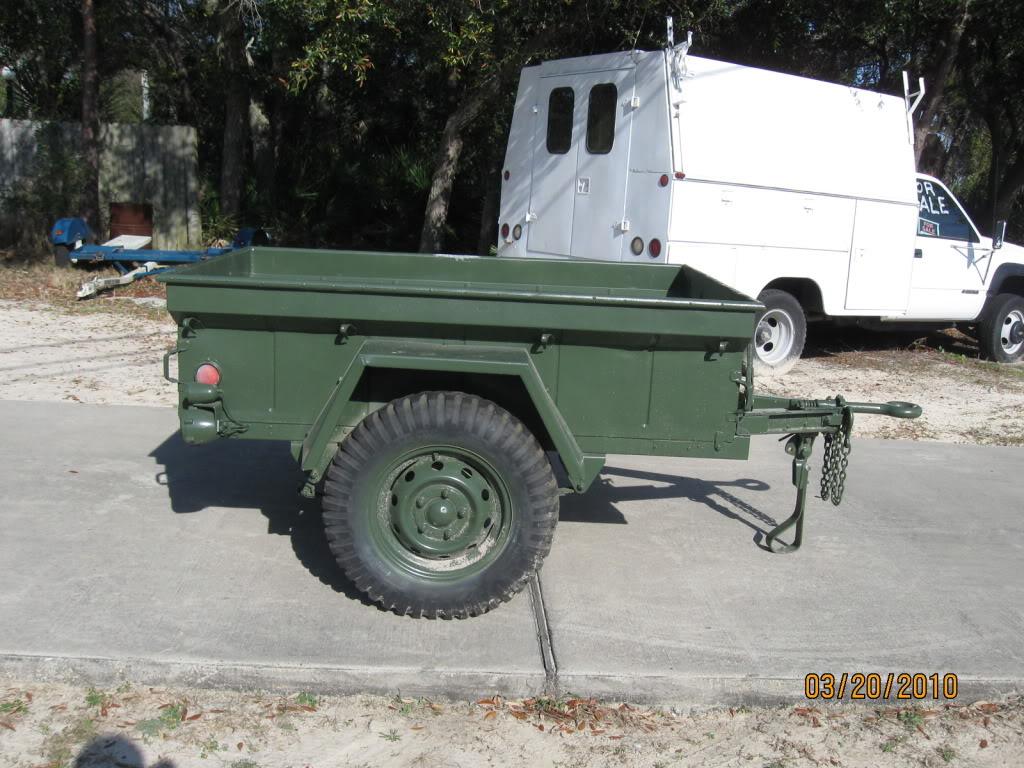
found some trailers for sale
please see my thread in the trailers sub forum..
please see my thread in the trailers sub forum..

- City
- Yorktown
- State
- Va
Cut the extra bolt length off.
Not all u-bolts are same length. And aftermarket spring packs are different thicknesses. So the u-bolts are made long.
Since you should never be unbolting them and reusing them. It is best to cut off extra length to avoid hang ups or bent bolts.
The shackle issue is partly caused by same thing. One manufacturer makes a width to meet most spring packs. If it really bothers you. Purchase a set of large fender washers and take up extra space to make it so that when you tighten the bolt to spec that you do not deform side of the plate.
On the bottom spring plate. I personally think that they should have been slotted at least to a small degree. Because it is hard to get two different manufacturers to bend a set of u-bolts to the exact same width. But using channel lock or better yet a C-clamp is OK if the amount that you need to make up is not too great. The u-bolts should have fit pretty snugly over the axle tube. If not then a little more bending in that area would have helped too.
Carl
Not all u-bolts are same length. And aftermarket spring packs are different thicknesses. So the u-bolts are made long.
Since you should never be unbolting them and reusing them. It is best to cut off extra length to avoid hang ups or bent bolts.
The shackle issue is partly caused by same thing. One manufacturer makes a width to meet most spring packs. If it really bothers you. Purchase a set of large fender washers and take up extra space to make it so that when you tighten the bolt to spec that you do not deform side of the plate.
On the bottom spring plate. I personally think that they should have been slotted at least to a small degree. Because it is hard to get two different manufacturers to bend a set of u-bolts to the exact same width. But using channel lock or better yet a C-clamp is OK if the amount that you need to make up is not too great. The u-bolts should have fit pretty snugly over the axle tube. If not then a little more bending in that area would have helped too.
Carl

ilovetrains
slightly backward
- City
- Lee's Summit
- State
- MO
Great story. And just to say, I started my CJ build in 2005...um yeah, right there with ya brother.
And as others have stated, THANK YOU FOR YOUR SERVICE!
And as others have stated, THANK YOU FOR YOUR SERVICE!
Bushmaster6
Legacy Registered User
- City
- the Springs
- State
- CO
steep learning curve this weekend...
.. ending in frustration..
decided to knock out the ball joint replacement, which is a job that (by reputation) was imposing but, in actuality, was not that technically hard.. although I had the help of a substantial set of tools and some advice from the shop techs at the on-base auto crafts shop..
my rule of underestimating my time requirements by 50% or more continues to kick my butt.. I figured I could do it in one day.. side 1 turned out to be a full day plus an hour this morning (in my self defense, I was not just changing the ball joints, I also sandblasted and painted the steering knuckle, the brake dust shield, and the hub cover), and the sandblaster was sucking this weekend.. I think it needs new material in it..
so, per the norm, side 2 started to go much faster than side 1 and I was on track to finish by shop closing time (4PM) and I ran into a hurdle.. might cross post this question in the suspension forum.. but I could not reassemble the driver's side lower ball joint and get it torqued on propery.. see next post..
.. ending in frustration..
decided to knock out the ball joint replacement, which is a job that (by reputation) was imposing but, in actuality, was not that technically hard.. although I had the help of a substantial set of tools and some advice from the shop techs at the on-base auto crafts shop..
my rule of underestimating my time requirements by 50% or more continues to kick my butt.. I figured I could do it in one day.. side 1 turned out to be a full day plus an hour this morning (in my self defense, I was not just changing the ball joints, I also sandblasted and painted the steering knuckle, the brake dust shield, and the hub cover), and the sandblaster was sucking this weekend.. I think it needs new material in it..
so, per the norm, side 2 started to go much faster than side 1 and I was on track to finish by shop closing time (4PM) and I ran into a hurdle.. might cross post this question in the suspension forum.. but I could not reassemble the driver's side lower ball joint and get it torqued on propery.. see next post..
Bushmaster6
Legacy Registered User
- City
- the Springs
- State
- CO
how the heck do you torque the lower ball joint nut?
I ran out of time to take pics to illustrate my problem but...
my driver's side lower ball joint nut went on fairly easily, and I was able to use a set of narrow gauge vise grips (below the hole in the steering knuckle and above the rubber boot of the new ball joint, grabbing the body of the "bolt" portion of the ball joint) and a torque wrench to get it on and torqued to spec but..
my pass side, once I re-hung the knuckle on the axle, connected the tie rod/drag link ends, torqued the upper ball joint castle nut (100lbs).. moving to the lower ball joint nut.. and the nut/spindle that it's on spin together..
the nut that comes with the kit has three small indentations which are on the top surface of the nut.. these indentations in turn put a "bite" in the highest thread in the nut, effectively pinching off that thread.. once the nut is spun on my hand down to where the bolt hits the top thread, any further torquing spins the nut and bolt together.. shop tech told me that was designed that way so you'd have to torque it on and "break" those pinches to get the thread open and the bolt all the way on..
on the driver's side, I was able to use a pliers to hold the nut (below the knucle, pinched just above the greast boot of the joint).. on the passenger side, the ball joint is high enough into the knuckle that the grease boot in nearly flush with the bottom of the knuckle.. I"m afraid that if I use vise grips to hold the bolt, I'll tear up the grease boot and ruin the new ball joint I just installed..
I tried using the old nut, I tried backing it both nuts on/off, and I tried an impact wrench (wich was a b-tch to get the universal joint/socket extension in there on top of the nut.. and I couldn't get enough torque on the thing without spinning the bolt..
left the shop angry with myself and the truck and out of good ideas..
add to that frustration, I'm paying 6 bucks an hour for a lift bay until I get this thing out of there (during shop openign hours only.. and they're closed Monday, so I have about a day to figure out what I"m going to do)
anyone experience this and figure a way around it?
I ran out of time to take pics to illustrate my problem but...
my driver's side lower ball joint nut went on fairly easily, and I was able to use a set of narrow gauge vise grips (below the hole in the steering knuckle and above the rubber boot of the new ball joint, grabbing the body of the "bolt" portion of the ball joint) and a torque wrench to get it on and torqued to spec but..
my pass side, once I re-hung the knuckle on the axle, connected the tie rod/drag link ends, torqued the upper ball joint castle nut (100lbs).. moving to the lower ball joint nut.. and the nut/spindle that it's on spin together..
the nut that comes with the kit has three small indentations which are on the top surface of the nut.. these indentations in turn put a "bite" in the highest thread in the nut, effectively pinching off that thread.. once the nut is spun on my hand down to where the bolt hits the top thread, any further torquing spins the nut and bolt together.. shop tech told me that was designed that way so you'd have to torque it on and "break" those pinches to get the thread open and the bolt all the way on..
on the driver's side, I was able to use a pliers to hold the nut (below the knucle, pinched just above the greast boot of the joint).. on the passenger side, the ball joint is high enough into the knuckle that the grease boot in nearly flush with the bottom of the knuckle.. I"m afraid that if I use vise grips to hold the bolt, I'll tear up the grease boot and ruin the new ball joint I just installed..
I tried using the old nut, I tried backing it both nuts on/off, and I tried an impact wrench (wich was a b-tch to get the universal joint/socket extension in there on top of the nut.. and I couldn't get enough torque on the thing without spinning the bolt..
left the shop angry with myself and the truck and out of good ideas..
add to that frustration, I'm paying 6 bucks an hour for a lift bay until I get this thing out of there (during shop openign hours only.. and they're closed Monday, so I have about a day to figure out what I"m going to do)
anyone experience this and figure a way around it?
Here's how
This is hard to explain but I will try. First off when doing ball joints you tighten the lower balljoint first. This is done as there is a adjustable split seat in the upper that has to be torqued once the lower is torqued on. That seat requires a special 4 prong socket that you can get at any auto parts store. All dana 30 and 44's use it. That upper adjustable split seat may be screwed down to far which will not allow the lower ball joint to seat. loosen the upper seats so there is nothing on them while tightening the lowers.
Now when doing lowers due to the pinch nuts you sometimes have to load the ball joint to be able to tighten it. If you are working with a lift (or whatever) put a jack stand, 4x4, block, under that knuckle (under the lower ball joint) and get some of the weight of the jeep on it (lower the jeep getting the weight on the knuckle you are doing). This will set the taper giving you a bind which will allow you to tighten the nut. Sometimes a little oil or anti seize on the threads will make those pinch nuts go on easier. Torque the lowers FIRST to 70-90 ft. lbs.. Now take the split seat tool and adjust the seats down on the upper studs, torque to 50 ft. lbs. Now put the nuts on the upper ball joint stud and torque those as well to 100 ft. lbs. If the cotter pin holes don't align go tighter to get them to...never loosen. The torques are from a chilton manual. Good luck
This is hard to explain but I will try. First off when doing ball joints you tighten the lower balljoint first. This is done as there is a adjustable split seat in the upper that has to be torqued once the lower is torqued on. That seat requires a special 4 prong socket that you can get at any auto parts store. All dana 30 and 44's use it. That upper adjustable split seat may be screwed down to far which will not allow the lower ball joint to seat. loosen the upper seats so there is nothing on them while tightening the lowers.
Now when doing lowers due to the pinch nuts you sometimes have to load the ball joint to be able to tighten it. If you are working with a lift (or whatever) put a jack stand, 4x4, block, under that knuckle (under the lower ball joint) and get some of the weight of the jeep on it (lower the jeep getting the weight on the knuckle you are doing). This will set the taper giving you a bind which will allow you to tighten the nut. Sometimes a little oil or anti seize on the threads will make those pinch nuts go on easier. Torque the lowers FIRST to 70-90 ft. lbs.. Now take the split seat tool and adjust the seats down on the upper studs, torque to 50 ft. lbs. Now put the nuts on the upper ball joint stud and torque those as well to 100 ft. lbs. If the cotter pin holes don't align go tighter to get them to...never loosen. The torques are from a chilton manual. Good luck

- City
- Redmond
- State
- OR
dsgraf has the procedure explained perfectly. You will want to re-torque the driver side in the above described manner also. You shouldn't be able to get much of anything in there when it's torqued properly. (referring to the vice grips)
Bushmaster6
Legacy Registered User
- City
- the Springs
- State
- CO
thanks guys.. makes sense.. didn't quite undertand that threaded split seat action on the upper.. and I had read to torque the lower first, but had tightened the uppers (to put pressure on to get torque on the lowers)..
had the same question on having "space" enough to grab with the vice grips on the lower, didn't look right to me..
had the same question on having "space" enough to grab with the vice grips on the lower, didn't look right to me..