• Notice for iPhone users: DO NOT use the image size reduction option when uploading photos to the forum. This causes portrait images to post as landscape. We have added a warning to the image insert pop-up as well.

Seat Conundrum - too tall after new seats. Need a definitive answer

jmarkel

Scrambled for Life
City
Fairfax Station
State
VA
Hi all,

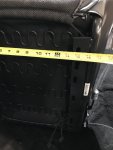
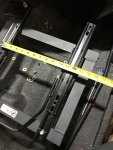
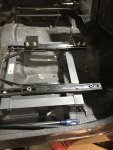
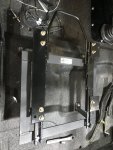
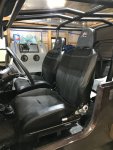
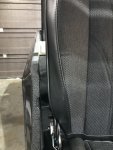
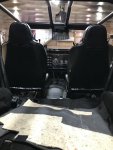
So i'm getting really close to finishing the 5-year project, and I went to mock up the seats today. I purchased a set of smittybuilt seats https://www.quadratec.com/products/24219_100X_PG.htm matching sides over a year ago when they were on sale. So now I'm at the point of install and I mocked them up today. On the passenger side, my wife's feet couldn't even reach the floor and mine were just close. I did not do the driver side, but I can already tell that if I put that on there, I won't be able to push the clutch all the way in.

So the question here is to wonder if there are alternative seat mounts that bring things down, or do I sell off these seats and get different ones. Looking for options. The seats seem to be pretty awesome, but they don't do me any good sitting up as tall as they do.
 

jmarkel

Scrambled for Life
City
Fairfax Station
State
VA
Well, i'm moving ahead. I purchased the Corbeau D124 and D125 seat brackets. They are supposedly 2 inches lower with the sliders attached. I might need to make an adapter to it out of 1/4" thick strip, but i'm hoping this works out. I just don't feel like going down the fab route on this...i have other fab ideas I"ll be taking on like some nerf bars and a custom tire carry setup.
 

jmarkel

Scrambled for Life
City
Fairfax Station
State
VA
Alright, the seat sliders are here. They are the right height! They will go in the holes in the floor with a little elbow grease! A mockup of the Smittybuilt seats on top tell me that they will be the perfect height! So, will the seats actually mount to the sliders? Not directly, but won't be difficult.

Here's how these will go together. The Corbeau seat slider is about 3" narrower than the mount points for the Smittybuilt seat. So, my plan is pretty simple. On one side of the seat, nearest the door, I'm going to put a 1/4" spacer and put the bolt through to the slider. That allows the seat to be centerline to the steering wheel. The other side I'm going to make up 2 4x3 plate of 1/4" steel and I'll drill those with 4 holes to mount the seat front and rear with two bolts each. The 4" will give me the length I need to make up for the 3" narrow frame and the width of 3" will give me enough to put two bolts through and have more surface so the weight of the person won't bend the brackets. 1/4" should be plenty for this application. Alternatively, you could put a complete piece of plate steel under there with just 6 holes but that would add about 10 lbs per side. It would also provide a really neat concealed space to hide stuff up under the seat...Repeat for the driver side. That's a pretty simple operation. And in the future if I ever wear these smittybuilt seats out, I'll either be able to replace them with similiar seats or I could directly mount a corbeau on there if I want.

This will be A LOT easier than modifying the original stock seat brackets to reduce the height. Yes, I lose the tilt forward but the seat will slide forward enough and with the tilt, to let people in the back if they need to get back there.
 

Twest

Basic User
City
Kalamazoo
State
Mi
I had to make a bracket to mount my Mastercraft seats to the brackets but they turned out great, you will love them
 

John N

Addicted....Ex-SOA VP
BENEFACTOR
Gold Member
Lifetime Member
SOA Member
City
Rockville
State
VA
I had to make a bracket to mount my Mastercraft seats to the brackets but they turned out great, you will love them
Mastercraft seats were a direct fit in my ‘81 Scrambler to the original mounts and slider.
 

jmarkel

Scrambled for Life
City
Fairfax Station
State
VA
I'll have some pictures today. It's a little more complicated than I was expecting. Not the brackets, but the fact that the MD Juan tub has put the seat mount holes in the wrong place so the brackets need to be different on each side. On the drivers side when the seat mount is in, is approximately 3.5" away from the body. ON the passenger side it is 4.5" away from the body.
 

Sfisher

Basic User
Silver Member
City
El Dorado Hills
State
CA
On my original tub the mounting holes are 7" from the driver's tub side and the passenger side is 9" (approx.) from the side. I have PRP seats with their mounting bracket. The driver seat is very close to the side while the passenger side has a couple inches to spare.
 

jmarkel

Scrambled for Life
City
Fairfax Station
State
VA
Heres a few pics. Passenger seat done and centered. These seats are wider than stock seats so its pushed to the window as far as i could conceivably make it. The driver side will need brackets on both sides to position where i want it. should work well. Ill post more when done.

What you see on this is the driver side. I made matching brackets for the passenger side and it put the passenger seat where I wanted it. I duplicated the brackets for the drivers side and found it was about 1.5" too much in the middle, so I'll be making new brackets before I mount the driver seat to position it the same distance away from the driver side door as I am from the passenger door and will center it directly.
 

Attachments

  • E402995B-698E-4755-AA52-F4F25CEF8EA7.jpeg
    E402995B-698E-4755-AA52-F4F25CEF8EA7.jpeg
    100.2 KB · Views: 31
  • 5E214134-F665-44D4-98DB-03EC914C98AC.jpeg
    5E214134-F665-44D4-98DB-03EC914C98AC.jpeg
    194.9 KB · Views: 31
  • D96C0E9D-F710-4C5D-A160-10F94E2E99F1.jpeg
    D96C0E9D-F710-4C5D-A160-10F94E2E99F1.jpeg
    166.1 KB · Views: 31

jmarkel

Scrambled for Life
City
Fairfax Station
State
VA
Both are mounted now and seem perfect. The driver side mounts are different than passenger.
 

Attachments

  • F68ACA7F-5AFA-4E71-962F-AA2CF704F32E.jpeg
    F68ACA7F-5AFA-4E71-962F-AA2CF704F32E.jpeg
    214.9 KB · Views: 43
  • 418A65C3-485C-4D03-A46D-6321CEBD2678.jpeg
    418A65C3-485C-4D03-A46D-6321CEBD2678.jpeg
    135.1 KB · Views: 43
  • 687DD376-CCA2-4813-B39A-8AF41EF4359E.jpeg
    687DD376-CCA2-4813-B39A-8AF41EF4359E.jpeg
    180.7 KB · Views: 41
  • EB97DCA5-2C71-456B-909D-1CFD86B41387.jpeg
    EB97DCA5-2C71-456B-909D-1CFD86B41387.jpeg
    184.3 KB · Views: 36
  • 8631404E-2F6D-4926-B035-EF5EFB172A41.jpeg
    8631404E-2F6D-4926-B035-EF5EFB172A41.jpeg
    125.2 KB · Views: 37
Top