• Notice for iPhone users: DO NOT use the image size reduction option when uploading photos to the forum. This causes portrait images to post as landscape. We have added a warning to the image insert pop-up as well.

Tub Removal

leeherron

Legacy Registered User
City
Pensacola
State
FL
So I've removed the hood, both front fenders and the grill (with radiator) .. I'm about to remove the windshield and full hardtop ..

Wanted to put together a check list for the tub removal ..

This is what I have so far ..

1. Steering column.


.. suggestions?
 
Did you post a question like this the other day? Saw it and thought it would be a good idea, let's keep this going...

2. Master cylinder

3. Seats

4. Center console

5. Dash pad

6. Dash board

7. Throttle cable

8. Clutch linkage

Sorry, those are obvious, but the point is to have a checklist so we aren't tugging when something is still attached. I'll be doing a tub swap this year, so I sorta understand your pain.
 
Two good friends and two sawhorses and it sounds like your ready. CJGoode will tell you to leave the seatbelt and anchors in too, to lift it with an engine lift if you have one...let's see the pics, too. :)
 
Yes that is what I did lifted it with the seat belts and an engine hoist. With steering column removed it is about the perfect center and balanced when lifting by them. Allows you to lift it a little get under and look for anything you missed.
 
After the front clip has been removed, this is the check list for tub-removal we've put together. Any last minute additions? I'm planning on doing it tomorrow.

__ Dash pad
__ Dash board
__ Wiring harness
__ Steering column
__ Master cylinder
__ Throttle cable
__ Seats
__ Center console
__ Clutch linkage
__ Emergency Brake cable.
__ Fill and Vent hose
__ Roll Bar

12 body mounts, 2 friends, sawhorses and some beer. Check.

So it looks pretty complete .. I'll add notes from my experiences.
 
A couple more small items:
heater hoses
wiring to transmission and transfer case
vent lines for the axles and transfer case
 
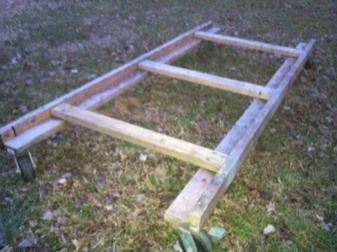
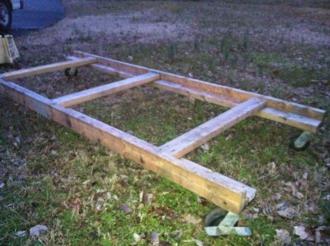
If you want to make things easier on yourself; get a few 2x4s and wheels and build a dolly to set the body on. Then you can move it around by yourself.
 
Like this!!

47b2d8a5f27a159d-1.jpg
47b2d8a5f291ecde-1.jpg
 
Not sure where the wiring is for the transmission and transfer case, and from what I have seen, the vent lines and check-valves are only wire-tied to the body .. maybe. Now the heater hoses, and related items are needed for sure! Updated list below.


__ Dash pad
__ Dash board
__ Wiring harness
__ Steering column
__ Master cylinder
__ Heater hoses
__ Throttle cable
__ Seats
__ Center console
__ Clutch linkage
__ Emergency Brake cable.
__ Fill and Vent hose
__ Roll Bar
 
I just took my tub off 2 weeks ago and your list looks pretty good.

If you unhook the wiring harness from the firewall bulkhead connector then you don't have to worry about the wiring to the t-case and tranny.

Also, you have to remove the e-brake cable from the pedal and it usually attaches to the undersdie of the bed in front of rear axle as well.
 
attachment.php


Guess what I did today ..

Need to add Evap lines from gas tank to the list .. there are probably some other details that I will add tomorrow.

You wouldn't believe what two guys will do to finish a goal with limited tools.

Thanks for the help guys.
 
Okay, so my experience .. really not as bad as I thought it might be; no broken or seized bolts. A few hoses we just cut instead of properly disconnecting, but they are slated for replacement anyway. Here is my final version of the list, with notes:

I didn't include taking the windshield off .. which was pretty easy actually.

__ Dash pad
> - didn't have, so no notes.

__ Dash board
> - It is best to disconnect the harness/fuse block and leave gauges and lights intact. The only trouble with this method is the harness is laced between the steering column and top of the dash - for me, I had to remove the bolts that held the column to its mount. Also, you have to remove the high-beam switch.

__ Wiring harness
> - See above. There are several anchors that hold the harness across the firewall, a single wire attached to the heater fan (engine compartment).

__ Steering column
> - single bolt just above spline inside engine compartment .. PB basted it, released with a tug. Harness has to be removed just above the column (inside). A few bolts at the gasket in which the column travels though the firewall. (don't forget the bolts that hold the column up to the dash (inside).

__ Clutch linkage
> - remove carter pins and washers from clutch linkage; both sides of firewall, remove linkage.

__ Master cylinder
> - remove and seal brake lines, drain fluid, release clip for brake pedal linkage from inside. Remove bolts at firewall - which also holds the brake peddle assembly in place. Clutch linkage has already been removed, so now the peddle assembly can be removed.

__ Charcoal Canister
> - forgot about this one .. pretty easy, but removing it includes removing the fender braces to the firewall.

__ Throttle cable
> - Release cable attachment at gas peddle and fished though firewall.

__ Seats
> - as easy as it seems.

__ Center console
> - Didn't have one; no notes.

__ Emergency Brake cable.
> - Release cable attachment at peddle, then detach the cable underneath the body just in front of the rear axle (single bolt).

__ Fill and Vent hose
> - Remove at tank. See evap notes below.

__ Evap Lines
> - These come from gas tank and travel through a body brace to driver's rear quarter - we just cut'em.

__ Roll Bar
> - as easy as it seems.

__12 body mounts
> - There are two less obvious body mount bolts hidden between the fuel tank and the rear axle .. only difficult ones (sorta).

There were only two of us, so it was a bit tricky lifting the body off the frame without a hoist (you can see us using a ratchet-strap to hold up one end of it :)

Also, be prepared to accommodate the edges of the body, as they are lower than the braces which support the body.

attachment.php


attachment.php


attachment.php


Overall, a lot of fun! :)


.
 
Last edited:
Back
Top