• Notice for iPhone users: DO NOT use the image size reduction option when uploading photos to the forum. This causes portrait images to post as landscape. We have added a warning to the image insert pop-up as well.

Randyzzz Scrambler Restification Thread!

Jake- are you trying to use the stock harness or did you get an aftermarket harness?

I have several links that I used to modify my own harness down to 6 power feeds, fuel pump relay and starter relay, and brake switching wires. I am using that cop car fuse panel so that has complicated things "a bit":rolleyes: .

Here's the links I have found most helpful. On the forums you just have to read through the posts and pick out what you need. I have found that even though there are similarities, be careful as to the year of your engine compared to the diagrams.

http://www.lt1swap.com/wiringharness.htm (Used this one the most)
http://www.ls1tech.com/forums/conversions-hybrids/312119-ls1-swap-faqs.html
http://www.thirdgen.org/techboard/ltx-lsx/157243-ls1-swap-question-answer.html
http://www.nc4x4.com/forums/showthread.php?t=39092
http://pirate4x4.com/forum/showthread.php?t=705829
http://www.ls1truck.com/forums/lsx-truck-conversions/

I have a ton more, but I was able to get most of my info from here. One of the biggest helps was buying an online wiring diagram for the donor vehicle.

If there's anything specific, let me know and I'll see if I have the info. I've "built" a pretty good binder of stuff by now...

I still haven't addressed fuel system plumbing. I'm elbow deep in my electrical system conversion. I'm building that fuse panel to be modular in that it is completely connected by various types of weatherpack connectors. That and trying to overthink and pre-plan for possible future system requirements...
 
Last edited:
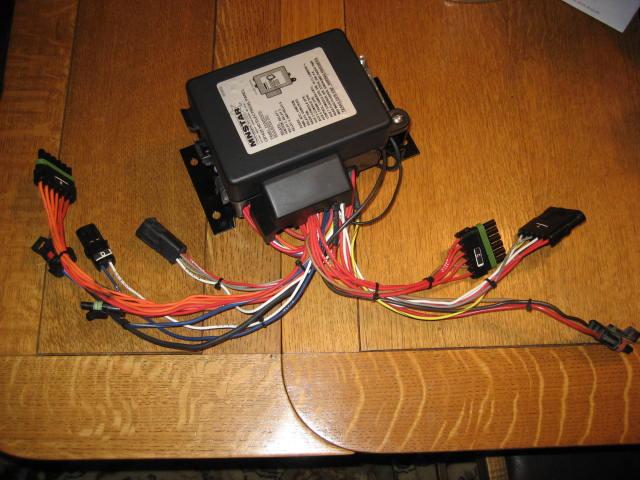
thanks for the reply. I am using a stock harness that has been reworked. I need to lay out the whole harness and look at it and write down my questions. The inital question I have is he sent the harness with some relays. He identifies what goes to hot and ground, and keyed hot. it also came with a fuse block that I assume I will run the relays thru. I'll sanp some pics of the harness later.
 
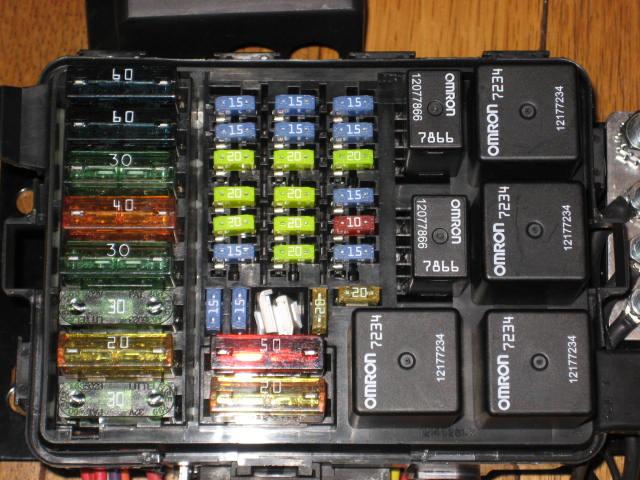
Seeing as we're talking about wiring I thought I'd post a couple pics of the finished fuse box/power distribution center. This will put all the fuses under the hood.


The wires on the left go to the engine and to the horn/washer. The wires to the right go to the bulkhhead connector and fuel pump. All connections are using Weatherpack style connectors. The main power cable feeds into the front, and the Ign switch feed is next to it.


PDC002-1.jpg


The maxi fuses on the left feed 2 banks of 3 fuses, and the 6 relays. the 2 maxi's on the bottom feed the ign switch and rear power to the trailer plug. The 18 fuses consist of 10 relay fed fuses keyed off the ignition switch, 6 battery fed fuses, and 2 pass-thru fuses for horn and washer. The relays consist of 3 controlled by ignition power, and one each for the horn, starter, and fuel pump. There is a ground buss at the side too. My goal here is to have minimal amperage behind the dash, with relays doing most of the switching duty. There is another 4 relay center for the headlights hi/lo and fog and driving.

PDC003-1.jpg


Now to rewire the dash again...
 
Last edited:
wow, thats cool. I am trying to figure what I should have keyed hot and what needs to be hot all the time. Also figuring on where to mount the computer on the DS. My harness came with a fuse panel and I cant decided or figure if it can be some keyed hot while others are hot all the time.
Jake
 
This might help... some of the circuit numbers were different on my 04, but you get the idea what is ignition keyed (pink) and battery feed (orange). I don't remember where I downloaded this from...

Wire Cavity , (# of wires), Color, Circuit #, description
CAVITY WIRE COLOR Circuit No. FUNCTION
B8 (2) ORN 440 BATTERY 12V+ TO PCM
C11 PNK 439 KEY 12V+ TO PCM
F2 (2) PNK 1020 KEY 12V+ TO PCM & TRANSMISSION SOLENOIDS

C10 (2) PNK 1039 KEY 12V+ TO INJECTORS 1 & 3
D10 (2) PNK 1039 KEY 12V+ TO INJECTORS 5 & 7

C12 (2) PNK 1239 KEY 12V+ TO INJECTORS 2 & 4
E7 (2) PNK 1239 KEY 12V+ TO INJECTORS 6 & 8

E12 PNK 1039 KEY 12V+ TO COILS 1,3,5,7
E6 PNK 1239 KEY 12V+ TO COILS 2,4,6,8

C4 PNK 839 KEY 12V+ TO MASS AIR-FLOW SENSOR
D8 (2) PNK 539 KEY 12V+ TO O2 SENSORS, BANK 1 & BANK 2 FRONT O2'S

D11 PPL 6 STARTER SOLENOID FEED, 12V+ DURING CRANK ONLY.

B7 DK GRN/WHT 465 FUEL PUMP RELAY FEED (PROVIDES 12V+ TO RELAY)

All the grounds needed will be in the engine harness. Should be 3 of them.

Rear of engine behind intake, should be two grounds. G103 & G104
Drivers side, below manifold is a ground. G102


I also found the online instructions form Painless to be helpful also.
 
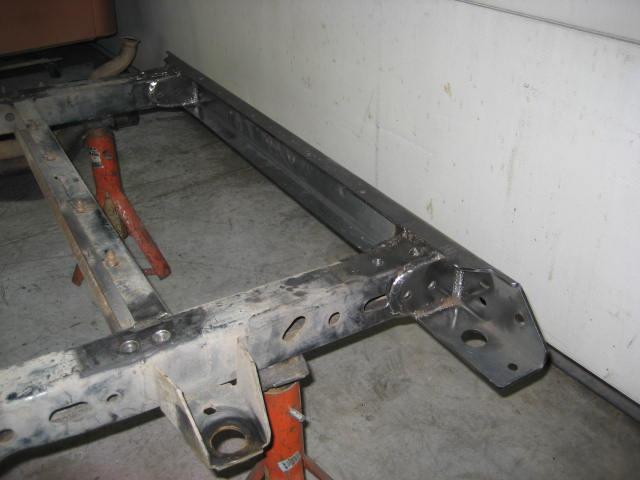
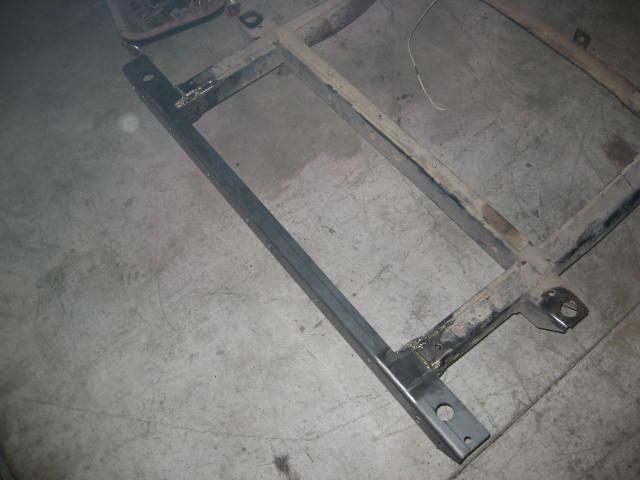
Made some serious progress today. Got the heavy duty rear crossmember from Jason installed. All I can say is, this thing should be a requirement on every Scrambler here! It fits perfectly, the extra frame tabs made the installation 100% stronger, and it looks great!

I should have taken more pictures, but here's what I have.

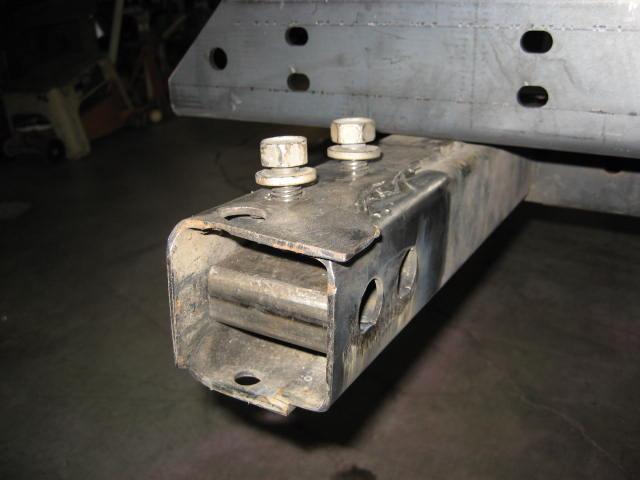
I started by cutting off the stock piece of tin, and cleaning the frame stubs. I then welded 2 nuts to a drilled plate to match the existing holes in the bottom of my frame. Welded the plate in, better than threaded inserts. Next I took a piece of rectangular tubing and welded it as a support sleeve between the frame rails where the two 1/2" bolts pass through. Don't think it would crush after the side plates were welded in, but hey, overkill is good!
rearcrossmember001-1.jpg


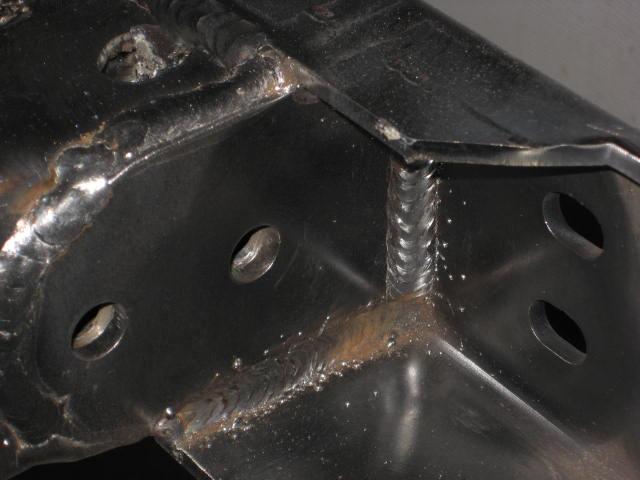
Next I welded all the areas that touched before installing the side reinforcement plates. Basically, if it touched, it got welded.
rearcrossmember002-1.jpg


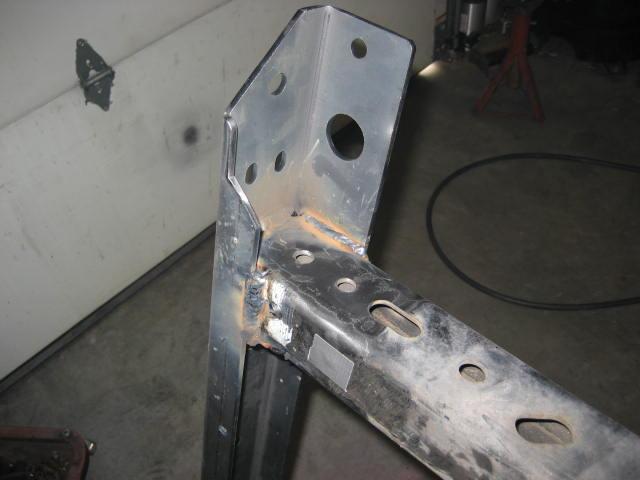
Next I installed the reinforcement plates. I just bolted them into position and burned them in. One great advantage with the plates is on the inner seam- from the factory the frame doesn't touch the rear crossmember. It does now!
rearcrossmember013-1.jpg


Just have to get the rest of the crud off the welds, prime, and paint.
rearcrossmember011-1.jpg

rearcrossmember004-1.jpg


Thanks again, Jason for providing such a great product!

Tomorrow is shock hoop day. I got the tubes bent this afternoon, I'll post up pics of how they turn out tomorrow.
 
Last edited:
Nice, that may be the only setup I've seen that is stronger than the way I replaced my crossmember with the Runck bumper :evil:
 
Looks awesome. Looks like you burned that in with some 6011's. I never have got the hang of those.
 
Pepper said:
Looks awesome. Looks like you burned that in with some 6011's. I never have got the hang of those.
No, that was straight MIG. I use a Lincoln PowerMig 215, 220V. It rocks, compared to my old Hobart 125. Hardest part was flipping the frame over and over to get good access to the welds- trust me- my overhead and vertical welding doesn't look as good as that. My welding mentor told me the sign of a good weld is if you can see evidence of the weld on the backside of the plate. I think these will hold. :D
 
Those welds are nice. GREAT project, I've been enjoying following it!

Nothing welds like a Lincoln with Lincoln wire in it! I'm really happy that Home Depot offers the large Lincoln spools for only about $38!

A Powerwave MIG 215 or 180 is on my list. I have a little 135 Plus right now and the tombstone 225. One of my favorite tools is the Lincoln Procut 25 plasma cutter.
 
Thanks for the positive words. This build has been way slower than I had ever expected, first because of being laid off and lacking funds, and second because I decided to do a complete frame-off. Finally taking my own advice to do it once, and do it right. Hopefully this will mark a beginning of increased progress, still unemployed but I have gotten to the stage where I can make instead of buy stuff.

I had a plasma cutter- Hypertherm Powermax 600- but I didn't use it enough to merit the expense, so I sold it. There's not many things that can't be done with a sawzall!:D There have been a few times I wish I still had it- made sheet metal patterns a breeze, but overall I haven't missed it.
 
Split the cost with a buddy. We were going to fab parts in some volume but I got out of that . . . turned a hobby into work, then no hobby anymore.
 
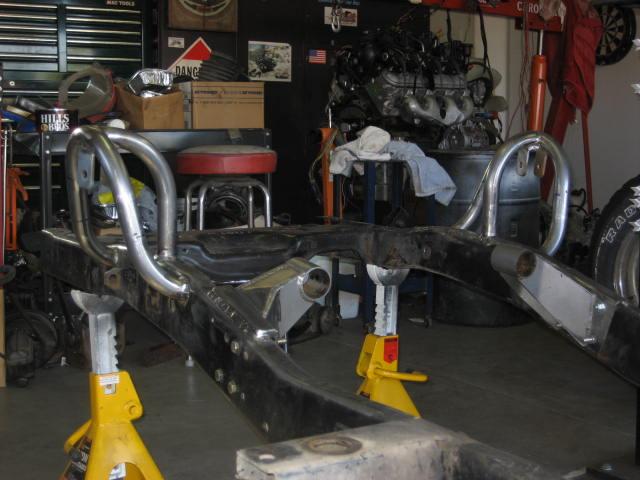
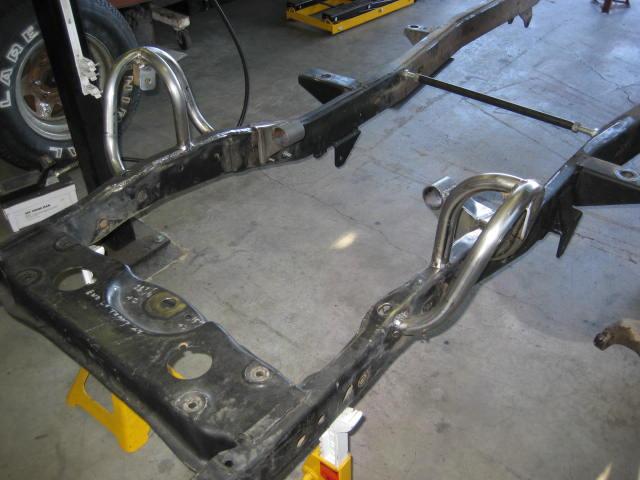
Well, yesterday I mentioned shock towers... and today I built them. They are basically the same height as stock, just better looking. (I think) Simple project, 1.25 tube and some upper brackets I had left over from a Cherokee. I'll let the pictures do the talking.

shockhoops0041-1.jpg

shockhoops0011-1.jpg


This is about all I needed to do on the frame! Now I can start on the tub...filling all the unneeded holes, re contouring the firewall to fit the A/C, changing the tailgate to a swing gate, and building the cage.
 
Last edited:
Nice. Have to ask though why you didn't go for a height more like you get with the Ford shock towers for a bit more travel?
 
Couple of reasons. I have decided to tone down the hardcore aspect of my build. I want to be able to keep this Jeep "forever" and also be able to use it as a daily driver. I want it to be street friendly, and the type of wheeling I do is more like trail riding than anything else. With my back and neck issues I couldn't do hardcore even if I wanted to. I also want to be able to get up into it, and have my wife enjoy riding in it so we can take it on vacation from time to time. It's interesting, I have read several threads lately where guys are considering undoing some of their modifications to make their rigs more user friendly. I am trying to skip the intermediate step, and go straight to comfortable. Hence the cruise, A/C, automatic, nice stereo...

Secondly, and with the above thought in mind, the Edelbrock reservoir shocks I ordered were for a 4" lift. I measured where my axles were at max compression (before steering started to get in the way), and max droop. The stock mount height worked out perfectly. So, the shock mounts were mostly because I wanted something "cool".

So, my direction will be more towards a trail riding/expedition type vehicle. Something usable daily and extremely capable. Getting laid off has made me realize what is really important to me. I will probably end up keeping just the Scrambler and the 90 Wagoneer. My wife and I have both realized we long to simplify our lives. I want to spend my free time enjoying life- camping, exploring, being with friends. I have spent most of my life until now with too many irons in the fire, and being rather obsessive/compulsive and consequently being unable to enjoy anything. So, I'm building the Scrambler to be something I'm happy with on the street, at a car show, on the trail, and hopefully when I'm old and gray, or at least as long as they're still pumping gas.

Wow...got a bit philosophical there. Bet that's a lot more answer than you expected for a simple question!

And don't worry- I'll have lots more cool stuff in this build. I'm still shooting for summer to be driving!
 
That is quite an answer! ;)

I get it and I understand, that's why mine's built like it is and why I had a definite "stopping point" in terms of size/beef. The last big structural part of that puzzle is going in next week when the cage is built. After that it'll be fixing/improving/replacing little things to make it last and engine swap/mods to get it to cruise down the highway comfortably.

There were a couple points in the months after the move up here that I could have taken a plunge into another project, but I didn't want too many things going at once.

Game on.
 
Yeah, I just had a Jeepster Convertible and another Scrambler offered to me this week. I'm going to pass on both of them because I just don't need another project.

I had my "Ah Ha" moment last summer- I was sitting at the lake with my wife, my daughter and son in-law, and granddaughter. Instead of enjoying what most people would have thought to be one of those "best" days, I was constantly thinking "I don't have time for this, I have Jeeps to work on". And the light bulb came on. Thank God! I'm still tempted, but I just have to remember that moment.
 
Randyzzz said:
I will probably end up keeping just the Scrambler and the 90 Wagoneer.

Does this mean I might have a chance to buy the Jeepster someday? :D All the work you're doing on the Scrambler is top notch! :bow: Wish I could weld like that...still learning...at least I can weld thin sheetmetal together with tack after tack after tack...
 
jeffs396 said:
Does this mean I might have a chance to buy the Jeepster someday?

That's a possibility! My daughter has first shot at it though, she has always wanted it. And, It's far from a finished product.

Jeff, if you can weld sheet metal, you're doing great. That's one of the hardest types of welding. Most people get frustrated, and try to go too fast, warping the metal. Then there's always blowing through... I wish I'd kept my smaller welder for sheet metal work.

And thanks for the compliment on my progress.
 
Back
Top