

You are using an out of date browser. It may not display this or other websites correctly.
You should upgrade or use an alternative browser.
You should upgrade or use an alternative browser.
The beginning.. the end.... and a fresh start
- Thread starter surfjeepzx
- Start date

superduty_5.9
Basic User
- City
- Mount Victory
- State
- OH
Awesome build. I read this whole thread over the last 2 days at work. I almost felt ill when you scrapped your old CJ8. I live in Ohio in the rust belt and never thought about Florida trucks rusting. We put saly on our roads and you have salt in your air near the ocean. I'm glad you stuck with an AMC engine instead of the common small block Chevy. I'm a diesel guy so when I find a CJ8 for my next project it will be powered by a 4BT.
Anyway love your Jeep. Glad to see your daughter helping! My daughter is 6 and loves to help her dad. I have 2 boys also but they don't want to help me but with her I don't even have to ask!
Anyway love your Jeep. Glad to see your daughter helping! My daughter is 6 and loves to help her dad. I have 2 boys also but they don't want to help me but with her I don't even have to ask!

- City
- Wilbur by the Sea
- State
- FL
I lower the front and back and turn on the floor fan you see in this pic. That fan moves some serious air. It has 3 speeds and with the ends of the tent closed it pulls so much air the tent evacuates all the fumes as fast as I spray. Also I'm using HVLP (High Volume Low Pressure) spray guns. They put out way less air and overspray.Are you using any exhaust in that tent? Or just spraying with the side closed.
Sent from my SPH-L900
- City
- Wilbur by the Sea
- State
- FL
Today I rolled the tub out and wet sanded the sides in preparation for applying the pin line tape. It took me all day to get it ready for painting the stripes. Between sanding and taping the first side took me beyond several hours with figuring the lay out. When I did the other side it took me 1 hour. Then taping everything off with paper and such I ran out of daylight but I'm ready for paint tomorrow morning.
I took a bunch of pics as I was planning on showing the process of lay up but then it started clouding up and then a few showers rolled through so I had to move back under cover. Under the tent I couldn't get the side view for pics but I'll show what I have for now.


Sides sanded and starting on the pinlines


That's where I left off before the sun and then rain moved me under cover. I did change a couple curves here and there so the stripes have morphed since those shots. And looking at them now I can tell I want to un-change one of my changes already. So I'll take another look at it in the morning when my brain is rested.
I took a bunch of pics as I was planning on showing the process of lay up but then it started clouding up and then a few showers rolled through so I had to move back under cover. Under the tent I couldn't get the side view for pics but I'll show what I have for now.
Sides sanded and starting on the pinlines
That's where I left off before the sun and then rain moved me under cover. I did change a couple curves here and there so the stripes have morphed since those shots. And looking at them now I can tell I want to un-change one of my changes already. So I'll take another look at it in the morning when my brain is rested.

- City
- stafford
- State
- va
Wow ! NICE


- City
- Wilbur by the Sea
- State
- FL
Well here she is
I'm happy with how it turned out.. and I'm beat. Now I gotta get ready for trick or treating fun with my little Angel. The paint still needs to be sanded and polished. I still have the tailgate, roll bar, and doors to finish. And the front bumper should be here next week. And then there's the wheels which I haven't sprung for yet and on and on...


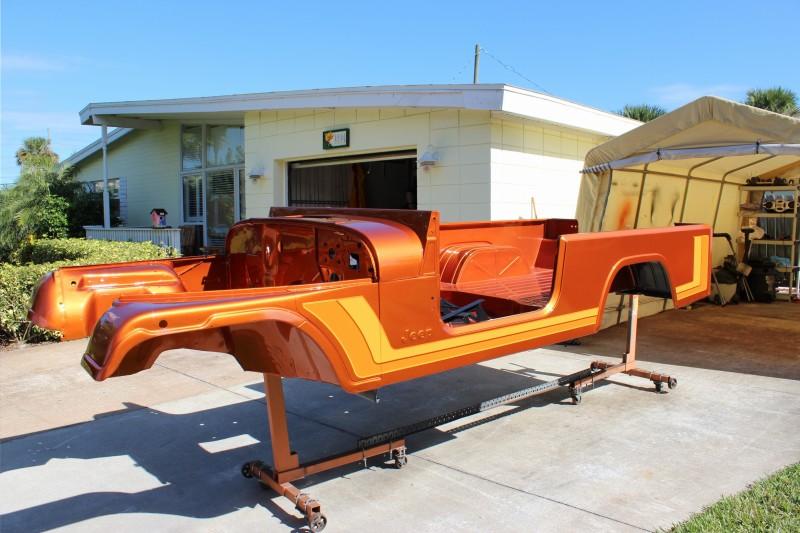


I'm happy with how it turned out.. and I'm beat. Now I gotta get ready for trick or treating fun with my little Angel. The paint still needs to be sanded and polished. I still have the tailgate, roll bar, and doors to finish. And the front bumper should be here next week. And then there's the wheels which I haven't sprung for yet and on and on...


superduty_5.9
Basic User
- City
- Mount Victory
- State
- OH
Really nice work on the stripe layout! Looks awesome.
- City
- Wilbur by the Sea
- State
- FL
Thanks guys. Next week I'll get it transfered onto the chassis. Looking forward to Monday.

- City
- Bedford
- State
- NH
I tried to look through all the posts to find my answer, but didn't come up with one... just curious, why wasn't the radiator shell either installed and/or painted as well at the same time so everything would match?
I am no painter by any means, but I did a lot of parts months apart when I attempted to paint my rig and I can see 2 different color silvers depending on when the light hits it right and which angle I am standing at.
Your job is far better than how mine turned out, but I just happened to see the pic of it on the rotisserie and it just struck me as odd that the grille wasn't included, either installed or separate.
cb
I am no painter by any means, but I did a lot of parts months apart when I attempted to paint my rig and I can see 2 different color silvers depending on when the light hits it right and which angle I am standing at.
Your job is far better than how mine turned out, but I just happened to see the pic of it on the rotisserie and it just struck me as odd that the grille wasn't included, either installed or separate.
cb
- City
- Wilbur by the Sea
- State
- FL
Good question, the grill was painted when I painted the inner fenders, the firewall, and the wheel wells, within a day or so apart. I'd have to look back myself to see if I posted the pics. The grill was completely cleared in aircraft clear. So it may be slightly off but only because I used a different clear on purpose. I planned on installing a chrome overlay so I opted for the harder clear coat over the entire surface more for abrasion resistance and corrosion protection. After I removed the overlay from my other grill and saw the damage I planned ahead.
To answer your question as far as paint times and matching the finish, when I bought the first gallon of paint I reduced it all at the same time. So the mixture is identicle. In other words it's all being sprayed from the same source of paint just at different times. Also I buy the paint from the same store and the same person mixes the paint from the same stock etc. He knows what he's doing and he has matched colors for me on a few other specialty projects I've done as favors. So far so good.
To add to that there is a difference in the clears coats I've used and that does give the finish a different look in certain lighting, more so in the shade. The tub interior, firewall, inner fenders and wells are cleared in aircraft clearcoat. That paint was sourced from my work as shelf life expired stock that was being disposed. The difference is the finish hardness and fluid resistance of the airplane stuff is right up there with powdercoating, maybe even harder. The stuff is very hard, if not impossible to work with but does offer more durability. The airplane stuff is not designed to be sanded and polished to a certain finish. It's spray it and forget it type paint there fore the couple spots a sagged were near impossible to sand and polish out. Good thing those spots are under the Jeep.
Although there is a slight tint difference between the floors and the exterior surfaces it's only noticeable in the shade, and then only if I point out the difference. My wife and friends that have seen it up close think I'm overly picky because they would never have noticed if I didn't say, "look at it like this.. from this angle.. can you see what I'm saying?" Also once the rollbar, front and rear seats, floor mats, and other interior stuff are in place it will all disappear.
The outer areas use the same copper base coat but an automotive clear that not as hard but very workable.
To answer your question as far as paint times and matching the finish, when I bought the first gallon of paint I reduced it all at the same time. So the mixture is identicle. In other words it's all being sprayed from the same source of paint just at different times. Also I buy the paint from the same store and the same person mixes the paint from the same stock etc. He knows what he's doing and he has matched colors for me on a few other specialty projects I've done as favors. So far so good.
To add to that there is a difference in the clears coats I've used and that does give the finish a different look in certain lighting, more so in the shade. The tub interior, firewall, inner fenders and wells are cleared in aircraft clearcoat. That paint was sourced from my work as shelf life expired stock that was being disposed. The difference is the finish hardness and fluid resistance of the airplane stuff is right up there with powdercoating, maybe even harder. The stuff is very hard, if not impossible to work with but does offer more durability. The airplane stuff is not designed to be sanded and polished to a certain finish. It's spray it and forget it type paint there fore the couple spots a sagged were near impossible to sand and polish out. Good thing those spots are under the Jeep.
Although there is a slight tint difference between the floors and the exterior surfaces it's only noticeable in the shade, and then only if I point out the difference. My wife and friends that have seen it up close think I'm overly picky because they would never have noticed if I didn't say, "look at it like this.. from this angle.. can you see what I'm saying?" Also once the rollbar, front and rear seats, floor mats, and other interior stuff are in place it will all disappear.
The outer areas use the same copper base coat but an automotive clear that not as hard but very workable.
- City
- Wilbur by the Sea
- State
- FL
If I were 900 miles closer, I would enjoy lending a hand. Re-assembly is the fun part.

If you were 900 miles closer I'd accept the help and even supply the Beer!

- City
- Bedford
- State
- NH
Thanks for the explanation... I know that sometimes people do things because it was "how it was done at the factory", or "how to do it the right way" or what not and I wasn't sure if this was following some script or not.
As for the clears... that stuff sounds great for the extra hardness behind the grill shell.
My 76 had one on it and when I removed it, there were bare spots that were worn through the paint and other areas that weren't even touched... so I know what you are saying on wanting more protection there.
cb
As for the clears... that stuff sounds great for the extra hardness behind the grill shell.
My 76 had one on it and when I removed it, there were bare spots that were worn through the paint and other areas that weren't even touched... so I know what you are saying on wanting more protection there.
cb