• Notice for iPhone users: DO NOT use the image size reduction option when uploading photos to the forum. This causes portrait images to post as landscape. We have added a warning to the image insert pop-up as well.

Brake Bleeding Problems

forfoxsakeoffroad

New member
City
Franklin
State
IN
Hello all. I've been reading a lot on the forum and getting tons of tips, but even after searching and reading through pages of info I'm coming up a little short on what should be a simple process.

We're working on a frame off CJ8 basketcase build. It showed up in buckets and piles and we've had to source just about every single thing. I'm nearing the end, but cannot get the brake pedal to firm up. I've bled countless brakes and never had this issue, and I'm hoping you all can help.

New M/C, used booster, new booster bracket and linkage, used pedal, new lines, new proportioning valve, new soft lines, new calipers pads and rotors in the front, new cylinders, shoes, hardware and drums in the back.

Bench bled the MC, have the lockout tool that screws in where the sensor goes in the prop valve, and have vacuum bled, 2 man bled, gravity bled, and used a few different parts store one man bleeders all to no avail. Fluid comes out at each corner with no bubbles. No leaks anywhere. However, the pedal is soft the first time you push it. The calipers are squeezing because there is resistance on the wheels up front, but not enough to hold the wheels when even turning by hand. If you pump them up a few times they will hold, almost like there is still air in the line.

I've gone through the entire process multiple times, but can't get them bled. Going to give another MC a shot and see what that does, because it wouldn't be the first time I got a bad new part. Hoping there is something else I'm overlooking so we can get this puppy back on the road.
 
I fought a brake issue on a disc brake CJ5 took to my buddy's shop they but it on the lift and found the calipers were put on the wrong side. Make sure your bleed valve is at the top not the bottom. I wouldn't have thought you could but them on that way but they were.
 
I would try another master. Also- I have bench bled a master, let it sit for 10 minutes, and seen air bubbles in the ports. Bled again until the air bubbles were gone- 10 minutes later they were back. It took about 4 bleeding sequences before it was bubble-free.
 
I fought a brake issue on a disc brake CJ5 took to my buddy's shop they but it on the lift and found the calipers were put on the wrong side. Make sure your bleed valve is at the top not the bottom. I wouldn't have thought you could but them on that way but they were.
That just happened to me. Working on a friends jeep. I did the lift kit and other work. He came over and did the brakes to save money. Could not get a pedal. He put the calipers on wrong side with bleeders on the bottom
 
That just happened to me. Working on a friends jeep. I did the lift kit and other work. He came over and did the brakes to save money. Could not get a pedal. He put the calipers on wrong side with bleeders on the bottom
This happens A LOT more than you think...

cb
 
Thanks for the thoughts guys. I double checked and the calipers are on the correct sides with the bleeders at the top. I just ordered a new master, this time from NAPA since a few threads seemed to favor those. Hopefully I'll have it today and I'll bench bleed it a few times before strapping it into the truck.

I also saw on a few threads about adjusting the rod between the booster and MC, but this one doesn't have any adjustment there, just a solid plunger deal. Truck was originally an 81, but it's more like the Johnny Cash song than any one year.
 
Good luck as that can be pretty frustrating. Its quite a pain to bleed the master. I always bench bleed more than I think. Even after that its pretty common to see bubbles in the reservoir while bleeding the calipers.
 
Thanks for the thoughts guys. I double checked and the calipers are on the correct sides with the bleeders at the top. I just ordered a new master, this time from NAPA since a few threads seemed to favor those. Hopefully I'll have it today and I'll bench bleed it a few times before strapping it into the truck.

I also saw on a few threads about adjusting the rod between the booster and MC, but this one doesn't have any adjustment there, just a solid plunger deal. Truck was originally an 81, but it's more like the Johnny Cash song than any one year.
Make sure the metal clip holds the lid down super tight. So tight you have to pry it off with a screw driver. If you can can flip the wire closure thing open and shut by hand it will leak at the lid. This has been the only problem I have had with the NAPA master cylinders. If the lid clamp is a loose fit, do not install it, tell them to get you another master cylinder :twocents:
 
Thanks for the thoughts guys. I double checked and the calipers are on the correct sides with the bleeders at the top. I just ordered a new master, this time from NAPA since a few threads seemed to favor those. Hopefully I'll have it today and I'll bench bleed it a few times before strapping it into the truck.

I also saw on a few threads about adjusting the rod between the booster and MC, but this one doesn't have any adjustment there, just a solid plunger deal. Truck was originally an 81, but it's more like the Johnny Cash song than any one year.
I had an issue once with a master cylinder that wouldn’t build pressure. This comment reminded me. The customer had upgraded to power brakes but was given a master for manual brakes. Everything bolted up and looked perfect, except for no real pressure. A manual cylinder has a deep pushrod hole in the back of the piston. A power cylinder has a shallow pushrod hole in the back of the piston. A manual master installed in a power booster will give those symptoms. What happens is the pushrod on the booster has to almost fully extend before it starts moving the piston, resulting in a soft pedal 2B03C2AB-97A8-4CFB-B346-29233FFBD19C.jpeg
On the left is a manual master. See the deep pushrod hole? On the right is a power master. Shallow hole. Pull your master and make sure you have the correct style installed.
 
Last edited:
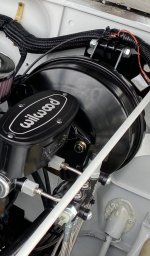
Here is a picture of the rear of the master. From the inside of the tapered divot to the outer most face is just shy of 1/2". I'll attach a picture of booster in the next post since they are limited to one picture each.


IMG_9422.JPEG
 
That looks like the correct master. The diameter should be 1". Believe the manual brake masters were 3/4".

You are still using the factory proportioning valve and have Disc front/drums in the rear right? If using all stock parts you shouldn't be able to connect them backwards as they are different sized. Thing to remember is that the Disc brakes will be connected to the larger reservoir on the master.
 
New master cylinder, same old problems, but @sdsupilot has me questioning everything now :oops:

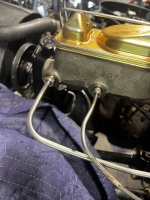
So the truck is disc front/drum rear. I am using an aftermarket proportioning valve which looks to be a universal deal with an adapter for the rear output line size. I do have the stock one, but the sensor on the top was broken off which is what led us to replace it. I just took a look and they appear to be the same otherwise. We are also working on another CJ7, but it has a different master with the outputs on the passenger side which is different from the 2 new ones we received which have the outputs on the driver's side and the big/small lines are reversed. Not sure when they changed as we're new to the CJs. The CJ8 we are working on didn't come with any master so I don't have anything to compare that to.

We are using a Classic Tube prebent brake line kit. On the lines running from the master to the prop valve the fittings are different sizes on each end. I'm not sure the exact fitting size, but I do know the wrench size to tighten them. There are two lines hooked up the follow way:

Bigger line has a 9/16 wrench end which hooks to the smaller cylinder on the master
Bigger line has a 7/16 wrench end which hoods to the rear of the prop valve leading to the rear brakes
Smaller Line is 1/2 wrench on both ends which goes from the larger cylinder on the master to the front of the prop
Because of the different end sizes I don't see any other way to hook it up.

I'll continue in a second post for another picture...


IMG_9437.jpeg
 
Great description/pictures. It looks like everything is connected properly.

Are you still getting air bubbles from the calipers/wheel cylinders? If so - have you tried to use a vacuum pump to suck fluid/air through the lines? I normally use my vacuum pump to pull air and fluid to the bleeder valve. Seems to really save time.

When you are bleeding at the calipers/wheel cylinders are you getting a reasonable volume from both front/rear? The prop valve can trip and send the fluid from both front and rear to one or the other. Google "resetting brake proportioning valve" for a better description/fix.

Gravity bleeding also generally works but I have had good luck with that little vacuum pump. You can also get a vacuum pump from Harbor Freight for $25.

All that said - I would try a new master if you have bled and bled the brakes and aren't getting a pedal and have no bubbles while bleeding.
 
Here is something you can try.
Get a brake clamp and clamp the flexibles at the front calipers or the rear axle to close them up and see if you can get an improved pedal.
If you can amass enough clamps and do all 3 the pedal should be rock solid as the fluid has literally nowhere to go.

Do remember to take them off again when finished though! or pray your emergency brake is pretty good... 😁
 
@sdsupilot I was able to bleed it to the point of not getting any bubbles at any corner. I saw the proportioning valve reset, and I can't help but wonder if that has something to do with what is going on. I bought the tool that threads into the sensor hole (which you can see in the picture above. It is a black knurled aluminum deal) that is supposed to keep the slide from moving, but I can't help but wonder if that is actually doing the job.

I am on my second master and it is acting exactly the same. This second one I bench bled several times and only got bubbles on the first and second go round. I've got it sitting in the vice overnight so it can think about what it has done :ROFLMAO: I'll give it a few more rounds just to make sure in the morning.

I am going to try and swap in the stock proportioning valve tomorrow and see what that does. I also bought the new version of the tool that goes over the end to hold the slide that the haynes/chiltons manuals call for which should be in tomorrow since the thread in tool won't work as the sensor holes are different threads.

I have tried vacuum bleeding, gravity bleeding, two man (and three man) bleeding, and two different one man bleeding kits. All of them get to the point of no bubbles at the wheels, but still squishy until you pump 3-4 times on the pedal.

@Dave The Sparky I'll have to give that a go as well. I've got a bunch of those clamps, but never thought to use them like that.

Also, as a side note, how on earth are you guys liking things?
 
@sdsupilot I was able to bleed it to the point of not getting any bubbles at any corner. I saw the proportioning valve reset, and I can't help but wonder if that has something to do with what is going on. I bought the tool that threads into the sensor hole (which you can see in the picture above. It is a black knurled aluminum deal) that is supposed to keep the slide from moving, but I can't help but wonder if that is actually doing the job.

I am on my second master and it is acting exactly the same. This second one I bench bled several times and only got bubbles on the first and second go round. I've got it sitting in the vice overnight so it can think about what it has done :ROFLMAO: I'll give it a few more rounds just to make sure in the morning.
I am going to try and swap in the stock proportioning valve tomorrow and see what that does. I also bought the new version of the tool that goes over the end to hold the slide that the haynes/chiltons manuals call for which should be in tomorrow since the thread in tool won't work as the sensor holes are different threads.

I have tried vacuum bleeding, gravity bleeding, two man (and three man) bleeding, and two different one man bleeding kits. All of them get to the point of no bubbles at the wheels, but still squishy until you pump 3-4 times on the pedal.

@Dave The Sparky I'll have to give that a go as well. I've got a bunch of those clamps, but never thought to use them like that.

Also, as a side note, how on earth are you guys liking things?

I know the manuals say to mess with the proportioning valve when bleeding brakes, I never have and have never had issues :shrug:

You might be on the right track reinstalling the (hopefully) OEM proportioning valve :twocents:
 
Sorry, didn’t mean to post the photo twice, and I can’t seem to edit it out. But…
That was my solution for what it’s worth. Brakes are awesome now!!
 
Back
Top