
You are using an out of date browser. It may not display this or other websites correctly.
You should upgrade or use an alternative browser.
You should upgrade or use an alternative browser.
1983 Scrambler resto
- Thread starter Craner8
- Start date
Craner8
CJ-8 Member
- City
- Orlando
- State
- FL
Some progress tonight. Worked 2 hours. Got the heater in.

Put the brake and clutch pedal assembly in tonight, too, along with the high beam indicator. However, I ordered HID headlight kits and H4 headlights for it. They came in. They tell me I may need a switch on the dash to switch to high beams. It was suggested that I could wire it into the high beam indicator. That ought to be fun; never done it.

Hot in the garage.The spots on the Line-X are sweat! Dedication baby. Bought an air conditioner today to put in the window but need some PT wood to mount. So, in the meantime, put it on a table. Yeah, water runs out the back and it puts heat out the back, but we dealt with it. Wife wouldn't let me leave door open to the house but I tried.... More tomorrow. Pics to follow.
Elldee, color very similar. You said its a Nissan color; real close. I'd like to see them side by sdie.
Put the brake and clutch pedal assembly in tonight, too, along with the high beam indicator. However, I ordered HID headlight kits and H4 headlights for it. They came in. They tell me I may need a switch on the dash to switch to high beams. It was suggested that I could wire it into the high beam indicator. That ought to be fun; never done it.
Hot in the garage.The spots on the Line-X are sweat! Dedication baby. Bought an air conditioner today to put in the window but need some PT wood to mount. So, in the meantime, put it on a table. Yeah, water runs out the back and it puts heat out the back, but we dealt with it. Wife wouldn't let me leave door open to the house but I tried.... More tomorrow. Pics to follow.
Elldee, color very similar. You said its a Nissan color; real close. I'd like to see them side by sdie.
Craner8
CJ-8 Member
- City
- Orlando
- State
- FL
Got a temp steering column in today with all the brackets. Wired the dash and may install tomorrow and put newly rebuilt tilt column in then too.
QUESTION: How does the rubber go between the cowl and the windshield frame? I didn't take pics, I guess. Does it attach to the windshield frame, or to the cowl? I thought during the bodywork we attached it to the cowl but the screw holes don't line up. Pics tomorrow. Mounted the window AC too. 97 degrees outside today with a heat index of 107. Too hot. Slow go.
QUESTION: How does the rubber go between the cowl and the windshield frame? I didn't take pics, I guess. Does it attach to the windshield frame, or to the cowl? I thought during the bodywork we attached it to the cowl but the screw holes don't line up. Pics tomorrow. Mounted the window AC too. 97 degrees outside today with a heat index of 107. Too hot. Slow go.
I am 99% sure mine attached to the windshield frame. One trick I did was put some baby powder on the rubber when putting the windshield up. The powder lets the rubber slide and seat properly between the two. We are in Oviedo and left the 8 at the beach yesterday otherwise I would know 100%. Plan to work on the 40 some today. Let us know how well the AC cools the garage.
Craner8
CJ-8 Member
- City
- Orlando
- State
- FL
Chris, you're right. I figured it out this am and installed it although the w/s frame isn't buffed yet. Accomplished some today. A/C cools ok but its well undersized.
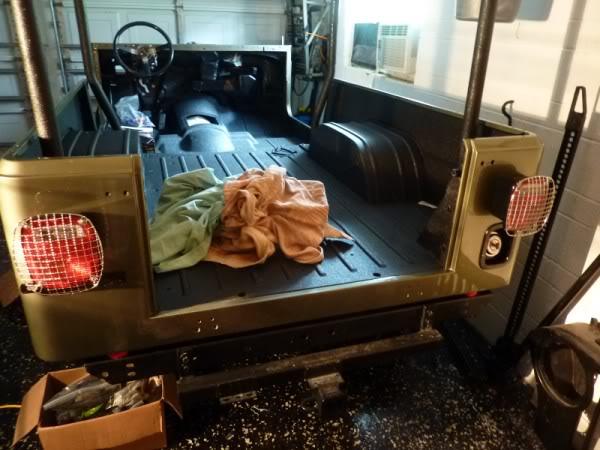
Installed the taillights and gas filler neck.
 And I found the locking gas cap with key!
JohnN, using the 3M product behind everything, and sealing all holes with clear rubber caulking and hitting all threads with blue Locktite.
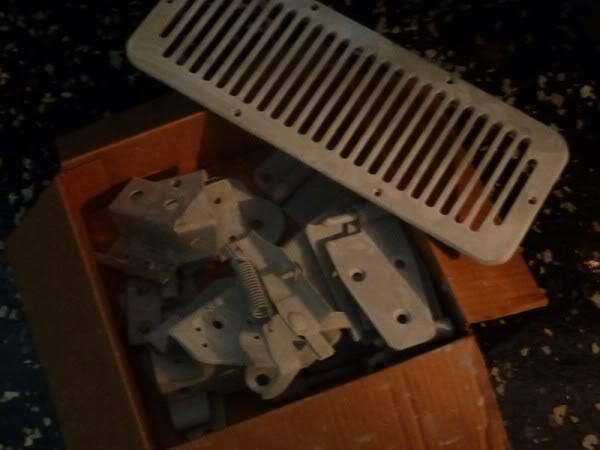
Wet sanded all of the hinges and vent cover with 600 today. Plan is to shoot one coat of green on the parts while off the Jeep, then install those that we can (hinges) and paint a final coat plus clear while on. Tape off and cover Jeep in plastic. The bolts will be body color too.
Bad pic of the column; its coming out and the tilt column is going in when the dash is ready.

Installed all bolts for the roll bar too.

Installing A/C from Collins Bros. Reviewed the installation instructions today and it references an OEM 6 point plug in the 8's wiring harness near the steering column that their 6 point plug, plugs into. I have installed a Painless wiring system and I don't see any OEM-looking 6 point plug that isn't labeled for ignition etc. Today's question: Anyone done this and if so, what I am I looking for?

 Any help is greatly appreciated. Thanks.
Installed the taillights and gas filler neck.
JohnN, using the 3M product behind everything, and sealing all holes with clear rubber caulking and hitting all threads with blue Locktite.
Wet sanded all of the hinges and vent cover with 600 today. Plan is to shoot one coat of green on the parts while off the Jeep, then install those that we can (hinges) and paint a final coat plus clear while on. Tape off and cover Jeep in plastic. The bolts will be body color too.
Bad pic of the column; its coming out and the tilt column is going in when the dash is ready.
Installed all bolts for the roll bar too.
Installing A/C from Collins Bros. Reviewed the installation instructions today and it references an OEM 6 point plug in the 8's wiring harness near the steering column that their 6 point plug, plugs into. I have installed a Painless wiring system and I don't see any OEM-looking 6 point plug that isn't labeled for ignition etc. Today's question: Anyone done this and if so, what I am I looking for?
Craner8
CJ-8 Member
- City
- Orlando
- State
- FL
Again, slow progress. Hot here; heat index of 105 degrees. Here's what's recently done:
Grommets in for speedo cable and ww hose.
 E-Brake in and hooked up at both ends, with grommet. Took alot of time until I figured it out--- works much better with dish washing soap to work the grommet into proper place.
 Additional wiring behind dash.
 E-Brake cable in place under body.
 Stripped sound bar to clean and re-do before installing.

Grommets in for speedo cable and ww hose.
Craner8
CJ-8 Member
- City
- Orlando
- State
- FL
Went to 'Skycraft' today and bought a bunch on 'plugs' for the floorboard and other holes in the body to plug up. Skycraft is a surplus store near me that sells all surplus stuff, cheap. Plugs, screws, stainless stuff, grommets, everything, ...for pennies. Working on the soundbar now. Will install tomorrow and take pics.
DiveSherpa
Legacy Registered User
- City
- Fort Worth
- State
- TX
Man! That thing looks so good. I have been sitting inside working on finding parts... It's all an excuse to stay out of the heat. There you are out in the heat rocking on that 8! Keep it up. It all looks impressive! When fall is here and the weather is great, you will be loving life (and making the rest of us jealous)! 
Craner8
CJ-8 Member
- City
- Orlando
- State
- FL
Installed dash, completed most wring under dash and installed new tilt column and wheel. Finally, to the point of installing the plastic cover over the column to dash and it appears the column needs to come 'out' quarter inch so panel sits flush. Took a break! Will get back at it and loosen column in a couple places and see if it'll come toward driver a little bit to accomodate cover. Pics later.
Craner8
CJ-8 Member
- City
- Orlando
- State
- FL
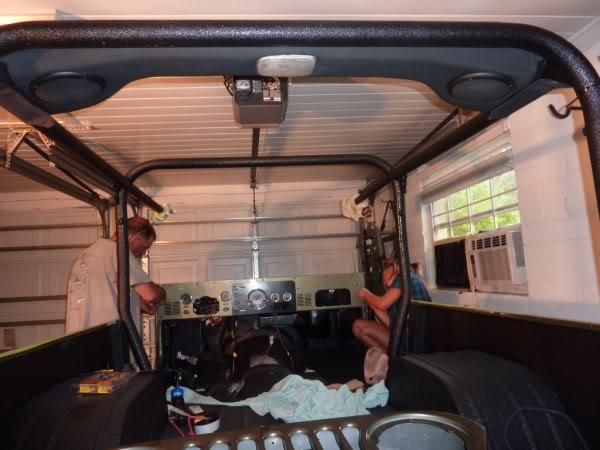
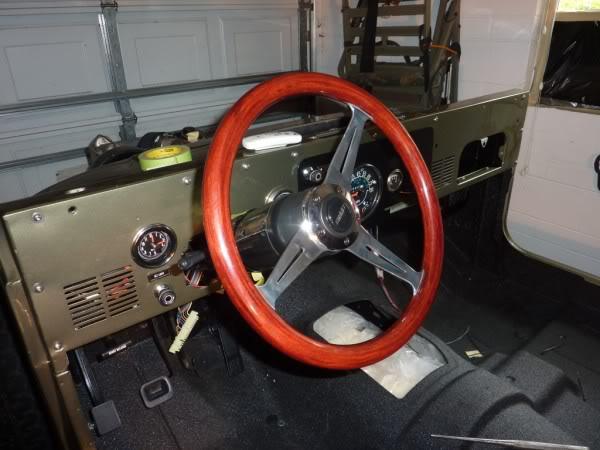
Got all Energy Suspension bushings in, the sound bar installed, the dash installed and the column in and steering wheel mounted.

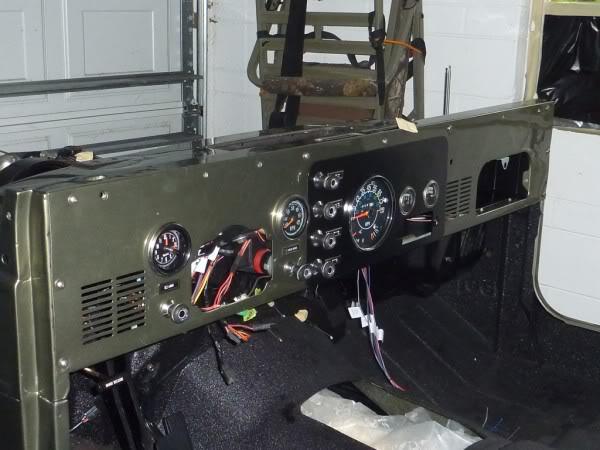
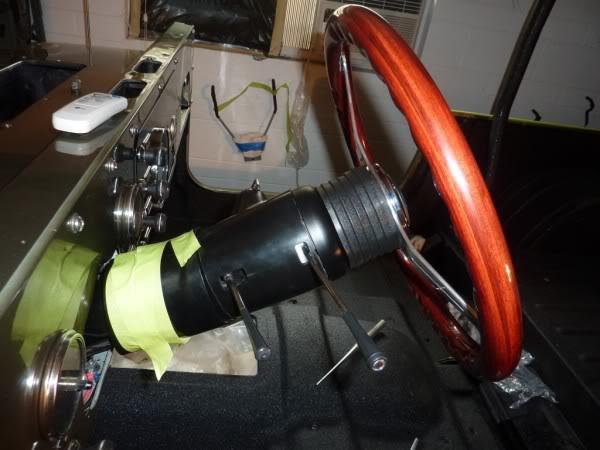
Wiring the dash before install.


Initial fit.

Dash in.

Tilt column in.
Steering wheel installed.
Loosened column at cowl and pushed back half inch and installed the cover on the dash. Done, finally. Need to hook up the wiring to the column, windshield washer motor plugs in and a few other minor issues. Long day. Had tilt column rebuilt and needed a special tool to remove the plate under the wheel. Grant had three sets of instructions to install everything..too confusing but I thinks its in right. We'll find out.

Wiring the dash before install.
Initial fit.
Dash in.
Tilt column in.
Steering wheel installed.
Loosened column at cowl and pushed back half inch and installed the cover on the dash. Done, finally. Need to hook up the wiring to the column, windshield washer motor plugs in and a few other minor issues. Long day. Had tilt column rebuilt and needed a special tool to remove the plate under the wheel. Grant had three sets of instructions to install everything..too confusing but I thinks its in right. We'll find out.
Craner8
CJ-8 Member
- City
- Orlando
- State
- FL
Zeeksta, I thought of that but I can't find them. So I loosened all the nuts to the end so that I can remove them easily. How big are they-- 5.5 inches, such that I can buy them now and install them this week b4 I go to far?
Tower210, prior owner installed it. Looks custom. Sound bar unknown source; on it when I bought it. Small speakers tho.
Speaking of lost parts, I lost an aluminum piece for the top. Screws to the passenger corner rear, top of the body. About 6 inches long, 90 degree turn, has lip on the outer edge about inch and a half wide. Anyone have one? Don't know name of top-- it is tan so its not new but likely 3 or so years old. Will post pic of one I have if that helps.
Thanks.
Craner8
CJ-8 Member
- City
- Orlando
- State
- FL
Installed the wiring harness for the rear tonight. Ran thru the frame. Painless Harness does not have adaptors for the rear tailights apparently, so have to use the original, or find others. Crimped the wire lead to the gas tank so need to loosen body mount bolts and lift body a little.
Question: anyone know where the harness goes across the rear-- is it attached to the rear cross member-- or to the body?
Wired up most under the dash--ordered and got a tach to install to use with the fuel injection system. Should be easy to reach before I install the A/C unit. Will take pics tomorrow. Need to finish the rear harness and install the filler tubes to the tank.
- City
- Biloxi
- State
- MS
Question: anyone know where the harness goes across the rear-- is it attached to the rear cross member-- or to the body?
If I remeber right, there should be some plastic clips that snap into some predrilled holes in the body that hold the rear wire harness. I forgot to take a pic of that when I took mine apart

Craner8
CJ-8 Member
- City
- Orlando
- State
- FL
I did not see any holes in the body but I'll look again. Are they in the body support near the gas tank or in the body panel at the rear? I'm not sure it really matters but if the holes are there I'd like to use them. The frame cross-member has square holes but the rosebud clips don't fit them. Thanks--Jim
 Thats how both of mine are
")
Craner8
CJ-8 Member
- City
- Orlando
- State
- FL
Perfect. Now I know where they go. Tomorrow I'll install it. Bought two three-prong adaptors for the taillights. Will install them tomorrow too and button up the rear. Gotta figure out the wiring for towing- prior owner had a kit that hooked directly into the taillight wires so that they functioned when it was being towed.
Thanks again for the info and pic.
Thanks again for the info and pic.