

You are using an out of date browser. It may not display this or other websites correctly.
You should upgrade or use an alternative browser.
You should upgrade or use an alternative browser.
Meet Red, my 81 Restomod Build
- Thread starter Randyzzz
- Start date

- City
- Redmond
- State
- OR
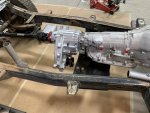
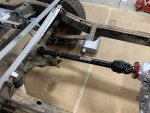
Haven’t measured the rear yet, I need to get the permanent rear axle in there first. But it looks like about 24-25”. Keeping the front flange, there’s plenty of conversion companion flanges available. I could have gone to a yoke but non cv yokes take a special seal and I wanted to keep parts as easy to find as possible.Looks great! My rear driveshaft was 24.5". Have you measured yours yet? Are you planning on running the stock GM front output flange or switching to a yoke?

sdsupilot
CJ-8 Member
- City
- OKC
- State
- OK
On post #84 i have a pic of my 1310 yoke and seal part numbers. The seal was normal stock at the local Napa. That said, the stock GM flanges are everywhere. I ran the yoke to give more clearance to the tubular cross member.
https://www.cj-8.com/threads/the-story-of-peggys-jeep.48070/page-5
https://www.cj-8.com/threads/the-story-of-peggys-jeep.48070/page-5
- City
- Redmond
- State
- OR
Thanks for the tip. I had found that yoke and seal but I sorta like the idea of using the 4 bolt flange. Won’t be spitting out strAps or u-bolts!On post #84 i have a pic of my 1310 yoke and seal part numbers. The seal was normal stock at the local Napa. That said, the stock GM flanges are everywhere. I ran the yoke to give more clearance to the tubular cross member.
https://www.cj-8.com/threads/the-story-of-peggys-jeep.48070/page-5
- City
- Redmond
- State
- OR
Back at it! First a tool recommendation. I have been slowly going from air tools to Milwaukee Fuel 12v and 18v. Today I picked up a tool that is AMAZING! It’s their 12v right angle die grinder. This thing makes life so much easier! No dragging air hoses! No high pitched whine! 4 speeds, top is 24,500 RPM! Just grab and go! I love it. It is a battery drainer though. 10 mins runtime on top speed running a biscuit. Here’s some pics.
Leaves a clean surface, and it’s pretty compact.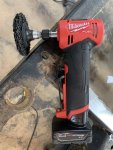
This took under 30 seconds. (This is the only rusty body mount on the whole tub!)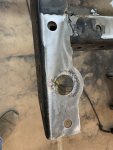
Leaves a clean surface, and it’s pretty compact.
This took under 30 seconds. (This is the only rusty body mount on the whole tub!)
- City
- Redmond
- State
- OR
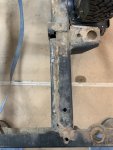
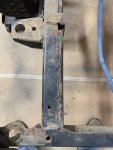
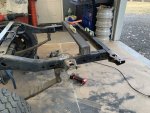
On to the good stuff. I had to figure out a way to brace the frame over the new tank and replace the crossmember I had removed. I started with removing the inner portion of the rear frame rails. It’s amazing how poor the welds are, and how uneven everything is. 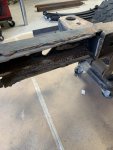
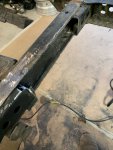
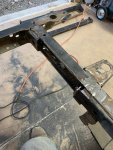
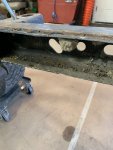
Looking down from the top. Not a straight line to be found. I think the same crew that built the cowl was helping on the frame.
Got into the cutting and fitting and forgot to get in between pics- but here is the final product.
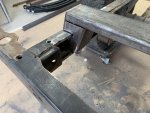
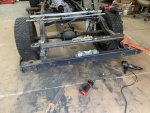
The side brackets go into the opened up frame channel and will be welded on all 3 areas that are touching. The top piece is 1x3x.120 so it should be plenty strong, and add considerable strength. I need to weld all the seams up, and then cut new pieces to re-box the open frame channel.
Looking down from the top. Not a straight line to be found. I think the same crew that built the cowl was helping on the frame.
Got into the cutting and fitting and forgot to get in between pics- but here is the final product.
The side brackets go into the opened up frame channel and will be welded on all 3 areas that are touching. The top piece is 1x3x.120 so it should be plenty strong, and add considerable strength. I need to weld all the seams up, and then cut new pieces to re-box the open frame channel.

- City
- Ducor
- State
- Ca
Great thread! Seems like you are having a lot of fun with this build. I’m enjoying watching it come together. Thanks for sharing.On to the good stuff. I had to figure out a way to brace the frame over the new tank and replace the crossmember I had removed. I started with removing the inner portion of the rear frame rails. It’s amazing how poor the welds are, and how uneven everything is. View attachment 79469View attachment 79470View attachment 79471View attachment 79472
Looking down from the top. Not a straight line to be found. I think the same crew that built the cowl was helping on the frame.
View attachment 79473View attachment 79474
Got into the cutting and fitting and forgot to get in between pics- but here is the final product.
View attachment 79475View attachment 79476View attachment 79477
The side brackets go into the opened up frame channel and will be welded on all 3 areas that are touching. The top piece is 1x3x.120 so it should be plenty strong, and add considerable strength. I need to weld all the seams up, and then cut new pieces to re-box the open frame channel.
- City
- Richmond
- State
- TX
How necessary is boxing the frame rear of the shackles?
If that was left open you could more easily clean out the frame.
If the cross member was moved forward to near the rear shackles, the only load on that frame would be the rear body mounts, bumper, trailer hitch, and possibly a tire carrier if bumper mounted. That is assuming the cross member would clear the bed supports near the shackles.
If that was left open you could more easily clean out the frame.
If the cross member was moved forward to near the rear shackles, the only load on that frame would be the rear body mounts, bumper, trailer hitch, and possibly a tire carrier if bumper mounted. That is assuming the cross member would clear the bed supports near the shackles.
- City
- Redmond
- State
- OR
How necessary is boxing the frame rear of the shackles?
If that was left open you could more easily clean out the frame.
If the cross member was moved forward to near the rear shackles, the only load on that frame would be the rear body mounts, bumper, trailer hitch, and possibly a tire carrier if bumper mounted. That is assuming the cross member would clear the bed supports near the shackles.
The cross member needs to be that far back to clear the fuel pump module. I would have liked it to be between the shackle hangers, but that would mean the gas tank would have to be 1”-2” lower. Not a worthwhile trade-off. I’m not too worried about junk in the frame- it’s easy to flush out there and they don’t salt the roads here.


Belizeit
CJ-8 Member
- City
- River Ridge
- State
- La
I missed that. I was thinking that was a rice crispy treatI like the hornets nest photo! I've found a couple of rats nests, a birds nest, and lots of spiders in my Scrambler, but no hornets nests.
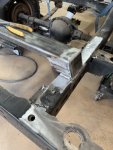
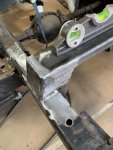
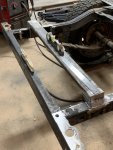
On to the good stuff. I had to figure out a way to brace the frame over the new tank and replace the crossmember I had removed. I started with removing the inner portion of the rear frame rails. It’s amazing how poor the welds are, and how uneven everything is.
What I found most interesting about that area is that there appears to have been no standard for how it was done. Both of my Scramblers were '83's but that area was executed completely differently between the two of them. Jeepskate II/XL was done very nicely, JPSK8 looks like yours.
- City
- Redmond
- State
- OR
What I found most interesting about that area is that there appears to have been no standard for how it was done. Both of my Scramblers were '83's but that area was executed completely differently between the two of them. Jeepskate II/XL was done very nicely, JPSK8 looks like yours.
My 82 looked a lot better back there if I remember correctly. The left rail on this one was bent in ever so slightly, but everything is square to the body mounts. The right rear inner boxing piece was not fully inserted into the outer frame rail before welding. Everything squared up again at the rear tank hanger crossmember (the one I removed) but then the crossmember that doubles as the front tank hanger and body mounts was slightly V’d forward in the middle and the lip where the date was stamped was kinked down in the middle. I got that all straight with a bit of dead blow hammer persuasion. The other thing I noticed was the body mount outrigger aren’t anywhere near level off the top of the frame. None of this has any evidence of an accident or post-paint damage. Combined with the abnormal weld on the cowl under the windshield frame, I’m wondering if this wasn’t an “ end of run, what can we throw together “ Scrambler. Maybe they were running short on orders so they went out to the parts piles that didn’t pass initial inspection and picked the best of the worst. It was built 6/17/81 (a Wednesday) but it looks more like a Friday job.
No matter what the backstory, it will be a gem once I’m done with it.
- City
- Redmond
- State
- OR
Well, I guess I’ll chalk up my slow rate of progress to being old and slow. Or something like that. I will say, working out in the shop with KOH on was a hoot. Here’s what I accomplished. I started out with cutting some tube up to make replacements for the inner frame boxing that I had removed to put the cross brace in. They turned out well. I made the front seam at the junction where the old cross member was welded inside the frame rail. I’ll add fishplates once the frame is bare again and I can put it up on its side.
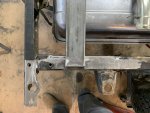
Then I addressed how to secure the straps to the frame. I put come c-channel in the rear crossmember, and then welded some tabs to it. The front of the straps will bolt up to the spot where the old tank mounted.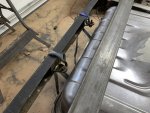
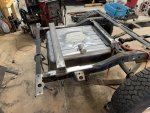
Here’s an overview of the installed tank. I still have to make some perimeter braces to keep the tank securely in place. I’ll make the rear one large enough to protect the tank from being punctured by the hanger tabs in case I get rear-ended.
 Once that’s done I can get the exhaust figured out and routed. I also have to get my rear end ordered. So many choices there. Any Ford 9” experts here? I’ve been researching until I’m cross-eyed. Are 31 spline alloy axles beefy enough? Will a true-track be a sufficient traction device? Is a re-drilled Explorer disc setup my best choice for rear discs with parking brakes? Like I said, any advice is appreciated.
Then I addressed how to secure the straps to the frame. I put come c-channel in the rear crossmember, and then welded some tabs to it. The front of the straps will bolt up to the spot where the old tank mounted.
Here’s an overview of the installed tank. I still have to make some perimeter braces to keep the tank securely in place. I’ll make the rear one large enough to protect the tank from being punctured by the hanger tabs in case I get rear-ended.
Once that’s done I can get the exhaust figured out and routed. I also have to get my rear end ordered. So many choices there. Any Ford 9” experts here? I’ve been researching until I’m cross-eyed. Are 31 spline alloy axles beefy enough? Will a true-track be a sufficient traction device? Is a re-drilled Explorer disc setup my best choice for rear discs with parking brakes? Like I said, any advice is appreciated.
Last edited:

- City
- East Norriton
- State
- PA
I believe 31 spline will be strong enough
That is what was used in most of the 9" under Ford trucks. '70 Torinos with 429 Super Cobra Jets drag packs options(very underated at 370hp ) had a 9" rear with 31 splines, 4.30 gears, and a Detroit locker from the factory.
That is what was used in most of the 9" under Ford trucks. '70 Torinos with 429 Super Cobra Jets drag packs options(very underated at 370hp ) had a 9" rear with 31 splines, 4.30 gears, and a Detroit locker from the factory.


