• Notice for iPhone users: DO NOT use the image size reduction option when uploading photos to the forum. This causes portrait images to post as landscape. We have added a warning to the image insert pop-up as well.

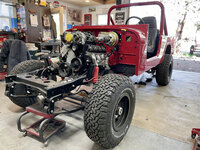
Meet Red, my 81 Restomod Build

The aftermarket accessory mounts are cool, I just never got excited over them. I’m more of a form follows function type of a person.

I’m also the kind of person that would keep my hood shut until after the race. No need to advertise.
 
Ag, I couldn’t agree more. I’ve spent hours re-engineering those front derives so they work in addition to looking cool. Millions of stock R&D dollars equates to good products. No reason to reinvent the wheel unless no other option exists.

From the measurements I could find online, it looks like I’ll net about the thickness of that threaded stub with the new setup. Once the 1/2” body lift is installed, that should be enough. Double edged sword- now the upper hose comes straight out the front. I’ll have to find a hose that has a sharp 90* turn but that should be doable. A bonus will be tons of room for the air intake.

I also found a really cool 2 piece Edelbrock water pump. With a bolt on pulley. But at almost $500 with pulley, I’ll never know how cool it really is...
 
Bit of good news, I was able to return the new water pump that didn’t fit. And I have found some silicone 90* hoses that should work perfectly. Top hose - 2 piece with a straight splice. Anxiously awaiting parts!
 
Hows momma horse doing?
Thanks for asking! So far so good. No progress yet- we are sort of guessing when “it” happened seeing as she was wild then, but both our instincts and the trained eye of the vets think it should be any day now. Did the knob work?
 
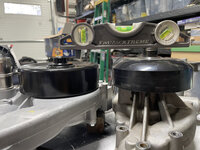
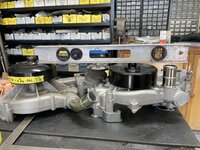
Well, the new water pump arrived today. I gained about 1/2”, so not quite as much as I had hoped but it should be enough. The actual pulley is right where I thought it would be, but the shaft sticks out 1/8” more. Still- better than spending big bucks. Here’s a pic. 091F29CD-079D-4E30-9F11-9996A28C8D75.jpegStock truck pump on the right,Vette pump sitting on 1 1/2” spacers on the left. The proof will be Wednesday when the billet spacers arrive and I bolt it up.
 
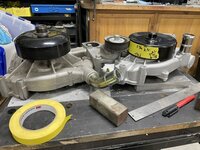
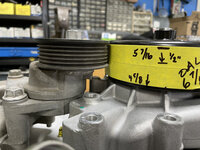
So...not being one to leave stuff alone, I might have discovered the “magic” combination. I measured where the belts ride on the pulley and on the truck pump, the belt rides at the back edge of that huge pulley. With the 1.5” spacer, the belt rides at the back of the Vette pump. That’s .5” away from the front of the pulley. I got out a 1” chunk of aluminum, and bingo! The belt rides at the front of the pulley, and I just gained another .5 clearance. Overall length from tip of pulley- 6.25”. I know it looks close but the spacer uses 2 gaskets, so that’s another 1/16”. So I either need to get the spacers machined down to 1”, or buy that Edelbrock water pump. 50626E16-38BD-44E9-8D7D-4E7DB03DE988.jpeg

C7E0F7B0-77F9-4F31-A231-C6F6724C1B4A.jpeg
 
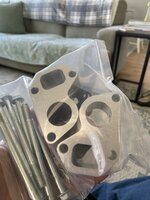
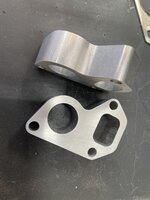
The 1.5” water pump spacers arrived. I was thinking I could have them surfaced to 1.0”, but there’s a steam hole in the side of one that eliminates that possibility. It’s a little bit too close for comfort. I found a company that makes 1.0” spacers, so I’ll order a set. Between the two something will work out. B716ED07-A270-4B50-8724-9EE2899EA32E.jpeg6F06837D-547C-48A6-AB67-ABD64B4CA84B.jpeg
 
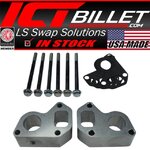
I just got off the phone with ICT Billet in Wichita, KS. They are sending me an undrilled one, and a return label for the drilled one. Now that’s what I call customer service! They have a lot of cool LS swap stuff, and I highly recommend them.

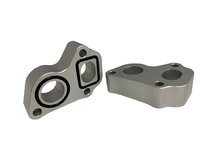
You might wonder why I just don’t buy the 1” set instead. Well, the 1” set used a proprietary o-ring seal, and the rectangular hole appears smaller. I prefer using stock gaskets, and having as much flow as possible. Also, I can have the ICT parts milled to a hair over 1” so the belt has a bit more room on the pulley. Here’s some pics for reference.

ICT partFC2B5892-7C10-49E3-A639-2A886AA730BD.jpegO-ring 1” spacer038101D8-7EC0-44BC-AE8E-A73018459F2C.jpeg
 
Any possibility of milling both sides and leaving the steam port intact?

Is the steam port in this location needed?
 
Any possibility of milling both sides and leaving the steam port intact?

Is the steam port in this location needed?
Wow. Sometimes it just takes a different perspective. I hate to admit but I never even thought of that. 🤔 However, I’m not using the steam port. The radiator has a provision, so I would have ended up plugging it anyways. And, truth be told, I’d rather not have the steam port if I’m not using it. One more spot to leak.
 
The spacers are at the machine shop, they are milling them down .400. That gives me a little breathing room at the front of the pulley. I also made some .400 spacers for the belt tensioner to get everything back in line.

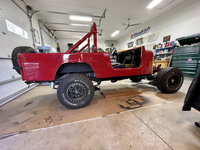
Today I installed the 1/2” body lift. Went smoother than I thought- hardest part was getting the body dead center on the frame again. I sure hope this sags some. If not, I’ll be getting some 33x10.50R15’s. Pics of the new stance.
920CC845-63E4-44E2-A632-DDD2D6448A3D.jpeg317DADF7-75CD-4973-BE98-4EB611CE0EA0.jpeg
As a bonus that I hadn’t considered- that extra 1/2” gave me what feels like so much more room between the frame and the body. I can actually put my hands on things I could only barely see before! And- my engine cover now clears the brake master!
 
Last edited:
As a bonus that I hadn’t considered- that extra 1/2” gave me what feels like so much more room between the frame and the body. I can actually put my hands on things I could only barely see before!
I’ve always maintained that this is the best part about a reasonable body lift. :cheers:
 
Who did you use for the 1/2" body lift..not looking for extreme but tastefully done where you have to look twice would be what I will be shooting for...also for 33's
 
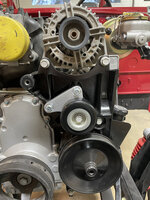
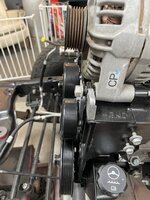
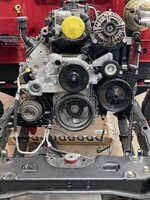
Another piece of the puzzle showed up today. With the Vette water pump, the hose comes out the front right into the belt. ICT Billet makes a cool and inexpensive pulley mount to relocate the idler. The pulley used to mount on the boss at the upper left. This kit reuses the factory pulley and bolt, and gives real good belt contact around all the accessories 8C8ADC79-CE51-447E-83C8-E3545C4BC981.jpeg


063EE88D-4EBC-4781-BCE3-5F03859186AA.jpeg
 
Last edited:
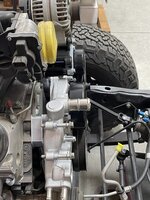
The pump spacers were ready at the machine shop today. He ended up cutting both sides to make sure they were 100% smooth and parallel. So I guess I could have used the spacer with the plug. Oh well. I bolted the pump up and I am really pleased with the outcome. I’ll know for sure later today when I get the grille and fender back on, but I think this is a winner. The water pump pulley tip is now on the same plane as the power steering pump. And the new hose outlet location should leave plenty of room for a nice air intake.
25F409D9-CCE7-4892-A282-320545C70CF1.jpegMilled spacers. D0302B61-7C61-4BDE-B549-B67CC047D41D.jpegNow that’s more like it. No more protruding pulley. You can see how the spacers install 77994585-2D4A-4B54-8293-92222CD23BA4.jpegAnother angle.C15F6FFE-8E79-483E-8975-AA2B373C1246.jpegGreat new location for the hose.4F84F874-6996-4AEA-AC1A-B08EAF4F0D5D.jpegShowing the amount gained. Basically the thickness of the water pump shaft stick out.
 
Back
Top