Decisions, decisions. My color samples came in. I took pictures of a paint sample with the color samples on top. It’s hard to get a good pic of colors, so I took several and picked the best match from my eye to the phone. Here goes-
View attachment 94723Garnet at the left- too dark IMHO. Lobster Red, too bright. The center red is I think the best. Seeing f as it is close but not exact, I’m going to leave the door panels, dash, and visors black.
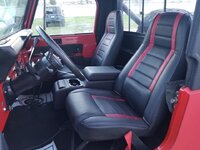
Just to illustrate how shadows and lighting can mess with colors- here’s a couple of the same pic shot with incandescent and ambient light. The 1st pic was shot with daylight mimicking LED.
View attachment 94724View attachment 94725Still think the middle is the best match. Opinions?