• Notice for iPhone users: DO NOT use the image size reduction option when uploading photos to the forum. This causes portrait images to post as landscape. We have added a warning to the image insert pop-up as well.

Meet Rusty, 82 5.0 Build

STSFCTN

Active member
Silver Member
City
Centennial
State
CO
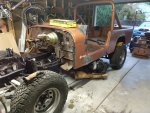
Hello I want to introduce myself to the forum. I recently purchased a 1982 Scrambler. I was a previous Classic Mustang guy and have restored one 1967 and resto-moded the another. So I am familiar with classic cars, PB Blaster, and the money pit factor.

The previous owner of the Jeep had named her Penny, I have since renamed her Rusty. This Jeep was driven hard and put away wet. It had a bumper sticker that read, if it works don’t fix it, and I should have known right there I was buying someone else’s problem. I thought this would be a good Winter project and I thought I was starting off with good bones since it did have a rebuilt 4.2l and t176. Once I got it in the garage did I learn it leaked from the engine, transfer case, diff, and both wheel seals. I began the complete demo taking it to the frame.
This is what I have done to date:
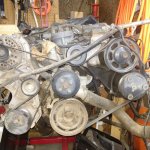
  • Sold the 4.2L
  • Bought a 1994 complete 5.0 engine and harness
  • Bought a Electrical and Vacuum Troubleshooting Manual from Ford for a 94/95 Mustang
  • Bought the correct throw-out bearing from Novak, and a 5.0 bell-housing
  • Bought MORE mounts
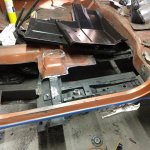
  • Cut out the drivers floor
  • Completely gutted the tub and media blasted the bottom tub
  • Bought a super fantastic rear crossmember from CHIEFWAHO
  • Cut out the passenger side rear corner
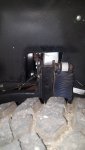
  • Wired down the frame, cleaned out 5lbs of sand and rocks from the inside of the frame, etched it, primed it.

Here are my current hurdles
  • I have 4 body mounts that I need to cut out and reweld in new plates since they completely disintegrated with the slightest torque
  • The rear floor has some pin holes trying to find just a small floor skin, I don’t need a large replacement.
  • Learning how to incorporate the not so popular 94 Mustang harness
  • Determining if the all the accessories (including A/C and Smog Pump) on the new engine will clear the exhaust, the steering linkage, and brake proportioning valve.

Here are my Winter hurdles.
  • Taking apart the 5.0 Harness and marrying that to a new EZ wiring harness.
  • Getting the correct catalytic converter and emissions stuff taken care of
  • Dropping in the engine in hopes I don’t have to get new driveshafts made up.
  • Replace rear bearings, brakes, and seals on the AMC 20
  • Hydraulic clutch setup

Any help or comments are appreciated-
Kevin
 

Attachments

  • WIN_20200522_08_51_38_Pro.jpg
    WIN_20200522_08_51_38_Pro.jpg
    177.6 KB · Views: 79
  • 2.jpg
    2.jpg
    171.9 KB · Views: 82
Last edited:

designerRob

CJ-8 Member
Silver Member
City
Allen Park
State
MI
It looks like your Jeep finally found the owner that will take good care of it. Nice job so far.
 
Last edited:

cbford

Legacy Registered User
City
CLT
State
NC
I have done this swap. Runs great.
Harness integration difficulty depends on how much electrical you want to be Ford and how much you want to leave as Jeep. If you just add engine harness while leaving the body harness Jeep it is 4 wires to tie together (plus power runs for your fuel pump/inertia switch and extra grounds you will need to keep EEC power stable).

In space terms, you may have problem with the power steering and A/C compressor locations for 1994 accessory set. The A/C is low on driver side, right? And I think the stock ford ps pump sticks out pretty far from head? Those may be an issue. In Jeep, your stock power steering lines, and lower radiator hose, and the bottom edge of inner fender all want some of that same space. But, the smog pump will be fine.
You can get the electric fan set for a Contour to use on stock radiator. Will bolt right to radiator mounts and works/looks like it was made for Jeep.

I used a set of f150 4x4 shorty truck headers (pace setter brand, CARB certified) for exhaust in combination with mechanical clutch linkage, fit fine. I ran full dual exhaust pipes with an H-pipe for balance.

Driveshafts will be a function of transmission you use and lift combination, and how liberally you plan to apply the gas pedal or do flexy offroad stuff. I spent $200 having my rear shortened 1.5" and adding longer sliding splines, and lengthening the front one 1 inch with longer slide splines.

Invest in drive flanges or 1 piece axle shafts for rear also. The 5.0 makes enough torque to cause problems on stock parts at floating end. If you add a traction device like a locker or strong posi, I would tell you to weld your axle tubes to the center section also. You will have plenty of power to twist them if you dont (ask me how I know).

Let me know what else I can help. I changed lots of stuff over the years....
 

STSFCTN

Active member
Silver Member
City
Centennial
State
CO
CBFORD - thanks for the advice. Did you also use the MORE engine mounts. AC is not vital now but maybe something down the line. The AC really does stick out.
 

Attachments

  • 16002094264706750814224783194237.jpg
    16002094264706750814224783194237.jpg
    246.5 KB · Views: 30
Last edited:

cbford

Legacy Registered User
City
CLT
State
NC
I did use the MORE mounts, good product. I also added their steering box brace kit, and their heavy duty shackle hangers.
Made a huge difference.
 

STSFCTN

Active member
Silver Member
City
Centennial
State
CO
I installed the mounts today. From the picture of the engine, I want to clean it up with the PS pump leak and will pull off that ps /ac bracket. Did you delete the AC and smog pump on yours? What are the 4 wires you mentioned in your original post that I need to wire?
 

STSFCTN

Active member
Silver Member
City
Centennial
State
CO
Tub back on frame after fixing the rusted body mounts. Now on to floor and side panel replacement. Wish I could have done it with the tub off the frame but needed the garage space.
I did purchase the one piece axle kit as recommended with the swap.
Starting to study the 5.0 harness to figure out what needs to be kept and what is essential to get it running.
 

Attachments

  • IMG_20200927_175658_01.jpg
    IMG_20200927_175658_01.jpg
    168.4 KB · Views: 35

sdsupilot

CJ-8 Member
Member
City
OKC
State
OK
I’m glad to see this jeep getting the TLC it needed. This pic was from about 3.5 years ago when Drew purchased it from @mxracer919 near Miami OK.

141B7954-5EDB-4B9A-A2B2-B42E5EA3612C.jpeg

Notes from my experience with Penny, er Rusty... pretty nice body except the little bits of rust, solid frame. We also noticed the sticker and had the same thoughts. It does appear to like penetrating oil when removing any bolts. You know this by now.

I don’t have any knowledge of ford swaps. If you have any questions specific to the Jeep itself let me know. Also, please don’t judge my fab skills by the way they bolted the bumper on.
 

STSFCTN

Active member
Silver Member
City
Centennial
State
CO
Cool pic, wish he would have kept the doors and top. I am looking for full doors now. I am glad I media blasted the bottom of the floors to really get an idea of the rear bed. Fortunately the cj7 skin covers/replaces the majority of the bird shot.
 
Last edited:

STSFCTN

Active member
Silver Member
City
Centennial
State
CO
Looks like I am missing the front sway bar. The brackets are there. I assume since this will be mostly used on the street, this is something I should purchase as well as the bushings and end links. Or is this something the previous owner removed with the wide track swap?
 

cbford

Legacy Registered User
City
CLT
State
NC
Answering from a few posts back....
I am using the accessory set up from a 85 GT. It is pretty much the same set up that ran through 93. The 94-95 mustangs changed accessory location when the hood got a little lower on those years. Your air pump should work fine if you need it for emissions. Plenty of room on the lower passenger corner. I think you may be able to make the AC and power-steering work as well if you are willing to trim a bit.
Not that you need to, but I wanted to use a saginaw style power steering pump. My experience with the ford pumps was they struggle with big tires in rocks/obstacles, if that is your thing. So I made a bracket to use that type pump which is why mine is not stock pump. My end result sticks out about the same amount as the stock bracket did, not sure how that compares to 94-95 accessories, but is probably close.
I had to cut my inner fender a little as you can see. I have a "snap in" shield (removed in picture) to protect the belt/pump from debris in wheel well off tire. Set up has worked just fine for me. You can also see the power steering lines and stock radiator hose locations in these pictures.
Keep in mind I also have a 1" body lift.
 

Attachments

  • 20200920_130547.jpg
    20200920_130547.jpg
    90.9 KB · Views: 24
  • 20200920_130536.jpg
    20200920_130536.jpg
    122.9 KB · Views: 24

cbford

Legacy Registered User
City
CLT
State
NC
The wire choices you will have to integrate are power in crank and run key positions for ECU and fuel pump. Charging activation and control for alternator (input/output to ECU) and ties to fuse panel. ECU Power and Ground. Obsess about your grounds. Use dielectric grease and tie every part - frame/engine/tub - together with a direct daisy chain cable and you will not have voltage stability problems or feedback loops. This will make the engine run.

Then you can decide how to hook up your gauges. For example - the ECU needs a ECT sensor input. Your stock gauge needs a sensor as well, and they are not same resistance range. You can get a gauge that is right range for mustang sensor, or you can make 2 ports - 1 for ECU and 1 for Jeep gauge. Repeat this decision tree for oil pressure, tach signal (if applicable), voltage, etc..
 

STSFCTN

Active member
Silver Member
City
Centennial
State
CO
The wire choices you will have to integrate are power in crank and run key positions for ECU and fuel pump. Charging activation and control for alternator (input/output to ECU) and ties to fuse panel. ECU Power and Ground. Obsess about your grounds. Use dielectric grease and tie every part - frame/engine/tub - together with a direct daisy chain cable and you will not have voltage stability problems or feedback loops. This will make the engine run.

Then you can decide how to hook up your gauges. For example - the ECU needs a ECT sensor input. Your stock gauge needs a sensor as well, and they are not same resistance range. You can get a gauge that is right range for mustang sensor, or you can make 2 ports - 1 for ECU and 1 for Jeep gauge. Repeat this decision tree for oil pressure, tach signal (if applicable), voltage, etc..
Thanks so much for the explanation. I am really looking forward to get past the body work.
 

mxracer919

Legacy Registered User
Gold Member
SOA Member
City
miami
State
ok
I’m glad to see this jeep getting the TLC it needed. This pic was from about 3.5 years ago when Drew purchased it from @mxracer919 near Miami OK.

View attachment 87581

Notes from my experience with Penny, er Rusty... pretty nice body except the little bits of rust, solid frame. We also noticed the sticker and had the same thoughts. It does appear to like penetrating oil when removing any bolts. You know this by now.

I don’t have any knowledge of ford swaps. If you have any questions specific to the Jeep itself let me know. Also, please don’t judge my fab skills by the way they bolted the bumper on.

I know that Jeep! Was glad to see Drew get it back on the road! I always had big plans for it after buying it off my buddy (For the OP I wasn’t the one that was hard on it) and had a hard time choosing between keeping it or my first scrambler that I bought to do an original restoration. Opted to let this one go and continue with my original, which is essentially the same (copper brown metallic, nutmeg interior and an 82) but with a t176.

Looking forward to seeing your progress on this one!

Edit: Looking at the thread I guess the Jeep had a 176 in it. Correct me if I’m wrong Mark, didn’t it have a t5 in it originally? Sorry, at this point they all kinda run together......haha
 

mxracer919

Legacy Registered User
Gold Member
SOA Member
City
miami
State
ok
Here’s how (and essentially where) it sat when I brought it home until Drew bought it.
 

Attachments

  • 0E526596-48E7-4323-A3D0-48B07DDFBE53.jpeg
    0E526596-48E7-4323-A3D0-48B07DDFBE53.jpeg
    152.1 KB · Views: 39

sdsupilot

CJ-8 Member
Member
City
OKC
State
OK
@mxracer919 you have a great memory. Yes, it had a T5 when drew bought it. Drew’s intent with this was to have a trail rig to ride around with our group.

We brought it to his place in OKC and got it running pretty quick. He took the carb in to a local shop and had it completely rebuilt. It ran for a short time and one of the freeze plugs popped out... the fun one behind the cylinder head. So we pulled the engine flushed it out and put new freeze plugs in. Put the engine back in with a new clutch, pressure plate and flywheel. The engine had been sitting and had quite a bit of blow by. The T5 was a bit loose in the shift mechanism, but still drivable. We also put a 2.5” lift on it. I replaced the fuel lines, sending unit and the rollover valve on the tank.

About this time Drew and his family moved to CO. He really doesn’t work on his own vehicles and has never owned a carbureted vehicle. He decided he wanted to make it more reliable, so he had a shop rebuild the engine. He had another shop rebuild the 300 and traded the worn out T5 for a Rebuilt T176 . A shop installed all of this. He also swapped out his original wide track axles with 2.73s for a set with 3.54s.

In the end, he was still nervous driving it. He decided to sell and bought a JKUR. If I were a betting man, I would say he probably put less than 250 miles on it.
 

STSFCTN

Active member
Silver Member
City
Centennial
State
CO
@mxracer919 you have a great memory. Yes, it had a T5 when drew bought it. Drew’s intent with this was to have a trail rig to ride around with our group.

We brought it to his place in OKC and got it running pretty quick. He took the carb in to a local shop and had it completely rebuilt. It ran for a short time and one of the freeze plugs popped out... the fun one behind the cylinder head. So we pulled the engine flushed it out and put new freeze plugs in. Put the engine back in with a new clutch, pressure plate and flywheel. The engine had been sitting and had quite a bit of blow by. The T5 was a bit loose in the shift mechanism, but still drivable. We also put a 2.5” lift on it. I replaced the fuel lines, sending unit and the rollover valve on the tank.

About this time Drew and his family moved to CO. He really doesn’t work on his own vehicles and has never owned a carbureted vehicle. He decided he wanted to make it more reliable, so he had a shop rebuild the engine. He had another shop rebuild the 300 and traded the worn out T5 for a Rebuilt T176 . A shop installed all of this. He also swapped out his original wide track axles with 2.73s for a set with 3.54s.

In the end, he was still nervous driving it. He decided to sell and bought a JKUR. If I were a betting man, I would say he probably put less than 250 miles on it.
Thanks for the history and the info. I thought he went with 3.73 gears. This is where I am with the build getting ready to weld in the driver's floors and side panel
 

Attachments

  • 16024570924027657847108362771036.jpg
    16024570924027657847108362771036.jpg
    220.7 KB · Views: 36

sdsupilot

CJ-8 Member
Member
City
OKC
State
OK
It could have been 3.73. By the time he did that it was in CO and I wasn't around to watch progress.

You work really fast! Excited to see what you build.
 

STSFCTN

Active member
Silver Member
City
Centennial
State
CO
Almost finished welding in the new floors and was underneath making sure the welds were penetrating through when I saw this wrapped up in masking tape in the transfer case. What is it and what is supposed to cover this?
 

Attachments

  • IMG_20201102_120146601.jpg
    IMG_20201102_120146601.jpg
    123 KB · Views: 39

FLCJ8

Legacy Registered User
City
Palm Bay
State
FL
Are you referring to this:

Inkedspeedo_LI.jpg

That is the connection for the speedometer cable.
 
Top