• Notice for iPhone users: DO NOT use the image size reduction option when uploading photos to the forum. This causes portrait images to post as landscape. We have added a warning to the image insert pop-up as well.

The Descrambler Project

W.R.Buchanan

Legacy Registered User
City
Ojai
State
CA
Hardtop

OK guys here it is.

I ran into some minor fittment problems when installing all due to the Fiberglass Tub and Windshield. Turns out my tub is about 1/4" narrower than a stock tub. The owner is having a new rear window made to fit my top and installation.

It will fit a stock tub very well as is, and I actually saw it mounted to one with the windshield and doors mounted when I arrived.

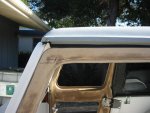
We used 6 overcenter latches (see pic) to hold the top down on the body, along with 2 smaller ones at the windshield. After looking at it and watching it on the drive home I will probably change this mounting system to something more rigid. Normally the top would bolt to three holes in the upper lip of the tub with normal bolts and a tee nut type insert from under the lip. I will probably drill and tap some 3/8-16 holes in the top lip of the tub or maybe some kind of threaded insert. I haven't figured out the windshield attachment completely as of yet, but the overcenter latches aren't going to get it. They tend to pull the windsheild frame to the rear instead of pulling the top odwn which is what needs to happen. This stuff is minor.

Note: I chose to NOT have my top finish painted and what you see is primer gray. Ordinarily they are painted White, Gray, Black, or Beige over a speckle finsih. I saw several other tops at the facility that were completely finished, and all looked very good.

All of the hardware is first rate Camper shell/ RV style stuff you've all seen before.

Pretty stoked about this top. And for the price of $1695 it is a hell of alot better than some POS used top that is 20 years+ old. Every used top I looked at was complete crap with UV damaged fiberglass and the owners still wanted $1000-1200 for them. For $500 more I got a new one, with all new hardware, glass, new carpet in the head liner, keys that fit the locks, etc

Anyone looking at a used top should consider the value aspect of this before jumping into a used top of questionable condition, and having to try to replace piece parts that are no longer made or difficult to find and best. Plus if the fiberglass is dead,UV damaged) you're just buying a POS. If the side or rear windows are damaged you are probably SOL!

Jerry Mancini Owner of Rally Tops is very easy to deal with, completely customer oriented, and aims to please at all cost. I give him my highest recommendation.

Well worth the price IMHO! Plus I'm pretty sure Rally Tops is the only outfit making Full Length Scrambler Hardtops right now.

I like it!!!

Randy
 
Last edited:

W.R.Buchanan

Legacy Registered User
City
Ojai
State
CA
Fitting Doors

The doors are a completely different story. :banghead:. These tops are made to fit a stock steel body with stock steel doors. And they do. I saw my body on a scrambler tub with windshield and doors. It fit perfectly. :thumbsup:

My body is a fibreglass body with fiberglass windshield and Acme Fiberglass doors. The ACME doors are made to fit an ACME top which is slightly different in the door area than my new top. I kind of saw this coming.:shrug:

The doors fit the body and windshield because I made them fit. I will have to make the doors now fit the top too, as changing them is way easier than changing the top. This will involve some fiberglass work which is relatively easy to do, but it would have been nice to just be "turn key."

Unfortunately,,,"Turn key" does not exist on this project. Cuz it's built from scratch. :banghead:

This is the price I'm paying for an all fiberglass Jeep with a diesel engine.:rotfl:

Here's some pics of the drivers door fit. I will have to raise the top edge of the door about 1/2-5/8" at the front and extend as needed at the rear of the door and down at the bottom of the top. The passenger side is pretty much more of the same.

After this is done the weather stripping will engage the top, and the windshield and hopefully be water tight? Emphysis on "hopefully".

Those of you who haven't experienced a leaking Jeep in a real rain storm really need this experience. I will tell you up front it SUCKS outright, but you really need to experience it yourself to appreciate the level of vacuum generated.

Randy
 

Attachments

  • Scrambler 505.jpg
    Scrambler 505.jpg
    50.1 KB · Views: 183
  • Scrambler 506.jpg
    Scrambler 506.jpg
    36.9 KB · Views: 173
  • Scrambler 507.jpg
    Scrambler 507.jpg
    29.7 KB · Views: 171

W.R.Buchanan

Legacy Registered User
City
Ojai
State
CA
Made some small progress this week. I got burried in work for my machine shop. Feast or Famine Machine. didn't have a chance to unload the body/top into the garage until today.

This was because the postion of the rolling chassis, which has been on Jackstands it's entire life, was such that there was no way to get the body past it into the garage.

Well yesterday while sitting on the toilet looking at a Harbor Freight flyer I had an ephifany!

I should just go down and buy a 2 pairs of thiose car wheel dollies they have on sale right now. $59.95 a pair. I bought a full set for $120.+tax. They are well made and assemble easily in 5-10 min. I got the heavy duty 1500lb capacity ones insteead of the 1000lb cheaper ones for $10 less. Like Nancy Pelosi always says, "go big or go home."

I came home and assembled them, jacked the axles up, and away we go.

I can move the entire vehicle anywhere I want in the shop. And whereas it is not super easy I can still do it by myself. With two people it is easy.

Me and my roommate pushed the jeep to the rear of the shop, I backed the trailer down into the shop, we picked the body with the overhead Jib crane , I drove out from under it, and then we set it onto the other 4 wheel dolly I have.

Now I can move all of it, anytime I want.

I have no idea why I didn't do this before. It's surprising what you can learn sitting on the toilet!

For those of you with space limitations, this is a good way to mobilize a project that has been anchored to the floor for years.

Randy
 
Last edited:

Randyzzz

Blown Budget
BENEFACTOR
Gold Member
Lifetime Member
SOA Member
City
Redmond
State
OR
Good call not getting the cheaper ones... don't ask how I know...
 

W.R.Buchanan

Legacy Registered User
City
Ojai
State
CA
Sliding Windows from Motion Windows

The new windows for my fiberglass doors arrived Wednesday, and I have to say they are very very nice. :thumbsup:

Both panes slide on these units, not just the rears like most. :D

The tint matches my hardtop's windows perfectly. :D

I have to do a small amount of fitting to get them totally into the doors but it is a minimal amount of sanding to the flanges in the doors, it will take 10 min per door.

Pretty happy with this product. They look really good. :thumbsup:

I'll post some pics of them soon.

www.motionwindows.com talk to Jeff

Randy
 

W.R.Buchanan

Legacy Registered User
City
Ojai
State
CA
Here's a pic of the right side window, the left is a mirror image. Both panes slide on these unlike earlier models which only allowed the front pane to move, or was it the rear? :huh:

Also some pics of the body off the frame.

Randy
 

W.R.Buchanan

Legacy Registered User
City
Ojai
State
CA
Today I had an epifany! :eek:

I got a PM from a guy , Jon/ mindscrambled, about doing fiberglass work on fiberglass doors, and tops etc.

I had back burnered dealing with the issues of fitting my doors and hartop to my body because I knew I was going to have to do major work, and I didn't have a clue what I was going to do about it. NO plan whatsoever! :crazy:

Well after I left for town this morning, I ate lunch at FatBurger, and went to a gun shop to buy some bullets for my new Glock .45. The shop was not open yet so I went to a friends Jeep shop (Offroadwerkz) nearby, He was replacing an air compressor on his YJ Jeep with hardtop, so he can go to "Fright Night" which is a run put on by the local Jeep club this coming weekend. I just stood there messing with him as he tried to figure out a wiring problem, and then after enough time had passed and he wasn't being fun anymore I decided to leave and go back to the gun shop. :evil:

As I was leaving I happened to glance at his fiberglass upper half doors and then closed the door and there it was !!!!!!!!!!!!! It was at that moment that I realized that the problem with my installation was not the top or the windshield or the body, It was all in the damned ACME fiberglass doors. Yes, the ones I worked so hard to find and buy! :banghead:

It's the doors that have to be modified not the top!

To describe the issue,,,It all has to do with the top edge of the ACME doors. They are level , they were made to fit an ACME hard top. There is also a radius on the front of the top edge of the doors that shouldn't be there. All of the other makes of doors and half doors have a sharp corner at the upper front.

Stock doors are tapered from front to back, and as a result there is no big gap to fill, because the top of the door extends all the way to the top of the Windsheild Frame.

What I will have to do, is build up the top edge of the doors to fill the offending area. I will also have to grind down several areas of the door's edges to fit the top and body cutouts better. The actal building up of these areas will be done with 1/4" sheet fiberglass and Fiberglass Bondo. See earlier in this thread for info on these materials.

Like I said, almost all of the mods happen to the doors not the body top or WS frame. The large radius at the top front of the doors must go. as well as the radius at the bottom of the angled front edge. Also the area just above the door latches will have to be raised to fill the cutout in the top. This essentially isolates all of the fiberglass work to the doors.

Suddenly a solution appears out of nowhere, and clarity returns to the project that has been stalled due to this particular stop, and of course, a ton of work that came into the shop in the last month,which ultimately will pay for the rest of the Jeep. Can't complain too much.

See pics below for a "before look" at the problem. I won't be dealing with this right now but at least I have an idea of what needs to happen. Before today I was blank and not liking my options.

I have to tell you guys, this type of thing happens to me frequently, solutions to problems be they design problems, or just plain everyday problems, just fall out of the sky. To the point where I just dont' rush into things anymore. The solution will come, it just takes the right push to get things moving. thanks Jon! :thumbsup:

Randy
 
Last edited:

John N

Addicted....Ex-SOA VP
BENEFACTOR
Gold Member
Lifetime Member
SOA Member
City
Rockville
State
VA
So, did you ever get the ammo?
 

Randyzzz

Blown Budget
BENEFACTOR
Gold Member
Lifetime Member
SOA Member
City
Redmond
State
OR
Interesting...your hardtop and fiberglass doors fit almost like my hardtop and hard doors. My fit issue is with the roll cage not clearing by 1/4". Looks like a good fix. ( I have to do some major top surgery to make mine fit, it will end up looking like one of Jeff's Safari tops, I hope.)

A new Glock, huh? I'm jealous...promised myself no new "toys" until the Scrambler is running. Then a Sig 229 Equinox .40 is on deck...
 

Major Jack

Legacy Registered User
City
Zillah
State
Wa
Still have the Springfield 1911 .45 I bought in a pawn shop in San Diego for $75.00 in 1968. Went through 2 1/2 tours with it.

Can't begin to count the number of times it helped me out of a jam. My team members used to say, "When Ole Equalizer came out, Jack was gettin down to business." Love that gun.

20 plus years ago as a gift my brother sent it to Wilson Arms in Arkansas. Came home a new gun. I told my wife I want it to be buried with me.
 

mindscrambled

Basic User
City
O'fallon
State
Il
I just looked at your pics Randy and the gap at the top looks almost identical to my problem. I'll get some pics up this weekend. My fiberglass doors came from a YJ and lack the lower window though.
 

W.R.Buchanan

Legacy Registered User
City
Ojai
State
CA
Jon: I got my fibergalss material from Mc Master-Carr. They have everything known to man. I am using some 1/4"x 2 flat stock they sell. It is located in the materials section of their catalog which is available on line also. They have a variety of shapes and sizes to choose from, and you can buy just about any quantitiy you need. I built up the section of my floor boards where the Yukon seats fit with fiberglass angle from MC so I have a bunch of left over pieces to work with.:thumbsup:

I decided NOT to just try to build up the offending areas with long strand (tiger hair) bondo because I don't think it would be structurally as strong as using solid pieces of material.

To build up the area in question you will make a cardboard template that fits in the missing area and is slightly larger than said area. You use this template (one for each side cuz they're probably completely different) to cut the pieces of filler stock to their approximate "oversize". Just make sure you are TOO BIG as you will grind and sand everything down to final size later on, and the less filler you have to use the better the result wil be. :D

Bonding the pieces to the top edges of the doors is where it gets tricky. I plan on glueing some pieces of 1/16" welding rod into the edges to act as pins to reinforce the edges. These pins will go vertically into the top of the door, and I'm thinking about 6-8 will do it, like every 2-3" along the top. The reason for this type of reinforcement is because of the amount of wear and tear there is on doors. They get handled alot and banged around, slammed etc. So some mechanical reinforcement will probably be a good thing. It will take much longer to do it, but in the end you don't want the top edge of the door coming off later on. Also take a pair of dikes and dimple (partially cut) the rod just a little so the resin has some "profile" to get ahold of, so it won't just slide apart later. :shrug:

You need to use fiberglass resin for glue here and make sure everything is totally saturated. After the resin is cured you can rough shape the area, and then use fiberglass bondo to fill the low spots. All of these materials are available at any big auto parts store, as they are the same stuff used to fix fiberglass car bodies or boats. I guess you could also use a high grade epoxy glue too. I also use Devcon 2 ton epoxy for gluing alot of stuff. Make sure everything is roughed up really well and totally clean (acetone) before gluing. I have a blast cabinet with steel grit in it so I blast the fiberglass parts with that and it works real well. Rough sand paper works too. The Acetone is also needed for clean up afterwards. So buy a gallon. (Walmart is the cheapest place to get this stuff.) :thumbsup:

You can use waxed paper to isolate the resin and hold it in place until it goes off. Do a dry run first on mixing the resin to see how long it takes to go off. If you mix it too hot it will go off in a matter of a few minutes and you won't have time to work it. Too Cold and it will just run all over the place... It's really not that hard to figure out you just have to play with it a little to get the hang of it.

Good luck and post lots of pics so other people can benefit from your experience.

Also Jeff Scherb is the resident fiberglass expert here, so maybe he can chime in here a guide us novices along too. :cheers:

Randy
 

W.R.Buchanan

Legacy Registered User
City
Ojai
State
CA
Orionn: In answer to your questions on the hardtop thread.....

I'm not building a subframe for the seats or dash. Just a dash made from 1/4" aluminum to reinforce the cowl.. I heavily modified the floor to get the seats to mount up at all. There will be a reinforcing plate that connects to the bottom of the roll bar horizontially and to the step in the tub vertically. This will reinforce the weak point of Scrambler tubs which is in the same place fiberglass or steel. IE right behind the door opening.

I don't plan on using this Jeep in the rocks and tearing it up. Been there done that. So even though it has the "capibility" to go to the rocks, it would only be used in an emergency. I assure you that this Jeep will go anywhere any other Scrambler on 37's will go, It's just I don't see a need to prove it. Anybody that actually knows what they are looking at will be able to see that, the rest I don't care about.:banghead:

All of the bottom of the body in the seat mount and trans tunnel area will be glassed over when I turn the tub over. This will reinforce this area enough. I need to put some cross braces in the trans tunnel as well as the shifter is mounted on it, and it flexes all over the place. After I cut the hole for the shifter in the floor I found it to be only 1/16-1/8" thick in that area. I must say this product from 4WD Hardware has gotten cheaper over the years, as my CJ5 is 1/4" thick virtually everywhere. Either cost cutting or the same guys making the product for 20 years and they were just tryin' to get home early. :rotfl:

The body mount plates are radiused on the top and bottom plates where they sandwich the body. They will also be glued in place using either silicone seal or or body seal goo at final assembly so there will be no vibration or leaks. :thumbsup:

As Far as 20 years goes,,, this Jeep will outlast me for sure. But the way I'm putting it together it should last alot longer than 20 years, hell I have a 83 MBZ diesel that is nearly 30 years old and I drive it nearly everyday. The Cummins motor will never wear out as it is in such a cream puff application there will be virtually no load on it, and all of the machinery can be rebuilt forever. The body will never go away unless it is totalled. Knock on wood. :fingerscrossed:

No I'll probably be burried in this one cuz I'll never get my money out of it by selling it, I'll have to use it til the end. Maybe my wife will learn to appreciate it by then and keep it going for another 50 years. All the women on her side of the family have made 100+, so she'll look cool driving this Jeep around Santa Barbara when she is 95. (fat chance, she hates it):evil:

Randy
 

W.R.Buchanan

Legacy Registered User
City
Ojai
State
CA
Not much going on right now.

I haven't had much to do on this project for a little while. I ordered my drive shafts last week and they should be done tomarrow12/31. not cheap either.

They are made both with all 1330 spicer U joints and CV joints. 3" tubes front and rear.

Due to the extra length of the overdrive unit the front drive shat is 55" long and the rear one is 16" long.

I'll put up pics when the are installed.

I am currently designing the rear traction bar to be fabbed soon.

Randy
 

W.R.Buchanan

Legacy Registered User
City
Ojai
State
CA
Well finally got the drive shafts and I must say they will be down right impossible for this jeep to break in my lifetime . :thumbsup:

As you can see in the pics the rear is at 12 degreees included which is not very much for this type of CV. The front is at a much shallower angle. Note also there is plenty of clearance for the front drivehsaft to operate in including the clearance over the crossmember. The rear is wide open so there are no potential clearance issues for it at all. The only thing left that will occupy any space behind the transfer case is the muffler which will be near the right frame rail. I might integrate some kind of an airtank in this area as well. Also the rear traction bar will be to the left of the drive shaft and parallel to it. I have yet to install the last crossmember that will support the dead side of the traction bar. It will be located on the upangled portion of the frame. It will also act as a hanging point for the exhaust system.

I have designed the Ebrake mount and it's just a matter of setting the mill up to profile the thing. Mike Partridge of AA sent me the drawing of the tailshaft housing for the Atlas Transfercase so I could get the position of the bolts right.

The bracket is made from 1/4 x 6 CRS flatbar, and attaches to 3 of the 5 hold down bolts for the tailsahft housing.. Then there will be a set of spacers that position the caliper over the disc. The Cable is mounted to the bracket and will go strait back and then do a full 270* loop and address the caliper from the right side.

Here's some pics of the Drive shafts .

Randy
 
Last edited:

W.R.Buchanan

Legacy Registered User
City
Ojai
State
CA
Pics of Ebrake caliper and disc. I'll put up more pics when the project is complete. Randy Today is Groundhog Day. 2/2/2011 my favorite holiday.
 
Last edited:

Randyzzz

Blown Budget
BENEFACTOR
Gold Member
Lifetime Member
SOA Member
City
Redmond
State
OR
Looks great. That rear shaft is short...looks like a '7 almost!
 

W.R.Buchanan

Legacy Registered User
City
Ojai
State
CA
Yeah Randy it's about 16" OAL but since the angle on the CV is relatively shallow there shouldn't be any problems with it.

My CJ5 ran just fine at 17* and it was turning 4,000 rpms at 70MPH!

If you notice the spring hangers are just about in line with the CV joint. This means that when the axle cycles thru it's articulation, there won't be hardly any in or out movement of the slip yoke. That's from full tilt one way to full tilt the opposite way.

The only way the CV could be made to be at a higher angle is if I jumped the vehicle and the axle went strait down. Luckily it will only go strait down about 1-2", and I have plenty of travel for that if it happens.

Probably won't be jumping this one a whole lot. I doubt it is going to be real peppy in the sand.

Randy
 

W.R.Buchanan

Legacy Registered User
City
Ojai
State
CA
E-Brake Caliper Mounting

Finally made some more head way.

Been working on the E=Brake Caliper mounting.

As seen in pics above I want the Caliper mounted horizontally above the disc.

To do this I had to fabricate this mount however after building the damn thing and installing it I found that the AA drawing had omitted one point.

The way it was drawn is how I made the first mount bracket but what the drawing didn't say is that the drawing was clocked 15 degrees off Vertical so when I made the bracket it is tilted 15 degrees to the right.

I can't have this because the Ebrake cable with interfer with the exhaust pipe.

So I got to make it again. :banghead: Here's pics I'm sure glad this smiley exists cuz it saves me a bunch of explaination.

Randy
 
Last edited:
Top