

You are using an out of date browser. It may not display this or other websites correctly.
You should upgrade or use an alternative browser.
You should upgrade or use an alternative browser.
Voodoo Blue 82 Complete Refresh
- Thread starter gpassida
- Start date


- City
- Redding
- State
- Ca
"Phase 2" of my build has officially been started!
The plans are to increase the highway drivability for distant Overlanding/Rocklanding trips. It runs great now with the V8, 5-Speed and 22 gallon tank. The problem areas are heat, noise, dust and lockable storage.
When my F350 died and we drive it 3K miles to Colorado and Idaho and back to California, it cruises easy at any speed up to about 80 mph. 80 mph is a bit too fast but 70-75mph is perfectly doable for long stretches in 5th gear. But heat and wind noise can be brutal. Especially on triple digit temperature days. And once on a dirt trail, the full Kayline soft top is not optimal due to the back window getting very dusty, including the zippers. I have had to clean and fix the zippers more than I care to. It allows a good amount of dust inside as well. And on cold days, frequently opening and closing the back vinyl window isn't fun when it gets rigid.
Here are the plans:
- Air Conditioning (Vintage Air Kit)
- Full length hard top (Xtreme Tops)
- Heat and noise insulation on the floor and side surfaces (Dynamat type stuff - need to research)
- Likely a CJ-7 Bed Rug kit for the front of the tub and custom (matched to the Bedrug) carpet in the rear
- Rock lights (Switch is already wired and active on my S-Pod)
- Interior lights (Switch is already wired and active on my S-Pod)
- Front and back cameras that show on the iPad mini I use on my dashboard
- Potential bonus item 1: Cruise control for the Chevy 350TBI
- Potential bonus item 2: Custom second gas tank under the bed in the empty space. (maybe 5-8 gallons)
Once all of this is done, I anticipate running in either FULL TOP mode for Overlanding and general camping trips OR for the Rubicon and similar trails, just my full-length bikini top and the YJ steel half doors I will finish rebuilding and install this summer. (also painted Voodoo Blue)
I can drive it to any trail or tow it.
I bought the full Vintage Air kit with the Sanden compressor and brackets for my Chevy V8. Will be working on that very soon.
And, after looking for 2-years for any West coast Xtreme Tops/Rally Top type full hard top, I just ordered a new one from Mike at Xtreme Tops. Shipping to Northern California is brutal. But the time has come and Mike has been great to work with. I gave him detailed measurements of my full-length roll cage, and it looks like his top will fit - just barely. It should start its journey to me next week sometime.
I used AI to generate this picture to see what the Xtreme top would look like on my Scrambler. It did pretty good and it helped me sell the concept to my wife. (She also recalls the hot, noisy 3K miles trip...)

So... we're off the starting blocks for Phase 2! This Jeep is my escape from everyday life and the events that happened to my family on April 3rd last year. We take Athena with us everywhere and leave these buttons behind. She's our constant sidekick on all of our adventures. We will never forget her. All of our friends have these buttons as well and send us pics of where Athena has been with them. We also have a TV in our house that constantly rotates a slide show of her short 21-year life - including the button pictures.


And lastly, I want to get these upgrades done while I have a job. Our plan is to retire at the end of this year - both at Age 62. Unless we go into a significant recession, that should be happening for us. We're excited and once it actually does happen, the adventure gates will open wide for us. Look out! We're hoping to have a lot of action in our "Go-Go" years before moving into the "Slow-Go" and then "No-Go" years.
Scrambler's rule!
The plans are to increase the highway drivability for distant Overlanding/Rocklanding trips. It runs great now with the V8, 5-Speed and 22 gallon tank. The problem areas are heat, noise, dust and lockable storage.
When my F350 died and we drive it 3K miles to Colorado and Idaho and back to California, it cruises easy at any speed up to about 80 mph. 80 mph is a bit too fast but 70-75mph is perfectly doable for long stretches in 5th gear. But heat and wind noise can be brutal. Especially on triple digit temperature days. And once on a dirt trail, the full Kayline soft top is not optimal due to the back window getting very dusty, including the zippers. I have had to clean and fix the zippers more than I care to. It allows a good amount of dust inside as well. And on cold days, frequently opening and closing the back vinyl window isn't fun when it gets rigid.
Here are the plans:
- Air Conditioning (Vintage Air Kit)
- Full length hard top (Xtreme Tops)
- Heat and noise insulation on the floor and side surfaces (Dynamat type stuff - need to research)
- Likely a CJ-7 Bed Rug kit for the front of the tub and custom (matched to the Bedrug) carpet in the rear
- Rock lights (Switch is already wired and active on my S-Pod)
- Interior lights (Switch is already wired and active on my S-Pod)
- Front and back cameras that show on the iPad mini I use on my dashboard
- Potential bonus item 1: Cruise control for the Chevy 350TBI
- Potential bonus item 2: Custom second gas tank under the bed in the empty space. (maybe 5-8 gallons)
Once all of this is done, I anticipate running in either FULL TOP mode for Overlanding and general camping trips OR for the Rubicon and similar trails, just my full-length bikini top and the YJ steel half doors I will finish rebuilding and install this summer. (also painted Voodoo Blue)
I can drive it to any trail or tow it.
I bought the full Vintage Air kit with the Sanden compressor and brackets for my Chevy V8. Will be working on that very soon.
And, after looking for 2-years for any West coast Xtreme Tops/Rally Top type full hard top, I just ordered a new one from Mike at Xtreme Tops. Shipping to Northern California is brutal. But the time has come and Mike has been great to work with. I gave him detailed measurements of my full-length roll cage, and it looks like his top will fit - just barely. It should start its journey to me next week sometime.
I used AI to generate this picture to see what the Xtreme top would look like on my Scrambler. It did pretty good and it helped me sell the concept to my wife. (She also recalls the hot, noisy 3K miles trip...)
So... we're off the starting blocks for Phase 2! This Jeep is my escape from everyday life and the events that happened to my family on April 3rd last year. We take Athena with us everywhere and leave these buttons behind. She's our constant sidekick on all of our adventures. We will never forget her. All of our friends have these buttons as well and send us pics of where Athena has been with them. We also have a TV in our house that constantly rotates a slide show of her short 21-year life - including the button pictures.
And lastly, I want to get these upgrades done while I have a job. Our plan is to retire at the end of this year - both at Age 62. Unless we go into a significant recession, that should be happening for us. We're excited and once it actually does happen, the adventure gates will open wide for us. Look out! We're hoping to have a lot of action in our "Go-Go" years before moving into the "Slow-Go" and then "No-Go" years.
Scrambler's rule!


- City
- Redding
- State
- Ca
Yes, that's definitely something we're addressing. Fortunately, we have been investing using a "3 bucket strategy". 401K, Roth IRA's and an after tax Brokerage account. We're able to pull some from each during the three years and stay under the MAGI cap so we qualify for ACA incentives. And I've been modeling our retirement plan in the "Boldin" software which has been amazing for us.If you can handle the medical at 62, by all means do it. These years after 62 fly by in a few blinks.

sdsupilot
CJ-8 Member
- City
- OKC
- State
- OK
Excited to see what you decide on phase 2! I also added AC to my jeep. I used the Jeep air kit. Glad to see you got the sanden compressor. I got the original style, new, and it has started leaking after 2 years.
AC does make the engine run hotter and the floors reflect more heat. To combat that I added fender vents. I am also going to add hood vents and trim my metalcloak inner fenders. Lastly a new radiator should solve the run hot issue while running AC.
All that said I will be following how you deal with heat/noise as that is something I also need to get under control.
AC does make the engine run hotter and the floors reflect more heat. To combat that I added fender vents. I am also going to add hood vents and trim my metalcloak inner fenders. Lastly a new radiator should solve the run hot issue while running AC.
All that said I will be following how you deal with heat/noise as that is something I also need to get under control.
- City
- Redding
- State
- Ca
Test fit the Jeepair AC unit to my dashboard. Since the dashboard is totally custom, I was worried I may have fitment issues with the areas that stick up behind the dash. I did have to undo my very neat and organized wire looms to get it to fit but I think we will be good. Need to cut the top of the throttle pedal off a bit.
Also need to drill the four mounting holes in the bottom lip of the dash. It's held on for the test fit with a couple of C-Clamps on the ends.

And I painted the compressor and alternator brackets I bought from Jeepair. The existing alternator bracket on the 350 Chevy needs to be changed out as part of this.


Also need to drill the four mounting holes in the bottom lip of the dash. It's held on for the test fit with a couple of C-Clamps on the ends.
And I painted the compressor and alternator brackets I bought from Jeepair. The existing alternator bracket on the 350 Chevy needs to be changed out as part of this.

- City
- Redding
- State
- Ca
Lot's of work to get my Phase 2 done!
I ordered the Xtreme Tops full Scrambler hard top. Mike there has been great to work with.
They built it and shipped it out from Tennessee. I will have it here in CA next week. Here are some pictures he sent me:


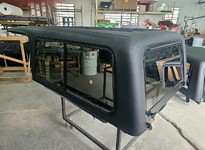


I ordered the Xtreme Tops full Scrambler hard top. Mike there has been great to work with.
They built it and shipped it out from Tennessee. I will have it here in CA next week. Here are some pictures he sent me:
Xtreme Hardtops
New member
- City
- Lafollette
- State
- TN
Thank you George for the shout out and the kind words.

- City
- Birmingham
- State
- AL
I love those full hard tops. On the list of upgrades to my Scrambler in the near future!!
- City
- Redding
- State
- Ca
The Xtreme Hard Top arrived a day early. The box took a little damage under the front of the top but it was packed really well inside and the top is in perfect shape. It is a really good looking top. Sealed it back up after inspecting it. It will likely be 2-3 weeks before I can install it. I want to finish the AC install and I have some work travel coming up.
Mike at Xtreme even packed me a surprise box with a hat and some stickers.
I gave him measurements of my roll cage and it should fit over it. But that's the last potential issue that would not be good if it won't clear it.
Here are some pics:


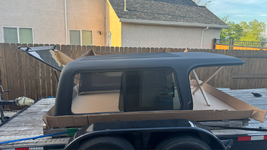


Mike at Xtreme even packed me a surprise box with a hat and some stickers.
I gave him measurements of my roll cage and it should fit over it. But that's the last potential issue that would not be good if it won't clear it.
Here are some pics:

- City
- Allen Park
- State
- MI
Love it! That side glass opening up is an awesome feature. 

- City
- Redding
- State
- Ca
I'm happy to say that I have AC now in the Scrambler! This is not a full install guide - just some highlights of my particular install.
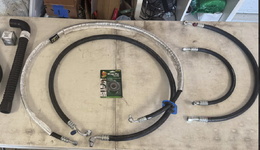
I used the Jeepair CJ/Chevy 350 Kit with the Sanden compressor. I used their driver's side 101L compressor mount. I ended up just modifying the stock alternator mount instead of replacing it with a new bracket. I made a couple of changes in the layout, so I had to buy more AC hose instead of using everything in the kit. I located the receiver/dryer on the driver's side fender instead of the more common passenger side install.
While I was in there, I replaced the Champion aluminum radiator with a brass/copper radiator from US Radiator. The Champion was working well but took some damage from high-speed hailstones. And I wanted the ability to repair small leaks in the field - which is hard on an aluminum radiator. This new radiator, as was the case for the Champion, is specifically for a Chevy Small Block in a CJ.
Here are some pics. (sorry for the dirty engine compartment - it gets a lot of trail use...)
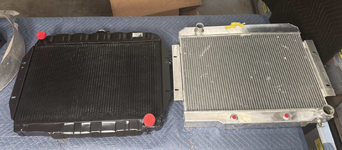
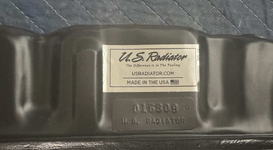
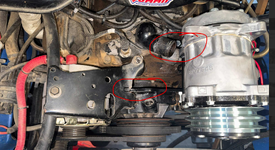
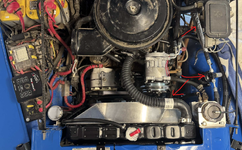
First problem is that the new compressor now totally blocked the stock Chevy thermostat housing. No way to get a radiator hose on it in that location. And you can also see the notch I made in the alternator mounting bracket to allow the Jeepair bracket to be used.
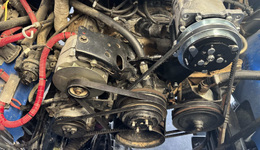
I have a V-Belt setup - not a serpentine belt. So, I had to figure out the right belt length. Ended up with a 57.5" Gates 7575 belt.
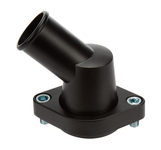
To solve the upper radiator hose issue, I sourced a "Swivel Neck" from Summit Racing for $25. It is an "Allstar Performance Aluminum Water Necks ALL30271" Besides swiveling into any rotation, the neck is at a 45-degree angle to allow for a smooth hose route to the radiator.
Ended up making heavier duty brackets for the condenser. I used the thin ones included in the kit and thought it would vibrate too much on long Overlanding washboard roads. Took @spankrjs advise and used screws with nylon lock nuts to mount them. Except for the top driver's side where I just drilled my new bracket and used the hood latch bolt that was already there.
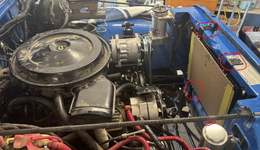
Here is the finished engine compartment. You can see the receiver/dryer on the driver's side fender. I also looked at MANY upper radiator hoses and found Gates 25806 universal hose with a 90-degree end that fit perfectly. Plus, it is stocked at most auto parts stores in case I need one while traveling. Used the constant tension spring type hose clamps to avoid leaks. And I inserted the high-pressure line that goes inside the cab into a DES heat sleeve so it doesn't pick up too much heat on the way in. (I'm not an AC expert and don't know if this really helps...but I wanted to have it be as cold as possible) Not pictured but all the hoses route up and over the back of the engine along the firewall - like the main wiring harness.
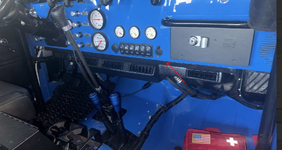
Here is what the inside looks like. I did have to cut my gas pedal down to clear the back of the unit. And I decided to space it down with an aluminum 3/4" square tube so it's not a forced fit with all my wiring due to the custom gauge locations on my dashboard. I could get it without the spacer, but it was compressing some of the wiring. Also dropped the rear support bracket 3/4". It still blows up into your face if you want.
I had a local shop do a vacuum leak down test and charge it with R134a. And I was happy to see it blows cold air within a degree or two with my wife's new 2025 Wrangler Willy's and our one and only economy vehicle - a 2023 Kia Forte. It took me a while but it's all in and works great.
It gets HOT here in Redding, CA. (over 110 degrees) I would say at up to a 97 degree day with the hardtop, that will be in the next post, it is good.
The limiting factor is the floor is HOT - like it will burn flesh if you touch it for too long. And that heat goes straight up into the air intake for the evaporator unit above the drivers footwell area. So, adding the heat/noise shielding and the BedRug kit should help with that - hopefully be adequate on temps up to 110 degrees. Just in case, I also ordered a "Wind Jammer" that can largely block off the front cab area from the huge back cargo area. Yes, a lot of air will go around it, but I think it will help somewhat.
I used the Jeepair CJ/Chevy 350 Kit with the Sanden compressor. I used their driver's side 101L compressor mount. I ended up just modifying the stock alternator mount instead of replacing it with a new bracket. I made a couple of changes in the layout, so I had to buy more AC hose instead of using everything in the kit. I located the receiver/dryer on the driver's side fender instead of the more common passenger side install.
While I was in there, I replaced the Champion aluminum radiator with a brass/copper radiator from US Radiator. The Champion was working well but took some damage from high-speed hailstones. And I wanted the ability to repair small leaks in the field - which is hard on an aluminum radiator. This new radiator, as was the case for the Champion, is specifically for a Chevy Small Block in a CJ.
Here are some pics. (sorry for the dirty engine compartment - it gets a lot of trail use...)
First problem is that the new compressor now totally blocked the stock Chevy thermostat housing. No way to get a radiator hose on it in that location. And you can also see the notch I made in the alternator mounting bracket to allow the Jeepair bracket to be used.
I have a V-Belt setup - not a serpentine belt. So, I had to figure out the right belt length. Ended up with a 57.5" Gates 7575 belt.
To solve the upper radiator hose issue, I sourced a "Swivel Neck" from Summit Racing for $25. It is an "Allstar Performance Aluminum Water Necks ALL30271" Besides swiveling into any rotation, the neck is at a 45-degree angle to allow for a smooth hose route to the radiator.
Ended up making heavier duty brackets for the condenser. I used the thin ones included in the kit and thought it would vibrate too much on long Overlanding washboard roads. Took @spankrjs advise and used screws with nylon lock nuts to mount them. Except for the top driver's side where I just drilled my new bracket and used the hood latch bolt that was already there.
Here is the finished engine compartment. You can see the receiver/dryer on the driver's side fender. I also looked at MANY upper radiator hoses and found Gates 25806 universal hose with a 90-degree end that fit perfectly. Plus, it is stocked at most auto parts stores in case I need one while traveling. Used the constant tension spring type hose clamps to avoid leaks. And I inserted the high-pressure line that goes inside the cab into a DES heat sleeve so it doesn't pick up too much heat on the way in. (I'm not an AC expert and don't know if this really helps...but I wanted to have it be as cold as possible) Not pictured but all the hoses route up and over the back of the engine along the firewall - like the main wiring harness.
Here is what the inside looks like. I did have to cut my gas pedal down to clear the back of the unit. And I decided to space it down with an aluminum 3/4" square tube so it's not a forced fit with all my wiring due to the custom gauge locations on my dashboard. I could get it without the spacer, but it was compressing some of the wiring. Also dropped the rear support bracket 3/4". It still blows up into your face if you want.
I had a local shop do a vacuum leak down test and charge it with R134a. And I was happy to see it blows cold air within a degree or two with my wife's new 2025 Wrangler Willy's and our one and only economy vehicle - a 2023 Kia Forte. It took me a while but it's all in and works great.
It gets HOT here in Redding, CA. (over 110 degrees) I would say at up to a 97 degree day with the hardtop, that will be in the next post, it is good.
The limiting factor is the floor is HOT - like it will burn flesh if you touch it for too long. And that heat goes straight up into the air intake for the evaporator unit above the drivers footwell area. So, adding the heat/noise shielding and the BedRug kit should help with that - hopefully be adequate on temps up to 110 degrees. Just in case, I also ordered a "Wind Jammer" that can largely block off the front cab area from the huge back cargo area. Yes, a lot of air will go around it, but I think it will help somewhat.
- City
- Redding
- State
- Ca
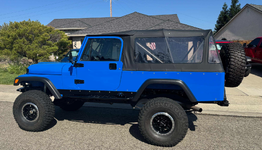
On to the Xtreme Tops full-length hardtop now! This top is awesome! Looks factory. The install was pretty easy, but my front roll cage hoop made it tricky to get the front hold down latches in. I did put some weather stripping down on the top of the windshield frame and the two hold down latches got it nice and tight. No wind noise from the top edge. I do have to add some weather strip to the upper corner where the door, windshield and top meet. That's my only area that I hear wind. (except for my driver's side door wind wing. It has a slight whistle when hitting 45+ mph)
Here is the last pic of it with the Kayline soft top on. It's a great top for sure. But for longer highway trips and dusty trails, it lets too much heat and dust in. Opening the zippers multiple times a day when they are covered in dust is a problem and my wife gets frustrated with it. And you can't lock all your gear up. The hardtop liftgate will seal much better and be easy to use. I'm not sure if I am keeping or selling the soft top at this point. Need to think about it for a while.
If you haven't already seen, I previously posted pics of this hardtop being made and the shipping container. Go check those out.
I was worried it wouldn't fit over my long custom roll cage, but it does clear just fine. Here are some pics and a video:
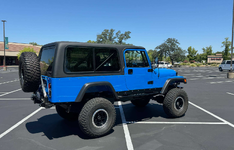
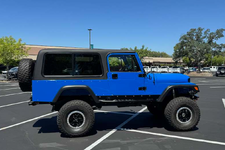
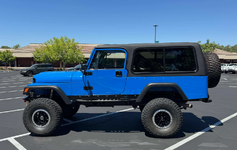
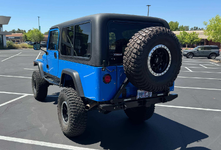
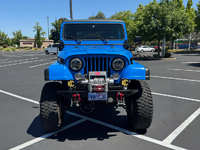
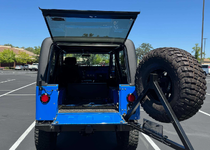
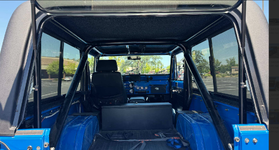
And here is a video walkaround:
Here is the last pic of it with the Kayline soft top on. It's a great top for sure. But for longer highway trips and dusty trails, it lets too much heat and dust in. Opening the zippers multiple times a day when they are covered in dust is a problem and my wife gets frustrated with it. And you can't lock all your gear up. The hardtop liftgate will seal much better and be easy to use. I'm not sure if I am keeping or selling the soft top at this point. Need to think about it for a while.
If you haven't already seen, I previously posted pics of this hardtop being made and the shipping container. Go check those out.
I was worried it wouldn't fit over my long custom roll cage, but it does clear just fine. Here are some pics and a video:
And here is a video walkaround:
Attachments

- City
- Biloxi
- State
- MS
I found that without carpet installed, after about 30 minutes of high speed driving, heat from the floor became too much for the air conditioning to compensate for. Carpet fixed this issue.
I had to modify the "fake tensioner" they included to keep the compressor belt tight. If not, everytime I initially turned the AC on, the belt would squeal due to the faux tensioner loosening. Adding an additional idler pulley on the long run from the crank also keeps the belt from wanting to flap.
Been a few years since I installed my JeepAir kit, still working perfectly.
I would love to add a real belt tensioner, still haven't, my fixes seem to work fine, just something to keep an ear out for.
I had to modify the "fake tensioner" they included to keep the compressor belt tight. If not, everytime I initially turned the AC on, the belt would squeal due to the faux tensioner loosening. Adding an additional idler pulley on the long run from the crank also keeps the belt from wanting to flap.
Been a few years since I installed my JeepAir kit, still working perfectly.
I would love to add a real belt tensioner, still haven't, my fixes seem to work fine, just something to keep an ear out for.