• Notice for iPhone users: DO NOT use the image size reduction option when uploading photos to the forum. This causes portrait images to post as landscape. We have added a warning to the image insert pop-up as well.

bigwalton's Postal Stroker

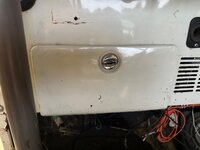
Through the hood of course. I like the knee braces as cup holders, nice set up.
Those are two of my greatest part finds ever. Bargain bin at Cabelas, ball bearing supported gimbaled cup holders marketed for boats that are screwed into the cage. They work amazingly well off road, the free surface effect of the liquid keeps them upright through all but the craziest bumps and inclines.
 
There’s a post/thread here on it somewhere and I’ll take new pics when I’m home.

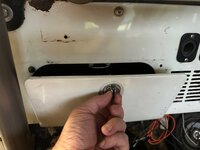
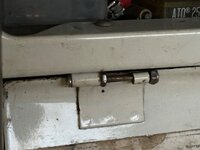
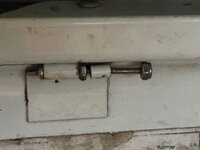
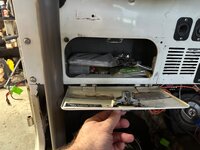
Modified the hinge to have a long screw as the hinge pin, unlatch, slide the door right and it drops down clear of the cage.
I remember your post.
I had a similar issue, but I swear I didn't steal your idea. :thumbsup:

 
I found it somewhere. Not my idea. Note that I ground down the threads on the “slider” portion. Works perfectly and haven’t touched it since I did it years ago.

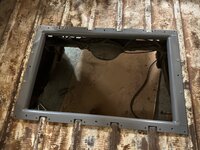
In other news… got the hatch frame mounted. Drilled out and countersunk the four bolt holes on the short sides for stainless screws/locknuts. The frame isn’t going anywhere and I like this a lot better than the rivets all over. Debated filling the other rivet holes before painting but didn’t just in case there was some reason I’d need to add more fasteners.

IMG_7884.jpeg

I plan to run some gasket material of some sort on the edge of the cover, the screws for it to attach to the frame are just a hair long and hit the bed, that will solve the issue without having to shorten the screws (I don’t want more holes in the bed) and allow for some tightening “cushion” to hopefully keep them from rattling loose.

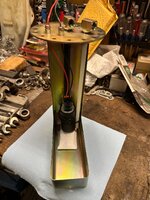
Then moved onto the Tanks Inc pump unit. Ended up lengthening the last slot in the upright maybe 3/16” to allow the baffle tray to sit flush on the bottom of the tank. I got the “deep” tank version with extra long return and supply lines. Simple setup per the instructions. Wish they included a 1/4 npt cap for the vent line if you don’t order a vent fitting. Can’t believe I didn’t have one in my bins. That’s all it’s missing to be done.

Went with the Tanks Inc fitting/filter/hose kit and doing everything in AN running up and back on my drivers side, away from the exhaust. (Old setup had one on each rail).

Stroker fuel rail is set up for return and AN fittings as well. I’ll reuse my Mallory adjustable regulator after the rail somewhere on the drivers side of the firewall. Got to find a good fuel filter mounting spot.

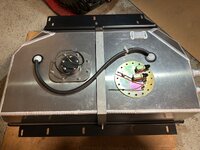
Supply/return fittings aligned to head up the drivers side and confirmed that I’ll be able to get to the mounting screws. Pic is before the AN fittings went on. Wiring bulkhead connectors are sweet.

IMG_7886.jpeg
Hoping to get some time out there tomorrow to get the mounting holes in the tank and get the tank in.

 
Last edited:
Lots of hole drilling and things are ready to mount.

Had to drill/tap for the Holley lidar level sender (non-contact) since I didn’t have a generic SAE level sender hole. Worked out nice that it could go in the block off plate and save more shavings going in the tank.

Spent as long vacuuming as drilling. Will go back in again and they suggest dumping some WD-40 in to slosh around and use a magnet. Magnet won’t help, but maybe worth trying and wiping it out by hand.

IMG_7888.jpeg
 
If anyone has a good vent solution for the tank to fight fumes without getting into running lines all the way to the engine bay, I’m all ears. Everything I see is as much or more than the freaking Holley level sender!
 
I found it somewhere. Not my idea. Note that I ground down the threads on the “slider” portion. Works perfectly and haven’t touched it since I did it years ago.

In other news… got the hatch frame mounted. Drilled out and countersunk the four bolt holes on the short sides for stainless screws/locknuts. The frame isn’t going anywhere and I like this a lot better than the rivets all over. Debated filling the other rivet holes before painting but didn’t just in case there was some reason I’d need to add more fasteners.

View attachment 122733

I plan to run some gasket material of some sort on the edge of the cover, the screws for it to attach to the frame are just a hair long and hit the bed, that will solve the issue without having to shorten the screws (I don’t want more holes in the bed) and allow for some tightening “cushion” to hopefully keep them from rattling loose.

Then moved onto the Tanks Inc pump unit. Ended up lengthening the last slot in the upright maybe 3/16” to allow the baffle tray to sit flush on the bottom of the tank. I got the “deep” tank version with extra long return and supply lines. Simple setup per the instructions. Wish they included a 1/4 npt cap for the vent line if you don’t order a vent fitting. Can’t believe I didn’t have one in my bins. That’s all it’s missing to be done.

Went with the Tanks Inc fitting/filter/hose kit and doing everything in AN running up and back on my drivers side, away from the exhaust. (Old setup had one on each rail).

Stroker fuel rail is set up for return and AN fittings as well. I’ll reuse my Mallory adjustable regulator after the rail somewhere on the drivers side of the firewall. Got to find a good fuel filter mounting spot.

Supply/return fittings aligned to head up the drivers side and confirmed that I’ll be able to get to the mounting screws. Pic is before the AN fittings went on. Wiring bulkhead connectors are sweet.

View attachment 122734
Hoping to get some time out there tomorrow to get the mounting holes in the tank and get the tank in.
I see some momentum starting to build!!!
Awesome work 👍
 
If anyone has a good vent solution for the tank to fight fumes without getting into running lines all the way to the engine bay, I’m all ears. Everything I see is as much or more than the freaking Holley level sender!
what about this?

 
I saw that when I got the pump and fuel line setup. The total “splurge” Holley laser level sender was $130 (which I got based on reviews I saw specifically with speedhut gauges and a hope for longevity without moving parts), and I couldn’t take the price for that as a simple can with charcoal. Had it in my cart and just couldn’t do it.
 
I see some momentum starting to build!!!
Awesome work 👍
My wife has taken to asking “so what are you going to get done on the Postal today” in the morning and “what did you get done on the Postal today” in the evening and she’s coming out to sit with me and help as needed.

I think she’s tired of hearing me complain that I wasn’t getting anything done and how much I hated another Sandblast without it.
 
New plan: get tank in, skip finishing the wiring, make a “break in board” (literal piece of OSB) that will have the Terminator X, relays, fuel pump power, etc needed to fire it up, install the ignition/engine harness wiring, attach radiator with prop rods, run fuel lines temporarily.

Ignition switch is already wired, don’t need any Speedhut gauges with terminator X readout. (That was the eureka moment on this plan).

Need to get the trans rebuilt and on, just shift into neutral, so new controller doesn’t need to be wired in.

I’ll cobble together some sort of exhaust.
 
Back
Top