• Notice for iPhone users: DO NOT use the image size reduction option when uploading photos to the forum. This causes portrait images to post as landscape. We have added a warning to the image insert pop-up as well.

Brake Bleeding Problems

This might be a stupid question, but where are you starting your bleeding? Passenger rear drum, then Driver side drum, then passenger side disc, then driver side? There is an order that normally is recommended.

Aside from that, are you sure that the connection at the rear axle splitter is tight? Make sure that the flex hose is new and not plugged?

Just grasping now.

cb
 
I don't believe that Wilwood has a disc/drum master available which would have a residual valve in behind one of the flared port(s) on the stock unit. You can grab a straw off of a brake cleaner can and press that into each of the holes in the flared seats on the stock master. One should be open and the other(the smaller well) should be springy. That would be the residual valve to hold pressure on the shoes. Pinch off the rear line and see if the brakes come up quickly. That will give you your answer.
 
I would try to hold pressure on the pedal without bleeding to see if any of the new connections leak over time. It could be pulling air in the line when you release the pedal from a loose connection. I don't think the wheel cylinders can be installed inverted. I would check those as well to make sure the bleeder is on the top side like the calipers. I would also pull the rear wheels/drums off to make sure a wheel cylinder isn't leaking. At this point I would check every connection and component to make sure there isn't anything leaking or loose.

I have had new brake parts fail out of the box. One reman GM caliper had a metric vs standard bleeder screw. It had a very slight leak that I didn't notice until I had driven my 8 for a week. A friend had a faulty reman that leaked out of the piston of a front caliper.
 
Well, I had hoped you had the wrong master but as others have said, everything looks good from here. With that style master, I am thinking it must have a residual pressure valve for the rear brakes. Lacking a residual pressure valve could cause your symptoms. In other words, I’m out of suggestions.
 
Alright folks, an update. After taking a few days off to work on some other projects I'm back to this and here's where I'm at:
While bleeding for the bazillionth time I realized the back passenger wheel cylinder didn't always get fluid to it. Wasn't sure if it was the cylinder or not so I went ahead and replaced it. Still no luck.

I realized the rear brakes weren't adjusted so I spun the star until there was a little bit of resistance on the drums. Still no luck.

I had the master on the bench and bled it at least 20 times. The last 15 times there were no bubbles. Still no luck.

I set my camera up to record the proportioning valve while I pressed the brakes. When I did that I saw the dohickey on the end going out every time I pressed the brakes. Well, the manual does say there is a tool to hold that in place. So I ordered one.

Of course it didn't fit, but I modified it until it did and bled the brakes again. Still no luck.

So I had another set of eyes and feet come over to help me bleed. We ran bottles through the system trying to get it to bleed. No luck. So I pulled the new valve off and put the old one on. Went through the process again, this time with the tool on the end to keep the doohickey from moving. Lots of bubbles in the rear like you would expect. Run a few bottles of brake fluid through just to be sure. The last dozen times through there were no bubbles. Bled the front and there were some bubbles on the passenger side, but not nearly as much as I would have expected, but its hard to tell when is actually a problem or what isn't after you've looked at them hundreds of times.

Interestingly though eventually I got to the point of throwing anything at the wall and seeing what stuck and my bleed partner said when I took the tool off the end of the prop valve and let the doohickey slide out she felt that the pedal was more firm. It's still the same. If you pump it 3 or 4 times you can get a pedal, but nothing before that. It feels like there is air, but I don't know how that could be.

I tried pinching off the rear soft line that drops down from the hard line to the axle. Still the same. Doohickey slides and the pedal is soft until you pump it 3 or 4 times.

Also, while pumping you can hear a fluid squirting sound inside the master. I've bled countless brakes, but honestly I've never paid attention to if this is a normal thing or not. This silly thing has me questioning every decision I've made in my life, haha.


I ordered the IMG_9437 (1).jpeg
 
This video gives a pretty good description of the prop/combination valve.


I wonder if you tripped the valve prior to inserting the bleeding tool. That's the tool that goes between the front and rear lines from the master. Looks like you have it installed in your pictures though. I've had this happen once. From there we removed the rear line and used a small brass drift to push the piston into its proper position. Not sure that the prop valve is the problem, but if you aren't getting sufficient fluid to the rear its another thing to check for the 83rd time.
 
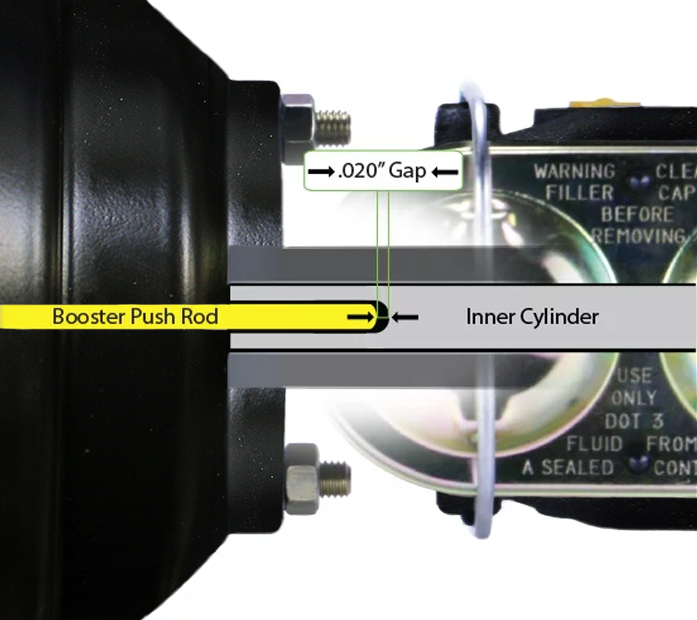
Another idea. Is the pin sticking out of the booster too long? This would never let the piston in the master go all the way back to the “rest” position and never get full volume. I have learned that this can cause brake drag, but I have seen it cause a soft pedal too. When you bolt the master to the booster does the pin on the booster start to move the piston in the master before the master is fully seated? Here’s some good tech-

 
Last edited:
Thanks for the video. I was thinking the metering valve and the portion that slides in the middle were a single unit. Now I see that they are two different parts. The manual says to hold the metering valve open, but I believe I've been holding it closed by keeping the pin from sliding out.

I did double check to make sure the middle part that slides is in the right spot before I put in the threaded tool.

I did also notice when I was putting the master on that there isn't any gap between the pushrod in the booster and the master. When I set it on there and snug it up it gets pretty close, but I'm pretty sure it is depressing that cylinder in the master a bit while I tighten it up. I'll measure today to verify.
 
Well it looks like I FINALLY have it figured out and the whole problem was that I assumed L meant left and R meant right on the calipers.

When installed this way the bleeder is above the hose and bolt, but what I didn't notice with the tire on was that this put it at the bottom of the caliper piston.

I put the one marked R upside down on the driver's side and the one marked L upside down on the passenger side and everything bled perfectly and I now have a nice firm pedal. Still some adjusting to do to get everything functioning perfectly, but there you go.

Hopefully this helps some poor sap down the line from as much frustration as I just endured.


IMG_9612.JPEG
 
Hi, Sorry I'm joining late... I just saw this.

Can I offer a different diagnosis and perspective?

My humble 2 cent opinions for your consideration:
1) I believe your calipers are NOW reversed (even though you say you have pressure).
That is, they are reversed now that you put the L-stamped caliper on the Right passenger and R-stamped caliper on the drivers side.

2) Why then do you have pressure? There are different procedures for different combination valves. Also different procedure if you use a combination valve bleed tool or not.
I suspect that when you went to re-bleed the brakes after swapping the calipers, you stumbled upon bleeding them correctly using the "non-tool" bleed procedure. (See my references below to my 2020 post).

Here is my support for my opinions above.

1) Support for the statement: The calipers as installed now are reversed. L belongs on the Left (Driver) and R belongs on the Right (Driver)

The Bendix 2238366 (L/R) casting was used on the following vehicles. Only the 1981 Scrambler had it.

AMERICAN MOTORSAMX1978-1980
AMERICAN MOTORSCONCORD1978-1981
AMERICAN MOTORSGREMLIN1977-1978
AMERICAN MOTORSHORNET1977
AMERICAN MOTORSPACER1977-1980
AMERICAN MOTORSSPIRIT1979-1981
JEEPCJ51978-1981
JEEPCJ71978-1981
JEEPSCRAMBLER1981

If you go to Rock Auto and examine the photos of every manufacturer's listing for the 1981 Scrambler, you will see that every manufacture displays as "Front Right" and image of your caliper that you have now installed on your Front Left.
https://www.rockauto.com/en/catalog...cid+l6,1183890,brake+&+wheel+hub,caliper,1704

Separately but related, Is your Scrambler (and/or axle) a 1981? If not, you might have the wrong calipers too.

2) Reasoning for:
a) The reason for the brakes not originally having pressure is because your Type W combination valve's metering pin was not properly pushed (depressed) when bleeding.

b) The reason why your brakes NOW appear to have pressure after multiple bleed procedures is you unknowingly correctly performed the "Non-Tool" bleed procedure (see 2020 thread reference below).


Our 1980s Scramblers have Combination Valves which "combine" the proportioning and metering function into one unit. Additionally to make matters worse, Jeep CJs over the years had different versions of combination valves and different manuals had different instructions regarding whether to push or pull the pin when bleeding.

If I understand you correctly, you used some sort of tool to remove the metering pin? If yes, that is wrong for the style (Type W) combination valve in the photo you posted (at least wrong according too the FSM).

The square-ish style body (Type W) in your picture is the same as the stock one that is still on my 1985 and was used in the 1980s. (Note, this is different than the rounded-style body used earlier in the 1970s.. the metering pin is treated differently during bleeding).

The Factory Service Manual (FSM)'s original shop tool is one that it slides OVER the low-profile hex nut that the metering pin resides within. By grasping the groove right behind the hex nut, the part of the tool flush with the face of the hex nut depresses the metering pin. which requires the pin to be pushed.

Here are various write-ups on this subject I posted in 2004, 2009, 2019 & 2020:

Here is my 2019 post (for when using the bleed tool) is the most concise regarding bleeding with a photo of a simple tool you can make that depresses the metering pin (which replicates the functionality of the OEM service tool):
https://www.cj-8.com/threads/brake-bleeding-frustrations.50266/#post-419550


Here is my 2009 post that best explains the procedure when you do NOT use the tool referenced in the 2019 thread:
https://www.cj-8.com/threads/soft-pedal.22119/

That is, you can bleed rear brakes on a type W combination valve (when you have a substantial amount of air to bleed) WITHOUT depressing the pin. To do so would require bleeding in this sequence:
- rear right
- rear left
- front right
- front left
- rear right (again)
- rear left (again)


Here is my 2004 post which is a longer but gives more of the backstory on the Push vs. Pull debate on metering pins.
(The answer is that there have been different styles over the years and only the FSM can be relied upon... NOT Chiltons or Haynes. 1970s were pulled and 1980s Type W are pushed. But unlike the FSMs, the Chiltons and/or Haynes never made that nuance change in their manuals during the 1980s).
https://www.cj-8.com/threads/brake-adjustment.7547/#post-44081


Here is my 2020 post that is interesting info regarding a port on the Type W valve. Some have experienced leaking there on NEW type W combination valves:
https://www.cj-8.com/threads/leaky-combination-valve.50425/#post-423506


Just my 2 cents :twocents:

Thanks for entertaining my thoughts,
Jim

 
Last edited:
Hi, Sorry I'm joining late... I just saw this.

Can I offer a different diagnosis and perspective?

My humble 2 cent opinions for your consideration:
1) I believe your calipers are NOW reversed (even though you say you have pressure).
That is, they are reversed now that you put the L-stamped caliper on the Right passenger and R-stamped caliper on the drivers side.

2) Why then do you have pressure? There are different procedures for different combination valves. Also different procedure if you use a combination valve bleed tool or not.
I suspect that when you went to re-bleed the brakes after swapping the calipers, you stumbled upon bleeding them correctly using the "non-tool" bleed procedure. (See my references below to my 2020 post).

Here is my support for my opinions above.

1) Support for the statement: The calipers as installed now are reversed. L belongs on the Left (Driver) and R belongs on the Right (Driver)

The Bendix 2238366 (L/R) casting was used on the following vehicles. Only the 1981 Scrambler had it.

AMERICAN MOTORSAMX1978-1980
AMERICAN MOTORSCONCORD1978-1981
AMERICAN MOTORSGREMLIN1977-1978
AMERICAN MOTORSHORNET1977
AMERICAN MOTORSPACER1977-1980
AMERICAN MOTORSSPIRIT1979-1981
JEEPCJ51978-1981
JEEPCJ71978-1981
JEEPSCRAMBLER1981

If you go to Rock Auto and examine the photos of every manufacturer's listing for the 1981 Scrambler, you will see that every manufacture displays as "Front Right" and image of your caliper that you have now installed on your Front Left.
https://www.rockauto.com/en/catalog...cid+l6,1183890,brake+&+wheel+hub,caliper,1704

Separately but related, Is your Scrambler (and/or axle) a 1981? If not, you might have the wrong calipers too.

2) Reasoning for:
a) The reason for the brakes not originally having pressure is because your Type W combination valve's metering pin was not properly pushed (depressed) when bleeding.

b) The reason why your brakes NOW appear to have pressure after multiple bleed procedures is you unknowingly correctly performed the "Non-Tool" bleed procedure (see 2020 thread reference below).


Our 1980s Scramblers have Combination Valves which "combine" the proportioning and metering function into one unit. Additionally to make matters worse, Jeep CJs over the years had different versions of combination valves and different manuals had different instructions regarding whether to push or pull the pin when bleeding.

If I understand you correctly, you used some sort of tool to remove the metering pin? If yes, that is wrong for the style (Type W) combination valve in the photo you posted (at least wrong according too the FSM).

The square-ish style body (Type W) in your picture is the same as the stock one that is still on my 1985 and was used in the 1980s. (Note, this is different than the rounded-style body used earlier in the 1970s.. the metering pin is treated differently during bleeding).

The Factory Service Manual (FSM)'s original shop tool is one that it slides OVER the low-profile hex nut that the metering pin resides within. By grasping the groove right behind the hex nut, the part of the tool flush with the face of the hex nut depresses the metering pin. which requires the pin to be pushed.

Here are various write-ups on this subject I posted in 2004, 2009, 2019 & 2020:

Here is my 2019 post (for when using the bleed tool) is the most concise regarding bleeding with a photo of a simple tool you can make that depresses the metering pin (which replicates the functionality of the OEM service tool):
https://www.cj-8.com/threads/brake-bleeding-frustrations.50266/#post-419550


Here is my 2009 post that best explains the procedure when you do NOT use the tool referenced in the 2019 thread:
https://www.cj-8.com/threads/soft-pedal.22119/

That is, you can bleed rear brakes on a type W combination valve (when you have a substantial amount of air to bleed) WITHOUT depressing the pin. To do so would require bleeding in this sequence:
- rear right
- rear left
- front right
- front left
- rear right (again)
- rear left (again)


Here is my 2004 post which is a longer but gives more of the backstory on the Push vs. Pull debate on metering pins.
(The answer is that there have been different styles over the years and only the FSM can be relied upon... NOT Chiltons or Haynes. 1970s were pulled and 1980s Type W are pushed. But unlike the FSMs, the Chiltons and/or Haynes never made that nuance change in their manuals during the 1980s).
https://www.cj-8.com/threads/brake-adjustment.7547/#post-44081


Here is my 2020 post that is interesting info regarding a port on the Type W valve. Some have experienced leaking there on NEW type W combination valves:
https://www.cj-8.com/threads/leaky-combination-valve.50425/#post-423506


Just my 2 cents :twocents:

Thanks for entertaining my thoughts,
Jim

Well said and clearly well thought out. I am definitely not an expert, but here are a few of my thoughts and some steps I took:

The truck was originally a 1981. I have every reason to believe it is the stock axle, but as it came to our shop as a pile of parts I don't have any real way of verifying this. I had to purchase the brackets, calipers, pads, etc. new and bought what various sources claimed to be 1981 Scrambler equipment, but again I don't know for certain.

For the calipers they were purchase from O'reilly at the below link:


If you click on that it gives you lots of great pictures and even a 360 degree view. If you click on the link it is for the right side caliper. However, if you mount it as shown (and with the casting number oriented properly) you will see that the bleeder would be positioned at the 4 o'clock position and not at the top as one would expect it to be trapping the air at the top of the caliper piston with no way to bleed it out. If mounted on the opposite side with the casting numbers upside down you end up with it oriented as pictured above with the bleeder at the very top allowing the air to bleed.

As for the proportioning valve I was using both the original and an aftermarket new version of the type W valve. I was using the tool for both that slipped over the hex nut and depressed the metering pin while bleeding. What I was referencing about removing was on the newer GM style version there is a tool that can be inserted where the brake light sensor goes which locks the inner slide from moving forward or aft while bleeding.

It certainly does seem odd to mount them with the casting numbers upside down and on the "incorrect" side, however, I cannot see how it would be possible to bleed them with the calipers mounted as one would believe they should be based on castings.

Let me know what you think!
 
For the calipers they were purchase from O'reilly at the below link:


If you click on that it gives you lots of great pictures and even a 360 degree view. If you click on the link it is for the right side caliper. However, if you mount it as shown (and with the casting number oriented properly) you will see that the bleeder would be positioned at the 4 o'clock position and not at the top as one would expect it to be trapping the air at the top of the caliper piston with no way to bleed it out. If mounted on the opposite side with the casting numbers upside down you end up with it oriented as pictured above with the bleeder at the very top allowing the air to bleed.

Yes, I agree this is odd... all RockAuto vendors list with photos the "L" casting as Drivers front Left and the "R" casting as Passenger front Right. But as you pointed out actually holding the caliper up to the bracket, the bleeder screw would be at the 4 o'clock position.

Here's a thought I just had... that caliper is also listed for a variety of AMC cars.... most of which are 2WD Rear wheel drive cars.

So I just Googled the Hornet and found some Hornet photos... the front caliper on the 2WD RWD Hornet is mounted on the forward(leading) side of the rotor (where the bleed valve faces up). However, on the 4WD CJs it is mounted on the rearward(trailing) side of the rotor.

Hornet Front Right (passenger showing caliper on leading edge of rotor -- this is opposite of the 1981 CJ-8 trailing edge of rotor)
DSCN6097.jpg


Hornet Front Right (passenger showing caliper on leading edge of rotor -- this is opposite of the 1981 CJ-8 trailing edge of rotor)
DSCN6099.jpg


Since the Bendix casting 2238366-R & 2238366-L caliper's beginning year Hornet application of 1977 is before the beginning year CJ-5 application of 1978, I'm wondering if the Bendix casting # suffices (R & L) were determined by the 1977 forward orientation application (meaning that on 1978 CJ-5 rearward application, they would need to be reversed).

If so, that would provide further rationale for installing them with R on the Left side & L on the Right side and the casting numbers upside down.

The conclusive way to solve this mystery is to find and read a 1981 CJ Factory Service Manual (FSM... not Chiltons or Haynes) and only a 1981 since 1981 was the only year this caliper was used on Scramblers.

Jim
 
Last edited:
@CJ-8_Jim and @sdsupilot there we have it! I really hope this helps someone in the future because I just about drove myself nuts trying to figure it out :oops:

The picture isn't awesome, but the 1981 TSM does have a picture of calipers mounted behind the rotor and with the bleeder at the same location as on mine with the calipers "swapped". Combined with what you fine fellas dug up I'm calling that pretty well sorted out. Thanks again for the help!


CJbrakes.jpg
 
Great thread!

What about the fluid spurting in the master cylinder when you hit the brakes? Do you still see that I have the same thing going on. I never noticed it before I removed it on my resto. Now that it is in and I have not put my hood back on yet, I do see it when I pump the brakes. I do get good pedal pressure and it stops great. But is this normal?

If I were to have the cover off the master cylinder and hit the brakes medium hard, it would surely spurt a good amount of brake fluid out into the engine bay.

Also, I don't have any stock brake components. I have the "Navajo" brake booster from Harold Off's shop that I bought many years ago as well as Chevy calipers.
 
Back
Top