
You are using an out of date browser. It may not display this or other websites correctly.
You should upgrade or use an alternative browser.
You should upgrade or use an alternative browser.
DOJO's 1st OCHO
- Thread starter DOJOLOACH
- Start date


Things have started to pick up pace a bit, I'm starting to assemble the firewall items and wrapping up the chassis.
Does anyone have good details or photos of the tub behind and under each wheel well? I was told the LCV/Rollover valve bracket fit behind the drivers side well in the tub, however I'm not 100% sure whether to mount it on the same piece as the brake lights or to mount on the wheel well.
Once I have these three fuel lines ran I should be able to put the tub on the frame and start fitting everything together for paint.
All the fuel and brake lines are now ran. I was able to find the location of the Tipover valve so I'll weld some nuts into that crevice behind the drivers wheel well. Fuel lines didn't quite turn out as expected but at least are hidden from view ")
Now waiting on a custom AX15/D300 Twinstick shift boot from stronghold before I cut my transmission tunnel.
I started working on the firewall a bit and fitment of doors, fenders, hood, etc.... Not too worried about relocating a few holes here and there, however I am a bit nervous about fitment of the doors and tailgate. It looks like the rear quarter panels on the tub could be bent too far inward, causing the tailgate to fit odd. I'm hoping the body guy at RS customs can help with these items.
Does anyone know of a good resource for a fully dimensioned firewall? I especially could use the hole locations for fender braces.
Attachments


- City
- Joshua
- State
- Tx
Is that the OEM trans crossmember with the AX15? If so how much fiddling did it need with the D300 clocking ring and angles? Would love a few more close ups of all that. Planning an AX15 myself this winter.
Great progress!
Great progress!
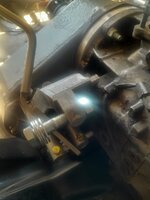
That's the oem crossmember with a Novak ax15 transmission mount and advanced adapters clocking rings/adapter ring.Is that the OEM trans crossmember with the AX15? If so how much fiddling did it need with the D300 clocking ring and angles? Would love a few more close ups of all that. Planning an AX15 myself this winter.
Great progress!
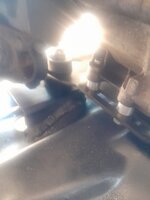
I cut a profile out of 2x3 x 3/16" steel rectangular tubing and welded it onto the crossmember.
As you can see I had to cut part of the twinstick bracket on the D300 as well. To be determined if I need to relieve the area around the front driveshaft. Additionally I'll have to cut the tub a bit to fit the sticks through
Attachments


The new dash fitment was a joke, especially considering it was made by the same company as the tub. Also a thinner material.... I had to:
- Plug weld and redrill most every tub hole mounting the mdjuan dash to the mdjuan tub
- Open up the speedometer hole slightly to allow alignment of my kentrol dash plate
- Make extra holes for the dashpad, glove box latch, a/c unit, and still have to weld the threaded rods on for the speedometer and speakers.
At least the steering column fits correctly. I have two original dashes though, I may still give the bodywork guy the option to use one of them.
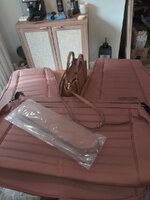
Bought a few goodies including the painless harness, nutmeg seat covers for the front and a fold/tumble (ebay and thanks @rubclt ), a CV rear shaft and Standard shaft for the front from Tatton's. Wiring this thing is a ways away but figured it would be useful to make the wire clip holes prior to getting paint work completed. I can find a solution to the rear wheel well channel bracket as well.
Also had a small amount of interference between the D300 shift bracket and the tub which bending would not resolve. I ended up cutting a patch out and welding in a new piece the best I could. Took me ~5 hours to do that, and I still need to trim the cutout a bit more.
- Plug weld and redrill most every tub hole mounting the mdjuan dash to the mdjuan tub
- Open up the speedometer hole slightly to allow alignment of my kentrol dash plate
- Make extra holes for the dashpad, glove box latch, a/c unit, and still have to weld the threaded rods on for the speedometer and speakers.
At least the steering column fits correctly. I have two original dashes though, I may still give the bodywork guy the option to use one of them.
Bought a few goodies including the painless harness, nutmeg seat covers for the front and a fold/tumble (ebay and thanks @rubclt ), a CV rear shaft and Standard shaft for the front from Tatton's. Wiring this thing is a ways away but figured it would be useful to make the wire clip holes prior to getting paint work completed. I can find a solution to the rear wheel well channel bracket as well.
Also had a small amount of interference between the D300 shift bracket and the tub which bending would not resolve. I ended up cutting a patch out and welding in a new piece the best I could. Took me ~5 hours to do that, and I still need to trim the cutout a bit more.
Attachments


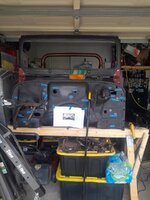
Lots of trial fitting parts, drilling holes, welding nuts etc the past couple months. I was nervous about the soft top fitting but it does!
Finally got this thing towed to the paint and body guy this past weekend. Unfortunately I couldn't see in my rear mirror the catastrophic failure of a tire. I brought tools with me to disassemble a front hub and swap tires, thankfully.
Still I'm undecided on color but am leaning towards an 80s slate blue, ice blue, or a modern 24 wrangler chief blue or hydro blue. Body guy showed me a sample of his bed liner so I'll have that on the underside and If tintable the interior as well.
Attachments


I could use some advice on the amc360. I was able to determine there is an Edelbrock "RPM AirGap" intake and a 600cfm 4bbl carb with electric choke (Edelbrock #1406)). Being that it's out of the jeep its best time to do some preventative work and I could use some input on the below items. Again, this is on an engine I only have seen a video of running and was told it had good compression.
While sitting on a spare tire and braced with some wood:
-Prime the oil pump and test pressure using a power drill into the HEI port, inspect oil ports near each rocker arm for good oil flow
-With HEI and engine near TDS I'll attempt to start it and run for a few minutes with no belt, fan, or cooling system. This is to hopefully tell me if the head gaskets are OK and no coolant is in the exhaust. If everything looks good I would leave the head gaskets and intake gasket alone.
-Verify cylinder compression numbers, if they are within 30psi of eachother and 130psi or so I've read that I'm in good shape, otherwise I'll have to take the heads off and evaluate further.
-Open timing cover and inspect the gears and chain, replace crankshaft seal and timing cover seal
-Open water pump, inspect, and reseal
-Replace oil pan and rear main seal
-Remove rust and repaint the engine
-Replace all fuel lines and brittle vacuum lines.
-The flywheel looks freshly ground and ready for a new clutch wear plate so I'd swap that out as well. Running this with an external slave cylinder (New GM)
I went with ice blue metallic, and honestly I'm very happy with how the aftermarket tub turned out because of him.
Cowl and hood gap was fixed, body sides were horrendous so he used some bondo. I'll try to write up more details on the tub and door fitment
I was planning to make the roll bar paint match the body, but last minute he recommended gloss black and it looks great, debating refinishing my rocker trim gloss black as well
Attachments

I'm happy I went with an old cj color, it was surprisingly overwhelming to try and pick a custom color.
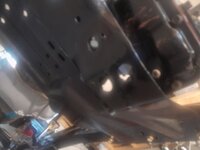
Painter spray lined the bottom of the tub and I wanted paint on the inside , if I has found a good tintable spray liner I might have done that.
Regarding the engine. I bought a felproseal kit recommended on the amc forums but after pulling the airintake and seeing new head gaskets I'm just putting a new coat of paint on the engine and running it. I measured ~150psi on all cylinders while the oil pump had cycled/primed and engine cold. Previous owner reported no issues as well
Attachments

Progress for me has come to a hault, I originally set out to have this thing drivable end of April for my own wedding reception, well the wife wants a Cabo Wedding so this thing is getting crated up and off to Mexico! Jokes aside ive had to save room in my brain for other things besides the jeep.
For this update: the engine is in. It took me almost a week to figure out how these accessory brackets get mounted, from my research the amc factory would have used a janky setup of mismatched washers and spacers to get the pulleys aligned, I think I've got everything where it needs to be.
Ive made some rookie mistakes, my biggest is putting the engine too far forward to help the ax15 shifter location not be too far back, I think it's about 1" too close to the radiator. I assembled and test fit the engine /drivetrain with radiator basically 90 degrees and naively left out a pulley on the water pump which offsets my fan an extra 1/4". I'll still try the mechanical fan, but if it is too tight I'm going to do a dual electric fan setup.
Attachments


- City
- Dexter
- State
- MI
I remember going through that alignment process with the 360 in the Cherokee when I got it going the first time, paired with going to a one-wire alternator. So many spacers and washers, I kept saying "this can't be right", but it eventually made everything work.
Congrats on the upcoming wedding!
Congrats on the upcoming wedding!
Here is my design for a rear bumper. 1/4" plate for the main bumper, swing tire carrier is 2x2 x 3/16 square tubing. I'll have reinforcement gussets on the inside and include a sleeve for the swivel so it can be welded to the top and bottom of the bumper. Somewhat a knockoff of the TDK bumper but I plan to add a lockable storage box in the tire carrier area.
- Extra trailer hitch receiver pointed vertical for an extra carry rack or maybe a flag for American holidays.
- Trailer wiring harness cutout
- Shackle mounts on either side
- Possibly an extra set of backup lights similar to Gpassida's modification
- Tie down hook spots on left and right top of bumper
- A lockable storage box of ~5" depth welded into the triangle opening for recovery supplies/tools
- City
- East Norriton
- State
- PA
Sounds cool.....and heavy. Good ones aren't light though.Here is my design for a rear bumper. 1/4" plate for the main bumper, swing tire carrier is 2x2 x 3/16 square tubing. I'll have reinforcement gussets on the inside and include a sleeve for the swivel so it can be welded to the top and bottom of the bumper. Somewhat a knockoff of the TDK bumper but I plan to add a lockable storage box in the tire carrier area.
- Extra trailer hitch receiver pointed vertical for an extra carry rack or maybe a flag for American holidays.
- Trailer wiring harness cutout
- Shackle mounts on either side
- Possibly an extra set of backup lights similar to Gpassida's modification
- Tie down hook spots on left and right top of bumper
- A lockable storage box of ~5" depth welded into the triangle opening for recovery supplies/tools
View attachment 116280
Definitely heavier than the C channel it might have came with stock. When I ran calculations though its only about 12 lbs heavier using 1/4" vs. 3/16" for the main bumper. Doesn't include the tire carrier though.Sounds cool.....and heavy. Good ones aren't light though.