• Notice for iPhone users: DO NOT use the image size reduction option when uploading photos to the forum. This causes portrait images to post as landscape. We have added a warning to the image insert pop-up as well.

Expedition Scrambler..?

I had that same reaction. Randy stated the possible issues very well.

X3. Move the bushings to the frame sides of the arms. I'd also consider two stringers on each side going out to the frame. Sort of like an "H" instead of an "I" when viewed from the top.
 
Well....damn. I see what you guys are saying and I have to admit that the design has looked a little fishy to me as I went. I'm gonna try and see if there is a way to salvage it instead of scrapping the entire thing and starting over. While the drivers side seems to have plenty of room to work stuff... trying to get around the front output for the t case has been a royal ball buster. Guess I wasn't as successful as I'd hoped. :( Oh well... back to the drawing board.
 
Quick question for you. I have acquired an ARB bumper for a tj. You did a great job putting one on your truck. What did you have to do for mounting and putting a 8274 in it? Im taking off my 500 pound cow catcher on my cj8.

regards

Jim
 
In order to get the TJ ARB and the 8274 to work was a lot more work than I thought it would have been. Thanks for the compliment on my makin' it work. :) As I think back on it I would have to say you have two options. Sell the TJ one and buy one for a CJ or get out the cutting tools. Most of the way the TJ one mounts will be useless, period. The easiest thing would be to just get at all the internal mounts and bracing and cut it all out of the way, grind it smooth and start fresh. Put the "shell" up on the Jeep and find some way to make adjustments to it so it sits where you want it to. From there just make new brackets out of plate, weld them to the bumper and bolt it to the frame. Sounds easy huh... its not. lol! Your working in all directions (fore/aft,up/down/Lf/Rt,pitch/yaw,etc) so just be patient. It took me a good while to get it all where I wanted it and some of that time was wasted trying to make the original ARB stuff work. The other things you'll run into are the winch... It can only mount so low in the bumper before it either hits a bend or forces the thing out to far. Plus it will only fit so far on the frame and the ARB doesn't really give much room to push forward into it. Also you'll have to mind the hoop on the bumper... it fits really close to the control pack on the winch. I intended to move my box to the engine area but haven't gotten around to it yet. I'm not 100% happy with where the hoop lines up in relation to the grille either but haven't decided if I will cut it off, trim it down somehow, or something. It's been on one of the way back burners but I'll get to it someday. To many projects and to little time. If you want I can try for some pics of how it is now... just let me know.


Quick question for you. I have acquired an ARB bumper for a tj. You did a great job putting one on your truck. What did you have to do for mounting and putting a 8274 in it? Im taking off my 500 pound cow catcher on my cj8.

regards

Jim
 
Working through being pissed off...

Today was my first chance in quite a while to work on the scrambler again following a nasty field problem. Went in today knowing I need to change the design of the cross member again but got stuck waiting in line for a bay. While I was waiting I discovered that while I was in the field some jerk decided to walk off with the S10 springs I was going to use on my 01XJ. And if that wasn't bad enough, someone (or maybe the same someone?) decided to pull the diff cover on my 8.8 as well. Its headed for the XJ and I've already bought a pile of parts to support the swap. Well... wouldn't you know that after they threw it off the cart I had it on they must have realized it wasn't what they were looking for. They did steal all the wheel studs and were kind enough to leave the diff cover off so the axle could fill up with water! GRRRRRRRRR! I hate people!
Getting back to the scrambler I pulled off all the new/old cross member stuff I had built and began scratching my head again. I'm really a bit stumped again on how I need to make this all work. Thanks to you guys that showed me my original design was flawed but now how to fix it. The next best thing I have come up with is to build a support using the oil pan on the Dana 300. I can't just run a straight member where the tranny mount is for two reasons. First, it would interfere with the front driveshaft due to how the t-case is clocked. Second is that it would leave way to much hanging free after the cross member and that would likely break something. To be honest I liked the idea of building a girdle using the bolts on the back of the t-case but the more I looked at it the more it bothered me. To much metal attached to aluminum housing and way to likely to cause more leaks. So that will be getting scrapped as well.
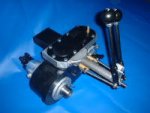
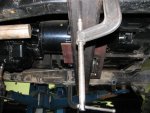
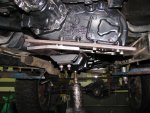
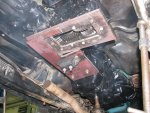
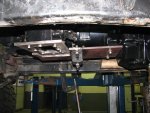
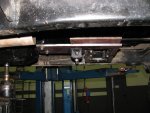
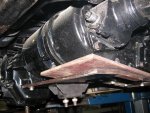
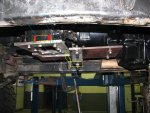
With the need to get this moving along I think I will try and build something like this (see pics), only mine will be out of steel. This plate will be larger than the one shown and I will tie it into the mount on the transmission somehow. Hopefully I can make it removable so I don't add to much more work should it come time to work on something under there. The cross member will branch off of these things somewhere and hopefully be more correct than the last design. Wish me luck.. tomorrow is "A game" time to see what I can make.
 

Attachments

  • FLIPPAGE000 (2).jpg
    FLIPPAGE000 (2).jpg
    12.9 KB · Views: 219
  • FLIPPAGE009.JPG
    FLIPPAGE009.JPG
    18.8 KB · Views: 209
Opinions?

Ok all you engineering maestros... take a peep at my current design cross member and let me know what you think. :)
Granted its not done and the pics aren't great but let me know if you see anything drastically wrong so far, ok?
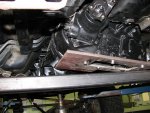
The main cross member is 2x4x1/4" rectangular tubing. The two main parts of the girdle are 1/2" plate. Cutting all that stuff with the 'ol angle grinder has made it slow and not the most fun time but its working so far. The mount you can see in a couple pis is from my parts box, I think I had bought it years back for a full size Jeep but can't remember. That will mount to the main 1/2" plate that runs from the tranny foot to the t-case on the top. On the bottom it will bolt to a gusseted angle I will weld to the the rectangular cross bar. What you don't see is I will mount a piece of tubing with shock bushings in it to the passenger side of the transfer case and it will bolt onto the cross member tubing to help control the twist when the go pedal gets mashed. I still have to build the drain pan for the t-case and figure how the 2x4 tubing will actually mount to the frame but I'm happy with how most of the design is panning out this time much more than the last one did.
I believe I have a 3 day weekend net weekend so I will be back at it then. Sadly I had to leave it inside the shop on the lift since it smells like the snows coming. It will cost me about 40 bucks each day weather I'm working on it or not but that's better than wasting the time to push it in and out and then have snow water dripping all over me when I work on it next. Sure can't wait to get a garage some day!
 

Attachments

  • IMG_0526.JPG
    IMG_0526.JPG
    107.1 KB · Views: 199
  • IMG_0527.JPG
    IMG_0527.JPG
    92.2 KB · Views: 201
  • IMG_0528.JPG
    IMG_0528.JPG
    117.7 KB · Views: 200
  • IMG_0529.JPG
    IMG_0529.JPG
    95.8 KB · Views: 200
  • IMG_0530.JPG
    IMG_0530.JPG
    120.3 KB · Views: 201
More pics...

More..
 

Attachments

  • IMG_0531.JPG
    IMG_0531.JPG
    125.9 KB · Views: 199
  • IMG_0532.JPG
    IMG_0532.JPG
    104.9 KB · Views: 200
  • IMG_0533.JPG
    IMG_0533.JPG
    91.6 KB · Views: 199
  • IMG_0534.JPG
    IMG_0534.JPG
    129.1 KB · Views: 200
So the square tube crossmember will attach to this at that tranny mount?
 
Yeah... the rectangular tubing goes from frame rail to rail like most normal members. The front FSJ/Ford type mount with the two bolts will hold the lions share of the vertical load. The bushinged tube mounted to the passenger side of the t-case will (hopefully) take up any extra torque that passes by the main mount. Hope that makes sense? I doodled a little on one of the pics to hopefully clarify. I'm not much with computers so please excuse the 2 year old with crayons look. :)
 

Attachments

  • IMG_0532.JPG
    IMG_0532.JPG
    108.7 KB · Views: 191
I think you're on the right track.

Do only hook the trans/xfer girdle etc. to the mount.

It will all move as a unit and if you tie it down in more than one place it won't allow the whole drive train to flex with torque.

One point I need to make is what you have designed looks good, BUT you need to remove every bit of extra metal that you can or the thing will weigh 900lbs! It will be plenty strong, and you could even make some lightening holes to save some more weight.

I have seen a few D300's that had an added torque foot that captured the transfer case and prevented it from rotating with torque. However I have seen more where the D300 just was hung on behind the tranny and the crossmember was bolted to the trans only.

My Atlas was left hanging in the breeze so to speak at the recommendation of Advance Adapters. They said there was no need to control the xfer in torque as long as the trans' rotation was controlled.

My drive train is suspended by two large mounts on the engine and two similar mounts on the crossmember. The Overdrive (in my case) is bolted hard up to the cross member. The mounts form a Trapezoid with the top leg 20", the bottom leg 30", and a height of 48"looking down from the top.

This suspends the whole mass as one unit, at 4 points, so which ever way the motor moves the rest of the machinery has to go along. However the mounts only allow small amounts of movement. This is fine although it will probably transmitt some vibration to the rest of the vehicle, the the drivetrain is located positively.

Your's will do the same thing however you must not let the flexibility of the mounts get out of hand.

The more the mass can move, the more momentum it can gain in abrupt situations. The more momentum it gains the higher the possibility that something will give way, scattering parts accross the landscape.

This lesson was learned on the Moab Rim trail in Moab UT when I dropped into a little hole and the front bumper hit a rock and abruptly stopped the jeep. However the entire drivetrain did not stop, and continued forward cutting a perfect 13" hole thru the entire core of the radiator. This was momentum in action. Body in motion tends to stay in motion? :shrug:

Since we were at the top of the trail it only took us 2 hours to recover the jeep and drag it down the trail back to the road, where it was put back on the trailer and towed 860 miles back to Ventura CA.

My entire Jeeping experience for that trip lasted about 20 minutes, and then of course there was the 2hour + recovery which everyone in the club throughly enjoyed.

The result was mounts made from spring bushings and a positive location of the drivetrain, backed up by a limit chain bolted to the trans and the frame preventing the drive train from going forward even in the event of a mount failure.

You would be wise to incorporate this feature also.

Randy

 
Last edited:
Thanks for the input sir! I see what your saying about minimizing the amount of mounts. By using the original style Ford/FSJ rubber foot, I think I will need the torque bushing. In a way I am kinda mimicking the factory design...sort of. The original cross member used a similar (maybe even the same) main mount. They then use those round bushings that look kinda like sway bar bushings mounted on a stud to the passenger side of the drivetrain. Mine is pretty much like that except instead of using a stud vertically, I will use a bushed sleeve horizontally and a little closer to the frame rail.
As for the weight... I'm doing my best. lol! Its hard to eyeball a piece of steel and know its capabilities or what it is able to withstand since I'm no engineer. I just kinda eyeball it and if it looks weak I go bigger. :) When its all said and done I imagine it will be fairly heavy but I will do my best to shave off any unneeded pork wherever I can. At least all the weight will be on the bottom of the Jeep.. maybe it will act like a counter balance or a Keel? heehee! I'll be back on it Friday so wish me luck!
 
Holy beef Batman! That looks sturdy! Nice work. Use a torque stud or a poly spring bushing to counteract the torque, for sure.
 
If Randy says that.... :eek: ;)

I KNOW....RIGHT?!?! haha!
Thanks guys. I think I'm on the right track with it now. Still a lot of metal work to do just with it but I'm not sure how much will happen soon versus just getting it to function and hit it with some paint to hold it over. Sooooo much more to do to it and I still have the XJs to deal with as well. Time is slipping by fast here too.... Thankfully I'm off Friday-Sunday so the 8 will get Fri & Sat while I will try and work on something XJ related Sunday... probably the front bumper. :)
 
Thank you for the info. When I get the "moose catcher" off I will fab some new brackets for the front shell of the bumper.
You have quite the engineering project going on. Keep up the good work.

Regards

Jim
 
Your welcome Alaska... Hope it helped. My own project has been fighting tooth and nail but I think I'll make some decent progress starting tomorrow. *crosses fingers* :)
 
Today started crappy but got a lot better. Went to work on the heep and discovered that once again someone had been at the 8.8 I got to swap in to my XJ....Grr! This is the third time someone has messed with it but this time the only harm was they stole the cart it was sitting on. After being grumpy for a bit I finally said F it and moved on with the work...spilled milk and all that stuff. *Shrugs*
I can't say it was a speedy day or that I'm all done but I made some real, solid progress. Didn't get any pics but I'm back at it again tomorrow so I'll shoot some then. Today was spent cutting the actual cross member tube to size, then making plates to sandwich the frame as well as a pair to hold the captive nuts in the tubing. I finished by drilling a boat load of holes in all kinds of stuff...sure is slow going with that but at least I only grenaded one drill bit. I also got most of the holes drilled to size (5/16s) through the frame to hold the sandwich plates. I really want to (and will eventually) add tubing in the holes going through the frame but that will have to wait. It will be a little time consuming to do and for now I just need this thing to come together so I can both get it out side for next week as well as start on some of the mountain of other repairs and stuff I need to do before it heads to inspection. Times short and the clock is ticking. But I think I'll be ok without the sleeves in the frame for a short while since it will not be seeing any off road and even very limited on road use for the next couple of months even after I get if runnin' and rollin'.
Off to bed for now so I'm rested and up early enough to fully caffinate before hitting it again! :)
 
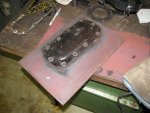
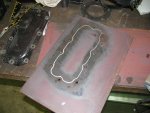
More positive progress today but it was really slow going. Got the last two holes drilled through the frame and then went at working on the t-case girdle thingy. I had roughed out the shape last weekend and now it was time to match it with the shape of the gasket. Let me say that a CNC Mill sure would have been nice to have! But after hours on the old trusty angle grinder I managed to get it pretty close to what I wanted. I then spent a while cutting out the parts to make the oil pan for the t-case and getting it all burned in. I still have a lot of final welding and then clean up/grinding to do before that part is near done but so far, so good. Sadly I ran out of time waiting between welds to cool so the 1/2" plate didn't warp. I literally got run out of the place which kinda pissed me off since at that point I was just cleaning up my huge mess and trying to put my tools away. But the guys that work there just wanted to be asses and even turned the lights out on me once. After that I just said F-it, left my huge mess on the floor and will go back Monday as soon as I can to pick up my stuff. If I had been keeping them late or ignoring that it was closing time I would understand. Yesterday I left and the place closed 20 minutes early. Today they were turning the freakin' lights out 10 minutes early as well. I'm gonna have a talk with the shop manager on Monday... This is BS.
And since I got run out on a rail I of course didn't get to snap any pictures...bah! But next weekend is a 4 day due to turkey day so I'll get much further and take pics then... Thanks for readin' my thread!
 
Only good thing about being here for the holidays so far has been the fact that I can work on the Jeep tomorrow for Thanksgiving! All the American employees will be off but the Germans will fill in... so Thurs-Sat I will be Scrambler wrenching... Sunday I'll be back on the frustrating XJ... Though its REALLY difficult not to work on the XJ all weekend as I have a huge new pile of suspension parts laying all over my room.!. ;) More to come on that later..
 
Back
Top