• Notice for iPhone users: DO NOT use the image size reduction option when uploading photos to the forum. This causes portrait images to post as landscape. We have added a warning to the image insert pop-up as well.

FINALLY!!! A Build Thread of My '82 Scrambler!

It's looking great! I need to hang out on the board more because it gives me more motivation to be in the garage.

FWIW, I ended up with the Kilby skidplate for the gastank and was happy with it. Some of the holes didn't line up with my frame and required a massive ratchet strap to align and install, but I don't know that I can blame Kilby for that since my frame is aftermarket too. I think the Genright/Kilby/etc. skidplates are more-or-less all the same.
 
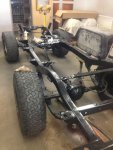
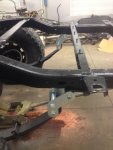
Little update. Began installing the Rubicon Express lift. Got the front end mostly put together but nothing is tightened up yet. I had mixed up the bushing sleeves on the first leaf and had it completely installed until I tried to put in the last bolt through the rear bushing and it wouldn't fit. Took me a bit to figure out what I had done, then I had to tear it apart and swap the sleeves (I didn't realize they were different sizes at first). :banghead: Once the first one was on, the other side went quick but then I got side tracked when one of my father-in-laws friends dropped by with a Dodge M-37 that he was hauling a load of wood with and it overheated. Blew a hole in the old radiator so we pulled it around behind the shop to let it cool down and gave him a ride home. We will be pulling the radiator and assessing it so see if it can be fixed or needs replaced. Anyway, here are a couple of pics (don't mind that front pinion angle, the axle is loose and will be rotated to the correct angle when I sung all the bolts down):
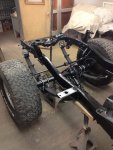
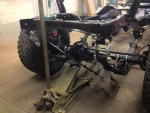
4-8-13 Rubicon Express Lift Install Front (1) small.jpg
4-8-13 Rubicon Express Lift Install Front (2) small.jpg
 
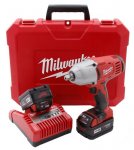
Forgot to mention, I did get a new tool to play with! It is a Milwaukee 18v Li-ion 1/2" Impact. 450ft/lbs of torque! Used it today for the first time to take the old lift off the Scrambler frame. Works awesome!
Milwaukee.jpg
 
Just ordered the Rusty's Offroad heavy duty steering box bracket. Still need to order the gas tank skid. I was able to get a hold of FourXDoctor but he said he was at least a month out before he could make it so I will probably go with Kilby or Genright. They are a little more expensive but they do come powder coated vs bare steel from FXD. Also need to order the stainless e-brake cables.
 
Looking good! Tell us what you think of that impact...I'm considering getting one. The tax man says I need to buy more tools this year!
 
Looking good! Tell us what you think of that impact...I'm considering getting one. The tax man says I need to buy more tools this year!

Randy, so far I love it. I got the one with the detent pin and right after I ordered it I saw where it is available with the friction ring. Not sure if I should have gone that way but oh well, not worth the hassle of returning it. I just used it for the first time yesterday and it took all the old nuts off the u-bolts on my Scrambler with ease. I've got a good test for it coming up. I have a nice chrome Laredo bumper on my parts Scrambler that I can't get off. The nuts and bolts are rusted together and my buddies 18v DeWalt 1/2" 300 ft/lb impact didn't even budge them. I don't really want to take heat to them in fear of discoloring the chrome bumper. I'm going to soak them with some PB Blaster and let this thing have a go on them!
 
Got a new Genright gas tank skid on order! :bacon: Now just need to get the e-brake cables and gas tank strap. Just more money right?!
 
Looking good! Tell us what you think of that impact...I'm considering getting one. The tax man says I need to buy more tools this year!

Upon further testing of the Milwaukee Impact, I can safely say I love this thing!! Took it and a can of PB blaster out to the parts Scrambler this weekend and had the front Chrome Laredo bumper off in less then 10 minutes! Mind you my buddies DeWalt wouldn't budge the bolts and I about gave myself a hernia trying to break them loose with a breaker bar! The only thing I found I don't like, and it is very minor, is that the forward/reverse switch located just above the grip is easy to hit with the edge of your thumb or finger and switch the direction without knowing it. I tightened one nut down SUPER tight before I realized I was going the wrong way. Now that I know to watch for it I don't think it will be much of a problem. Oh, and the detent pin isn't bad, I just need to keep something small in the case to push the pin down with to get the socket off. This may wear down over time to the point I can just pull the socket off but I don't have to worry about the socket coming off accidently or getting stuck on the nut and pulling off the gun.
 
Yes, I have often wondered whose hands they use in designing these things.
Just because it looks good in CAD doesn't mean it will work in the real world.
My drill is like that and it drives me nuts.

Man grip design for man hands, not graphic designers ideas!!! ROFL.
Now I am thinking of the hand model episode from Seinfeld!!!

cb
 
Josh!

The build is turning out great. I just PM'ed you again but I'm not sure my messages are working. Let me know and keep up the great work!
 
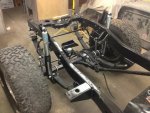
Got to work on the Jeep for a little bit yesterday for Father's Day. Got most of the RE lift installed. On the rear shackles, do these look right? The instructions I have are very vague and when I looked up other installs it looks like others have straight shackles vs the "L" shaped ones I have. One thing to note too, I do not have the rear axle attached to the leafs yet. I wanted make sure I had the shackles right before I put it completely together.
ImageUploadedByTapatalk1371471394.774977.jpg
ImageUploadedByTapatalk1371471410.827295.jpg
 
They look right. You just need to get weight on the suspension.
 
My straight shackles were inverted like that, too. Like BadKarma said, once you get weight on it/start driving it, it will all settle in:thumbsup:

One thing to note with the GenRight gas tank skid plate - I used the same skid/lift as you. I had to shorten the rear shackle bolts, and use thinner, metal self locking nuts, to get clearance between the ends of the bolts and the side of the skid plate. It is tight, but it clears:thumbsup:
 
They look right. You just need to get weight on the suspension.

Thanks! I thought that might be the case but wanted to double check before I finished it up so I wouldn't have to undo too much stuff to correct it if it was wrong.
 
My straight shackles were inverted like that, too. Like BadKarma said, once you get weight on it/start driving it, it will all settle in:thumbsup:

One thing to note with the GenRight gas tank skid plate - I used the same skid/lift as you. I had to shorten the rear shackle bolts, and use thinner, metal self locking nuts, to get clearance between the ends of the bolts and the side of the skid plate. It is tight, but it clears:thumbsup:

Thanks! I remember the issue you had with the gas tank skid. I will test fit it to see what the clearance is. My lift came with self-locking nuts but I may still need to shorten the bolts.
 
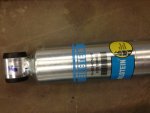
Buttoned up the lift install today as well as installing the front extended brake hoses an front shocks. I tried installing the rear shocks but found they were too short. A quick call to Rubicon Express revealed that when the u-bolt skids are added to the lift that 4" longer shocks are needed in the rear. I guess the guy who originally bought this lift (and i then bought it from him) didn't know that or the wrong ones were shipped 'cause they are too short! So I will have some brand new Bilstein 5100 series shocks for sale as soon as I figure out which ones I need now.
View attachment 34515
ImageUploadedByTapatalk1371783161.187441.jpg

The shocks that were too short:
ImageUploadedByTapatalk1371783188.271183.jpg
 
I am going to be needing shocks for my CJ5 soon, so let me check to see if they will fit or not and if so, I might be interested in the set.

cb
 
Buttoned up the lift install today as well as installing the front extended brake hoses an front shocks. I tried installing the rear shocks but found they were too short. A quick call to Rubicon Express revealed that when the u-bolt skids are added to the lift that 4" longer shocks are needed in the rear. I guess the guy who originally bought this lift (and i then bought it from him) didn't know that or the wrong ones were shipped 'cause they are too short! So I will have some brand new Bilstein 5100 series shocks for sale as soon as I figure out which ones I need now.
View attachment 34515
View attachment 34517

The shocks that were too short:
View attachment 34518

I just searched through all my build pictures for part numbers for what I have on my RE 4.5 kit and I can't find any good clear pictures, I would have to check it out tonight when I get home. I don't truly understand why the "floaters" or "pontoons" as I have heard them called cause the shock mounting location to go down so that you would need 4 more inches of travel, but then again, I haven't really taken that close of a look at the lower mounting location of the rear shock... and I have an aftermarket frame, so now I am wondering if I have enough travel.

cb
 
Back
Top