• Notice for iPhone users: DO NOT use the image size reduction option when uploading photos to the forum. This causes portrait images to post as landscape. We have added a warning to the image insert pop-up as well.

Gary's '81 Scrambler

Weekend Progress (and a milestone!)

Made some progress over the weekend. Got the new windshield glass installed,and got the windshield/frame attached to the tub. I also did a ton of wiring! The wiring is actually quite fun, but just takes time. I bought a universal harness without the factory ends alread terminated on each wire. This way, I can cut every wire to a specific length for the perfect fit. The only downfall is that there is a lot of soldering involved. But again, it's time consuming but fun at the same time! A few of the wire bundles have a bunch of wires: one is for the ignition switch on the steering column, and the other is for the turn signal/horn switch on the column. A bunch of wires to solder on each connector! Before I shut down the shop last night, I had fully terminated both the ignition connector and the turn signal connector. In addition, I had already wired everything 'firewall forward' (starter, ignition wire, battery, grounds, etc.) So I figured, let's see if any of this wiring works! I temporarily installed the battery positive cable and gave the key a quick turn...the motor immediately spun over about a half a rotation- before I let off the key...SUCCESS! At least my ignition wiring is working! Then I hooked up a test light to my turn signal wiring (not yet terminated to the lights) and I have blinking turn signals and hazards! This harness is great, and I'm having a blast doing it! In addition, it is comforting to know that every wire is brand-new, and by doing all of this in my own shop, I will have a very good knowledge of ALL the wiring, should I have any electrical issues down the road. Here's a photo of where she sits as of today...more wiring this evening:
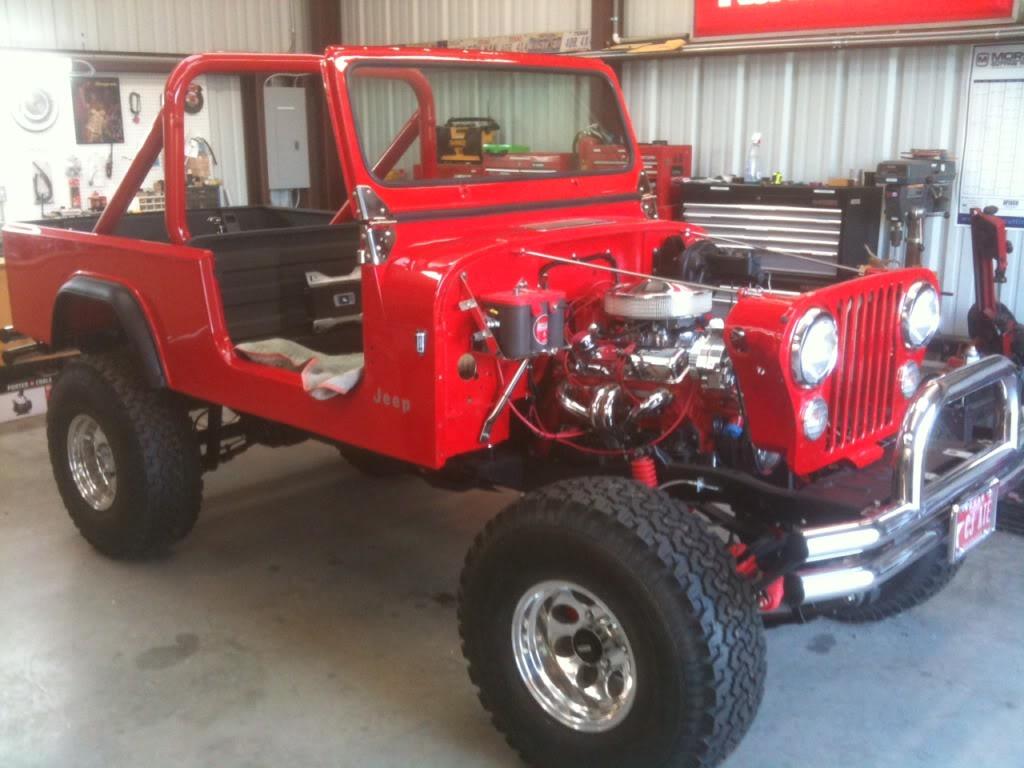
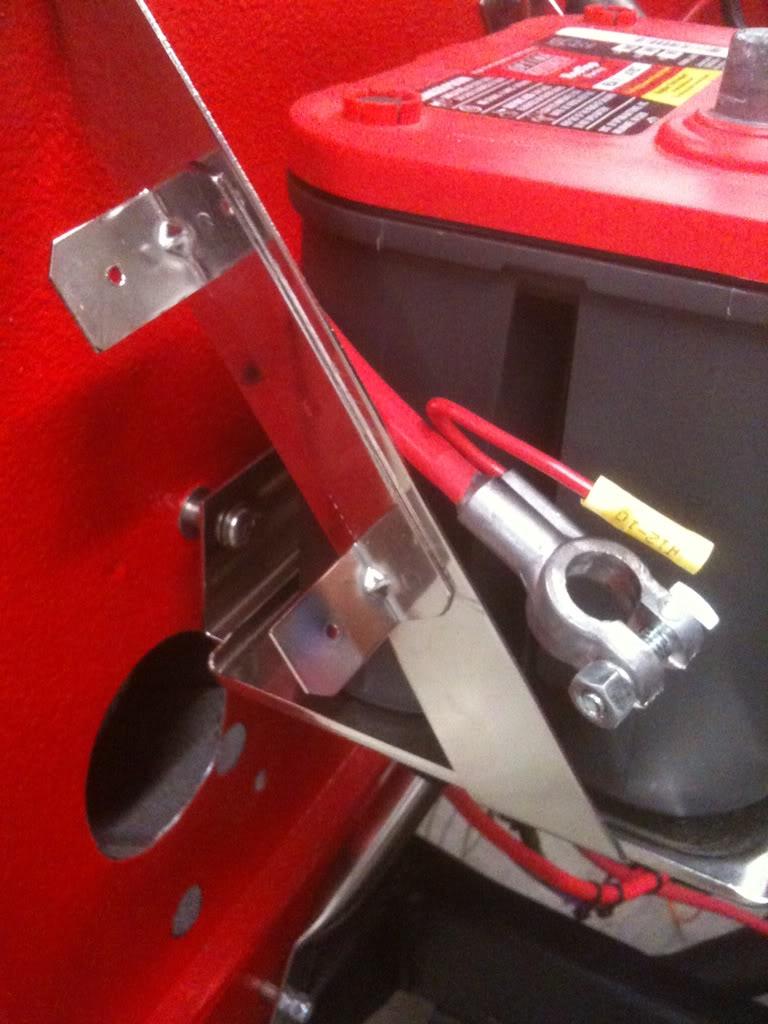
photo234-1.jpg
 
It's been awhile since I've updated, but I'm still doing wiring. I'm just trying to take my time with this critical part, and trying to secure / conceal almost all the wires I can. If I can get the dash installed (ie: temp and oil pressure gauges) I should be going for a first start attempt this weekend! I hope my motor rebuild works..... It's been decades since I last built a motor. In the interim, I'm wondering a few things: first, the marker lights in the grill, under the headlights: I got new ones and they only have a red wire and a black wire coming out of the housings. Normally this would mean obviously positive and negative. But in my universal harness, I have wires for parking lights and then another for blinkers. I need to eventually test this with a meter, but thought someone might know? I'm wondering if the lights don't self-ground in the grill, and one wire is for parking lights and one is for blinker (despite their red and black colors)??? It's gotta be something like that since the bulbs obviously have two filaments.

I'm also wondering- not that it's any big deal- but, my replacement battery tray has two tabs on the side, with each tab having a small threaded hole in it. I can't see a use for them but was curious why the manufacturer put them there? Maybe something on a factory setup went there, even though my stock tray didn't have them? Here's a pic:
9a4862f9-1.jpg
 
On the blinkers, one wire is constant power (for running light function) the other wire is for the blinker. The turn signal housings "ground" to the grill when you screw them on.

No idea about the tabs on the battery tray, I think mine has them, too:shrug:
 
No idea about the tabs on the battery tray, I think mine has them, too:shrug:

It was for diagnostics on later-model computer-controlled carbs. My '84 and '85 CJ-7s both had a huge thing of wiring that ran over there and ended at a covered plug.
 
Thanks for the replies, fellas. Trying like heck to go for the first start this weekend! Two things come to mind:
1. Hope it runs
2. I hope all of you hear it, no matter where you live in the country :D I have Flowmaster 40-series mufflers installed behind 2.5" pipe, that are supposed to sound really sweet :crazy:
 
Thanks for the replies, fellas. Trying like heck to go for the first start this weekend! Two things come to mind:
1. Hope it runs
2. I hope all of you hear it, no matter where you live in the country :D I have Flowmaster 40-series mufflers installed behind 2.5" pipe, that are supposed to sound really sweet :crazy:

We're all pulling for you! Good luck!
 
Still waiting on the first engine start attempt! I had planned to use the extended weekend to make some serious progress, but you all know how plans can quickly change (ie: yardwork, etc.)

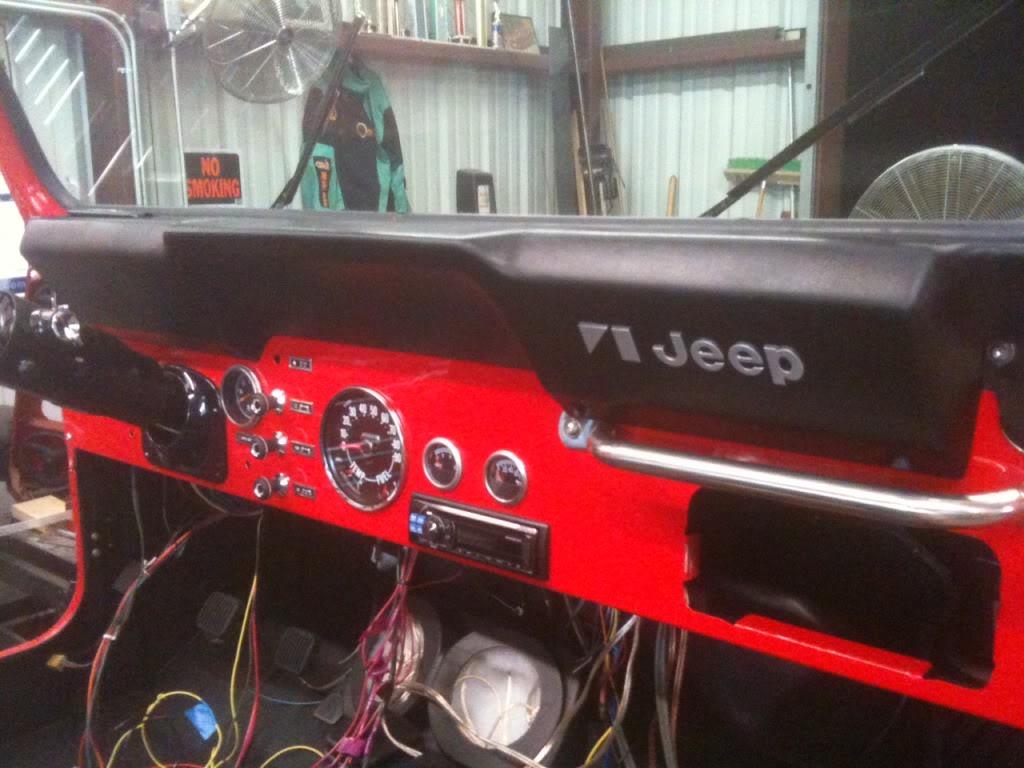
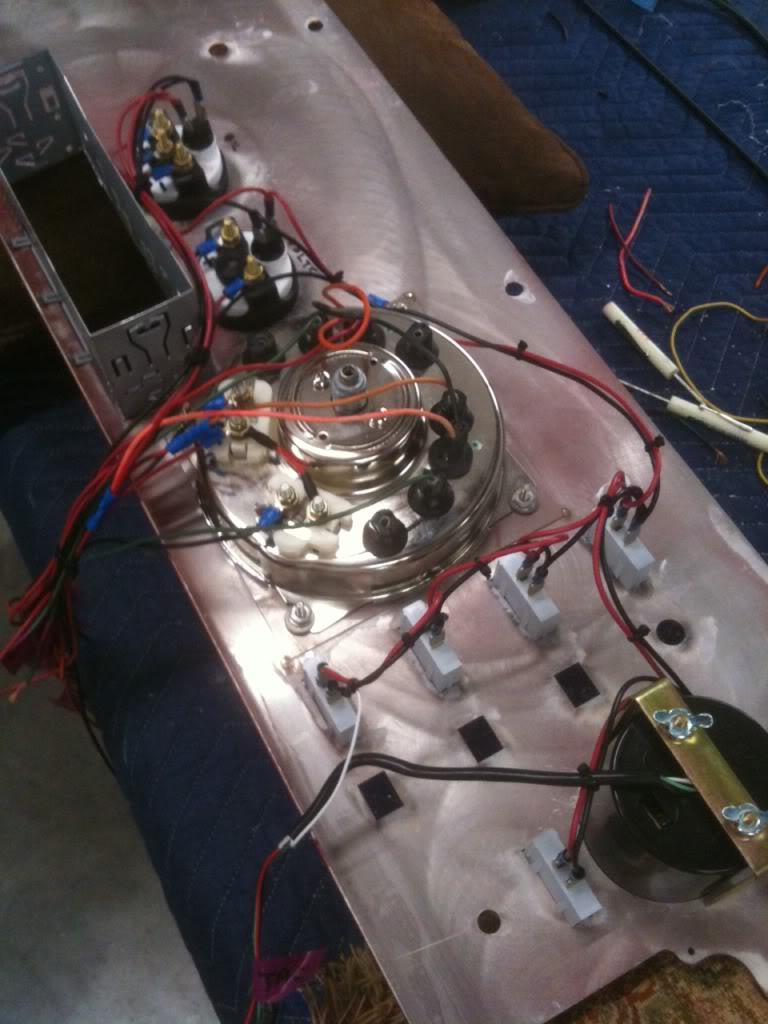
Rather than breaking my neck by doing the tedious dash wiring after it was installed, I decided to take the extra time and do it on the bench first. My idea is to wire all gauges on the workbench, with bullet connectors on the ends of each wire. In addition, all wires are being labeled for quick reference at a later date. This way, if I ever have to remove the dash in the future, it's a simple process by unplugging each wire and unbolting the dash.

Here's the dash as of last night:

dash-1.jpg


That's it for now....
 
I really dig the idea of connectors off of the dash that are easier to get to/remove. As long as you have things well marked and have a diagram, I think that's a great way to go :thumbsup:
 
You can get Molex connectors in up to 15 pin configuration- might make it easier than a bunch of individual wires.
 
Dash is in!

dash1-1.jpg


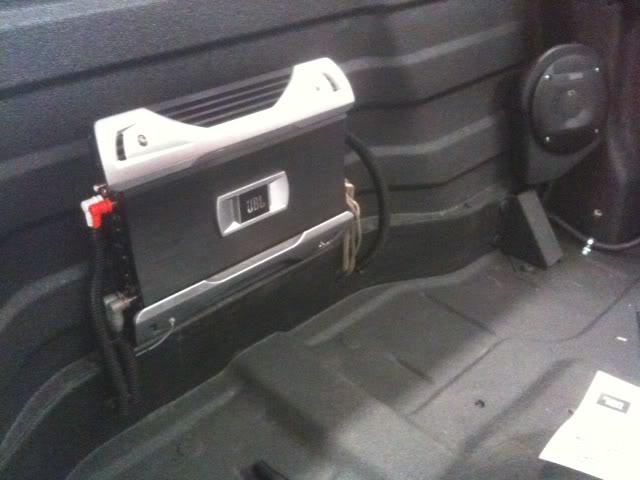
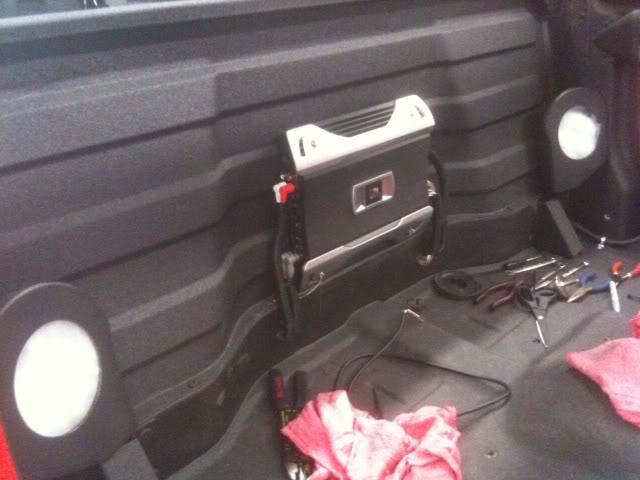
And here's a pic (a crappy cell pic) of the speaker pods. These are designed to go under the door openings, up at the front of each door. They fit TERRIBLE under the doors, so I moved them back here. They fit perfectly, and the angle of the speakers looks like they were made to go against the bulkhead!

speaks-1.jpg


tunes-1.jpg


973gif-1.jpg
 
Last edited:
It started!!!

I got the small block Chevy started! Sounds really bad a$$!
But I have a few problems I am hoping someone can help me with?
1. I'm not pulling fuel from the darn tank. It wouldn't start, and I checked the clear fuel filter I mounted on the inside frame rail: bone dry. It runs great with the suction hose from the fuel pump, running directly into a 5-gallon can of gas. Therefore I know the pump is good. I poured 5-gallons of fresh fuel into the dry tank before my start attempts. The idea was to check the fuel gauge with five gallons in there. I am indicating about a third of a tank on the gauge. I got to thinking that since I have no idea how much fuel my tank holds (black poly tank) that maybe I bought the wrong sending unit (too short to pickup fuel when only five gallons are in the tank? But holding the old unit beside the tank, it appears it darn near hits the bottom, and I recall the new one I bought being an identical length!? I pulled a fuel line and shot air down it. No blockage in the lines. Any ideas?
2. I'm not seeing oil pressure on the new Crown oil pressure gauge. And those guys give you NO schematic, so I followed the description on the guys website that talks about gauge troubleshooting. It has three terminals on the back. Has anyone successfully installed one of these lately that recalls the proper wiring? It just doesn't give me any real data by looking at the back of the gauge. Being aftermaket, it's probably wired different than the factory gauge the guy mentions online? Any help is appreciated!
 
Do you have an air compressor? If so, you can use and air nozzle to "pressurize" the tank and prime the fuel lines. Use a shop rag to fill the gap around the air nozzle. Make sure all the lines up front are tight, a gas shower/vapor cloud aren't a good thing...
 
Randy,
Yep, I've got a large compressor. I shot air from the line at the fuel pump all the back to see if I could hear fuel gurgling in the tank (really couldn't tell). Didn't want to shoot air from the tank end forward, for fear of blowing out the diaphragm in the fuel pump.???? But here's what I haven't done: on the extreme drivers side of the tank, there are two outlets that I have NOT connected to anything. These used to feed the lines up to the charcoal canister up under the rear drivers side fender. Could that be an issue? Here was why I ruled it out: it ran by sucking fuel from a gas can with the rubber fuel hose just stuck down in the can (ie: there wasn't any real pressurization going on there in that scenario)????????? In addition, I figure I'll never get true tank pressurization since there is the 'vent' hose that runs up into the filler neck, beside the actual fuel filler hose. I must be missing something here? Fuel flow should be one of my easier tasks to accomplish!?

Thanks! I appreciate all ideas! This perplexed me all day yesterday with no results. This problem, along with the OP gauge problem- which I've found no schematic on either.

Many thanks.
 
Last edited:
Quick Video of first engine start!

Anyone know how to embed a video?
 
Last edited:
post it on youtube, there is a link with the video to embed it.
 
I know that priming a mechanical pump can take 5 mins of cranking...been there done that.

The unhooked evap lines should have no effect.

How about temporarily splicing in an electric pump?
 
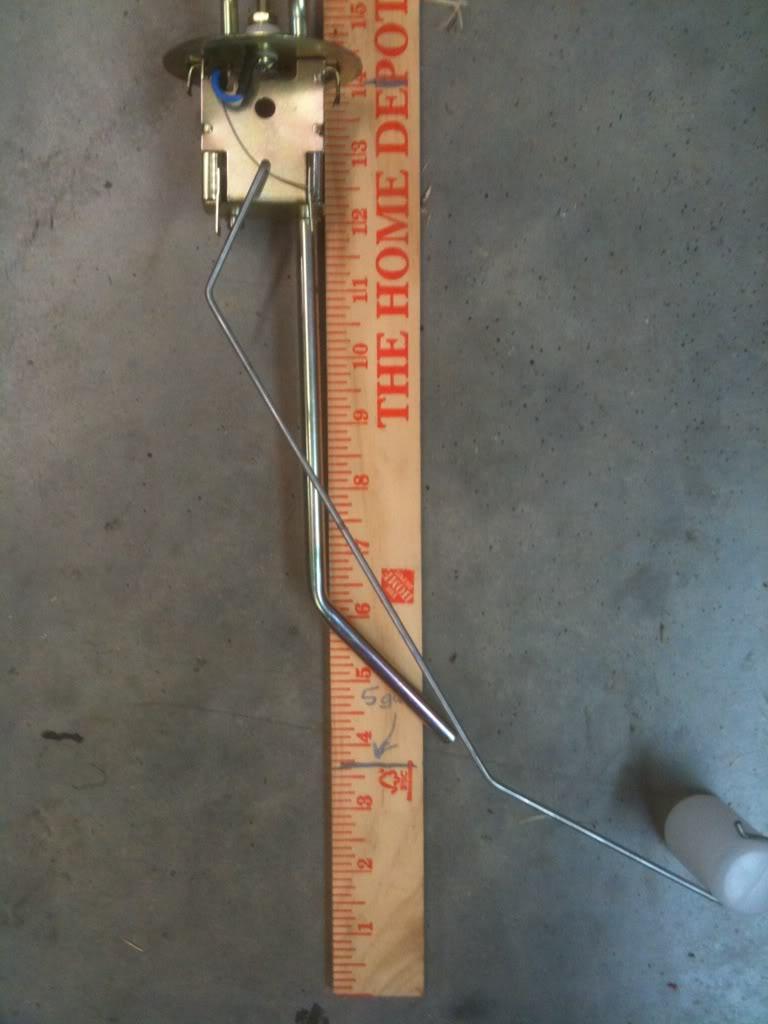
Fuel issue fixed. Here's what I did: I called Quadratec and had them look back through my orders...yep, they said I ordered/received a sending unit for a 20-gallon tank. While this would imply that the depth would be there on the pickup tube, something was still wrong- obviously. So I dropped the tank- huge pain in the a$$. But a floor jack really helped. I used a wooden yardstick to check fuel depth of 5-gallons. You'll see that marked on the stick at the bottom. Then I marked the top of the tank, where the sending unit bolts down: about the 14" mark. You'll then notice that my pickup tube is NOT reaching the 5-gallon fuel level!!! So I deducted that this was not a 20-gallon sending unit, or if it was, it wasn't the one for my aftermarket tank. So I found the original sender, and low and behold it was about 3.5" longer on the pickup tube! I checked the ohms of the old unit and it checked out like the online tutorial stated. So I stabbed it in the tank and remounted the tank. Hit the key and immediate start occurred. Set my timing and it's now purring like a kitten! I've still got no oil pressure indication on the Crown gauge, nor do I have temp on the speedo cluster- both of which bother me. So I'm gonna yank the Crown OP gauge (crap) and go with a higher quality mechanical gauge. No idea what I am going to do on the temp, since I like the factory look of the temp gauge in the cluster??? Anyway, fuel issue is solved and it's now on to gauge issues. Thanks for the help, fellas! Gauge input is now highly appreciated!?

19624f25-1.jpg
 
As many of you read over in the brake section of the forum, I've been fighting brake problems for almost a month now. I have been SO close to a test drive that it's not even funny! Like I mentioned early on, it's been 20+ years since I actively wrenched on a project, muchless a total frame-off restoration...not to mention a Chevy V-8 build and conversion into the Jeep! I've taken my time, tried to do everything the right way (either blast and powdercoat, blast and paint, new parts, rebuild what is rebuildable, etc.) In other words I have taken my time to make it perfect, in my mind.

When the brake problems started (couldn't get a firm pedal), I have fought that for weeks. I finally swallowed my pride, even after researching the Internet for possible solutions, and called in a friend who is a mechanic. He came over last night and within 30-minutes, I now have brakes. Not great brakes (they still need some fine-tuning), but brakes. The problem was that on the first rebuilt master cylinder I bought, the piston rod was NOT adjustable. I have thought all along (after getting rid of my air leak in one line) that the M/C piston may not be traveling far enough forward. When I still wasn't getting any brakes, I bought another M/C last weekend. I put it on, and same thing: no brakes. My buddy pulled the M/C last night, and sure enough, this newest one DOES have piston adjustment. We extended the piston rod out about 5/8" and now we are getting brakes. The rear brakes need some fine tuning once I get the E-brake hooked up, but I am close. So me and my buddy figured, what the hell....I kinda have brakes, so let's see if this thing will move under its own power. No dice. My transmission wouldn't go into any gear without the engine running, muchless with the engine turning. Dang it! I know it went through the pattern on the floor, because I checked it after getting it back from the rebuild shop. So we pull the tunnel cover, pull the stick, and somehow one of the shift forks had moved from a truly neutral position. The stick still installed, but it wasn't lined up within the transmission so nothing would shift. Cool! We quickly solved that problem!

So, I am damn near giddy that I am about to go for a test drive, FINALLY! Wrong again! Like an idiot, I failed to thoroughly study up on the conversion notes I received when I bought all my conversion stuff from Novak. My clutch would NOT adjust for squat. I glanced at the tech notes from Novak, and in bold, underlined, it talks about how the number one problem is that the installer uses the wrong throwout bearing. It says that everyone just assumes that the bearing that comes with the clutch is correct. Yep, that's exactly what my assumption was. VERY wrong. The throwout bearing is apparently much too thin that I installed. Novak gives you a method for measuring for correct throwout bearing depth, and it lists about 20-possible bearings depending on my specific clearances. So, back to the drawing board. This means that because of my lack of research in this one area, that I am now pulling the transmission, transfer case, and everything else that goes along with it- just to get in there to change that simple little bearing. This will be major work, and I am NOT a fan of tearing down a brand-new vehicle, but of course it must be done. That's the update as of now, and hopefully it is good advice for someone doing a V-8 and new transmission conversion in the future! Again, there are about 20 possible throwout bearings (and only ONE is correct) depending on your specific clutch measurements from the disc to the pressure plate, etc.

I'll keep everyone updated in the future, but it appears my evenings for the near future will be tearing down the transmission.....darn it! Oh well, I guess that's what happens when you build something that is FAR from stock configurations!

That's all for now.....
 
Last edited:
Back
Top