• Notice for iPhone users: DO NOT use the image size reduction option when uploading photos to the forum. This causes portrait images to post as landscape. We have added a warning to the image insert pop-up as well.

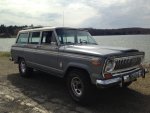
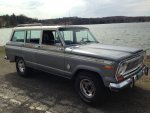
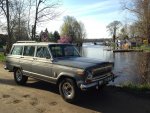
'Mater - '77 Cherokee S 4-door

Excellent cant wait to see that plate!

Check out that awesomeness....Drive something different...you got that motto covered! And by the way everyone needs an FSJ in their stable. Love everything about this rig :bacon:
 
Connie said to use Marine wax on the Jeep. (she knows her sh!t. She used to own a detailing shop). and to quote what she just said. "I know my waxes!" :rotfl:
 
Connie said to use Marine wax on the Jeep. (she knows her sh!t. She used to own a detailing shop). and to quote what she just said. "I know my waxes!" :rotfl:

Just marine wax in general from any company or is there a specific brand? Paste or is liquid ok?
 
Just marine wax in general from any company or is there a specific brand? Paste or is liquid ok?


Connie prefers McGuire's (liquid). you can get it at Canadian tire.. :crazy:
 
Got the stuff for the rear window from Team Grand Wagoneer and got it in. Been working randomly on the paint and wheels on the right side when I get the chance. Now that I'm not choking on exhaust with no rear window, took Mater for a little longer drive.

ImageUploadedByTapatalk1366147669.158404.jpg

ImageUploadedByTapatalk1366147680.757812.jpg

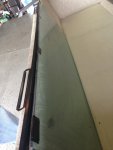
Here was my solution to mount the rear window in the track without buying the rubber strip I've heard horror stories about. Four spots with four strips of duct tape stacked up. Once I jammed the metal channel down on it I was able to lift the whole assembly just holding the channel. I sprayed some paint down inside the channel too for extra rust preventive.

Swapped the clips on the window arms out for 7/16" e-clips which was MUCH easier to deal with.

ImageUploadedByTapatalk1366147718.940071.jpg

I have a noise on acceleration and under load only that I thought was an exhaust leak. I tightened up the ypipe to manifold bolts and thought I had it licked because the driver side one tightened up a good bit, but still have it.

Is there any other noise that would be coming from the motor only under load or acceleration that sounded so similar to an exhaust leak?


Thanks, it's a mess really still, but the crud was just embedded in the flat paint and all the orange peel pits :eek: It doesn't match the body at all really, this picture makes it look closer than it is. Good news is the test spots I did on other body panels are all coming out great, and I did the edge of the roof on this side and it looks great too :thumbsup: Now to get the whole thing done without making my arm fall off. Anyone want to donate a DA polisher and some pads? :D
 
BTW, maybe it's not enough improvement to tell, but I've only done the fender and front door on this side, the rear door and rear quarterpanel are as they were when I got it. I just couldn't bear to wait until I get through all of that to take a picture. I did hit the rear wheel with mag polish and the cap with chrome polish though, so I figured that was enough for a nice photo by the lake. :shrug:
 
Nice...

I just got Tapatalk 2 installed...now I gotta figure it out.
 
Update time.

I have been battling the fuel setup in this thing. I think I explained how the tank fill worked with the filler going into the aux tank and a crossover pipe between it and the main tank. There had obviously been a long standing fuel spill issue out of the filler neck that ruined the paint on the side, I figure that was from when it was slam full and any acceleration/hill forced all that fuel back into the aux tank through the crossover. So I wanted them separated. Figured out a setup using 1.5" plumbing compression test plugs to get that part accomplished.

Once I did that, I test drove it and saw a small fuel leak. The return from the engine ran to a T and then to each tank. It was leaking at the return line connection to the main tank. Since I'd separated the tanks anyway, I went ahead and removed the T, capped the main tank return line and used a union to connect the return straight to the aux tank, I now have the main tank completely isolated from any fuel, only the vent is T'd into the vent to the filler neck (no charcoal canister on this, just vented gas cap).

So, problem solved, right? Another test drive, another fuel leak, this time at the return on top of the aux tank :banghead:

That I can't get to without dropping the tank, so I started in on that process only to be completely stopped by trying to disconnect the filler neck-aux tank connection. There's almost no room to work in and there's a THICK rubber/silicone pipe on the aux tank inlet that goes to part of the original metal filler pipe that's then connected to the stock rubber connector from the filler pipe to another metal pipe that runs into the body and is then connected to the bottom of the gas filer (which is also made up of two parts!)

I can barely get any of the pieces to rotate relative to one another, much less get them apart. I got too mad at it and walked away.

Once that's apart, I can drop the tank, correct whatever on the return line, check the other lines/sender connection and hopefully reinstall everything to finally put an end to this saga.

Eventually I think it would be cool to have some type of transfer setup between the tanks for the rare occasions I DO feel like putting 52 gallons of gas into this thing, but that's WAY down the list. I did order two of the electric fuel pumps I put in and wired it with a matching wiring connector figuring it's a spare fuel pump for now, but could be used like that as a transfer pump that could serve as an inline backup, would only take a couple of two-way valves...

Anyway, Mater's back on the inoperable list, but hopefully not for long...
 
Aux tank dropped, found both the return and vent lines were cracked through. Spray painted stuff while it was down, looked to be in good shape otherwise.

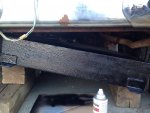
Putting it back was a PITA. Poor design IMHO with the way they did the filler neck, it has to go up at an angle to get over both the bottom and top flanges of the frame rail (frame is C channel facing inward, this is why the tank is at an angle in the pic) this also positions the neck within a 1/4" of the top of the frame, so getting the filler tube on it is impossible and does not have nearly as much overlap as it should.

Putting the clamp on the filler neck hose connection was a serious pain. I just hope it's good as it sits :fingerscrossed:

ImageUploadedByTapatalk HD1367506205.839169.jpg

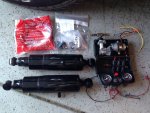
Only way to get to the upper left shock mount was to have this tank dropped, so did those while it was out. PO bought these air shocks but never installed them (likely when he saw it required the tank drop).

I have had an old Rancho air shock kit sitting on the shelf for years, figure I'll finally put it to use on these in some form. Scrambler has OBA now anyway if I ever did do adjustable shocks.

Fit is really tight between the crossover hose outlet on the aux tank and this wideass shock. Have to see what happens there.

Didn't hook up the air stuff yet, just got the shocks mounted.

ImageUploadedByTapatalk HD1367506221.961026.jpg


And the payoff. Test drive before work this morning. No gas leaks (and the garage didn't reek of gas this morning!)

Now the only big issue is tracking down and fixing the exhaust leak.
ImageUploadedByTapatalk HD1367506235.270262.jpg

Sent from my iPad HD
 
Back
Top