

You are using an out of date browser. It may not display this or other websites correctly.
You should upgrade or use an alternative browser.
You should upgrade or use an alternative browser.
OT: Retro Wrangler/Willys Pickup (long)
- Thread starter jscherb
- Start date


- City
- Redmond
- State
- OR
DO IT! Just a subtle suggestion... I like the second one also- but the first one's cool too. Sign shop is a good idea, I know they make extremely durable vinyl banners. There's always embroidery like on caps, but I don't know how that would hold up.
I like the second one also- but the first one's cool too. Sign shop is a good idea, I know they make extremely durable vinyl banners. There's always embroidery like on caps, but I don't know how that would hold up.
jscherb
CJ-8 Member
- City
- Elmira
- State
- NY
OK, let's put the spare cover logo idea on hold until I get the truck painted and we see how it looks. I've got one more variation below just for kicks.
Today spent some time working on the frame skirts. The left photo below shows one skirt already done in 16-ga. galvanized, and the rear skirt still in cardboard. I ran out of sheet metal otherwise I would have made the rest of them. Right photo is a close up of the one skirt I've made so far. The 21" long pieces of 16-ga. really taxes the limit of my small home-made bending brake but I think making them this thick and sturdy instead of 19 or 20 gauge is worthwhile.
I was considering either making them from diamond plate (and then painting them red), or making them from thinner sheet metal and using them as the excuse to buy the bead roller I've always wanted, but I've decided sturdy and simple is best.
They definitely give a more finished look to the bed and the truck in general. Will get more sheet metal Monday and finish the other three.
Jeff


Today spent some time working on the frame skirts. The left photo below shows one skirt already done in 16-ga. galvanized, and the rear skirt still in cardboard. I ran out of sheet metal otherwise I would have made the rest of them. Right photo is a close up of the one skirt I've made so far. The 21" long pieces of 16-ga. really taxes the limit of my small home-made bending brake but I think making them this thick and sturdy instead of 19 or 20 gauge is worthwhile.
I was considering either making them from diamond plate (and then painting them red), or making them from thinner sheet metal and using them as the excuse to buy the bead roller I've always wanted, but I've decided sturdy and simple is best.
They definitely give a more finished look to the bed and the truck in general. Will get more sheet metal Monday and finish the other three.
Jeff
jscherb
CJ-8 Member
- City
- Elmira
- State
- NY
Retro Wrangler "World Cab"
I won't be doing much work on the truck for the next few days but I did spend some time this morning mocking up the World Cab hardtop. These photos are slightly retouched; I haven't cut the roof panel yet so it sticks out about 18" past the rear wall - I cut that part off digitally in my paint program. Also included a photo of the model at the same angle for comparison.
I won't be working on the top for at least a month, maybe more... will wait until the truck is painted and the soft top is done and I take a short breather from all this fab work, but I wanted to mock it up now to make sure everything would end up going together according to plan...
This top panel really completes the look I'm going for You like it?
Jeff
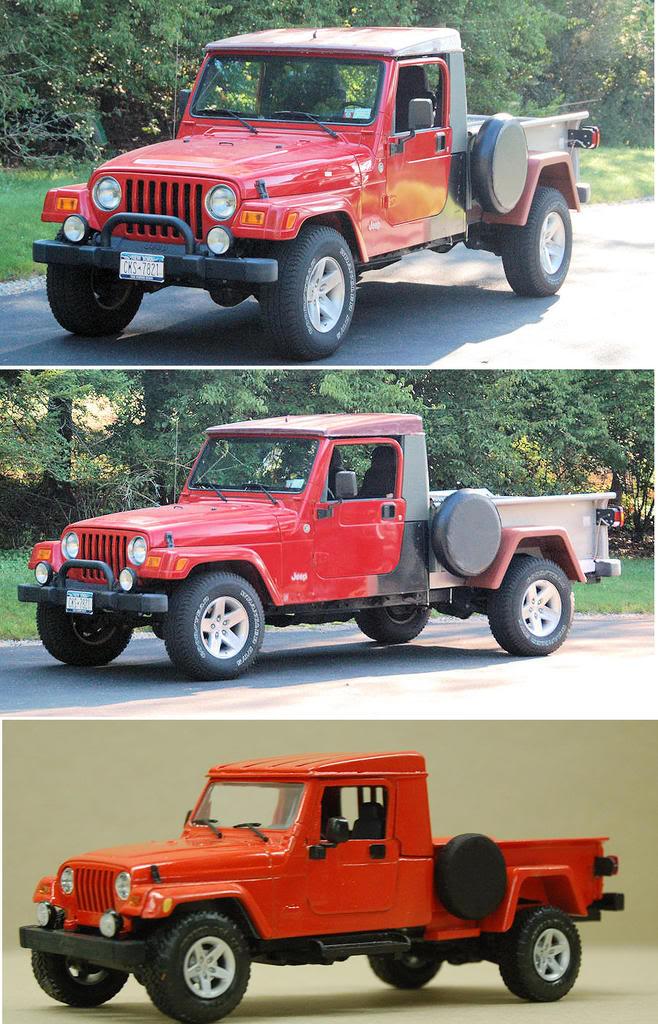
I won't be doing much work on the truck for the next few days but I did spend some time this morning mocking up the World Cab hardtop. These photos are slightly retouched; I haven't cut the roof panel yet so it sticks out about 18" past the rear wall - I cut that part off digitally in my paint program. Also included a photo of the model at the same angle for comparison.
I won't be working on the top for at least a month, maybe more... will wait until the truck is painted and the soft top is done and I take a short breather from all this fab work, but I wanted to mock it up now to make sure everything would end up going together according to plan...
This top panel really completes the look I'm going for
You like it?Jeff

1x1_Speed_Craig
Simplify...
- City
- Greeneville
- State
- TN
jscherb said:This top panel really completes the look I'm going for
Jeff
The hard top definitely pulls together the look of the whole truck. Nice work, Jeff (people have been saying that a lot, you know
).Craig
- City
- Redmond
- State
- OR
jscherb said:You like it?
Jeff
Oh Yeah....I just can't wait to see it all one color now!
 (a day late)
jscherb
CJ-8 Member
- City
- Elmira
- State
- NY
Not too much to report for the past few days, I've been working on little finishing up type projects, nothing worth reporting really. Got a rubber bed mat to protect the "wood" bed floor. Frame skirts are done and installed. Working on rear speaker boxes to replace the roll bar ones that had to go. Really just killing time until the upholstery shop can take me. All the phase 1 work is pretty much done.
Driving it a lot, and really enjoying that! No issues have come out of driving it, everything works as it should. It gets strange looks around town, probably because it looks so much like a project right now without paint. Can't tell if the looks are:
- "That's really wierd, why did he do that?"
- "What a mess of different colors, isn't he going to paint it?"
- "Wow that's cool, I hope I see it again when it's painted"
Don't care what the looks mean, I love it. It is everything I daydreamed and planned it would be...

Driving it a lot, and really enjoying that! No issues have come out of driving it, everything works as it should. It gets strange looks around town, probably because it looks so much like a project right now without paint. Can't tell if the looks are:
- "That's really wierd, why did he do that?"
- "What a mess of different colors, isn't he going to paint it?"
- "Wow that's cool, I hope I see it again when it's painted"
Don't care what the looks mean, I love it. It is everything I daydreamed and planned it would be...
- City
- Redmond
- State
- OR
jscherb said:It is everything I daydreamed and planned it would be...
Amen, Brother! I think owning a rig like this is one of all of our dreams!
jscherb
CJ-8 Member
- City
- Elmira
- State
- NY
The speaker boxes are one of the bits of fab I left until the main assembly was done. Since I had to remove the speaker pods from the roll bar because they would interfere with the half-cab, I had to find a new place for the speakers. Here's the result.
These boxes reuse the factory speakers and wiring components - you can see the wiring bezel on the side of the speaker box facing the front of the Jeep. I reused the factory speaker wiring harness without cutting, I just had to remove it from the roll bar. The boxes themselves are made from 1/2" MDO plywood and finished with Rustoleum texture paint which is a pretty good match for the interior upholstery. A few in progress photos are below so you can see the details.
They sound just fine.
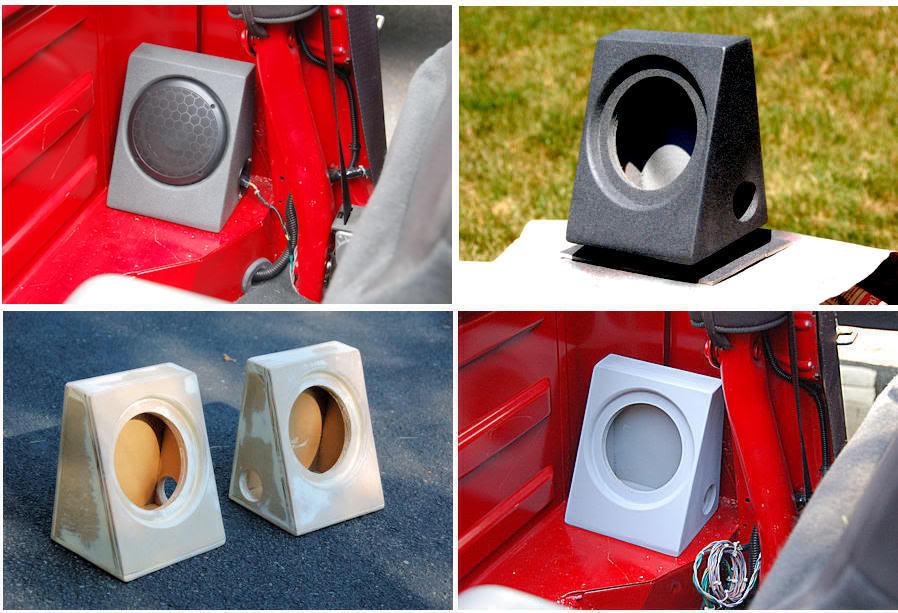
These boxes reuse the factory speakers and wiring components - you can see the wiring bezel on the side of the speaker box facing the front of the Jeep. I reused the factory speaker wiring harness without cutting, I just had to remove it from the roll bar. The boxes themselves are made from 1/2" MDO plywood and finished with Rustoleum texture paint which is a pretty good match for the interior upholstery. A few in progress photos are below so you can see the details.
They sound just fine.
Last edited:
jscherb
CJ-8 Member
- City
- Elmira
- State
- NY
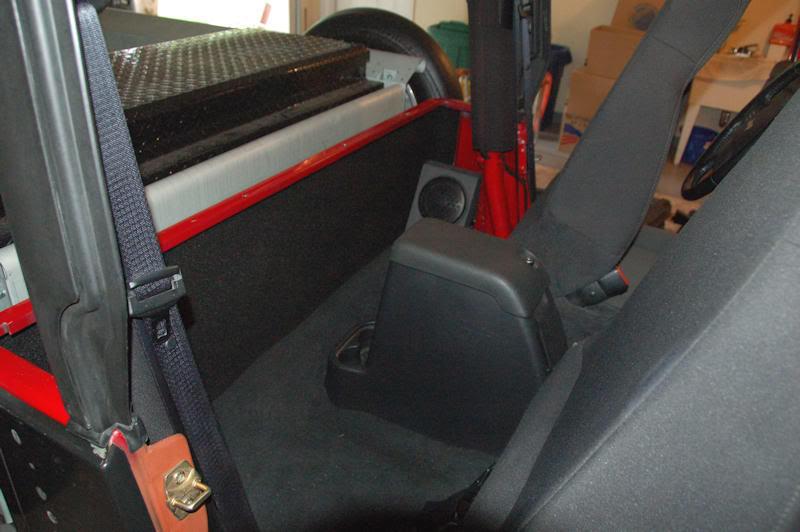
I've finished up the interior, so now there's nothing at all to do except wait for the upholstery shop and the paint shop. Everything else for phase 1 is done. I was able to reuse parts of the LJ floor carpet with some creative cutting and I added a rear panel carpet from Lowes; it's a pretty good match (looks darker than actual in this photo). Also put some Dynamat on the inside of the cab rear wall to deaden vibration and reduce noise. I'm really happy with how the carpet worked out, definitely looks factory.
The upholstery shop says they should be able to sew my soft top Tuesday or Wednesday next week. And paint should follow right after, but I expect that to take two weeks, so we're still about 3-4 weeks from having phase 1 totally complete.
Jeff
The upholstery shop says they should be able to sew my soft top Tuesday or Wednesday next week. And paint should follow right after, but I expect that to take two weeks, so we're still about 3-4 weeks from having phase 1 totally complete.
Jeff
I hate you
This all happened far too quickly and went together too easily. My projects always involve significant cursing, lost appendages, scared women and screaming children, in short...mass hysteria. My wife will never be allowed to read this post (or else her expectations of my work will change).
I can't wait to see the final product...
This all happened far too quickly and went together too easily. My projects always involve significant cursing, lost appendages, scared women and screaming children, in short...mass hysteria. My wife will never be allowed to read this post (or else her expectations of my work will change).
I can't wait to see the final product...

matnic
Scrambler-in-Progress
- City
- Rapid City
- State
- MI
lookin great!
question: what are your plans for side steps/rocker guards? I see something for the cab and something under the spare in the model, but didn't notice anything on the vehicle yet. Just curious what your plans were.
As for the spare cover logo, I say keep it simple. thats how older "real" jeeps were, so I vote for keeping it simple.
can't wait to see the end result...and thanks for keeping us posted so well! we live our dreams thru you right now!!
question: what are your plans for side steps/rocker guards? I see something for the cab and something under the spare in the model, but didn't notice anything on the vehicle yet. Just curious what your plans were.
As for the spare cover logo, I say keep it simple. thats how older "real" jeeps were, so I vote for keeping it simple.
can't wait to see the end result...and thanks for keeping us posted so well! we live our dreams thru you right now!!
jscherb
CJ-8 Member
- City
- Elmira
- State
- NY
I will reinstall the stock Jeep side steps after the painting is done.matnic said:question: what are your plans for side steps/rocker guards? I see something for the cab and something under the spare in the model, but didn't notice anything on the vehicle yet. Just curious what your plans were.
I'm leaning towards leaving them plain, but everyone can weigh in on this one after it is painted.matnic said:As for the spare cover logo, I say keep it simple. thats how older "real" jeeps were, so I vote for keeping it simple.
My pleasure!matnic said:can't wait to see the end result...and thanks for keeping us posted so well! we live our dreams thru you right now!!
jscherb
CJ-8 Member
- City
- Elmira
- State
- NY
twmattox said:I hate you
This all happened far too quickly and went together too easily. My projects always involve significant cursing, lost appendages, scared women and screaming children, in short...mass hysteria. My wife will never be allowed to read this post (or else her expectations of my work will change).
I can't wait to see the final product...
You think it happened quickly, and the time frame from disassembly to driving was less than 3 weeks, BUT:
- I spent most of 2007 and the first six months of 2008 planning and designing. I planned the technical design of course but I also planned the critical path of the project and made sure nothing would delay the actual build.
- I spent the first 7 months of 2008 fabricating parts to the design.
So when I actually started the job of assembling the pickup, it was the result of about 18 months of planning, design and component fabrication. The 17-day "build" was more or less like assembling a kit.
And I got lucky, only one component that I designed and fabricated beforehand had to be redone - the fuel filler bracket.
Also, I started with a 2006 vehicle - no rusted or frozen fasteners on that one! Everything came apart very easily.
Thomas Edison said: "There is no expedient to which a man will go to avoid the real labor of thinking" All the thinking that went into the design and planning was really hard work (granted there was no sweating or swearing), but you guys saw the payoff.
Sorry for being such a design and planning freak, that's how my brain is wired. Drives my wife absolutely nuts, she's a "last minute" person.
And believe me nobody is looking forward to seeing the final product more than I am!
Jeff
Believe me, I appreciate what you have gone through. I try to do this with most of my project (though with pencil and paper since I don't have all the cool skills you do). Even if I spent the time planning that you have, I would not be nearly as far along as you are (believe me, I can speak from experience on this). It just impresses me what can be done by others and baffles me as to why I can't seem to do it too...
jscherb
CJ-8 Member
- City
- Elmira
- State
- NY
Last call... I'm going to try to get this rusty old Willys bed to the metal recycler's this week, along with the remains of the second LJ frame I used to lengthen my frame and any other random non-trivial bits of scrap metal that came off the project. Bad news is it is in Elmira, NY, which is not near anything at all Also going to scrap are a pair of NT 3.54 CJ axles (not related to this project!), somewhat rusty but if you replaced all the brake parts I think they'd be usable. Any of this is free if anyone wants it but has to be gone in the next couple of weeks.
What's not going to scrap are the pair of Willys rear fenders (one is visible in the background) and the back of the LJ tub that was cut off. Oh and the nice fender and tailgate are already part of the Retro Wrangler, they aren't part of this bed! I need the bed gone because I plan to use the space it is occupying to store the back of the LJ tub, I need to get that out of the garage.
Jeff

Also going to scrap are a pair of NT 3.54 CJ axles (not related to this project!), somewhat rusty but if you replaced all the brake parts I think they'd be usable. Any of this is free if anyone wants it but has to be gone in the next couple of weeks.What's not going to scrap are the pair of Willys rear fenders (one is visible in the background) and the back of the LJ tub that was cut off. Oh and the nice fender and tailgate are already part of the Retro Wrangler, they aren't part of this bed! I need the bed gone because I plan to use the space it is occupying to store the back of the LJ tub, I need to get that out of the garage.
Jeff