• Notice for iPhone users: DO NOT use the image size reduction option when uploading photos to the forum. This causes portrait images to post as landscape. We have added a warning to the image insert pop-up as well.

Retitled: 83 Scrambler resto-mod finally gaining momentum

What a fantastic thread, you definitely get the BW seal of approval for picture posting, WELL DONE!!! :cheers: :bow: :rotfl:

I don't think anyone can answer your existential owner's crisis on frame-off vs. just F*&% it and git er dun... I like the thinking though.

First and most importantly, you WILL hate yourself later if you ditch it and get an LJ/JK.

I'm not all that great as a case study because my wife (oh how happy I am to have married her) wanted to get a Rubicon LJ when her DD took a crap on us back in 2005, so I've had that to use for the top-down Jeep fix when doing things to the Postal (like the 4.0/AW4 swap last summer). But here's my story on the build philosophy.

Reading on forums like this made me go through a lot of thinking on what to do with mine. Mentally I made a list of facts/factors/wants/needs that would go into the build I would do:

-I was not likely to have a tow-rig or trailer anytime soon
-I did not have more than basic handtools, a few power tools, no welder/welding experience, no lift, no engine hoist, etc. etc.
-I was facing the very real prospect of having to move to a different state within a few years (sounds like your in this boat)
-I was limited (in the house at the time) to a two-car garage and a wife that wanted to be able to park inside most of the time
-We were looking to start a family and knew time would get short (oh boy howdy if I only knew! :D)
-I'd never done all that much on vehicles myself and would be learning everything for the first time as I went along.

For me, all of that added up to a big NUH-UH on a frame off. Do I wish I had been able to do one, of course, who wouldn't? But, I've been able to keep the projects somewhat reasonable and just enjoy driving it.

I wanted something very capable, but also always capable of driving anywhere with my family in tow.

The one big thing for me was after I had my accident and the subsequent fixes/upgrades (https://www.cj-8.com/forum/showthread.php?t=10119). On the plus side, the settlement got me money that sped up my build, on the downside it put the Postal out of commission for 1 year, 2 months, and 29 days before it drove again. I love the upgrades that I ended up with out of the effort, but I got REAL tired of it not being together and running a couple times in there.

I think it's very possible to have an end goal in sight and just do things in a project fashion though. One thing you can do is look for used stuff as a step to get you closer and then sell them off when you want to go to something new to recoup the cost. I bought a used 4" lift knowing that one day I wanted to get a new lift kit, but the used set got me on bigger tires until I could do the new kit. My wreck killed me selling off the used lift, but that was the plan and I know I'd have gotten back what I paid for it.

Incrementalism will really bite you when you don't look to the end result and buy new stuff for each of the steps in the middle. Buying used and buying smart with an end goal can get you where you want to be, while keeping it drivable for long stretches and helps you learn along the way.

My $.02 anyway... I say get a plan, start looking for deals and build to what you want. You can always do the frame off later and hopefully by that time you're just fixing little things and reinstalling the good equipment you ended up with from the initial plan :thumbsup:

PS. on the trailer, just look for one of these: https://www.cj-8.com/forum/showthread.php?t=20940, no fab needed. The thing I've read about "back-halving" a Jeep or truck is that you end up with way more frame than you need and it's overweight. Now doing a Jeep body on a trailer frame is about ideal, but with the old military trailers out there for the finding, why bother?
 
Last edited:
Just now started reading your thread and noticed your stationed at Ft Carson , If you need any help I'm located on the north end of the springs . If your interested I belong to a small club that meets every third thursday at T.G.I. Fridays located at Woodman and I-25.
P.M. me and I can give you more details.
 
B.B.C... thanks, but I've recently left CO (to my dismay) for FLA.. have to update my profile to reflect that.. wish I'd come up on the net sooner and reached out more in the COS area, but frankly I was either working or deployed and had to fight just to spend some time with my family.. sorry I missed the chance while I was there.

Eric,

appreciate the detailed post.:cheers:

your thought process sounds very familiar.. and in many ways I'm starting or continuing in the same boat.
  • I currently have no garage, as I'm staying in a furnished apartment while my home is built (slowly)
  • my home build does come with a 3-car garage, which is still 1 short of my storage requirements (we have the LC, wife's Audi, and my 2 CJs)
  • when the home is finished by the builder, that's when my work begins... know for sure there will be a shed/storage unit build, I'd like to attempt an expoxy or VCT floor in my garage, building storage into the garage (I spend alot of time drooling over projects over at the garagejournal forum... GREAT website), the kitchen comes with linoleum flooring...which I'll end up tiling.. hanging blinds, changing paint colors, etc....
  • I have only basic hand tools and a small assortment of air tools + Craftsman compressor
  • what advantage I do have is access to the military craft shop, although that limits my available hours to work (can't do any midnight projects there), but it has lift bays, ASE techs for advice, and most specialty tools available to check out
  • I am always living under the time pressure of the possibility of another move or deployment.. it's one of my few complaints about the military lifestyle is that, you're in this constant series of short term commitments, and it's difficult to establish roots, relationships, etc.. I look forward to a time when I can think beyond "this tour" when it comes to a home, a project, my son, etc.. (the trade off is, I've lived all over and had fantastic experiences in some great places.. OK, KS, OK, GA, LA, TX, CO, FL.. Savannah, New Orleans, Colorado Springs, and now on the beach.. )

If I could find a trailer like that I'd jump on it in a heartbeat..perfect! I'd love to build a homemade adventure trailer set up with a roof-top tent and ability to camp out of it.. something modular in design so I could still use it for home depot runs, but agile enough and light enough to get into the mountains (assuming I ever get back to CO). I think I'd be more comfortable learning to weld on a project like that too..

Hear you on the CJ vs LJ/JK as far as character and all that.. in the end, I recognize that this project really makes no practical sense, and it's only a matter of how "badly" do I really want to do it? I definitely don't need it, but want...

I could be easily persuaded to sell both of my CJs and focus time and money on my FJ. Wifey has no preference and will go along with whatever I decide. Part of it for me is simple "follow through".. I've been saying for years that I'm going to do this, now it's time to put up/shut up, and I'm not sure I'm ready to surrender yet.

The "cost" to me is more about time and emotion.. I can afford the rebuild/refit. I tend to be very conservative with spending and very focused on retirement savings/investing, but I work hard and don't mind getting a little payback for it sometimes. The time is.. not travelling, not renting a boat or a jet ski, not hanging out with the family, playing golf, entertaining, having other hobbies.. and it's my wife's time commitment too, since she has to watch the monkey while I'm fiddling. That said, I think there's a foreseeable end to "major restore operations" that I could wrap up in a year or less and then move on to the "nice to have" mods.

it's a tough internal debate, because I'd rather be doing this (see pic) than turning a wrench any day, but I do get excited when I see other projects completed or when I think about the potential in mine..

attachment.php
 
I hear you man, you're listing all the same reasons I have had for doing things in a bit of a rush just to get them done and definitely cutting corners from how I'd ideally like to do things. Get them done, and done well enough to be good/safe but I don't spend time prettying things up the way I'd prefer. But the tradeoff is time with my girls and I'll take it.

All about finding your own balance. I say go for it working with what you've got.

And that's an awesome picture :bow:
 
Well if nothing else, hold on to the jeep until he gets old enough to be wrenching with you. My little boy is 6 now and I can harly keep him out of the scrambler and he loves being in the shop with me. I'm kinda looking at mine as a family project now. At first it was just for me, then my son really took a shine to it and now my wife, who is really into the out doors is excited about the aspect of being able to be out on the trails. So in summary I have no idea where this post is going but I hope it helps shed light on a direction for ya. I definately feel the pain of wanting to build and no time. Spent all day today painting the house with a pile of new parts calling my name from the garage. Tomorrow back to the fire dept for 24 hours, wed, & thur part time job, friday loading cars for the driving school I teach for and sat off to Greensboro NC to teach the driving class and back to the FD on Sunday. Just anoht avg week but I'll sneak a little time in here and there.
 
That green trailer is over the top, and I know what my next build is going to be.

Great looking son! My grandson is 7 mos old, he loves his Grandpa!

Anyways- I realized a couple years back that my builds were taking too much of my life away, and that I was missing out on a lot of things because I was putting my builds as my main priority. I didn't quit my building, I just got my priorities straight. I tend to be quite obsessive, too- I have to continuously recognize and control that aspect. Finish the Scrambler, you'll be glad you did. It's something that you can say "I did it myself", and be proud of something that not anyone can just write a check for and own. Luckily for you, there's other vehicles to drive while you're building, so you can take your time.
 
lessons learned from...

... five hours of getting my *** kicked by brake technology from the first half of the 20th century. Learned alot today, but I get frustrated with how long it takes me to do basics. I'll be back at it tomorrow to attempt re-assembly.

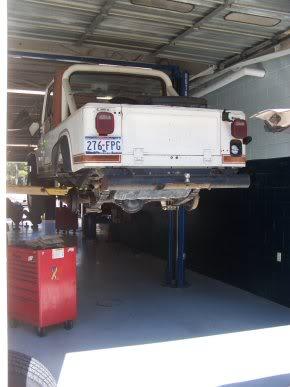
My approach at the moment is to tackle the jobs that make sense to while the truck is in storage at the auto craft shop.. I'm paying to store it there and it's obviously close to the shop facilities so, taking care of bigger ticket items that are worth of getting it up on the lift and taking advantage of special tools or technical advice. This includes but is not limited too:

  • service rear brakes
  • extend brake lines all around
  • front and rear lift shackles (doing heavier duty 3/4 in lift shackles because the front shackle bushings are bad,, figured I'd kill 2 birds on this one)
  • replace body mounts with 1" body lift
  • ball joints
  • sway bar bushings and links

So.. up on the lift she goes and we start to see what's hidden..

1Onthelift-1.jpg
 
Last edited:
lessons itemized:

  • I'm glad I started this, the system was a mess and I wouldn't have known it by casual inspection
  • I'm paying $6 and hour for a bay with the lift, $4 for a flat bay.. the lift is worth it
  • I wasted time by not researching all the steps before I got in the shop, didn't read the instructions until I was paying for booth time
  • I need to get a factory service manual. I use both a Haynes, Chilton, and normally have my Jeep Owner Bible and CJ restoration guide in the garage.. but if someone can get me a lead on an 83 FSM (searched Ebay but no 83-specifics), I'd appreciate it
  • Haynes Manual superior to Chilton, at least for this repair; spent hours trying to figure out reassembly based on Chilton steps. Haynes manual had steps in different (and easier) sequence.
  • self adjusting brake assembly = PITA
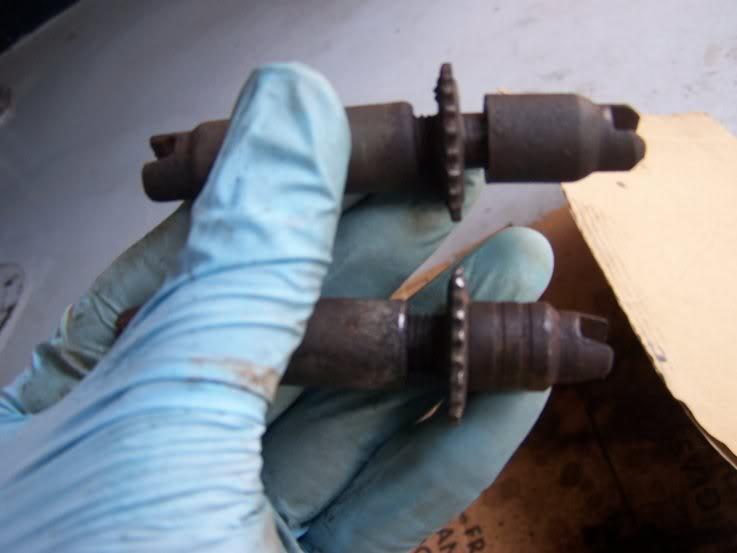
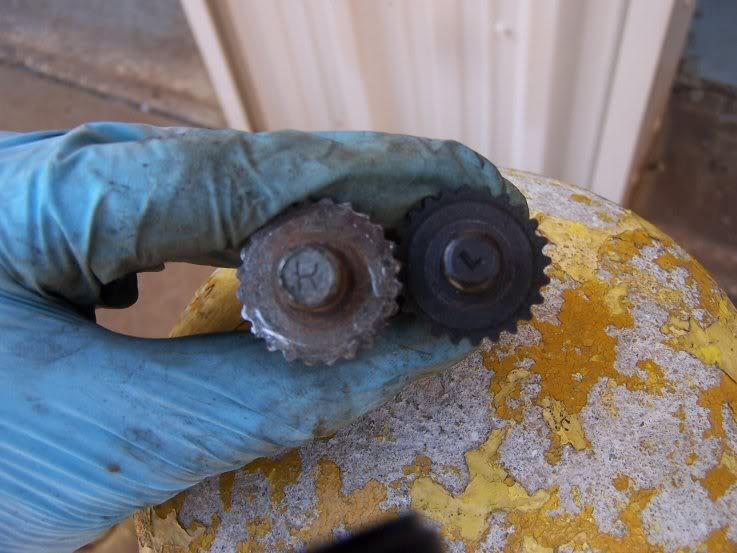
  • self adjusting screws are side specific, see pics below, they have a label by what side they should be on, and are threaded in opposite directions
  • don't be afraid to use the BFH tool to get your drum off, I though something internal must have been wrong, or I was missing a bolt somewhere, but the drum was just "rust welded" to the hub.. a few good whacks with 3lb hammer got it loose
  • brake spring tool worth whatever it costs
  • the reason people recommend doing one side at a time so you can look at the other side is.. because it's smart. I was missing a part so I decided to move to pass side after driver's side was all apart.. I had pics to refer to, but looking at the actual assembly would've been faster
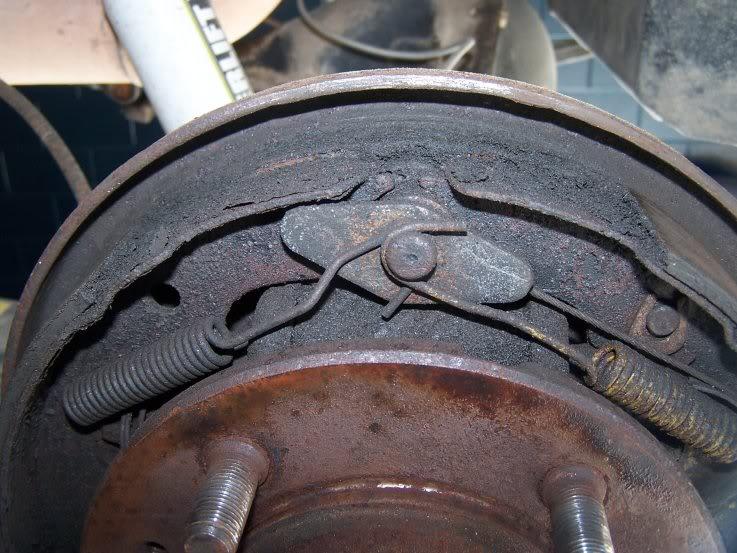
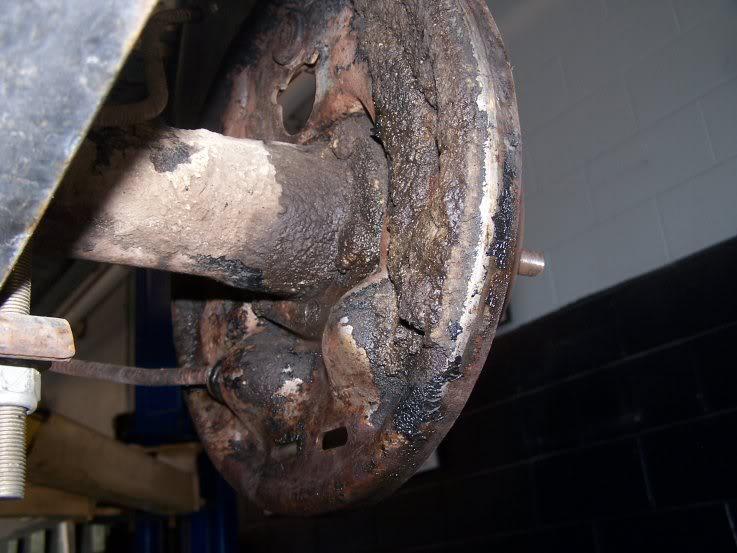
  • in unlimited time circustance, I would've been more patient and done some cleaining or touch up paint on some parts while I was in there, for now, I just scraped off the years of grease/mud that's been caked to it

2Messyunderthedrum-1.jpg


22Messybackhere-1.jpg


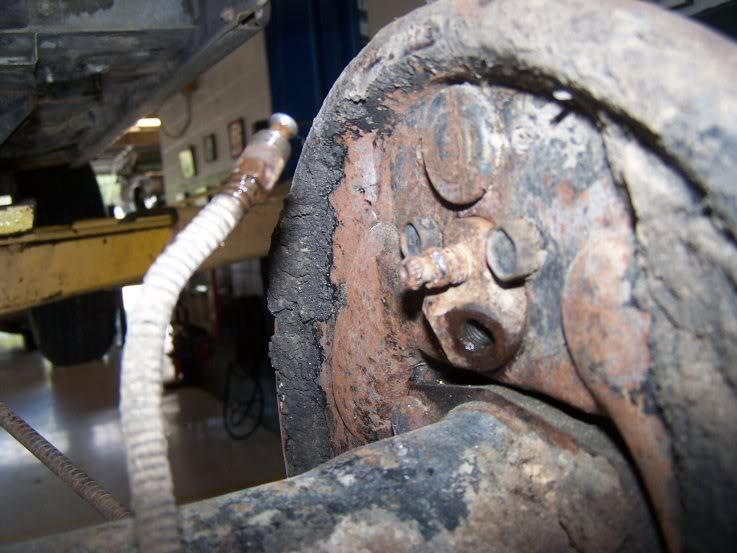
2Messybackheretoo-1.jpg
 
Last edited:
here's the self adjuster pics

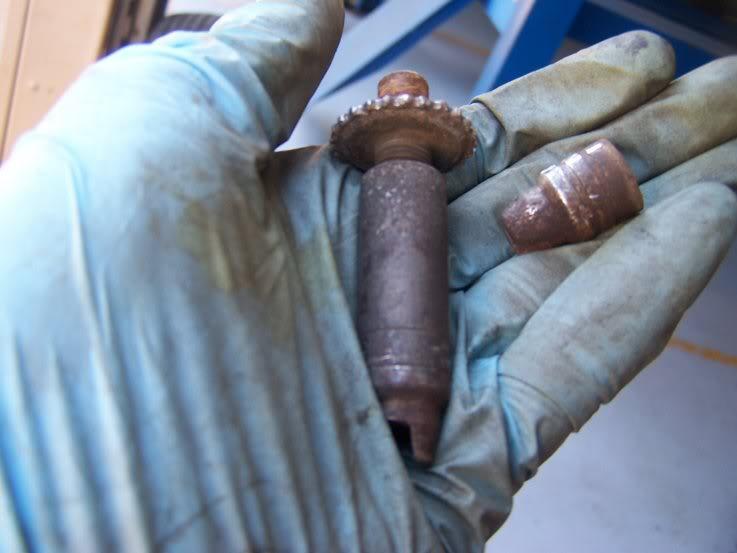
mine were all caked up so I didn't know that the caps came off until I figured it out by accident, pics aren't great but you might be able to see the reverse threads and the fact that the right, or passenger side has two bands on the cap.. not sure if that's a factory signal that it's side specific, but worked out that way..

51AdjusterareSidespecificseebands-1.jpg


cap comes off

52Adjustercapcomesoff-1.jpg


and lo and behold, they have "R" AND "L" engraved in them, not a big deal but I thought it was cool, hat tip to some engineer somewhere

53AdjustersideunderthecapismarkedRo-1.jpg
 
wheel cylinder removal

I didn't have too much problem getting them off, but could save you some time..

  • remove brake line
  • remove bleeder screw
  • remove 2 1/2 in bolts last (keeps wheel cylinder stationary for the brake line/bleeder removal)
  • remove rubber caps
  • rotate down and away
  • jiggle it out

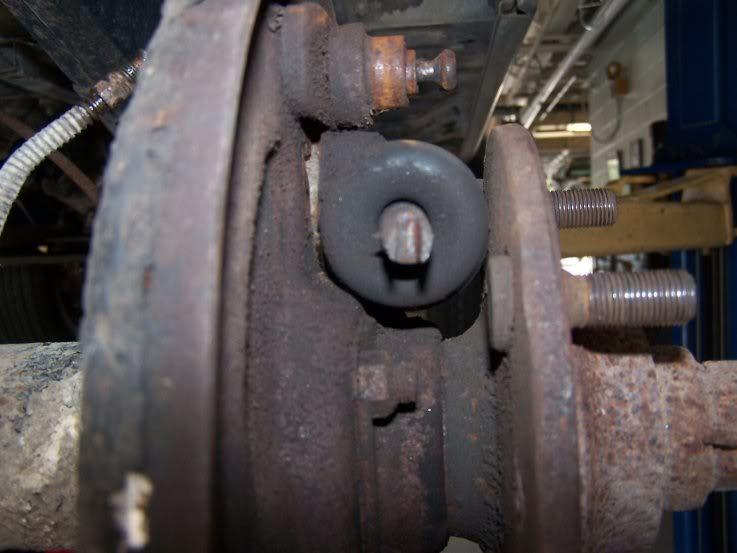
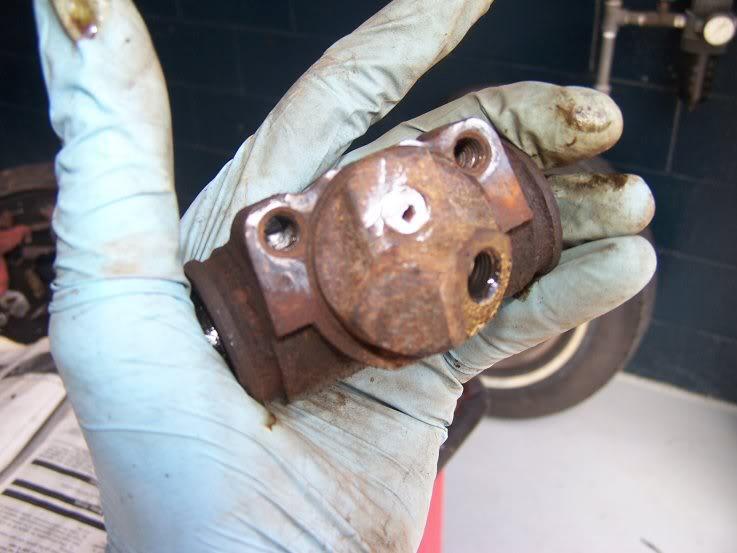
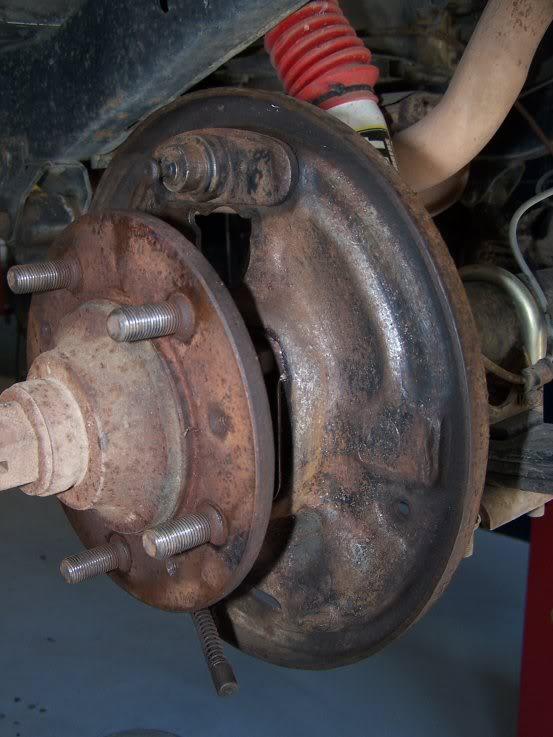
here's why it's hard to get out.. see how tight the space is between the back plate and the wheel mounting surface? hard to see here but the cast portion of the wheel cylinder is still through the backing plaste, and it won't come out through the back plate with enough room if you leave the bleeder on.. and it's easier to get it out if you pull the rubber cups as well (I'm replacing mine, but if yours are in good shape, just be careful to keep it as clean as possible). For a minute here I thought I was going to have to pull the axle just to get the wheel cylinder off... but it just didn't make sense so I kept trying other options..

Note the fine Texas "patina" still present all over the underside of this truck.. notable is the mud-caked break line spring/cover.. seems to have cemented itslef into a single solid object.. multiply this times, oh, everything under the truck, and that's what it looks like..

31Whywheelcylinderdoesntcomeoffeasy-1.jpg


I had one stripped and rust-frozen bleeder valve that vice grips did no help extracting, so.. a 3 lb hammer and a chisel provided enough motivation to break it off cleanly and allow me to get it through the backing plate.. again, I wasn't saving this wheel cylinder so it was disposable..

32Whattodowithseizedbleeder-1.jpg


cleaned up the backing plate with WalMart brake cleaner and a wire brush.. given more time I would've cleaned better and maybe done some hi heat or rust preventative rattle can here

4Cleanedupbackingplate-1.jpg


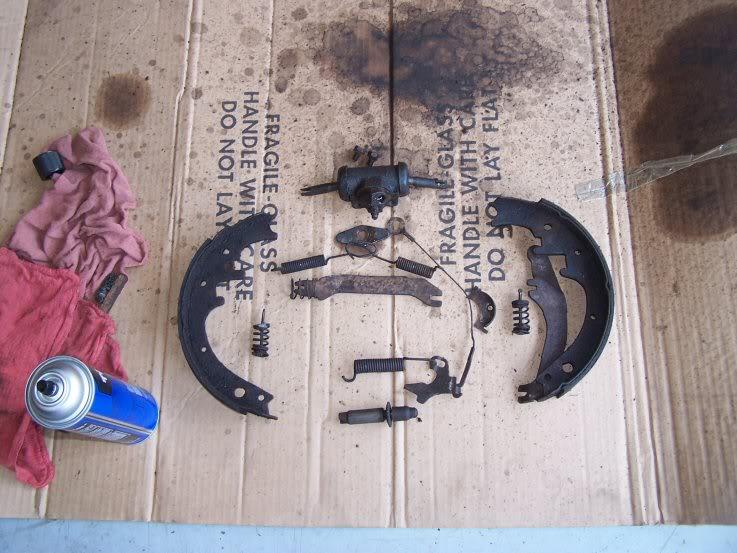
in the meantime, removed brake parts were laid out in somewhat logical configuration to aid reassembly of the new items/rebuild kit (bought from 4WD Hardware).. the brake pads themselves looked decent at initial inspection until I realized they'd been soaked through with brake fluid over the years.. so bought all new today and went ahead and paid the shop fee to have my drums turned.. six bucks per = bargain
3Layoutasitcomesoff-1.jpg


headed back to the shop for reassembly tomorrow.. ran out of time and patience today f-ing around with bad directions in the Chilton.. start fresh tomorrow AM and will post if there's anything I learn there..
 
Last edited:
Fsm

[*]I need to get a factory service manual. I use both a Haynes, Chilton, and normally have my Jeep Owner Bible and CJ restoration guide in the garage.. but if someone can get me a lead on an 83 FSM (searched Ebay but no 83-specifics), I'd appreciate it

You can always try this until you get a 83 FSM, it is for a 82. Should be not to many changes between the two years.
http://oljeep.com/edge_82_tsm.html

Here is the 84 - 86 M. R 252, Jeep CJ7/Scrambler workshop manual. It is a little clearer, but is 1300 pages.
http://www.civilianjeep.info/84-86FSM/CJ-FSM-84to86.pdf
 
Last edited:
awesome, thanks.. downloading the 82 on my other laptop right now..

I read somewhere that the 83 FSM was just an addendum to the 82.

I got a kick of of Chapter 3A "Wind Noise and Leak Repair"... that's kind of optimistic!
 
Ah, the memories :) I learned brakes on my Scrambler too. Good call on doing new parts, brakes and steering are the two places not to skimp.

On the body mounts/body lift, I might try to bust the body mount bolts loose while using the lift and if they all come out (you'd be one lucky SOB) but if you run into trouble and end up needing to find other ways to get some of them out (if they snap off, a captured nut spins, etc.) you might want to think about doing it in your garage at home. I got pretty lucky and only had one snap and one captured nut spin, and the process still turned into a multi-day effort to get everything out and fixed back together with the new mounts installed.
 
Eric.. thanks for the advice. so I guess the tip would be to see how many I can break loose first before I get too far into it?

Oddly, finding write ups online about body mount replacement or installation hasn't been that easy.. it "looks" like a straightforward job and most of the stuff (ie: 4x4xplor.com) I did find didn't address any problems along the way.
 
rear brake job complete: one interesting tip

took me about 4 hours today to get it all back together.. 50% of that time was figuring out side A, about 10% was side B (second side goes MUCH faster).. and the final 40% of time was trying to figure this out.. I"ll post the fix later.. but what would you guess?

  • both sides brake hardware reassembled
  • both drums freshly machined/turned with no signs of damage or warping
  • both sides brakes adjusted to allow drums to easily clear shoes
  • both sides drum turn freely, or failry freely by hand once drum is mounted
  • driver side wheel re-mounted, turns easily/freely by hand
  • passenger side wheel mounted: can't turn it by hand
  • remove passenger wheel, drum turns relatively freely by hand
  • passenger side wheel re-mounted: can't turn it by hand

now what?
my fix posted tomorrow..

THE ANSWER: check your drums.. after I had mine turned, I managed to swap them side to side, and the driver's side drum was binding on the backing plate (just barely, but enough to seize it up under the torque of the 5 wheel studs/bolts).. there's a small grove on the outer edge of the drum that "rides" on the raised outer lip of the backing plate, and mine wasn't "riding" it was "sticking".. no obvious damage to eitehr part, but I could see fresh metal where made contact.. so I swapped them again and, seemed to work okay now
 
Last edited:
Yeah, it's worth a shot with it up there. You're more likely to find stories on broken body mount bolt fixes than body lift installs, because there's not really much to the body lift beyond the instructions that come with them. How big a lift? It's when you start snapping bolts and things go wrong that it gets interesting. ;)
 
Back
Top