• Notice for iPhone users: DO NOT use the image size reduction option when uploading photos to the forum. This causes portrait images to post as landscape. We have added a warning to the image insert pop-up as well.

spankrjs's Biloxi, MS '83 Scrambler

Ok, the moment everyone has been waiting for LOL:rotfl:

I got the results back from the lab on the factory T5 fluid:

IMAG2403_zps05aac4a7-1.jpg


I only have Adobe Reader, so pardon my redneck way of posting the results. Here is the important part:

IMAG2404_zpsb4847f07-1.jpg


There you have it, the factory T5 fluid is similar to a 90 weight gear oil, NOT ATF:huh::huh:

This is the same fluid I found in "Yard Scrambler's" T176 and Dana 300.

So, this T5 has survived for 124,000 miles on gear oil, I think I will stick with a "brass safe" GL5 90 weight for now on in my T5's:twocents:

This is straight from a lab, so I feel pretty confident in this finding. But, please feel free to discuss:thumbsup:
 
Last edited:
I agree with you and on using 90 in T5s...its all I have ever done as well.

I do believe though that Jeep used ATF when originally equipped at the start, but then advised dealers/service stations to go with 90. Or at leasts that how the legend goes ;)

By the way, I drained and refilled my T5 in Western PA during the Jamboree trip home, which at 52K orig miles I believe was the original fluid and it looked like gear oil, the same reddish although thick stuff you have found.

Yep, 90 weight for now on with me:thumbsup: Yes, that weird reddish/purplish/alternative chick's hair color color that stains everything.


Did it smell (stink) like gear oil?

It has a smell, but not exactly like gear oil, hard to explain, thick like gear oil. Very unique smell, not necessarily nasty:shrug:


What did it taste like ??

CHICKEN:rotfl:

Yes it did...it tasted like it too :headbang:

It tastes a bit sweeter/bitter then regular gear oil, feels a bit different, too:shrug:
 
Looks to me like the way to go would be something like Redline MT90.

I changed my T5 fluid out at 30K miles and just put reg 75-90W gear oil in there. Jeep currently has 81K on it and haven't had any troubles out of it. Have a T177 in the shop that I'm going to swap in at some point, so haven't really worried about it.
 
I struggled to read the comments in the first picture. After I was finished, I scrolled down. :banghead:
 
I have been busy working on my tan Scrambler, so I have been neglecting this one. But, I did some work to it this weekend.

Since I will be installing new shocks/springs on it fairly soon, I decided to change out the factory steering stabilizer, mainly so it would match. The original stabilizer is shot, it has leaked out all of its fluid, and it offers no resistance. I don't think the stabilizers do much anyway, but since this Scrambler already had one installed..............

New versus old:

IMAG2417_zps8f1f8568-1.jpg


And installed:

IMAG2419_zps8ec78b5b-1.jpg


The "bright white" really stands out. Not the most exciting thing, but progress, and it was a nice, simple project. Note the jack stands, this Scrambler is pretty low, so having it raised on jack stands greatly improves under body work access.


I also recently purchased this:

IMAG2423_zps9a36fd7b-1.jpg


My factory clutch linkage is shot. The bushings in the tube are broke, and all of the "pivot points" have significant wear, which leads to a bunch of slop. I removed the old linkage this weekend, I should have the new stuff installed soon. I will post up some pictures of all the wore out parts in the next day or two.

Once the clutch linkage is installed, I am going to take the Scrambler off the jack stands to see if all of my new parts made a difference - motor mounts/transmission mount/T5 B&M shifter/sway bar bushings/steering stabilizer/clutch linkage. After a brief shake down time period, and after some pictures, the Scrambler will go back on the stands for the 1" lift install:)

I am also going to drain out the ATF, after a quick run, and install gear oil in the T5.

That's it for now:wave:
 
Where did that come from and is it a "kit" or did you pick individual components?

Bought it from Quadratec:

http://www.quadratec.com/products/52026_000_07.htm


Their website says it is "Crown" parts, but my parts were not in the typical "Crown"/Omix Ada packaging:shrug: They look to be the same quality as the wore out factory stuff I took off, time will tell:fingerscrossed: 
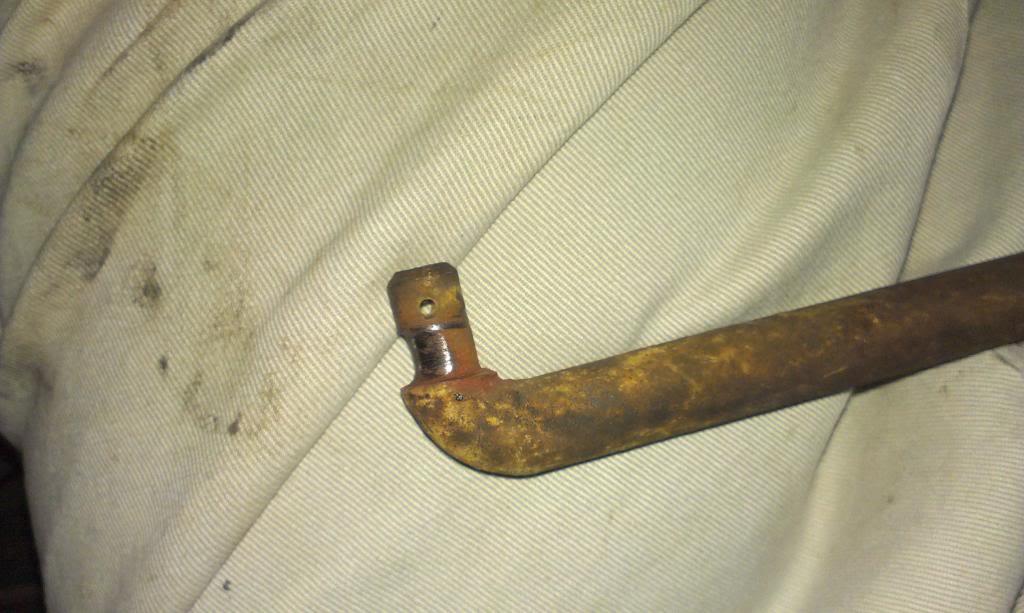
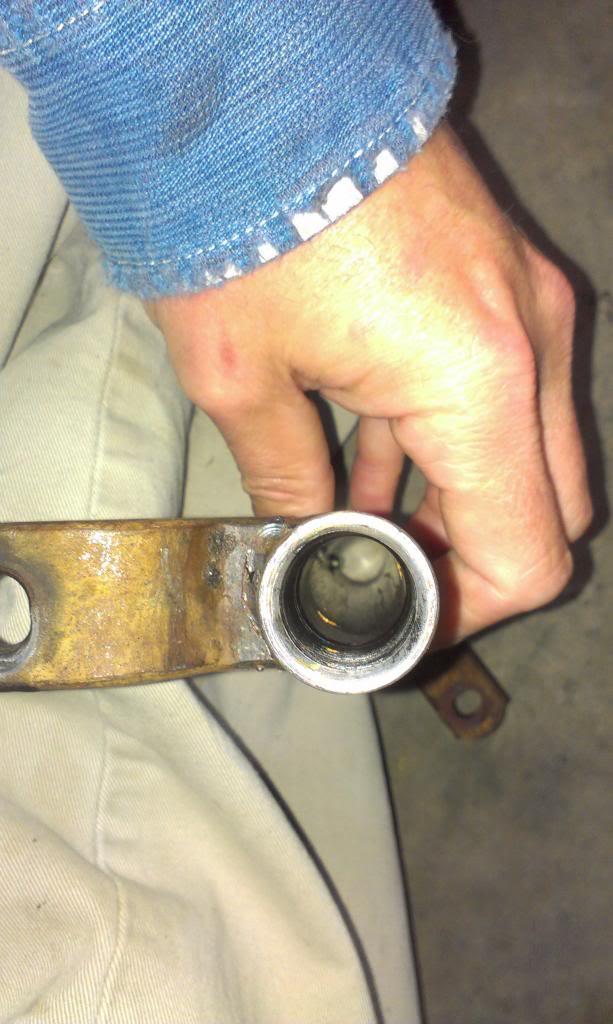
But, considering my current linkage would fall apart climbing curbs, anything will be an improvement:rotfl:

The parts come "bare", you have to paint them, but no big deal:thumbsup:


I will probably upgrade the two linkage rods to the better, spherical rod end types, in the future. But, since all of my parts were shot, this was the most economical option:thumbsup:
 
Quick picture of all the old parts, after I cleaned them. I might try to repair these parts and keep them as emergency use spares.

IMAG2425_zps10e1f25a-1.jpg


Some pictures showing all the various wore areas. The little bit of wear at all the pivot points makes for a lot of slop.

IMAG2426_zpsca19ac58-1.jpg


IMAG2428_zps2006c73d-1.jpg


IMAG2429_zps0c1787c3-1.jpg


IMAG2432_zpsef74a880-1.jpg


IMAG2433_zps7183ade9-1.jpg


The inside of the tube wasn't damaged, not pictured are the broken, stock, plastic bushings.

IMAG2434_zpsfe039e92-1.jpg


And a quick picture of the new assembled assembly, before bolting it in.

IMAG2437_zps5e86fd2b-1.jpg


I just need to install one more clutch linkage part, take it off the jack stands, then time for a test drive:thumbsup:
 
I welded up the worn out part and filed it down so it was round again. Good as new.

Yep, that's what I'm going to do:thumbsup:

Got it all buttoned back up last night, took it off the jack stands, and went for a cruise. Drove about 50 miles, no problems, all the most recent part upgrades are working great:D

Up next, the 1" lift install:wave:
 
I was going to go over to JeepAddict's to install this lift, but we haven't been able to schedule the "2 for 1 lift install weekend", so I started to put the 1" lift on my green Scrambler this weekend.

Here are some before shots, stock suspension with 120,000+ miles, no body lift, 30" tall tires:

IMAG2528_zpsc91b34e4-1.jpg


IMAG2529_zps9a4f5ff7-1.jpg


IMAG2530_zps2867a7c6-1.jpg


IMAG2531_zpse1e5b004-1.jpg


IMAG2532_zps4b198650-1.jpg


I pulled a few measurements, once I got the Scrambler on my level, concrete garage floor.


From the ground to the TOP of the front bumper:

Driver Side Front = 22-1/4"
Passenger Side Front = 22-1/2"


From the ground, to the TOP of the rear bumper (which is the same height as the rear frame cross member):

Driver Side Rear = 23-1/4"
Passenger Side Rear = 23-1/2"


So, it is basically sitting with the front 1" lower then the rear, with a 1/4" "gangsta-lean" to the driver side.


Some pictures of what comes with the 1" Superlift system:

IMAG2535_zps05f0a06d-1.jpg


The system comes with:

(x4) new leaf springs
(x4) new shocks
new u-bolts and hardware
new leaf spring bushings


You have to be careful, most lifts do not come with new shackle hanger bushings. This kit did not come with them, I had to purchase them separately. Also, most replacement bushings are made with a 1/2" ID, the stock shackle bolts will not work, more on this later.

Picture of the extra parts I purchased:

IMAG2536_zps85c1652b-1.jpg


IMAG2537_zps230c5f41-1.jpg


IMAG2538_zps70cc1de4-1.jpg


The instructions recommend replacing the stock shackle bolts with new, 1/2" bolts. So, I purchased new shackle bolts, and I also purchased new main eye bolts, and all new self locking nuts, for all of the bolts, and for all of the shock mounting locations.
 
The "lubricant" in the above picture was purchased at NAPA. It is very similar to that white, super sticky stuff that comes with poly bushings. It is also very similar to the tubes of stuff that Prothane sells. This little tube cost $8.00, so the big tubes of the Prothane stuff really aren't that out of line. I plan on lubing the bushings with this grease. Some people use normal grease, which might be fine. I am going to use this stuff, mainly because it is super sticky, and will not wash off.

Quick picture of all my old hardware, minus the u-bolt nuts/washers:

IMAG2541_zps86e94046-1.jpg


All of my old stuff came right out, no problems. This Scrambler came from the middle of MS, and it is virtually rust free, except for a few small spots of very light surface rust. So, you don't necessarily have to go out west for rust free:twocents: I will keep most of this stuff for trail repair uses.

Any way, quick picture of the new springs next to the old springs:

IMAG2544_zpse7aa29e2-1.jpg


This picture is a little misleading. Both sets of springs are showing identical arch, while unloaded. The stock springs, when they were installed, were 100% flat, no arch. The new springs will lift the Jeep a little bit, and I am sure they will ride a bit firmer, but that is OK, the stock springs were starting to hit the bump stops every time I hit a pot hole!!

Another quick note:

IMAG2545_zpsfd202111-1.jpg


I had to remove the passenger side rear shackle hanger to remove the upper shackle bolt. The upper shackle bolt, installed with the head facing the gas tank, would hit the 15 gallon tank before clearing the bushing. I love this Scrambler, these bolts came out no problem, no rust!!!! I will probably pull all of these bolts, tap the threads, and put a new coat of anti sieze on them, since I have it apart already.

Quick picture of some ID numbers on the bottoms of the springs, I am assuming these are the stock springs?

IMAG2543_zpsef335b26-1.jpg


IMAG2542_zps2901f97d-1.jpg


That's about as far as I got yesterday, had to quit working kind of early and head to the Superdome to watch the Saints:D

I need to drill out all of the shackle holes, and I am going to put a light coat of paint on the spring plates, then I can start assembly.

That's it for now:wave:
 
EDIT - forgot to post this picture, about to be pulled apart:thumbsup:

IMAG2534_zps4e1f4ac0-1.jpg
 
Raymond. You're actually working inside. You've done some of your best work under a shade tree.
 
Back
Top