• Notice for iPhone users: DO NOT use the image size reduction option when uploading photos to the forum. This causes portrait images to post as landscape. We have added a warning to the image insert pop-up as well.

Another Scrambler Purchase/Road Trip - UPDATE- BODY ON FRAME AGAIN

I found an unused tube of this stuff in the garage, looks similar to the Lucas stuff, might use it:

View attachment 95422

View attachment 95423
That’s what I used to use before I found the Lucas. Can’t really tell the difference. However, I had a tube of that Valvoline and forgot about it. When I opened it it had partially liquefied. I’ve had a tube of this Lucas stuff for a couple of years, and it hasn’t changed a bit.
 
I used a bronze bushing on the CJ5 4.0 swap. Seem to remember that the 4.0 to T18 via 176 housing didn't allow for a pilot bearing so a bushing it was. The 4.0 was a 94. No complaints.
My issue is that I have a 1" thick adapter plate between the front of the transmission and the bell housing. This 1" keeps the input shaft from reaching all the way back into the small inner recess of the crank where a regular bushing could go. Also, my input shaft is 3/4" OD. The bushing would be thin, like 1"OD and 3/4" ID. But, might not be an issue, that is about the size of the needle bearing I am using is. If I could go to a local parts store and buy an off the shelf bushing I would do it, but I need a bushing with a 1.818 OD and a .75 ID, not regularly available??
 
That’s what I used to use before I found the Lucas. Can’t really tell the difference. However, I had a tube of that Valvoline and forgot about it. When I opened it it had partially liquefied. I’ve had a tube of this Lucas stuff for a couple of years, and it hasn’t changed a bit.
This tube of Valvoline has a 1989 stamp, been in my garage for about 10 years, still looks new, no break down. With our high temps and humidity, it survived, I think I will give it a shot.

Besides, it seems like I am always pulling transmissions in and out of this Scrambler, I am sure something else will break before the grease gives out, unfortunately, 😆
 
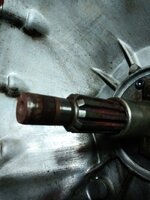
This is what the input shaft looks like, I have not touched it. You can see how the pilot bearing rode close to the end of the shaft, using the outer larger bore of the crank. If I put a bushing in the smaller inner bore of the crank the input shaft would never reach it.

20210707_200613.jpg

After a minute with some fine grit sand paper, cleaned the rust/baked on grease off. Cleaned up well, no grooves or damage. But, the shaft has wore a couple thousandths where the pilot bearing rode.

20210707_201122.jpg

Another interesting thing about the input shaft, not that I have measured a bunch of them with a caliper: the input shaft has a slight taper, it gets skinnier the closer you get to the very tip of the shaft. This was not caused by the pilot bearing, it has this taper before/after where the bearing rode.

The slight wear on the input shaft doesn't concern me. With either a bearing, or a bushing, it is not a press or tight fit. There is always a couple thousandths play between the shaft/bushing or bearing. The play I have is not excessive, so I am going to roll with it.

The pilot bearing I pulled out of here, besides the grease being gone, was actually still intact, and the needle bearings still spun freely. It only made noise due to the lack of lube, I guess.

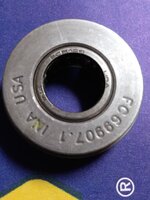
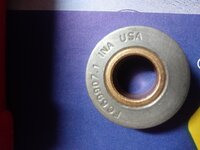
A stock 4.2/T5 pilot bushing on the right, the stock 4.0/AX15 bearing I have to use on the left.

20210707_202433.jpg

The stock 4.0 assembly is actually two pieces. If I could find a thin oilite bushing to install inside the larger outer donut I would be golden.

20210707_211457.jpg

You can actually easily press out the inner caged bearing assembly:

20210707_212415.jpg

With Sand Blast fast approaching, I think I am going to go with the pilot bearing. The NAPA guy called SKF, they said the bearing does not need additional lube. But, they didn't say what type of grease was installed. So, I am going to clean all the existing grease out of the bearing, repack it with the Valvoline grease. Also, this time, I am going to use the inner crank recess as a grease cavity, put some extra grease in there, like a reservoir. I did not do this last time, maybe a contributing factor for the bearing grease failure? The bearing actually has a rubber seal on the clutch side to keep the grease from migrating outward.

One other note - When I installed the previous bearing, I drove it all the way into the crank bore until it bottomed out. I never could get a straight answer on how far in to install it. But, the way the outer donut is made, only the middle of the donut contacts the ID of the crank bore.

20210707_220323.jpg

So, I can install this bearing about 3/16" shallower, so the bearing will ride closer to the transmission. This will better support the shaft, and get the bearing out of the old bearing "rut", tightening up the tolerance. It will also allow the pilot bearing seal to ride on "virgin" input shaft steel.

I might still see if I can find a bushing, but if I can't find one by Friday night, I am going to go back with the pilot bearing. Not my first choice, but I am going to be pressed for time between now and Sand Blast.

Thoughts/comments/criticisms/ideas welcome !!
 
Wonder if you can go to a bearing place (Motion Industries for us) and see if you can get a different spec bearing. Something larger with the same ID as existing....I would go round and round on this one but ultimately you suspect root cause to be bearing failure due to lack of grease. Both of the above should be tenacious enough. No issues due to alignment? I have to ask.
 
This tube of Valvoline has a 1989 stamp, been in my garage for about 10 years, still looks new, no break down. With our high temps and humidity, it survived, I think I will give it a shot.

Besides, it seems like I am always pulling transmissions in and out of this Scrambler, I am sure something else will break before the grease gives out, unfortunately, 😆
I just repacked our camper trailer axles with Amsoil synthetic bearing grease I've had since 1995. Had a $3.95 sticker on the quart from my parts guy in Santa Fe. I've been going through my 4 (now 2) containers ever since. It works great.
 
Wonder if you can go to a bearing place (Motion Industries for us) and see if you can get a different spec bearing. Something larger with the same ID as existing....I would go round and round on this one but ultimately you suspect root cause to be bearing failure due to lack of grease. Both of the above should be tenacious enough. No issues due to alignment? I have to ask.

On the alignment, I went through the trouble of checking the bell housing center bore/to crank center bore alignment with the old 4.2 motor before I initially installed the AX15, since I tore up a few T5's. With the old engine, it was well within spec. BUT, I then swapped in a new 4.0, and I did not check the alignment. Could be a possibility, but I do not suspect it at this time. IF I tear up another pilot bushing/bearing in the next 20,000 miles and have to pull it back out, I will reverify the alignment.

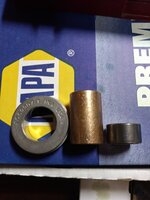
I found a pilot bushing that I can install in place of the bearing, a Dorman Part# 690-042, NAPA Part# 61500131. This will fit a 1973 CJ5 with a 304 V8.

I checked the measurements of the pilot bearing I pressed out of the donut this morning with the specs on this bushing, they match up:

OD: 1.056 (slight press fit into the donuts hole, just like the bearing)
ID: .754
Width/depth: do not remember but should be the same

O'Reilly's will have one this afternoon, NAPA will have one Monday, So, I will have a spare.

Advance Adapters makes a large OD bushing that takes the place of the two piece 4.0 style assembly: Part #716166


So, looks like I will have a bushing after all, and I feel more comfortable using a bushing versus the needle bearing :thumbsup:
 
All this talk about pilot bushings vs bearings, I was worried I might have put a bearing in my green Scrambler a few years ago. Luckily, looked back in the build thread from 4 years ago, I used a bushing, Post#272:


All these pictures/write ups I think help me more than anyone else LOL :crazy::thumbsup:

That was the last clutch job I did, so I should be clear after I put this one back together for awhile :fingerscrossed::fingerscrossed::fingerscrossed:
 
The Dorman bushing will not work, the OD is too large to fit into the adapter "donut". It is too long, but that is not really a problem.

The Dorman bushing would probably work perfectly inside the smaller inner crank bore, but my input shaft will not go that deep.

20210708_200308.jpg

20210708_200316.jpg

The other potential "issue" with the Dorman bushing, it hangs off a magnet, unlike the gold colored Oilite bushing:

20210708_200331.jpg

From my limited research, I believe the Dorman bushing is made from "Super Oilite" which has a 20% iron content. I am assuming that is what gives it the greyish color vs the gold color of a regular Oilite bushing?

The original pilot bearing OD is 1.015".
The original adapter donut ID is 1.000"
The Dorman bushing OD is 1.050" (1-1/16")

Theoretically, I guess, I could do one of the following to make the Dorman bushing works:

1) Spin the OD of the bushing down .035" on a lathe
2) Bore the ID out on the adapter bushing to allow a press fit of this bushing

I "think" that the adapter bushing's 1" ID and the Dorman bushings OD of 1.05" would be too much of a "press fit"??

Thought about the just installing the new needle bearing, but decided not too.

I went ahead and ordered the Advance Adapter pilot bushing Pat # 716166:

OD of 1.818 fit the ID of the outer crank bore (no adapter donut needed)
ID of .75 fits the transmission input shaft
Width of .75 works perfectly

Ordered it this morning, paid for FedEx overnight delivery, hopefully it will be here tomorrow so I can get this Scrambler back on the road.

Out of curiosity, I also ordered two Oilite bushings from Motion Industries:

Part # AA1049-01B
ID = 0.752"
OD = 1.0025"
With = .75"

I am "thinking" that this bushing might be a direct substitute for the adapter bushings needle bearing. I am "assuming" the .0025" will give enough of a "press fit" into the adapter donut? If so, I will have a spare pilot bushing assembly for this Scrambler. Always helps to have spares of oddball stuff, so you don't have to pay over $100 for overnight shipping when you need something and you did not plan ahead accordingly!!

That's it for now :wave:
 
Well, FedEx won't deliver to my address on a Saturday, bushing won't be here until Monday, that was a waste of $120.00 :mad:
 
Well, FedEx won't deliver to my address on a Saturday, bushing won't be here until Monday, that was a waste of $120.00 :mad:
$120 for a bushing!?!?! :oops:

How does that work with FedEx, do you get any kind of reimbursement if they don't deliver when they are supposed to? I've never overnighted anything before. But damn, if I paid that much I would expect it the next day!
 
$120 for a bushing!?!?! :oops:

How does that work with FedEx, do you get any kind of reimbursement if they don't deliver when they are supposed to? I've never overnighted anything before. But damn, if I paid that much I would expect it the next day!
Bushing was $20, overnight shipping was $120. They deliver on Saturday on overnight priority, which is what I paid for, BUT they are saying not in my particular area, so FedEx considers overnight on Monday, skipping Saturday. I don't live in the boondocks, so WTF.
 
Game on!!!

Drove 45 minutes over to a small/older bearing supply house in Mobile, Alabama, got what I needed, mostly:

20210709_191153.jpg

The OD and ID match the pilot bearing perfectly, so very happy with that.

The length is the issue, but no hill for a stepper!!

20210709_191211.jpg

The only widths they had were 1/2", a hair too short, or 1.5". I bought two 1.5" widths for less than $5.00, so I should be able to make extras.

Need to figure out how to cut it. Our bench mounted band saw at work is temporarily down, I do not think I can cut it straight with a portable band saw. I will try a hack saw first, then the Dremel.
 
I wish you weren't on the complete opposite side of the country/on a time crunch. Otherwise I would just machine/make this stuff for you. Any machine shops in your area? If it takes a toolmaker more than 3 minutes tops to part that off in a lathe smack him upside the head. Seriously, something that small and quick I'd be surprised if they even charged you anything.
 
5 minutes with my "Junior Hacksaw":

20210709_204346.jpg

I intentionally cut it a hair long in case my cut went crooked:

20210709_205845.jpg
The little bit of stick out on the crank side will not touch anything, so should be fine. I did not want to use a power tool and grind/cut it off flush, the heat might maybe potentially fuse up some of the pores in the oilite.

Pressed it in flush on the transmission side:

20210709_205836.jpg

Installed:

20210709_210650_HDR.jpg

I had to go "RedneckRay" on its ass, but should be good to go, and way happier with the bushing over the needle/roller bearing.
 
Not going to do a step by step, but I finished up the clutch install and some other work today.

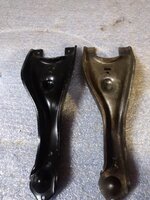
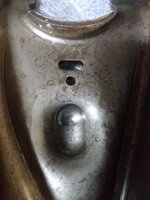
Changed out the clutch fork and installed a new release bearing. The fork had some wear where the adjuster rod pressed against it, and the two little "tits" that help secure the release bearing were gone on the old fork. I actually planned ahead and bought a new fork a few weeks ago, just in case. After my pilot bushing fiasco this go around, I either have in my possession/in transit enough pilot bushings for a 4.0 to last a lifetime, I hope!!!

20210710_085933.jpg

20210710_085914.jpg

20210710_085918.jpg

20210710_085911.jpg


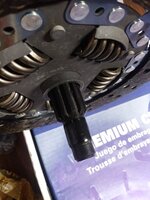
I am using a 258 flywheel and clutch disc/pressure plate. I wrap the end of the clutch alignment tool with electric tape to build up its OD to match up with the 4.0 pilot bushing ID of .75.
20210709_214038.jpg

Installing this transmission in this Scrambler is a huge PIA. I have to leave the bell housing bolted to the transmissions adapter plate, since the bell housing bolts to the adapter plate/transmission from inside the bell housing. So, instead of aligning just the transmission/transfer case to the bell housing, I have to align the entire bell housing/transmission/transfer case to the engine block. To me, this sucks. It is much easier for me to line up and bolt a transmission to an already installed bell housing. It is a bit harder to get to the bell housing to block bolts vs transmission to bell housing bolts.

Thankfully, I have only had to remove/install this transmission a few times. But, every time, it will NOT simply slide all the way home. The last 1" is a bitch. Even with spline lube and some oil on the pilot bushing/tip of input shaft, the damn thing just will not push in. I know you are not supposed to do this, but I always have to pull it in the last 1" using the 7/16" block to bell housing bolts. I will loosely install a longer 3/8" bolt at the top center location to keep everything centered. Then, easily tighten a 7/16" bolt on each side to bring it home.

It does NOT require brute force. I simply easily tighten each bolt a few turns with a 3/8" ratchet. I am not forcing it, not going to break the block or strip out the cast in place threads. This is how I have to install this transmission in this Scrambler. No amount of brute force/pushing/pulling/bouncing/twisting/praying will do it. This is the least destructive way for me to do it. Like I said, the bolts easily turn and bring it home, no drama.

Now, I was curious to see if pulling the transmission into place with the two bolts might have disturbed/damaged the pilot bushing, or even forced it out of its adapter "donut". So, pulled the transmission back out far enough to take this picture:

20210710_113243_HDR.jpg

No damage, the bushing is still flush with the transmission side of the adapter donut, so no harm, no foul. Reinstalled the transmission, and again had to bring it home the last 1" with a bolt on each side.

I know you are not supposed to do this, so the next time I have to pull this transmission someone wiser then me can come and show me how to reinstall it without having to bring it home with the bolts!!!!!

Quick recap, so I will remember what all I did in a few years LOL:

New 4.0 pilot bushing
New 258 flywheel/clutch disc/pressure plate
New HD 258/T5 throwout bearing
New 258 clutch fork
Drained and refilled the AX15, Valvoline MTF
Drained and refilled the Dana 300, gear oil
Cleaned/re-greased driveshafts/CV/u-joints

When the entire drive line was removed, I went ahead and spent a couple of hours cleaning 50,000+ miles of grease/dirt/mud and crud from the under body and the inside side of the frame rails. More OCD then anything else, but it is all nice and clean again, and I can see all the red paint again!!! The drive shaft u-joints/rear CV are the worse grease slingers. After I regrease these items, I spend a bunch of time removing all the old/excess grease to keep it from flinging everywhere. But, it doesn't matter. With the amount of highway miles I travel at high speeds, grease is always flinging out the u-joint/slip shaft/CV seals. Also, I have had various oil leaks over the years which help contribute to the undercoat. So, while everything was removed, I cleaned it all up. It won't stay clean, but it will be easier to keep up with a clean slate. IF I was building a Jeep that would not get wheeled, sealed u-joints and CV joint would help keep the undercarriage clean. But since this Jeep sees lots of road/off road usage, the greaseable stuff is the only way to go IMO.

After it was all back together, quick test drive between rain showers. New clutch works perfect and smooth, no noise or vibrations, thank God!!! And, with a new flywheel/ring gear, my starter is nice and quiet.

So, a huge PIA/amount of work for a $3.48 pilot bushing, but it made all the difference in the world.

Realistically, I could have reused the flywheel/clutch/release bearing, BUT if I have to pull all this stuff out, no way I go back with the old stuff!!!

So, that is the big thing off my to do list. I still need to look at my front engine accessories and see if something else up here contributed to the recent water pump failure.

That's it for now :wave:

20210711_200543.jpg
 
Reading a lot of your posts reminds me of, well, me. I just don’t take as many pictures and writs tutorials like you do. Congratulations on a job well done.
 
And here I thought all the slinging of the grease was a good thing. Keeping the body and frame from rusting at all.
 
Back
Top