Console and cupholders x3
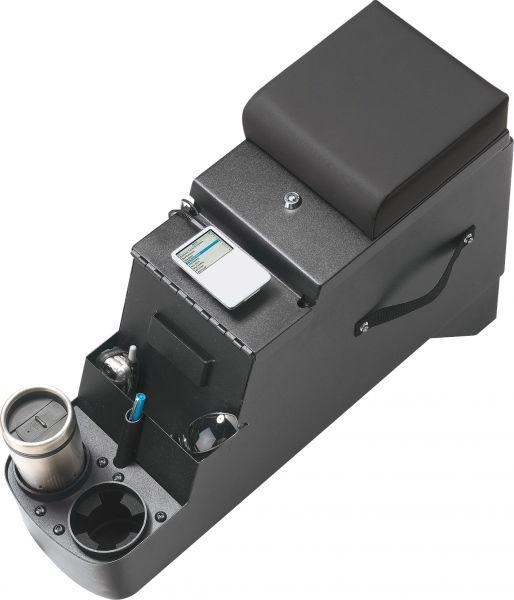
One of the birthday presents was an iVault security console from Quadratec:
http://www.quadratec.com/products/14026_2XX_PG.htm
I had a nearly new stereo sitting on the shelf from the Grand Waggy we owned for a short while and I'd always wanted to put it in the Scrambler after I pulled it out to sell the GW, but I didn't want it in the dash for fear of water running into it.
I was worried about how wide the console would be considering that the postal's e-brake is mounted on the left side of the driver seat mount, but I took a leap and got it anyway.
The width turned out great, I offset the console towards the passenger seat about .75-1" or so and there's plenty of room to reach the e-brake handle.
What didn't work out was the length. You can see in this pic that there's cupholders built in on the front. With those there, the spacing with the tranny shifter pushed the console too far back to the rear. (the tranny shifter is almost as far back as it can get in the tranny cover plate).
So I did a lot of staring at it sitting between the seats, pulled it out and stared at the way it was built and did a lot of head scratching. Moving the shifter forward looked like it would require a totally new linkage (I'd fabbed the linkage when I went to the AW4 and it's worked perfectly, so reworking it didn't sound like fun). It also didn't look like it would get me all the distance I needed because of the tcase shifters.
As much as I didn't want to, I decided I had to hack off the cupholders. With the angle on the section just above them, I could really push the console forward and it looked like the spacing would all work out.
I hated to cut up a brand new console, but I jumped in. The actual cupholder section on top was just tack welded in place, so I cut through the welds with a dremel and popped that piece out in one piece with very little damage, then cut off the wall/floor (the front/sides and bottom area for the cupholders were just continuations of the sides and bottom of the whole thing).
I cleaned up the cut edges and taped off the front of the thing and spraybombed it all black. That totally did the trick, the console slid forward so the back edge is dead even with the backs of the seats and the shifter angle when in 1st gear is perfectly parallel to the front of the console.
I will say, the stereo install took some thinking to work out though. Because you can't really reach up into the console once the stereo is installed, what I did was make long pigtails off the stereo's connector plugs that would reach up through the console so I could plug them up before dropping the stereo into the console. Because of how I wanted to run the wires, I didn't want the big stereo plugs hardwired to the long wires running to the dash so I put in connectors on all the wires next to the passenger seat.
Without any carpet, I didn't know what I was going to do with the wires from the stereo to the speakers and the power to the stereo. I have the flip-forward passenger seat and I really didn't want the wires running all the way across the floor under the seat where they could get pulled or pinched. I was walking through the hardware store looking for ideas and I found some 1/2" electrical conduit and clamps and found my solution.
I'm all about function over form, so I'm sure some folks will think it's cheesy, but I think it looks right at home in a CJ
")
I ran the conduit alongside the tranny tunnel, bending it a bit to follow the contour and put a 90° sweep on the end to take the wires up behind the heater box. They're completely protected and this only left about 3" of the wires exposed between the conduit and the console, which I slapped some corrugated wire loom on.
I put in the Centra-pod and fired it all up

In this picture, you can see one of the other weekend projects, I drilled and tapped the rollbar for our two sweet gimbaled/swivel drink holders (which I already had and they were the reason I wasn't too worried about losing the console cupholders). They are smooth as silk (actually mount with a sealed ball bearing) and were an awesome find:
http://www.cabelas.com/p-0040884522133a.shtml
As for the cupholders I cut off of the front of the console, I mentioned I didn't really do a lot of damage to them when I removed them and the way they're built the actual functional parts are all welded together into one solid unit. So I looked at them sitting there on the bench and got an idea based on the way our JK is set up with rear cupholders directly behind the console on the floor.
I test fit them on the back of the console and realized that with a little tinkering, they'd be perfect in that spot. So I cut the excess off the "back" edge of the cupholder unit, made a mounting bracket out of some 1" angle I had by shaping the bracket around the cupholders to pick up the bolts in the cupholder and I ended up with something that would bolt to the back of the console with some of the extra bolts/nuts that came with the console.
These are sitting flush on the floor and the vertical cylinders that actually hold the cups are sturdy metal, so they work like a step for Laura getting into her carseat (just like she does with the ones in the JK).
I had to paint the cupholder and bracket I made anyway, so I asked Laura what color she wanted for "her" cupholders and she chose purple.
Laura really digs the end result.
The one other cool little thing from this weekend was, with the old crap/broken stereo out of the dash, I could FINALLY get to the burned out bulb in the oil pressure gauge. Now I have fully lit and completely functional gauges/indicators/lamps, knock on wood (well, except the "4x4" lamp, but that's due to the swap and not bothering to try to make it work).
Also, I got a tranny temp gauge and a remote air pressure gauge for my OBA setup and I test fit them in the hole in the dash from the stereo. They'll fit perfectly in there, so another upcoming project is a cover plate for the radio hole to hold two gauges and some switches


")
 ) and the UPS man just showed up