caballogris
Basic User
- City
- TORRELLES DE LLOBREGAT
- State
- Ba

I would be honored if this personal project served others. Therefore, and if necessary, I have many more photos of the process available to those who need them, tips and more. Just ask for them and I will gladly send them to you. Also, I will share my experience if it could help to somebody. We have a (Spanish, of course) forum of Classic Jeep Willys, where I posted the process too. If some want to see, click here:That looks amazing. Broken YJ tops come up every once in a while here. I already have a Scrambler top but it has the typical slight sag on the top panels. If I can’t get that resolved to my liking, I just might copy your build!
Merry Christmas!I would be honored if this personal project served others. Therefore, and if necessary, I have many more photos of the process available to those who need them, tips and more. Just ask for them and I will gladly send them to you. Also, I will share my experience if it could help to somebody. We have a (Spanish, of course) forum of Classic Jeep Willys, where I posted the process too. If some want to see, click here:
Foro del CLUB JEEP WILLYS CLASICO ® , entra y descubre el apasionante mundo del JEEP - Identificarse
And Merry Xmas for everybody.....

 .
.


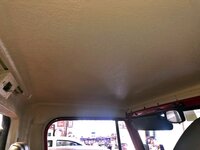
 ready to go!!!!