• Notice for iPhone users: DO NOT use the image size reduction option when uploading photos to the forum. This causes portrait images to post as landscape. We have added a warning to the image insert pop-up as well.

Meet Red, my 81 Restomod Build

Pman

Busted Knuckles
Lifetime Member
City
Mount Pleasant
State
SC
Well, this is a long overdue update. I can’t believe that almost two years have gone by since I last posted in this thread. Three of my projects sold and now Red is sitting in the new shop! So it’s time for a project update. I have changed the powertrain plans a little bit. Seeing as I kept the 6.0 and 4L80E out of the J-20, I’ll be putting them in Red. A bit of overkill? Maybe... I’ll probably keep the 3.54 gearing, should be plenty with the 6.0 torque and 31” tires. Also kept the Vintage Air Compact 2, I’ll be using that too. Once I have something picture-worthy I’ll post it up! Hopefully soon!
Randy- This had me chuckling as it seems like we all have the same time/priority issues. BUT, you are making some serious progress. Strong work!!! Will enjoy following this one.
 

Randyzzz

Blown Budget
BENEFACTOR
Gold Member
Lifetime Member
SOA Member
City
Redmond
State
OR
He's on a mission now !

Yep. And my debit card is getting a workout. The UPS driver will love me next week...?
Gas tank, mufflers, h-pipe, SYE, misc T/C parts, and maybe the lift are all headed this way...

Does anyone have any experience with removing the rear gas tank hanger crossmember? I’ll be replacing it with rectangular tubing but it will be about 8” or so further back. I’ll also be strengthening the front hanger crossmember. I’m a little worried about frame flex. I might have to beef up the inside of the frame rails.
 
Last edited:

bigwalton

Alaskan Postal nutjob
FORUM MANAGER
SOA Member
City
Dexter
State
MI
I'm not coming up with any memory of seeing a crossmember moved back on here to suggest as someone to talk to. Jake white just played with mounting his new Aerotank, but it didn't take anything close to that much change to do what he needed to make it fit. Reach out to @CHIEFWAHO to see if he's done it on one of his or Mike Starkebaum at 4x4Land?
 

Randyzzz

Blown Budget
BENEFACTOR
Gold Member
Lifetime Member
SOA Member
City
Redmond
State
OR
Thanks for the advice, Eric. I’m on a mission now, it’s no longer “if it can be done” but “how’s the best way to do it”. The fuel tank arrived today- no dents even! There’s a pan for the EFI pump so I think I’ll use a Chev setup with a Walbro pump. Here’s a few pics to give a general idea of fit.
B1D6BC66-65F9-4CD1-9F31-F5A280D85A1C.jpeg290356DA-EA07-4FC3-828E-F98D576E7CE4.jpegYou can see how the tank looks like it was made to fit there- with the exception of the crossmember. Well, I’ve got some ideas how to get around that. Not bad for a 25 gallon capacity F2146766-3A20-4A17-8A8B-C2F5C34F1853.jpegI’ll have to figure out how to convert the one fat fill tube to a fill and vent assembly this is how it looks inside the tank.328E0958-5F35-4B3C-B28A-5B0151909958.jpegInside shot of the fuel pump pan.
 

sdsupilot

CJ-8 Member
Member
City
OKC
State
OK
I've moved and replaced a couple cross members. Latest was on a CJ7. The factory just uses fairly flimsy stamped sections. I don't think you will have any issues replacing with rectangular tubing. Honestly it would likely be stronger than factory.

I would be tempted to cut and graft in the CJ fill/vent and plug the GM top fill. You could use the factory hoses then. Downside would be introducing welds that could leak (and toxic welding fumes). Space was pretty tight near the top of my fuel tank. I used the factory tank with a Tanks inc EFI conversion module. It will be nice using a factory drop in module.
 

CJ7Pilot

18436572
BENEFACTOR
Gold Member
Lifetime Member
SOA Member
City
Yuba City
State
CA
Wow, that looks like a great solution for long range fuel and suitable ground clearance! I think several of us will be watching this step with interest. :thumbsup:
 

spankrjs

Scrambler Junkie
Lifetime Member
SOA Member
City
Biloxi
State
MS
If you remove the cross member, are you going to "box reinforce" the existing frame around the gas tank? Might not be a bad idea with the massive increase in power?

That tank looks like a great idea, up high and tight, and fits a GM fuel pump module :thumbsup:
 

Randyzzz

Blown Budget
BENEFACTOR
Gold Member
Lifetime Member
SOA Member
City
Redmond
State
OR
Working out the details on paper right now. Ordered a few more goodies for the install. I’ll be sure to document this really well for anyone else interested.

So far, I’ll be modifying the cross bed support shortening it from about 4” to 1”- just between where the frame is. I’ll use some rectangular tube welded in to accomplish this. I’d like to not have to do a body lift. I’ll also be building an over-the-top crossmember to replace the one I’m removing. I’ll cut out the thin factory boxing behind the removed crossmember and replace it with thick gauge rectangular tube or channel. Lastly I’ll build a low profile removable lower crossmember that mounts in the vicinity of the shackle hangers. This piece will double as a skid plate mount. The tank will mount using straps so it’s easily removable. Sounds simple, right?

the vent tube is integrated in the GM module for a 91 Blazer, so that will work. I’ll rework the oversized fill to accommodate the smaller Scrambler fill. I’ll probably use some kind of step down adapter and weld or silver solder it in place.
 

Randyzzz

Blown Budget
BENEFACTOR
Gold Member
Lifetime Member
SOA Member
City
Redmond
State
OR
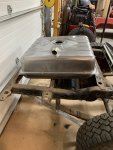
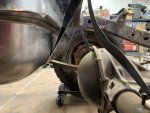
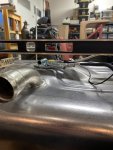
Taking the sawzall to a perfect frame...took a few deep breaths, but it was over just like that. The crossmember came out and nothing moved or flexed. Hoisted the tank up into position, took some measurements, and I’m really pleased. The tank hangs a bit higher that the stock 15 gallon tank, but it extends rearward considerably more. This won’t be an issue for me, and it probably wouldn’t matter to Scrambler’s with a decent lift, but at stock ride height it would decrease departure angle a bit. The back edge hangs about an inch lower than a straight line between the bottom of a 235 tire and the rear crossmember. A body lift would allow higher mounting, but I’m not interested in that. Anyways, now I need to do some crossmember and mount fab. Here’s some pics-

9350178B-C81D-40A3-9337-13720D109AA2.jpegThe level represents the bottom of the bed floor. The fill tube barely clears, but it’s going to get modified anyway. It comes out close to the stock hose!982D90D5-EE41-4D36-8850-68C0EB88D6C0.jpegC1831276-3EC1-424A-9234-345748F0056D.jpeg4E0AFB21-825D-4A63-90A6-D370F69C2828.jpeg9255A3A6-B4FF-4421-AF2A-22C542750A64.jpegI think this setup gives even better clearance at the diff cover than the stock tank! I placed it about 2” further back.
 

ag4ever

Average Nut
BENEFACTOR
Gold Member
Silver Member
Lifetime Member
SOA Member
City
Richmond
State
TX
I'm really digging that! I might have to steal that for my build.

I doubt that replacing that cross member with a shallow "c" section would make much structural difference in the frame. The factory cross members were only held on by a very poor weld on the tab of the cross member. The rest was only there to keep it from flexing in the center. Basically it was marginally better than a piece of flat stock (except flat stock would be very weak in resisting bending in one axis, good in the other). A tube or c channel would be equally as effective as the stock member.

Do you have any shots showing clearance between the spring hangers for running exhaust? Looks like there might be more clearance for a dual exhaust setup?
 

Randyzzz

Blown Budget
BENEFACTOR
Gold Member
Lifetime Member
SOA Member
City
Redmond
State
OR
I'm really digging that! I might have to steal that for my build.

Currently the plan is to go over the top with a 1”x2” thick wall tube right where the old crossmember was. I think that should be enough.

I doubt that replacing that cross member with a shallow "c" section would make much structural difference in the frame. The factory cross members were only held on by a very poor weld on the tab of the cross member. The rest was only there to keep it from flexing in the center. Basically it was marginally better than a piece of flat stock (except flat stock would be very weak in resisting bending in one axis, good in the other). A tube or c channel would be equally as effective as the stock member.

Do you have any shots showing clearance between the spring hangers for running exhaust? Looks like there might be more clearance for a dual exhaust setup?

Currently the plan is to go over the top with a 1”x2” thick wall tube right where the old crossmember was. I think that should be enough.

It’s a wider tank so there’s only about 3” on either side between the tank and the shackles. My plan is to go out between the springs and the frame behind the tires, or maybe even in front of the tires. You can actually use a 90* and a couple of 45* bends and go above the frame in front of the tires. Had the first exhaust in Copper that way. Here’s a pic of the old setup. Still laying around in the side yard...nope, I’m not a pack rat!
4C69367A-5172-49C7-9183-C97F69993006.jpeg
 
Last edited:

Randyzzz

Blown Budget
BENEFACTOR
Gold Member
Lifetime Member
SOA Member
City
Redmond
State
OR
So... more parts trickling in. The UPS driver knows- he asked “More Jeep parts, huh?” Yep. What else? The first part was the fuel module. I popped it in and it fits better than I hoped. It gives even more clearance than expected. I might even get to raise the tank a bit more. 1ED7110F-C3CA-4767-979F-A8F2BE3A86E4.jpeg80DC72D1-0FB4-4B0E-9726-8FF31BDB2C35.jpegThe tank straps also showed up, along with the exhaust cross-over pipes. F10E5466-0FE5-404B-AC47-02E6F305FA84.jpegAlso, the JBConversions SYE for the 241C showed up. I’ve heard they take a long time to ship, but my experience was the opposite. From order to my door in one week! 92F9287A-B238-4C52-B917-1C3C9A4024AE.jpegLastly, I have been looking for a small 110 welder to do sheet metal and other light jobs. The big Lincoln is amazing but a bit of a beast on small stuff. I stopped by the local farm store and they had a discontinued Hobart 130 on the shelf. It was missing the tip and ground clamp, so I went into bargain mode. Amazon sells them for over $500, and this one was on the shelf for $449. By the time I was done, I walked out the door with a new welder for $275!!! Score!261A8DFE-558E-425E-AD2B-B536359A6B38.jpegLooks like I need to get my butt in gear. I’ll try and take a lot of pics.
 

ag4ever

Average Nut
BENEFACTOR
Gold Member
Silver Member
Lifetime Member
SOA Member
City
Richmond
State
TX
That was about how long it took to get my sye. I think it has to do with stock on hand. If they are missing a part that needs to be fabricated, they wait for enough orders and make a run of parts. If you fall in that window it takes longer.

I notice his lowmax kit is often on backorder.
 

Pman

Busted Knuckles
Lifetime Member
City
Mount Pleasant
State
SC
Lastly, I have been looking for a small 110 welder to do sheet metal and other light jobs. The big Lincoln is amazing but a bit of a beast on small stuff. I stopped by the local farm store and they had a discontinued Hobart 130 on the shelf. It was missing the tip and ground clamp, so I went into bargain mode. Amazon sells them for over $500, and this one was on the shelf for $449. By the time I was done, I walked out the door with a new welder for $275!!! Score!.

Whaaaaaaaat? :love::love::love::love: Wow! You stole that thing. Those are such great little machines.

Enjoying this build!!
 

Randyzzz

Blown Budget
BENEFACTOR
Gold Member
Lifetime Member
SOA Member
City
Redmond
State
OR
Parts keep trickling in. BDS kit showed up today. Tweaked my back the other day so progress is a bit slow. Going to try and install the SYE this afternoon.
282F2B20-44D4-436D-A0FF-EF9BD250ED23.jpeg6FD41460-B598-4C2C-8C14-613C5CBA4DC6.jpeg
 
Top