• Notice for iPhone users: DO NOT use the image size reduction option when uploading photos to the forum. This causes portrait images to post as landscape. We have added a warning to the image insert pop-up as well.

Randyzzz Scrambler Restification Thread!

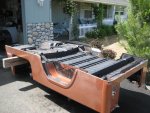
So today...waiting for more parts, being bummed I'm not at the Nationals.... I turned my attention to the tub. Filled 39 non-factory holes in the floor. Wow... someone must have gone crazy mounting stuff. I know I was responsible for some of them...but not 39! I also welded some nuts to the folding rear seat mount holes. So this weekend I'll clean the floor pan and prep for the undercoat.

P.S.---Look Ma- No Rust!:D

attachment.php


attachment.php


attachment.php


attachment.php
 
Just filled them all with weld?

The little ones! There were 8 1/2" ones I used patches. I'll end up using patches on the firewall too.

I use a backup copper plate on the small ones, just while I'm welding. Hold the gun at a steep angle, use short bursts, and build "blob" at the close edge, then keep it growing until it joins the other side. Having the gun at an angle doesn't heat the metal much, and the copper plate keeps air from contaminating the back side. Minimal grinding when you'e done, and no warping.
 
I can't wait until it's done. I can almost taste it! I got the underside of the tub cleaned, the bare spots primed/sealed, and it's ready for undercoat on Tuesday!

I can see the unfaded original color in the wheelwells- I really like it! It's really a vibrant copper color.

attachment.php


attachment.php


attachment.php
 

Attachments

  • IMG_0007.JPG
    IMG_0007.JPG
    78.1 KB · Views: 686
That looks great, I want to rework the body on mine someday and fix it right... so jealous.


BTW, that Grand Waggy is the hotness... love the white with the woodgrain and those rims are SWEET. It's got just the right lift/tire combo for my eye too. :bow:
 
That looks great, I want to rework the body on mine someday and fix it right... so jealous.


BTW, that Grand Waggy is the hotness... love the white with the woodgrain and those rims are SWEET. It's got just the right lift/tire combo for my eye too. :bow:

Thanks, Eric. The Waggy has a 3" lift with 31's, and a 350 HP fuel injected Small Block Chevy. I'm really close to getting it running. It's my wife's daily driver. :D
 
Factory GM fuel module install

Today I installed a factory GM fuel module into my Trailquest tank. The tank is fabricated steel, 1/8" thick, and about 24 gallons.

Here's all the parts....
2309745760041433204S500x500Q85.jpg


First, I cut a 4" hole in the center of the top of the tank using a hole saw. This step was a pain, and I would recommend using a 3 7/8" saw if I did it again, as the saw always cuts a bigger hole.
2580136260041433204S500x500Q85.jpg


Then, I cut out an inner plate and an outer plate, both with an exact 4" hole. I used 3/16" steel. The inner plate had to be cut in half to fit into the tank.
2538538030041433204S500x500Q85.jpg


2676597000041433204S500x500Q85.jpg


I used a 6.0 Turbo unison ring for my top retaining ring. Drilling 8 5/16" holes in the hardened 1/4" steel wasn't easy, but it made a great looking part.
2686946120041433204S500x500Q85.jpg


Using the unison ring as a template, I drilled 8 corresponding holes in the inner and outer plates, and in the tank. I chamfered the holes on the tank side of the inner plate so I could install viton O rings as a seal. I also used copper washers under the heads of the bolts.
2998190430041433204S500x500Q85.jpg


I used fuel tank epoxy between the tank and the outer plate. The nuts are metal locking nuts, and in addition to holding the whole shooting match together, they determine the amount the module seal compresses.
2544929030041433204S500x500Q85.jpg


Next step was to install the fuel module. It just drops in, followed by the upper retaining ring, and then nylock nuts. The nuts torque down until they stop, this compresses the seal properly.

2080984370041433204S500x500Q85.jpg


2438049210041433204S500x500Q85.jpg


2821593090041433204S500x500Q85.jpg
 
Then I hooked up the fuel lines.
2126979290041433204S500x500Q85.jpg


I used OEM style quick connects for the whole fuel system, along with nylon lines.
2665098260041433204S500x500Q85.jpg


The nylon lines run down the side of the frame to the fuel filter and the flex fuel sensor.
2803714460041433204S500x500Q85.jpg


They go into hard lines which follow the factory routing up to the engine.
2870677970041433204S500x500Q85.jpg


And into high pressure flexible lines, and into the fuel rail. Fittings are a combination of Russel, Earls, and Summit. The blue flex lines are good for 250 PSI, and 300* heat. Best part, no special tools, they just push on!
2916698250041433204S500x500Q85.jpg


I'm really pleased with how this whole assembly turned out. It should be easily servicable and extremely durable. Best of all it follows factory design and uses factory components for easy in field fixes, if necessary.

Tomorrow...undercoat, and trans lines if time permits.
 
Need your opinion...I'm thinking of using a boat deck access hatch above the fuel module. It's 9"X12", HD plastic with a waterproof O-Ring, and is strong enough to stand on. I was going to cut and hinge a section of the floor itself, but that will leave a notch that stuff will collect in, not to mention it's a real fabricating pain. This boat unit should just about disappear once it's covered in bedliner. Any opinions?
3b_1_bJPG-1.jpg
 
Looks great, much better than my booty fabbed junk!

I like the access hatch idea for sure. :thumbsup:
 
Looks great, much better than my booty fabbed junk!

I like the access hatch idea for sure. :thumbsup:

Your stuff isn't booty fab! And you are running...I'm still building...

I ordered the hatch. I would feel better knowing a repair is much easier. The only bummer is I have to do the undercoat today- work needs the gun back. I'll just touch up the edges after cutting the hole. Gulp...cutting a hole in a perfect floor...:eek:
 
Nothing exciting...got her undercoated. What a miserable job, especially with a light wind. I got it good and think in the wheel wells, about 6 coats there. It did dry up quick and it's not sticky...feels like rubberized bedliner. Here's the mandatory pictures...:D

2489075620041433204S500x500Q85.jpg


2505524770041433204S500x500Q85.jpg
 
Need your opinion...I'm thinking of using a boat deck access hatch above the fuel module. It's 9"X12", HD plastic with a waterproof O-Ring, and is strong enough to stand on. I was going to cut and hinge a section of the floor itself, but that will leave a notch that stuff will collect in, not to mention it's a real fabricating pain. This boat unit should just about disappear once it's covered in bedliner. Any opinions?

Wow, I couldn't cut that perfect tub like that...I'd rather go through the hassle of dropping the tank if necessary. If you ever want to fill the cutout in the tub, it would be a big pain getting it perfect because of the embossed strengthening ribs :eek:

Nice job on the fuel tank BTW! :thumbsup:
 
Yeah, cutting the bed floor is scaring me...especially since the floor is cherry. I'll see how the hatch looks when I get it. I can always use it for a side compartment lid for behind the wheelwell. I'm going to build in custom boxes.
 
As good of an idea as it it, I just can't bring myself to cut the floor for a hatch. Not only is it rust-free, but it has no dents, either. I'll have to figure out another way to make dropping the tank easier. Maybe weld short hooks to the ends of 2 of the mounting bolts so it can "hang" if needed. What I will do is replace the aftermarket fuel module with a Delco module, and carry that aftermarket one as a spare.

So...I ordered another matching hatch, I will be building in storage compartments behind the wheel wells, and I'll use them as the doors.
 
How about retrofitting a crank-down spare tire mechanism from a newer fullsize pickup or SUV? It would normally be bolted in place, but if it needed to be dropped for maintenance, remove the mount bolts, and crank it down...you'd have most of the fuel out of it anyway, so it could definitely handle the weight.
 
Not a bad idea...I wonder if there's room.

Maybe I just need to trust the pump...in typical fashion for me I'm over-thinking things-but after a few years working for GM, I learned the fuel pump never fails when it's convenient, and there's never any warning signs.
 
That's one sweet tub Randy!!! If you decide to cut a hole in the bed-Please, don't post pictures. Ha Ha. BTW, the rest of your build is looking great!!!!
 
Back
Top