• Notice for iPhone users: DO NOT use the image size reduction option when uploading photos to the forum. This causes portrait images to post as landscape. We have added a warning to the image insert pop-up as well.

Scout the Scrambler

jc_chandler

Well-known member
Member
City
Denver
State
CO
Small steps while I wait for the TDK frame to show up, had the wheels blasted and coated and the tires mounted and got them on the axles so I could wheel them around the garage (and under the frame when it's time to bolt the rolling chassis together). I kinda hate that the tire shop used the clip on balancing weights but they insisted they were needed on the "vintage" wheels. Is that accurate or just something I got b/c I cheaped out and went to Costco? The mount and balance was free (and the tires were on sale) so worst case I can take them somewhere else to re-do it with stick on (or beads??).
PXL_20210401_002924109.jpgPXL_20210401_002913952.jpgPXL_20210401_002930096.jpgPXL_20210401_002939441.MP.jpg
 

Belizeit

CJ-8 Member
Gold Member
City
River Ridge
State
La
That frame is going to be nice. I have the hammer on weights. The new wheels you pretty much have to use the peel an stick weights. Don't think you could use on vintage.
 

ag4ever

Average Nut
BENEFACTOR
Gold Member
Silver Member
Lifetime Member
SOA Member
City
Richmond
State
TX
I think hammer on weights are best. I have never thrown one, thrown the stick on ones though.
 

Randyzzz

Blown Budget
BENEFACTOR
Gold Member
Lifetime Member
SOA Member
City
Redmond
State
OR
The trick with stick on weights is first, make sure the inside of the wheel where the weights stick is spotless. Once the weights are installed, cover them with a piece of the aluminum tape used for HVAC systems. Most home improvement stores have it. If your wheels are aluminum the tape doesnā€™t show. If theyā€™re black, a little spray paint hides them perfectly. I have never lost a weight once I started using this process.
 

jc_chandler

Well-known member
Member
City
Denver
State
CO
The TDK frame finally showed up about a month late after UPS freight "misplaced" it. I'm not sure how you misplace a 12' 300lb Jeep frame. Anyway, this thing is BEEFY. I test fit a bunch of stuff and everything appears to line up dead on. I sprang for the galvanizing option because winter is a 7 month season here and they salt the roads like I salt my steaks, liberally.
PXL_20210409_201308335.jpg
I spent most of yesterday prepping it for paint and got it in Eastwood 2k epoxy primer. I used these strip discs on it first to knock down the galvanizing slag and take off all the shipping sticker residue. These things are amazing. I went through two on the frame.
1618148945297.png
I followed that up with degreaser, then a thorough scruff with a red scotch brite, then cleaned with Eastwood pre paint prep. I'm going to spray the Eastwood ceramic chassis black today, will post pics when that's done.

Question for the group though, the frame came with these front shock towers, which are also very well built, however there's nothing to prevent water and dirt from filling up the tubes. I'm thinking about drilling a drain hole where the tube meets the front face of the mounting flange. I also thought about capping the top with those plastic tubing caps you get can online, sealed with some rtv. Thoughts?
1618149662810.png
 

Belizeit

CJ-8 Member
Gold Member
City
River Ridge
State
La
Even the original brackets would fill with mud and water and create rust. I removed mine years ago and cleaned up and filled the gap with silicone and years later removed and no problems.
 

timo439

Scrambler Junkie
BENEFACTOR
Gold Member
Lifetime Member
City
Portsmouth
State
NH
I came across the same situation once I pulled the motor. I am hesitant to take them off as I don't anticipate anything good being under there... I am taking the head in sand approach and will probably regret it.
 

jc_chandler

Well-known member
Member
City
Denver
State
CO
Rolling chassis! (Minus the one replacement shock that's on its way)

This is by far the biggest project I've ever taken on (2nd place was replacing the heater core in my old XJ), so thanks to the community for the wealth of info across all the forums.

PXL_20210423_234342726.jpg
 

jc_chandler

Well-known member
Member
City
Denver
State
CO
Got the body onto the chassis without much hassle, everything lined up essentially where it was prior to the teardown. It's being towed over to a local restoration shop today who will do the last bits of metal work that I don't have the skills for, then final body work and paint. While it's there I'll start on the interior bits (seats, heater box, pedal assembly, etc.).
 

Attachments

  • 1620998189680.png
    1620998189680.png
    1.2 MB · Views: 17

STSFCTN

Active member
Silver Member
City
Centennial
State
CO
Got the body onto the chassis without much hassle, everything lined up essentially where it was prior to the teardown. It's being towed over to a local restoration shop today who will do the last bits of metal work that I don't have the skills for, then final body work and paint. While it's there I'll start on the interior bits (seats, heater box, pedal assembly, etc.).
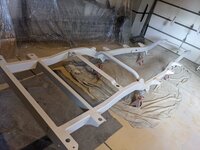
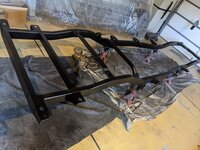
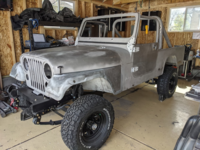
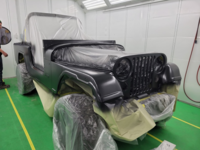
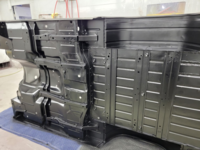
Awesome, you are passing me up in your build now.
 

Chamba

Not obsessed: focused.
Member
City
Vero Beach
State
FL
Got the body onto the chassis without much hassle, everything lined up essentially where it was prior to the teardown. It's being towed over to a local restoration shop today who will do the last bits of metal work that I don't have the skills for, then final body work and paint. While it's there I'll start on the interior bits (seats, heater box, pedal assembly, etc.).
Great that it's a factory 4 cylinder so you don't have to fart around with YJ pedals for the hydraulic clutch like I did. One less project for you!
 
Last edited:

jc_chandler

Well-known member
Member
City
Denver
State
CO
The shop has made a lot of progress over the past couple of months. They are in the filler primer stage so fingers crossed she's in paint soon! In anticipation of getting her back and starting assembly, Brown Santa has started dropping off a few things (mainly Painless harness, retro stereo+speakers, LED headlights/taillights, Speedhut gauges)
 

Attachments

  • 1630001552135.png
    1630001552135.png
    862.9 KB · Views: 29
  • 1630001648780.png
    1630001648780.png
    896.4 KB · Views: 29
  • 1630002096706.png
    1630002096706.png
    1.2 MB · Views: 29

Chamba

Not obsessed: focused.
Member
City
Vero Beach
State
FL
This thing is looking fantastic. I may have missed it. Did you decide on an engine yet? PLEASE tell me you're not converting her to a slush box. šŸ˜

That TDK frame is pure fantastic.
 

jc_chandler

Well-known member
Member
City
Denver
State
CO
Ha nope, have a T176 waiting to go in. I haven't fully decided on a motor yet. I've been following the electrification thread on here and I'm very interested in going that route, but the time and expense might derail that idea. My other option is to go with an LS based motor, been doing a lot of reading in the forums and over at Novak about the options there too.
 

jpnmaine

Well-known member
Member
City
East Wilton
State
ME
Have a 4.0 to go into the scrambler...but my neighbor is trying to sell me his 4.3 vortex with all the fixings. I know nothing about chev/gmc engines. Have a v6 in an 04 Sierra plow truck. Gutless but does plow and pull the pontoon boat every year.
 
Top