• Notice for iPhone users: DO NOT use the image size reduction option when uploading photos to the forum. This causes portrait images to post as landscape. We have added a warning to the image insert pop-up as well.

Another Scrambler Purchase/Road Trip - UPDATE- BODY ON FRAME AGAIN

Some more T5 information/rebuild updates from the past few nights.

Quick picture of the 5th gear parts/shifter assembly that are concealed behind the rear adapter housing.

00332-1.jpg


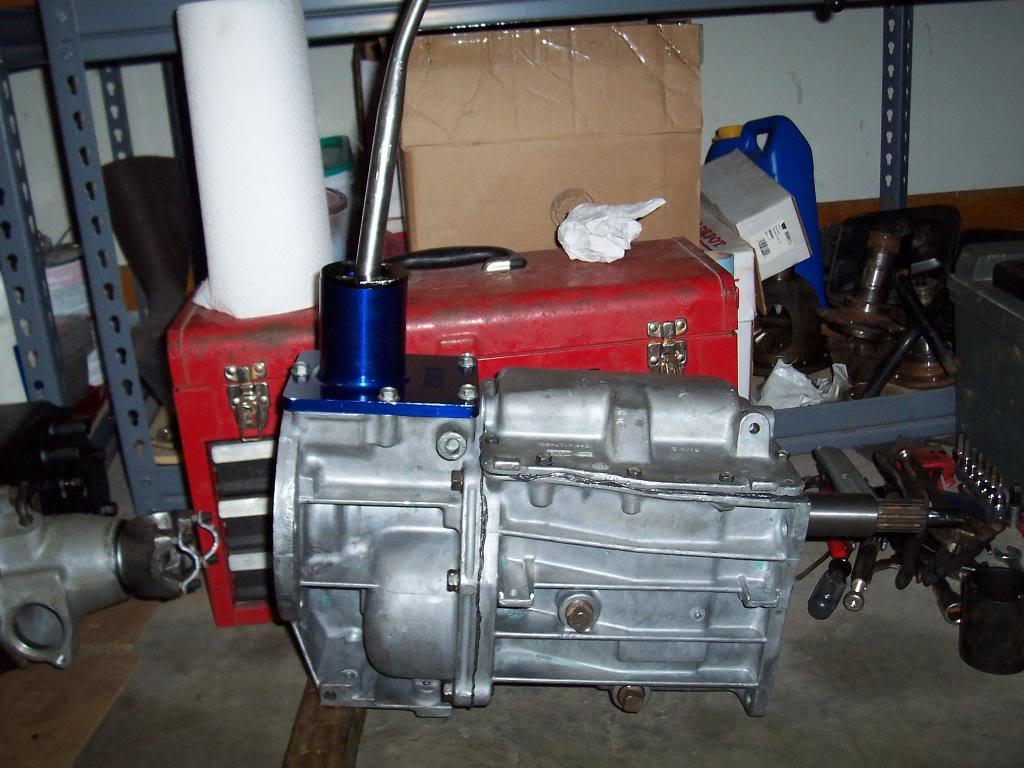
And the two T5's reassembled, but not yet sealed up, and minus the shifter assemblies.

00432-1.jpg


Standing the T5 up vertically to measure main shaft end play. This is my "spare" T5. It had 42 thousandths end play, added 3 thousandths for bearing preload, total shim stack behind front bearing race equalled 45 thousandths.

00531-1.jpg


00625-1.jpg


00724-1.jpg


The two top threaded holes on the front of the spare T5 transmission case had weak threads. When I torqued down the front bearing retainer, the threads pulled out. These are 8mm threads, but I used 5/16 Helicoils to repair these holes.

00821-1.jpg


And the shift cover installed. I installed this initially before realizing someone took the shift fork/rod assembly apart and put it back together wrong. I did not realize this until I went to install the adapter housing. Had to pull it back apart, take the shift fork assembly apart, and reassemble correctly.

00920-1.jpg


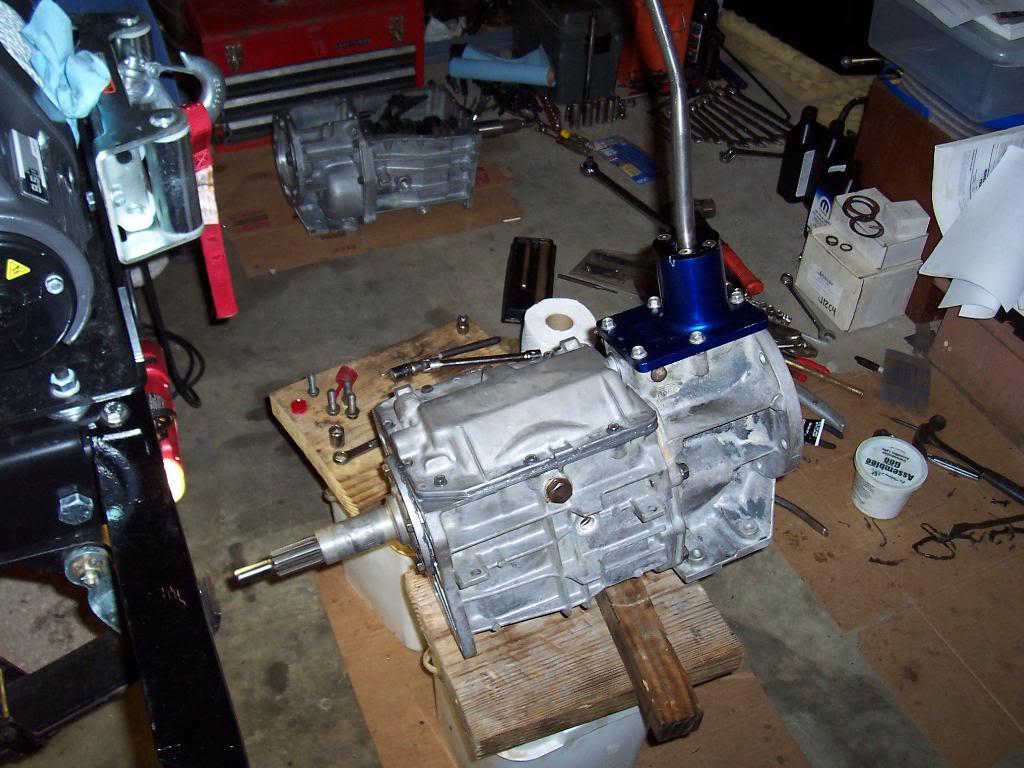
Once the top cover issues were resolved, I dry fitted the remainder of the transmission, i.e. the rear adapter housing and shifter parts. I shifter through all the gears, and it works.

01018-1.jpg


One thing I will say about the T5's compared to the T176's, they are very "fiddly" to reassemble. I have spent a good bit of time dry fitting up parts/assemblies and making sure they work before sealing them up. There are lots of little tricks/techniques to putting these back together that you need to figure out as you reassemble. The good thing for me, I figured out all these tricks on the first T5 rebuild, so the final assembly on the second T5 should go quicker.

That's it for now.
 
Last edited:
Updated "To Do List"

Quick list of some changes I want to make before heading to Moab:

1) Finish 4:1 Dana 300 rebuild - Complete, ready to install
2) Rebuild T5 transmission(s) - One is assembled 100%, the other is 95% complete
3) Take 1" body lift off, rework clutch linkage - will wait till after tire switch, might need the 1" of extra clearance
4) Switch 35" BFG's for 33" BFG's
5) Install Tuffy Stereo Console - sitting in garage
6) Install larger gas tank - Gas tank has been soaking in Purple Power, Gen-Right Skid Plate and NOS sending unit are on the garage floor
7) Rocker Protection - sitting in the bed of the green Scrambler

Looks like I will have a busy weekend and next week ahead:thumbsup:
 
when do you head to Moab and what are your plans? Let me know if you want some suggestions
 
when do you head to Moab and what are your plans? Let me know if you want some suggestions

It will be the end of April when I had to Moab. Some of the local Jeep Club people from down here (south Mississippi) are heading up that way. One of our old member's lives in Utah now, so we are going to hook up with him and his Utah Jeep club people:thumbsup:

I think they have an itinerary planned out, I will have to post up what trails we have planned. Feel free to offer suggestions:thumbsup: I think we plan on trail riding for around 5 days.
 
Update from this weekend.

100% finished with assembling the second T5, the one I am going to install. Shifter is just loosely bolted on to make sure it shifts into all gears. It will be removed to aid installation into the jeep.

00137-1.jpg


Woke up early Saturday to go pick up the transmission jack. Well, my green Scrambler has had an exhaust leak for awhile, and since it was nice outside, I decided that I would fix the leak. Started to work on it at 9 am. Spent two hours trying to remove the exhaust manifold to collector bolts. And this is what happened:

00239-1.jpg


Both studs snapped off inside the manifold. Well, no since crying over it. Took about two hours to pull the manifolds off. My green Scrambler is an 83 model, with the factory computer controlled carb, 10 miles of vacuum hose and wires, etc. Took two hours to get it to this point (remove carb, hoses and wires, power steering pump, etc):

00333-1.jpg


Had to spend two hours running to various store to gather up new gaskets (intake and exhaust), various drill bits, and studs. I was able to drill the broken bolts out. I was able to re-tap one hole and install a stud. The other hole I had to slightly overbore, so I dropped a bolt through it.

00433-1.jpg


And after about 3 hours to reinstall, that stupid metal line that runs from the exhaust manifold to the bottom of the intake is a PIA.

00532-1.jpg


The good thing is, after all the work, my green Scrambler is once again quiet. It sounded like some sort of "tuner" car before. So all the work was definitely worth it. The bad thing, what started out as a simple project ended up taking all day Saturday.


So, woke up early Sunday and picked up the transmission jack. I love this thing. It is big and heavy, but it makes removing/installing transmission/transfer case assemblies so easy.

01610-1.jpg


The Dana 300/T5 combo mated together, ready to install.

0178-1.jpg


A few pictures of the old transmission/transfer case assembly, T176/Dana300 combo.

While still installed.

01510-1.jpg


On the ground.

0187-1.jpg
 
Last edited:
I then bolted in the T5. Went in very easy. The bolts that hold the T5 to the bell housing are a PIA, not much room around the bolt heads and the transmission case.

0207-1.jpg


0217-1.jpg


0225-1.jpg


All in all, this was a very simple swap. I just had to look over to my green Scrambler to see how the skid plate bolted to the frame (T5 uses three rear holes, T176 uses front three holes) and to see how the transmission mount bolts to the transmission and skid plate. Very simple swap, everything bolted right up. I did have to order two new drive shafts, though, due to the T5 being longer then the T176.


A few pictures of some of the "goodies" I bought.

A few pictures of the "Gen-Right" gas tank skid plate. This is a heavy duty skid plate for the factory plastic 20 gallon tank. It is very heavy, looks pretty strong. It is way thicker then the thin factory skid plate. Since the 20 gallon tanks hang down lower then the 15 gallon tanks, this is a worthwhile upgrade. Especially with my driving, I always manage to smack the gas tank skids. NOTE layer of ash from Forest Service controlled burn. We have our first nice weekend of the year, and the forest service decides to burn all the woods down. It was literally snowing ash at my house.

00626-1.jpg


00822-1.jpg


Picture of some miscellaneous parts: T5 floor plate, fuel hose and clamps, sending units, vent valves, shifter boots, etc. I bought the Crown sending unit, but I plan on using a NOS sending unit. I bought Jeep YJ 15 gallon tank fill and vent hose, I will let y'all know if they work. As everyone knows, CJ7 20 gallon fill and vent hoses wont work on a Scrambler.

00921-1.jpg
 
Last edited:
And some pictures of the rock rails I bought. Note green Scrambler in the background, it is very jealous of all the work being done to the red Scrambler. I think this is why it broke its exhaust manifold bolts;)

01019-1.jpg


01116-1.jpg


01216-1.jpg


01315-1.jpg


I bought these rails from "Rocky Road Outfitters":

http://www.rocky-road.com/jeep-rock-sliders.html

Picture of the rails installed on a Scrambler:

http://www.rocky-road.com/media/cj_supderslider3.JPG


OK, first things first. I read a bunch of bad reviews about Rocky Road Outfitters on various Jeep forums on the Internet, mainly about customer service and speed of shipping. This had me nervous. I can say, however, that my experience with them was great. I ordered the rails on a Monday. I called them the following Monday for an update. They told me the rails had just been made and were being powder coated. I received an email from them several days later with a tracking number. The rails showed up 3 days after being shipped, from Utah to Mississippi. They took great care in packaging the items, too. I did not feel the lead time on these rails was long, they are a custom built piece pretty much made to order. If you are in a hurry, call them first, to see how long it will take to get the rails. The person I spoke to on the telephone was professional sounding. He didn't kiss my a$$ or anything, just told me the facts. All in all, I am happy with them. Speech over.

Now, for the important thing, do I like them? Yes. They are very well built, very heavy, and I like how they look.

Now, some people don't like this style of rail. These rails bolt to the frame, similar to a nerf bar. Some people like the big angle steel that bolts to the body. I had Sun Performance (no longer in business) rock guards on my CJ-7 and loved them. Those guards bolted to the body. They were strong, but you do bolt them to the body by drilling holes in the side and floor of your tub. I guess, theoretically, the rock rails I purchased could bend upward into the body if you hit them really hard, but you would have to rip them out the side of the frame to do that. They don't protrude past the body, so there is not much leverage working against the mounting arms. The only thing I don't like, besides the square rail at the end of the guard, there is no other "skid" along the bottom. I might bolt on some plate steel to the bottom of each rail to act as a smooth skid.

I will update more info on the rails when I get time to install them.

That's it for now.
 
Last edited:
Looking good!:thumbsup:

Appreciate it:cheers:

Time for you to "step it up a notch" on your Laredo rebuild:thumbsup:


Updated "To Do List"

Quick list of some changes I want to make before heading to Moab:

1) Finish 4:1 Dana 300 rebuild - INSTALLED
2) Rebuild T5 transmission(s) - One is INSTALLED, the spare is on the shelf
3) Take 1" body lift off, rework clutch linkage - will wait till after tire switch, might need the 1" of extra clearance
4) Switch 35" BFG's for 33" BFG's
5) Install Tuffy Stereo Console - sitting in garage
6) Install larger gas tank - Gas tank has been soaking in Purple Power, Gen-Right Skid Plate and NOS sending unit are on the garage floor
7) Rocker Protection - sitting on the floor under my green Scrambler

Looks like I still have a busy week and next weekend ahead:thumbsup:
 
I like it, nice job.

Appreciate it:cheers:

Hopefully this round of "major" upgrades will be the last big ones for awhile:shrug::fingerscrossed:

I have been spending too much time wrenching lately, not enough time jeeping. But, I would rather due all this work in our "winter", gives me all Spring, Summer, and Fall to drive it:thumbsup:
 
Nice rock rails! I had never heard of that company before! I think mine will be very similar but I will be building them myself. Can't wait to see them on!
 
Nice rock rails! I had never heard of that company before! I think mine will be very similar but I will be building them myself. Can't wait to see them on!

Appreciate it:cheers: Hopefully I can install them in the next week or two. I need to finish up my transmission swap, and gas tank swap(s) first:thumbsup:
 
I didn't notice the rock rail pics. Where will the rear mount fall relative to the rear spring hanger?

Not to be dramatic, but the thing I've seen first hand with this style is a crack propagating between the edge of the rear spring hanger and the holes that were drilled to mount the rail, and the spring hanger punched it's way right up inside the frame. The setup on that Scrambler basically perforated the frame rail on both sides in two nice vertical lines that allowed it to happen. It looks like yours don't have the mounting holes above one another, but if I were you, I'd seriously consider fishplating the sides of the frame before you drill holes for these.

Maybe if they mount a long way from the spring hangers I wouldn't worry, but after seeing it live in person, I'm way leery of ever drilling on my frame now without doing reinforcement first.

Like I said, not to be dramatic and I'm sure most people would use them and never have an issue, but it was a pretty clean Scrambler that this happened on, not some rusty mess. I may have posted pics on here somewhere, it was a number of years back in NC. The guy was an occasional poster on here, this incident had him debating about selling, not sure what he ended up doing.
 
Back
Top