• Notice for iPhone users: DO NOT use the image size reduction option when uploading photos to the forum. This causes portrait images to post as landscape. We have added a warning to the image insert pop-up as well.

Another Scrambler Purchase/Road Trip - UPDATE- BODY ON FRAME AGAIN

Yeah I rarely use the 1st in my T-18. Even off-road. It is great having it cuz its there when you need it. Sucks that it doesnt have an overdrive.

I am going to be buying a NV4500 to swap into my Scram in January. going to swap out the T-18.... and the I6... ;)
 
Yeah I rarely use the 1st in my T-18. Even off-road. It is great having it cuz its there when you need it. Sucks that it doesnt have an overdrive.

I am going to be buying a NV4500 to swap into my Scram in January. going to swap out the T-18.... and the I6... ;)

Sounds like you have a good swap in the planning stages;):thumbsup:
 
Yep, I had a granny low T18 in my previous trail CJ7, loved it for offroad:thumbsup: You could easily shift from the "crawler" granny gear to the "I need some wheel speed/momentum" second and third gear. I disliked the granny 4 speed on the highway, only 3 widely spaced gears and shifted like a dump truck, but was pretty much bomb proof.


:rotfl::rotfl::rotfl:
 
Today I read every post and page on this project. It took all day. I've got to say it is one of the best written and photographed pieces I've ever had the pleasure to read. You are an inspiration to all of us who need a little push of courage. I am curious as to the total cost in parts probably north of 15M. I also am contemplating the LoMax 4.1 for my hunting rig Scrambler. I am installing 4:88 front and back with Detroit lockers first. If it isn't slow enough following my bird dogs, I'll do the transfer case upgrade. Thanks again for your sharing.
 
Today I read every post and page on this project. It took all day. I've got to say it is one of the best written and photographed pieces I've ever had the pleasure to read. You are an inspiration to all of us who need a little push of courage. I am curious as to the total cost in parts probably north of 15M. I also am contemplating the LoMax 4.1 for my hunting rig Scrambler. I am installing 4:88 front and back with Detroit lockers first. If it isn't slow enough following my bird dogs, I'll do the transfer case upgrade. Thanks again for your sharing.

Appreciate the compliments, always glad to hear all this stuff I posted is helpful:cheers::cheers:

As for the cost, I still have not added up all the receipts, they are still piled up in the garage:D

I will try to do a 4:1 update this week:fingerscrossed:
 
Another 4:1 transfer case install update.

Did a little more work on the transfer case over the Christmas holidays.

I put back together the front input shaft. These are all stock parts, except for the gear, and a new bearing and seal. Picture of the parts.

0382-1.jpg


Installed the seal in the housing, drove the bearing on the shaft with a brass drift and a hammer, a press is not necessary for this part.

0402-1.jpg


A small problem with the rebuild kit furnished bearing retainer snap ring, it will not fit, it is too big. I ran into this issue with my previous Dana 300 rebuild. Make sure you keep all your old parts. Original ring is at the top, replacement is at the bottom of the picture.

0422-1.jpg


Placed the input shaft/bearing assembly in the input shaft housing, installed above mentioned snap ring. I used a brass drift and a hammer to put this assembly together.

0432-1.jpg


I then installed the snap ring on the back side after sliding the gear on to the shaft. Check your clearance between the face of the snap ring and the face of the gear. There should be almost no space, 0 to .003 gap. If the gap is larger, install a shim behind the gear. This completes the input shaft assembly.

0442-1.jpg


I then placed the shift collar onto the previously installed rear output shaft. Don't forget this part.

00430-1.jpg


I then applied anaerobic sealant to the input housing.

00527-1.jpg


And bolted up the input housing to the case.

00621-1.jpg


I then placed the factory shims on the rear output shaft. Chances are, if all you are replacing are the bearings, the factory shims will give you the correct end play. If you are installing different shafts, you might have to change this shim stack, due to manufacturing tolerances.

00720-1.jpg


I installed the two races in the rear output shaft housing, bolted the housing to the case, slid in the rear bearing, and then installed the yoke. I torqued the old nut to 100 foot pounds, and checked end play. I think I had .002, a little tighter then the .003-.005 desired end play, but with new bearings, this little bit too tight is fine.

00916-1.jpg
 
Last edited:
Next, I bolted the original shim stack and front output shaft rear bearing retainer plate to the case.

01014-1.jpg


I then placed the two shift forks on there corresponding shift collars. Note direction and placement.

01112-1.jpg


Next, picture of the springs and poppet balls that came out of the transfer case and the LoMax springs. The LowMax springs are stiffer then stock and help prevent the gears from sliding out of engagement, a common problem with 4:1 transfer case gears. These spring are much stiffer then the stock springs. Also note the smaller ball pictured with the new springs. I had to call JB conversions about that. OK, if you look close, the factory springs are two different lengths. They are made this way because the two recesses machined into the front bearing retainer are two different depths. Short spring goes in the shallow hole, long spring goes into the deeper hole when using the factory springs. The small ball that comes with the replacement springs is placed into the deeper recess, making both springs stick out the same height. The instructions don't mention this, that's why i called.

0462-1.jpg


Installed the two shift rail seals into the front bearing retainer.

00133-1.jpg


Picture of the old shift rail that you reuse. The other original rail is NOT reused, a replacement shift rail included with the LowMax gears is used in its place.

00234-1.jpg


And then installed shift rails. I followed the JB Conversion instructions and the install was simple, except for how stiff the new springs are!!! It is real fun trying to depress the poppet balls, that go on top of the springs, so that you can slide the rails in. On my previous Dana 300 rebuild, I installed the front bearing retainer plate on to the case first, then I installed the shift rails. I found it much easier to install the rails into the front bearing retainer first, and then bolt the assembled front bearing retainer plate to the case. Follow the JB Conversion instructions and the shift rail install will be a breeze.

00329-1.jpg


Next, I slid the shift rails through the case and into their shift forks. Bolted the retainer plate to the case and checked end play. I had to add 1 thin shim to reduce the end play slightly.

01212-1.jpg


I did not seal the front bearing retainer plate or the rear output shaft housing to the case yet. I wanted to make sure that I could install the idler gear first (remember, you have to grind the case slightly). My gear fit, but it was tight. I had to rotate the gears to get the idler to drop. Don't forget the thrust washers that go on each end of the idler gear. Picture of the installed idler gear/assembled transfer case.

01311-1.jpg


That pretty much finishes up the 4:1 gear install/Dana 300 rebuild. I still need to seal the above mentioned housings to the case, install the front and rear output shaft outer oil seals, and install two new yoke retaining nuts. So, I get to take it apart and put it back together. Kind of a pain, but I wanted to make sure the idler gear would drop in before sealing all this stuff up. I do not look forward to getting the idler gear back out, it was a tight fit.

That's it for now.
 
Last edited:
Finally an "UPDATE"[:D], but no pictures[:(]

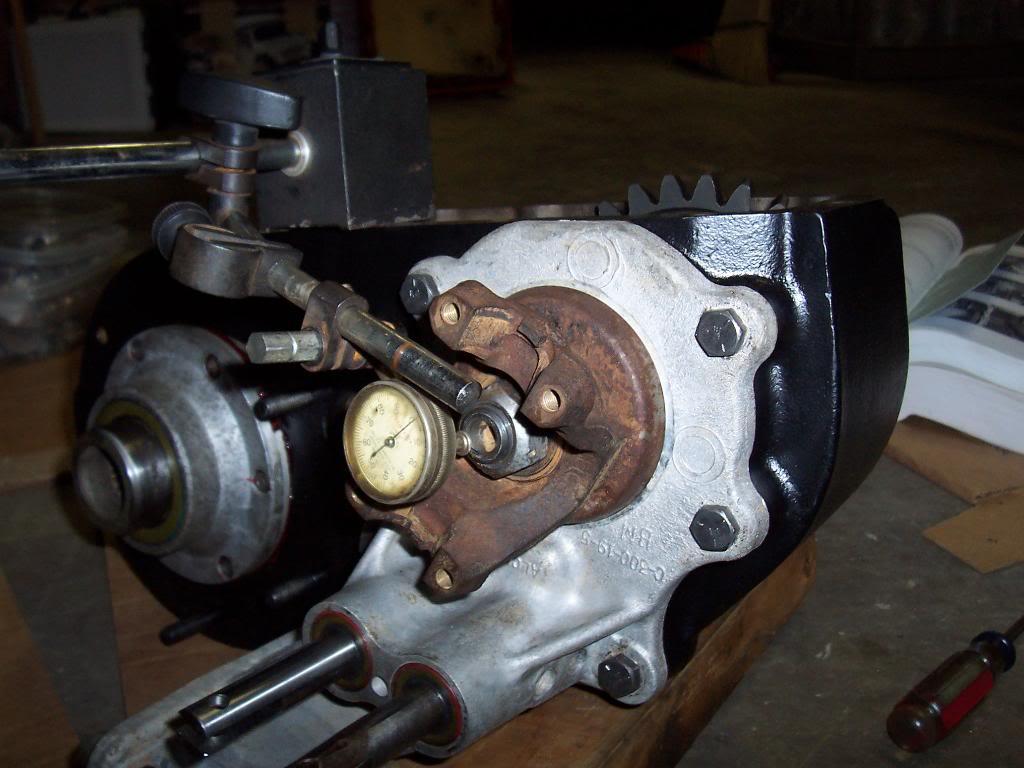
About finished up the Dana 300 rebuild. Basically, I took it back apart and sealed the aluminum housings to the cast iron case (anaerobic sealant), sealed the front output shaft rear thrust plates and shims to the case (aircraft sealant), installed new output shaft seals, and installed new yokes. I just need to install the inspection plate and a few other small parts and it will be ready to be installed. But, I am not going to install it until I swap transmissions.

Quick list of some changes I want to make before heading to Moab:

1) Finish 4:1 Dana 300 rebuild - 95% Complete
2) Rebuild T5 transmission(s) - picking up transmissions tomorrow, ordered rebuild kits
3) Take 1" body lift off, rework clutch linkage
4) Switch 35" BFG's for 33" BFG's
5) Install Tuffy Stereo Console - sitting in garage
6) Install larger gas tank - shopping for tank now
7) Rocker Protection - ordered today, 1/11/12

My red Scrambler works well how it is set up now, but these changes will improve its performance. These changes were decided on after I operated the vehicle for about a year. Quick explanation for each of the changes are as follows:

1) My Rubicon spoiled me, the 4:1 reduction enables excellent low speed vehicle control

2) 4:10 gears, 35" tires, and no Overdrive equals 16 MPG on the highway at 75 MPH with the motor spinning close to 3000 RPM. The switch to 33" tires will make the situation that much worse.

3) A switch to 33" tire will not require the body lift. Clutch linkage was the only modification required when I installed the body lift, it will be simple to rework this modification.

4) The 35" tires hit the rear sheet metal under compression, the vehicle feels a little too "tipsy" while off road. While I am confident that my upgraded stock power train can live with 35" tires, the down grade to 33" tires will also lessen the "load" on the vehicle.

5) I don't feel like cutting the dash and I need some tunes!!!

6) Factory 12 gallon tank does not give much highway range.

7) I have been needing to do this. I have almost smacked the rockers already,dropping to 33" tires will make it that much easier to smash them. It's not a matter of "If", it is a matter of "When". Any Jeep that goes off road, and especially the longer wheel base models like Scramblers, need rocker protection.

This is a short list of upgrades, compared to the whole rebuild, so i should hopefully knock these changes out fairly quickly.

That's it for now.
 
Nice!

Very well thought out as usual. ;)

Which rocker guards did you decide on?

:wave:
 
You've done great work on this, but I suggest leaving the body lift for now. Until you flex it with the 33's, you just don't know if you'll want it. My axles are wider, but I have the same RE lift, 1" body lift and 33's...I need that 1".

That factory tank should be at least 15 gal. I replaced mine with one from 4 Whel Drive Hardware years ago, I think it's 22 gallons. It may have been made by Trailquest?

You are probably right on the body lift, I will leave it for now:thumbsup:

Actually, I should have listened to some advice you gave someone else a while back regarding 35's with the RE 4.5" lift + 1" BL. While the 35's fit, and will work on the road and during light off road use, once you start flexing, the rear tires hit the body behind the rear wheel wells. I could space the bump stops way down in the rear, but that kind of defeats the purpose of the added flex. The front clears perfectly. I think I will be happier with 33's:cheers:

My tank is a "replacement" 15 gallon steel tank. It will only hold 12 gallons:eek: I will probably end up using a factory 20 gallon tank:shrug:
 
My rear tires also hit the rear of the body...4.5 RE with 5/8" body lift. I'm thinking of getting the MORE axle relocation kit that moves the axle 1" forward, might solve that problem.

http://www.mountainoffroad.com/_e/O...25/Off_Set_Plate_2_1_2_Wide_Springs_OP_25.htm

_1261143788.jpg

Moving the rear axle forward 1" will definitely help some, but I don't think it will be enough:shrug: When I flex out the suspension on a RTI ramp, the tires don't hit at all. But, in real world wheeling, they are starting to hit pretty bad. At first, the tires were just barely scrubbing the rear fender flares. Now, I have actually started to "flare out" the sheet metal from the rear tire contact. I have not been carrying too much weight in the rear, maybe 100 pounds MAX, so I think this situation will get progressively worse as rear cargo is added. These rear springs just flex too much, which is a good thing:D

Unfortunateyl, the only way that I can see to keep the 35" tires and the suspension articulation is to cut sheet metal, which I am not prepared to do yet:(


EDIT - Here are som pictures from the 2011 "National Topless Day" ride. Springs were still fairly new. It flexed out all the way on an RTI ramp with no rubbing at all.

20110514173833-1.jpg


201105141737091-1.jpg


20110514173724-1.jpg


20110514173733-1.jpg
 
Last edited:
I have unfortunately flexed mine out already to the point where the whole lip behind the tire us folded under...time to cut and weld some...
 
I have unfortunately flexed mine out already to the point where the whole lip behind the tire us folded under...time to cut and weld some...

Mine hasn't got that bad yet, but I have managed to tear the seam sealer a little inside the rear bed, where the floor attaches to the side:( I will post some pictures, damage is not terrible, and will be easy to fix, but I can definitely see how it will get worse if I don't downgrade to 33's, lower bump stops, or cut sheet metal.
 
Back
Top