

You are using an out of date browser. It may not display this or other websites correctly.
You should upgrade or use an alternative browser.
You should upgrade or use an alternative browser.
Another Scrambler Purchase/Road Trip - UPDATE- BODY ON FRAME AGAIN
- Thread starter spankrjs
- Start date


- City
- Biloxi
- State
- MS
I have a good running 258 out of an 84 that I can bring to nationals! Parking lot swapyou supply the adult beverage

If I knew it could make it up there, I know we could swap it out quick and easy, probably just a six pack


It would be pretty easy, I would just need to get another pilot bushing/bearing, and we would only need to pull off the Mopar MPI harmonic balancer and swap it over. I actually was thinking about it
If it was just 5-6 hours away, I would risk it. Unfortunately, South Dakota is a pretty good haul from South Mississippi
With time running out, I am just going to have to "abandon" the red Scrambler for now and get my Tan Scrambler ready to go, shouldn't take much

See you soon


- City
- God's Country
- State
- AR
Too bad I can't get a new 258 long block for $1,700, like I did with the GM 350 in the tan Scrambler
Any suggestions for further diagnostic testing, thoughts or opinions, will be appreciated

http://www.citymotorsupply.com/
This place had longblocks for about $1K not too long ago. Don't see pricing on the website anymore, but you might check with them.
- City
- Biloxi
- State
- MS
http://www.citymotorsupply.com/
This place had longblocks for about $1K not too long ago. Don't see pricing on the website anymore, but you might check with them.
They look like rebuilds, the long block I got for my Tan Scrambler was a brand new 350, straight from GM, I don't think I will find a "new" 258,but you never know
I will most probably just end up with some type of mail order rebuilt long block, probably the fastest/easiest/least expensive way to go


The NAPA near me sells ATK, but I have heard some bad things, but then again, you really only hear the horror stories on the internet, not the successes

- City
- Cobourg, Ontario, Cana
- State
- da
With time running out, I am just going to have to "abandon" the red Scrambler for now and get my Tan Scrambler ready to go, shouldn't take much
See you soon
leave the keys and title in it, I'm on my way to pick that pile up.
- City
- Biloxi
- State
- MS
Well, I have been ignoring this one for too long
Finally getting off my butt, should be swapping in another engine soon.
Most probably going to be installing a freshly rebuilt 4.0, swapping on all my MPI stuff. This will require new exhaust, but all of my current clutch stuff and front engine accessories will bolt on.
Waiting on the dyno sheet on it, to compare to what a stock 4.2 puts out. My only concern about the 4.0 vs the 4.2, the 4.0 has slightly less low end torque compared to a 4.2. But, I don't think it is a huge difference, and besides, I have 4:1 gears in the Dana 300
The 4.0's better higher end power should be welcome on the highway.
Not looking for a stroker, main concerns are MPG and reliabiilty, and cost If I was looking for a bunch more power, I know how to swap in a V8.
I feel the rest of my drive train is built well to handle a six cylinder. Would probably be fine for a V8, but I like my margin of safety
I should be starting this swap soon, around Christmas. I also plan on getting my current 4.2 rebuilt, if possible, and swapping it into my green Scrambler next year some time.
So, should be on the road again soon, I do miss driving this one.
Will post up some pictures/information once I start. My 4.0 swap should be fairly easy, but I will document any/all problems and issues
Finally getting off my butt, should be swapping in another engine soon.
Most probably going to be installing a freshly rebuilt 4.0, swapping on all my MPI stuff. This will require new exhaust, but all of my current clutch stuff and front engine accessories will bolt on.
Waiting on the dyno sheet on it, to compare to what a stock 4.2 puts out. My only concern about the 4.0 vs the 4.2, the 4.0 has slightly less low end torque compared to a 4.2. But, I don't think it is a huge difference, and besides, I have 4:1 gears in the Dana 300
The 4.0's better higher end power should be welcome on the highway.
Not looking for a stroker, main concerns are MPG and reliabiilty, and cost
If I was looking for a bunch more power, I know how to swap in a V8.I feel the rest of my drive train is built well to handle a six cylinder. Would probably be fine for a V8, but I like my margin of safety
I should be starting this swap soon, around Christmas. I also plan on getting my current 4.2 rebuilt, if possible, and swapping it into my green Scrambler next year some time.
So, should be on the road again soon, I do miss driving this one.
Will post up some pictures/information once I start. My 4.0 swap should be fairly easy, but I will document any/all problems and issues

FLCJ8
Legacy Registered User
- City
- Palm Bay
- State
- FL
Will post up some pictures/information once I start. My 4.0 swap should be fairly easy, but I will document any/all problems and issues
Great to hear.
If it is anything like your other build threads it should end up being the premiere 4.0 swap document on the internet.
- City
- Biloxi
- State
- MS
Great to hear.
If it is anything like your other build threads it should end up being the premiere 4.0 swap document on the internet.
Appreciate it
But, since I already have the Mopar MPI installed, the hardest part of the swap, i.e. the wiring, is already complete
I will be reusing my 4.2 flywheel/clutch/clutch linkage/current modified T-176 to AX15 bell housing, all this will bolt up to the 4.0.
I plan on swapping all my current 4.2 front accessories onto the 4.0, i.e. PS pump, alternator and associated brackets, BUT I am going to use a higher flow water pump. IIRC, I will have to space out my crank pulley to align with the other pulleys, we will see
I am "hoping" this will be all straight forward, but it never is LOL
I plan on pulling the current 4.2 out and taking it with me to get rebuilt when I pick up the 4.0, hopefully before Christmas
The 4.0 I am picking up has a header on it, and the exhaust manifolds on a 4.2/4.0 are different, so I know I will have to get new exhaust plumbed in.
- City
- Biloxi
- State
- MS
Went wheeling Saturday, got up early on Sunday and did this:
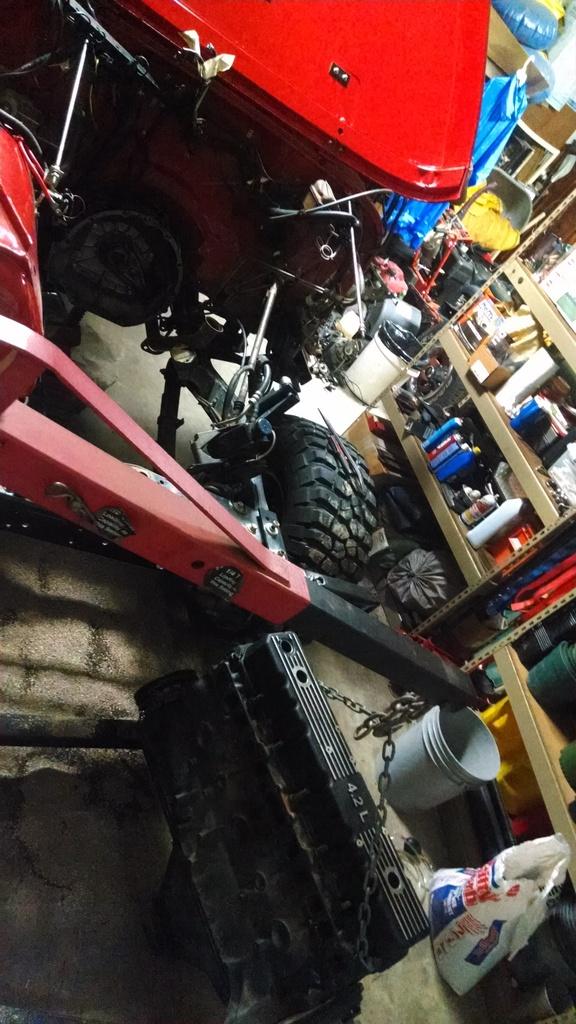
It was raining/cold/windy on Sunday, it was very nice to be working in the garage, can't remember the last time I worked in here, been in the yard more then the garage About 7 hours total. Since the big "rebuild" pretty much replaced/cleaned/repainted everything, plus all new bolts, pretty simple extraction. I pulled the grill to make lifting the engine out easier, pulled the driver side fender to make it much easier to remove/re-install the intake and exhaust manifolds.
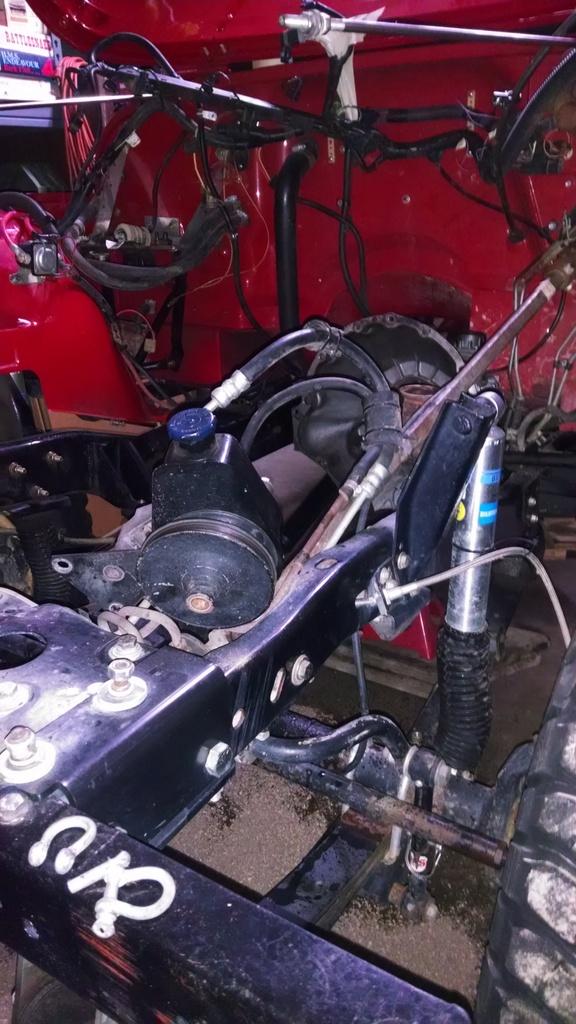
I left the PS hooked up, and all of the under hood wiring is still hooked up, just taped/draped/shoved out of the way:
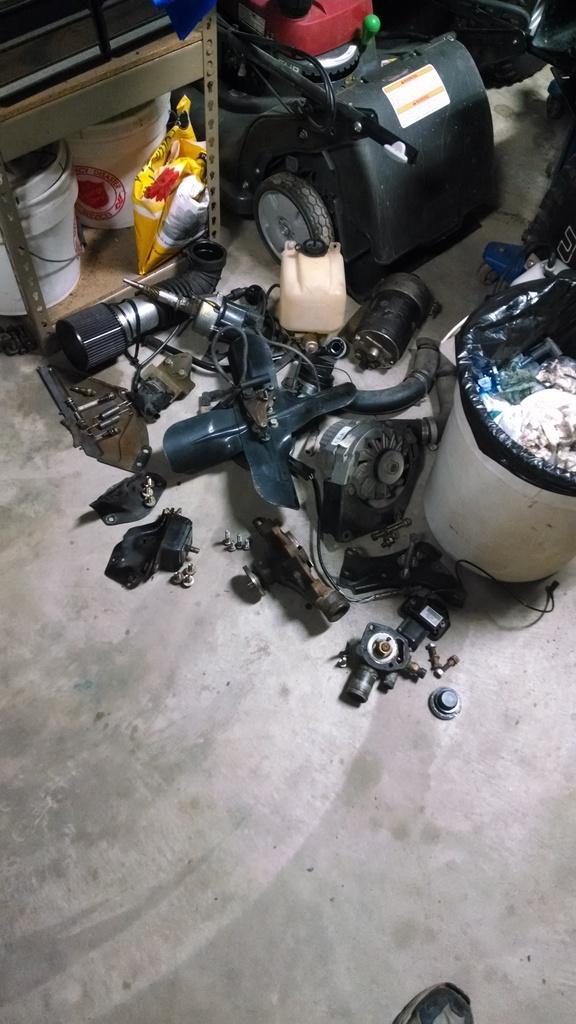
Pile of parts to clean up and re-use, stored conveniently on the floor:
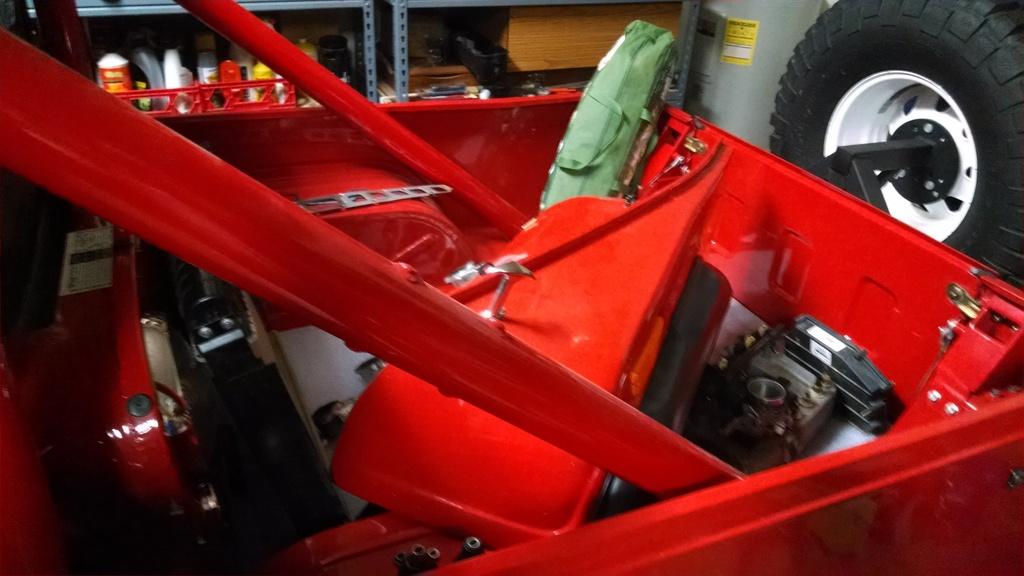
Big parts in the bed:
I plan on dropping off this engine and picking up my new engine on Wednesday. If I am lucky, maybe get the new engine installed over Christmas break, if I am real lucky, have it running/driving before New Years
If the old 4.2 is still a good re-buildable core, I plan on installing it in my green Scrambler this winter. Green Scrambler's current engine still runs good, but it is a bit tired. When I pull it's engine, I am also going to freshen up the T5 and Dana 300, maybe take it to Sand Blast 2017
So, busy winter, hope to get done with all these projects before Spring, plus try to keep up with all the Baton Rouge guests, too
It was raining/cold/windy on Sunday, it was very nice to be working in the garage, can't remember the last time I worked in here, been in the yard more then the garage
About 7 hours total. Since the big "rebuild" pretty much replaced/cleaned/repainted everything, plus all new bolts, pretty simple extraction. I pulled the grill to make lifting the engine out easier, pulled the driver side fender to make it much easier to remove/re-install the intake and exhaust manifolds.I left the PS hooked up, and all of the under hood wiring is still hooked up, just taped/draped/shoved out of the way:
Pile of parts to clean up and re-use, stored conveniently on the floor:
Big parts in the bed:
I plan on dropping off this engine and picking up my new engine on Wednesday. If I am lucky, maybe get the new engine installed over Christmas break, if I am real lucky, have it running/driving before New Years
If the old 4.2 is still a good re-buildable core, I plan on installing it in my green Scrambler this winter. Green Scrambler's current engine still runs good, but it is a bit tired. When I pull it's engine, I am also going to freshen up the T5 and Dana 300, maybe take it to Sand Blast 2017
So, busy winter, hope to get done with all these projects before Spring, plus try to keep up with all the Baton Rouge guests, too
- City
- Biloxi
- State
- MS
Got my new engine bolted in this past Monday, still have all the gazillion other things left to do.
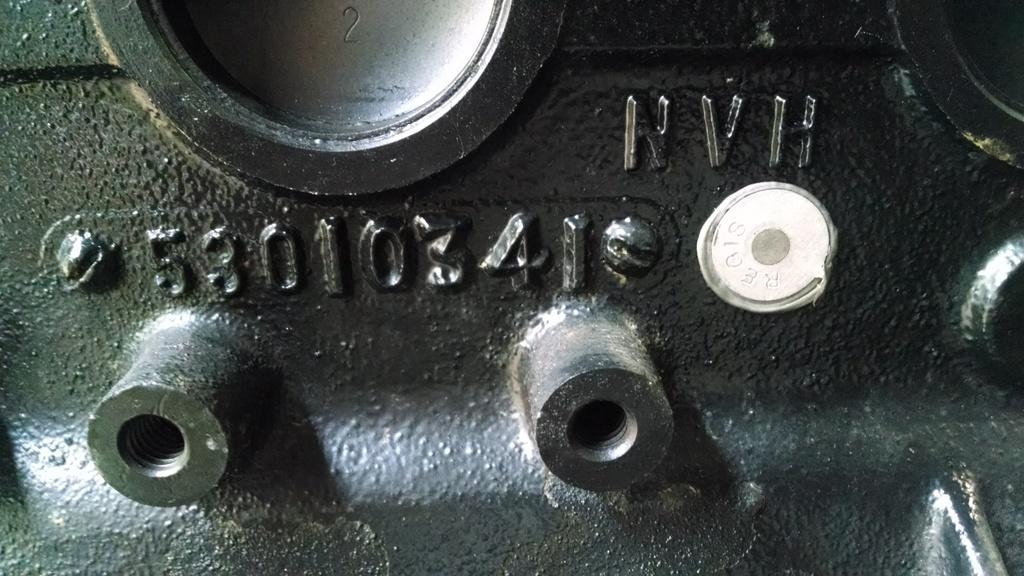
I installed a new, not rebuilt, 4.0. The block is a 53010341 NVH stamped unit (will have to look at the date stamps), the cylinder head is a "7120". I obtained this engine from Hesco, last of their new crate motors. It was used on a dyno to test computers, so it has had about 10 gallons of fuel run through it.
There are lots of 4.0 swap threads, and they are all different. I am going to highlight some of the issues that come up during this swap that are unique to my swap.
For the record, my swap is kind of backwards in several ways:
1.) I am going to use all my 4.2 front accessories; brackets, pulleys, fan (including my old Hesco crank sensor if possible)
2.) Re-install my Hesco 4.2 MPI kit on the new 4.0 engine
3.) Re-use my old 4.2 bellhousing, starter, flywheel;, clutch, clutch linkage
It would have been more straight forward to swap in a complete 4.0/AX15. But, my current transmission is not a Jeep AX15, it has better ratios. So, I am keeping it. Also, I prefer my mechanical clutch linkage, versus the hydraulic set ups (less stuff to go wrong IMO). The newer 4.0 front accessories/serpentine belt set up might be preferred by some, but all my old stuff is in great shape. Also, I do not have a donor vehicle to obtain all the front accessories, so cheaper/easier for me to keep what I have.
Anyway, on to some pictures/information.
I wanted to make sure my transmission input shaft/pilot bearing/ bellhousing/flywheel stuff would work with the newer engine/crank shaft, so I broke out some steel rulers/caliper and took some measurments:
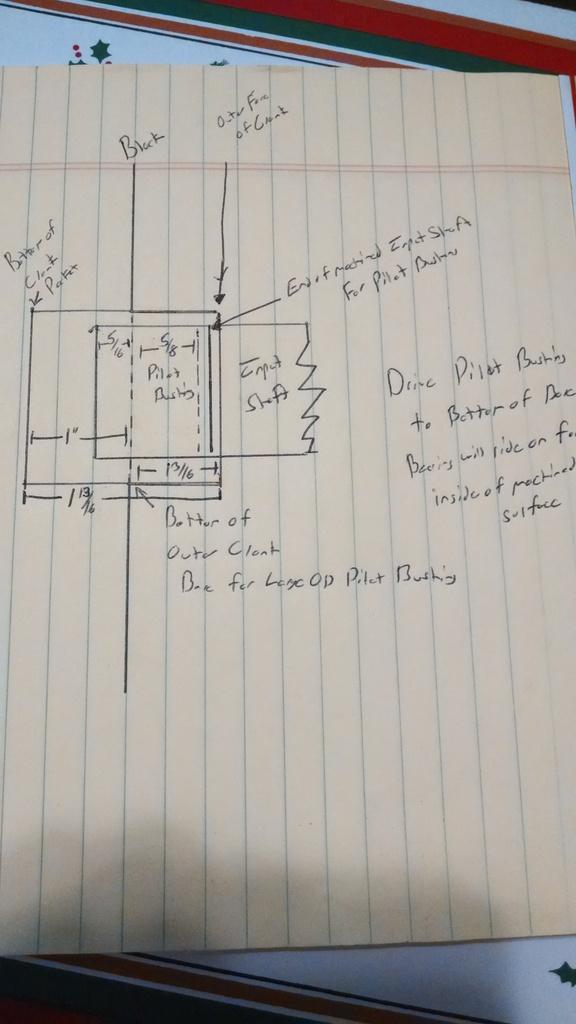
Sorry for the poor hand writing/hard to read diagram, this was mainly for my own benefit. I did not have an old 4.2 laying around the house to compare, so I took a bunch of measurements to see where the pilot bearing would fall on the input shaft. It all appears to be good.
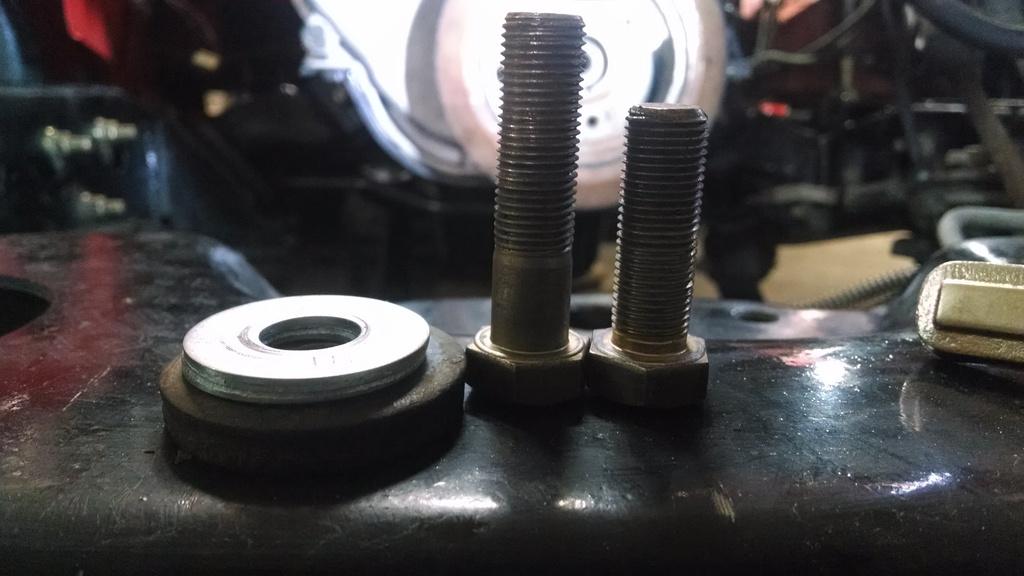
One issue I noticed, the bolts I was using to hold the flywheel to the crank in my old 4.2 seemed a bit too long on the 4.0 engine. It might be the same on the 4.2, I never checked, but worth noting:
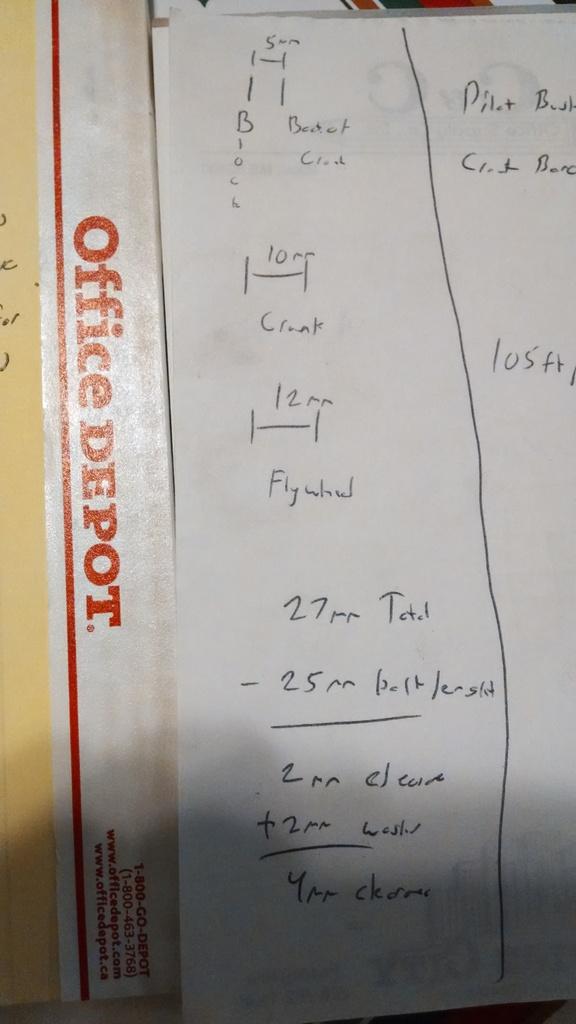
Just using the bolts, with no washers, I only had 2mm clearance. So, I added a washer behind the head of each bolt, increased the clearance to 4mm.
The picture below will show what I am talking about, hard to see. The lower bolt in the picture has no washer, it is close to the block. The upper bolt has the washer, more clearance, and the bolt still threads through the back of the crank.
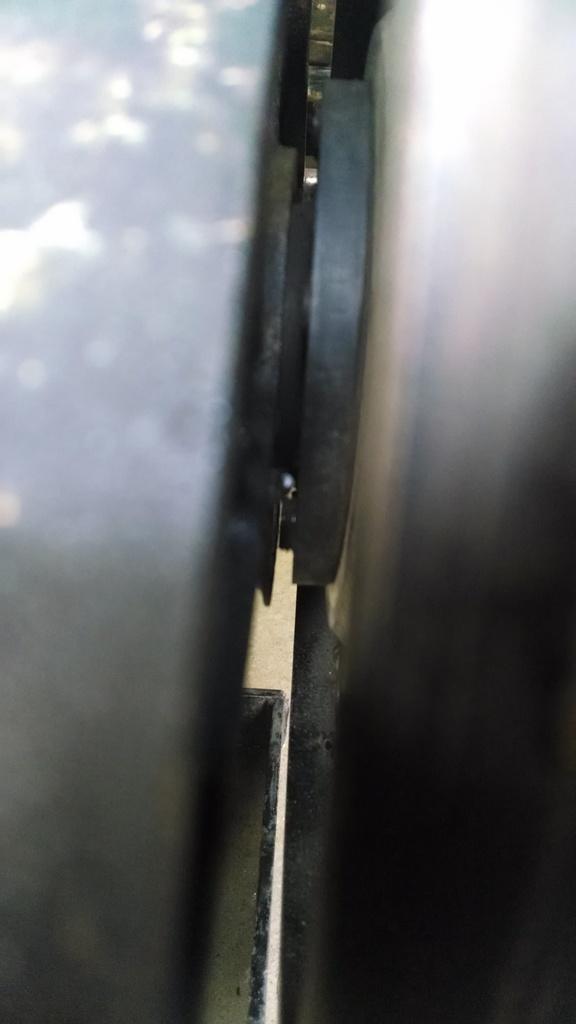
So, the old 4.2 flywheel bolted up to the 4.0 crank no problem, besides adding the washers.
I installed a new Wrangler AX15 pilot bearing into the outer crank step. I would assume this is how AX15 Wranglers come. I actually used the same part number pilot bearing in my old 4.2 crank the last time I pulled it apart to swap out the Center Force clutch.
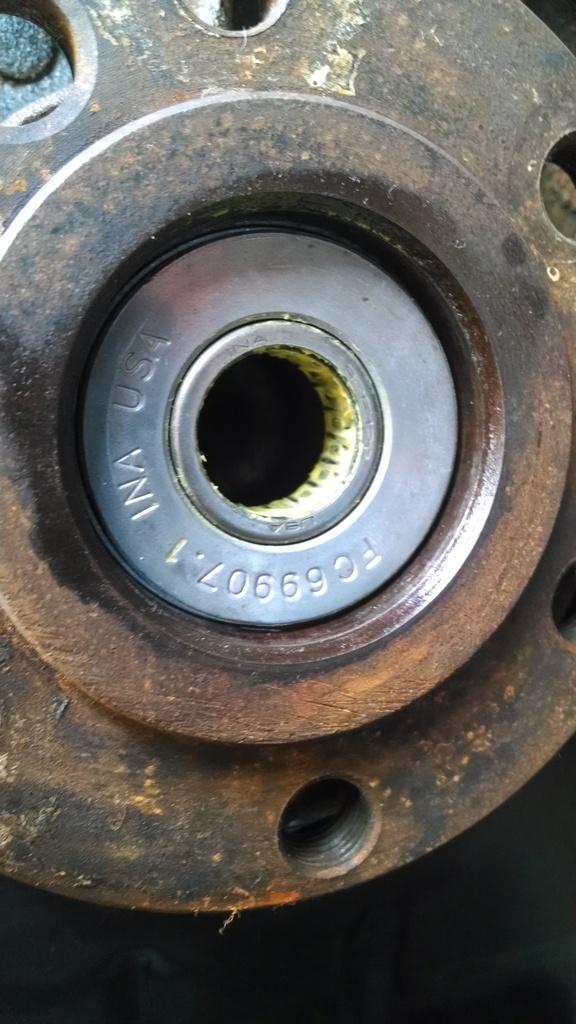
I would have preferred an oilite bushing, but good luck finding one of those at a local part store the day after Christmas. I should have planned ahead.
One other interesting note, ties into pilot bearing/bushing to input shaft stuff and my first detailed drawing above. On my AX15, with the bellhousing bolted up to the front of the transmission, the input shaft only sticks out past the bellhousing 5/16". So, if I would have used the cranks inner step, only the very tip of the input shaft would have been supported. Using the larger outer step, the entire input shaft is supported a bit further back from the tip. See where I am going with this? I kept breaking T5's using the recommended pilot bushings, installed in the cranks inner step. I never measured to see how far the T5's input shaft was actually going inside the back of the crank. Maybe using a different bushing/bearing that rides in the cranks outer step, like the one I am now using, would have kept my T5's alive????!!!!! When I pull apart my Green Scrambler (4.2/T5) I am going to take some measurements and see. But, IIRC, the T5 input shaft might be longer, so maybe the T5 riding in the inner step is correct. Well, it will be interesting to see.
Sorry for the detour, more pictures. The old 4.2 flywheel installed on to the 4.0 crank, note the washers behind the bolt heads to allow for additional bolt/block clearance:
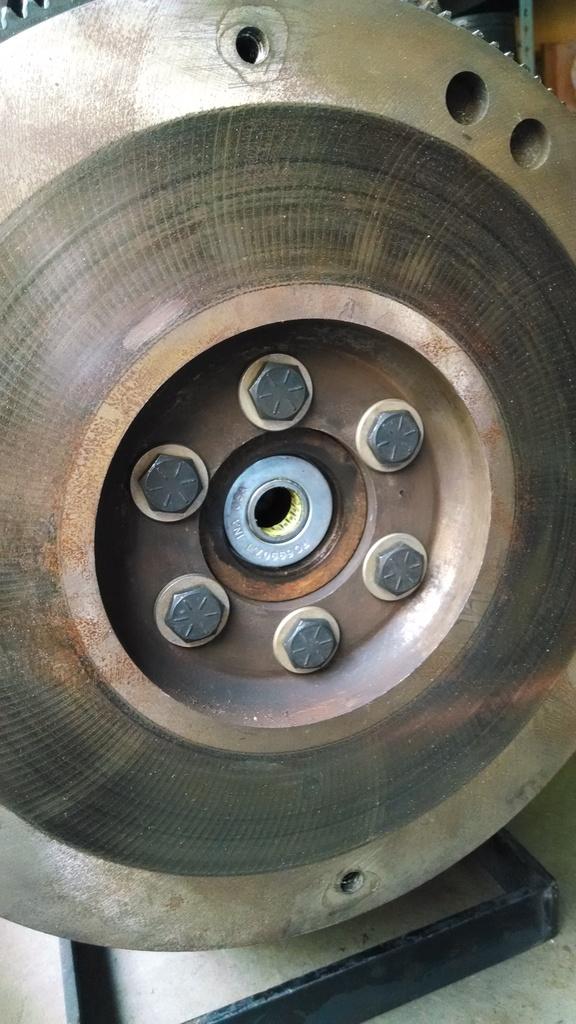
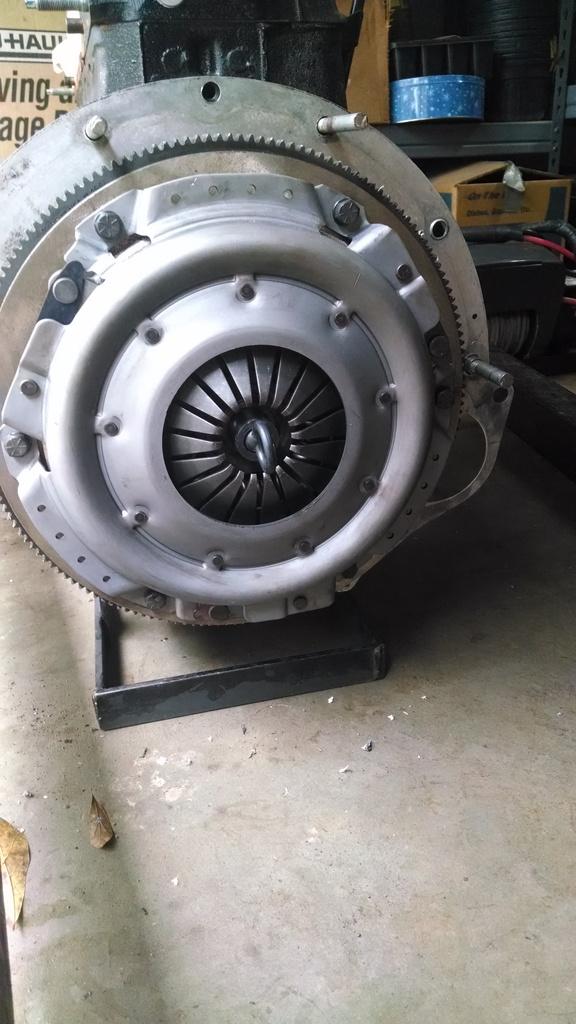
The flywheel was resurfaced 30,000 miles ago when I "rebuilt the whole Scrambler except for the engine". It was still in great shape, no hot spots, ridges, grooves, etc. So, I reused it. I also reused the new clutch I put in earlier this year, it only had about maybe 75 miles on it. If my stuff would have had wear/more miles I would have put in new stuff. But, since everything is in good shape, I reused it. Besides, gives me an excuse to pull the transmissionout again in a few months LOL. Anyway, picture with the disc/pressure plate bolted up. I am using a stock 4.2/T5 clutch kit, works perfect with my version AX15. Note the "dowels" (bolts with the heads cut off) I installed in the block to help with re-installation. My bellhousing (T176) bolts to the front of the transmission from INSIDE. So, bellhousing stays with transmission, block must be bolted to bellhousing.
Picture of my block casting number, followed by a picture of the head casting number:
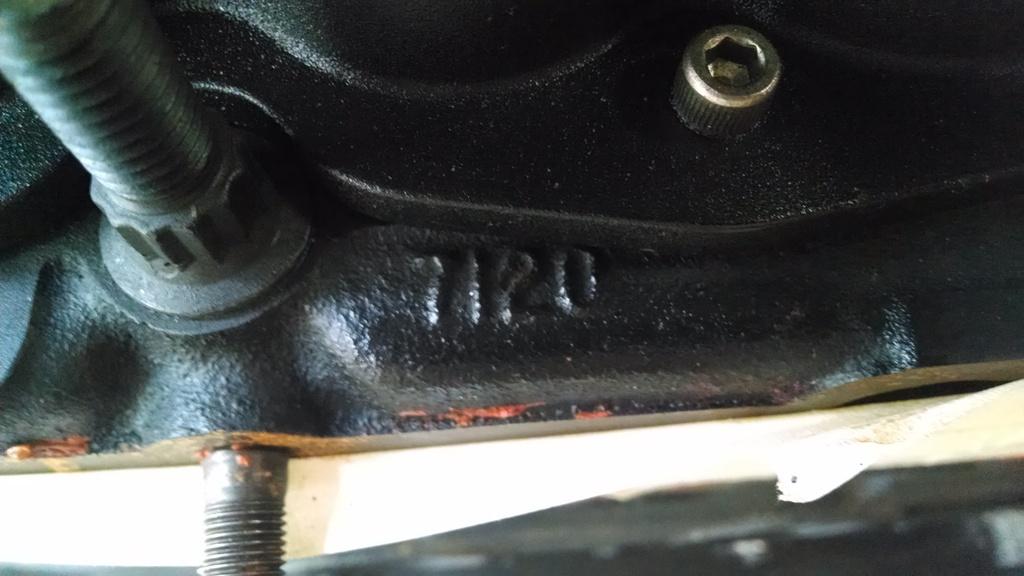
And, without further ado, the freshly installed Hesco 4.0:
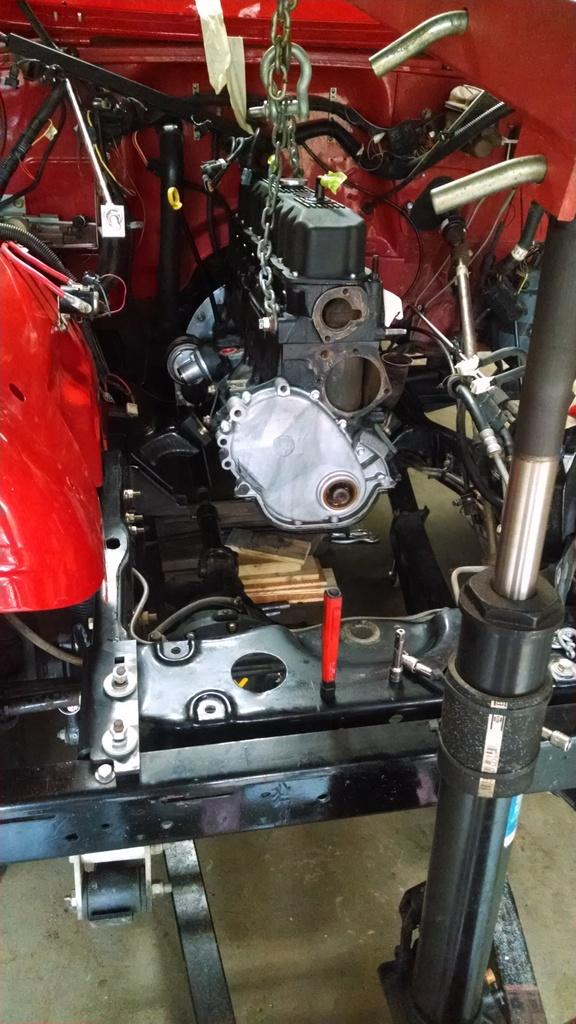
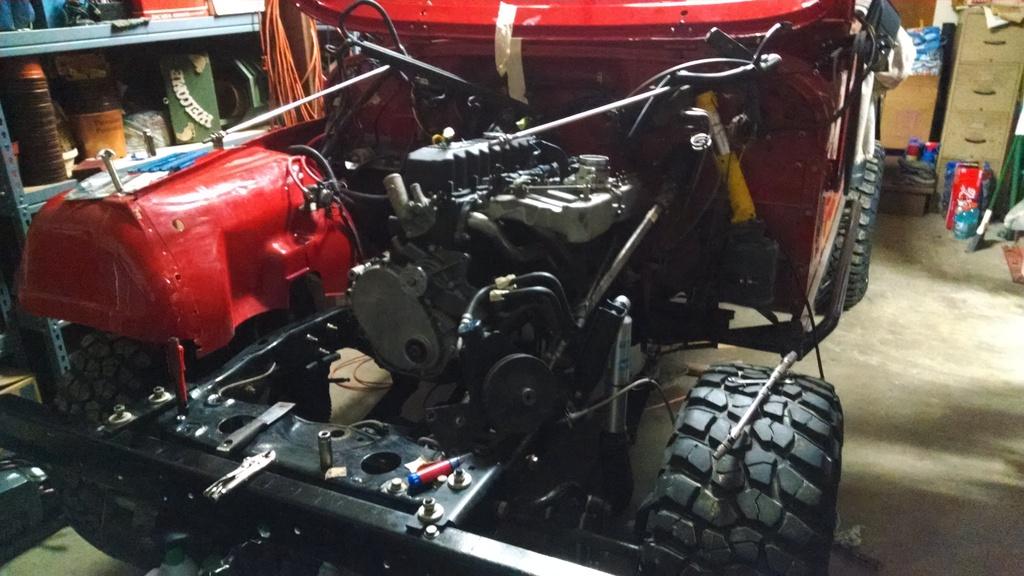
It went in fairly easy. I matched the transmission's upward angle by angling the engine down the same. The dowls helped, too. But, I still had to kind of gently push the engine up/down a bit to get it all to go home. Pretty sure my home made clutch disc alignment tool does not exactly center the disc. Anyway, some gentle rocking/pushing, it slid in.
The above picture shows the engine hoist still hooked up. It is still hooked up because of this:
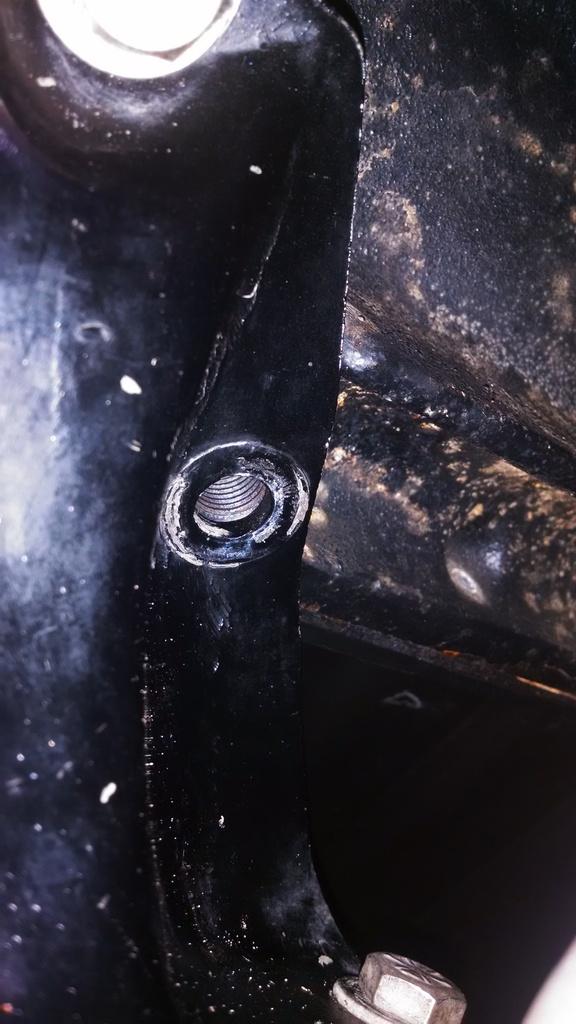
I guess this is the first "quirk" I have run into. On the 4.2, all the threaded holes in the block for the engine mounts are 3/8". On this 4.0 block, all 3 passenger side holes are 3/8". On the driver side, two of the holes are 3/8" thread. This one is metric. From internet research, it should be M12-1.25 thread. So, except for this one threaded hole, so far, no surprises.
But, the above was the "easy part". I am going to tackle some more "easy" stuff next, i.e. intake and exhaust manifolds, water pump, and thermostat housing. I am going to leave the "hard" stuff, i.e. all the front accessories, till last. All the front end stuff "should" bolt on, I will have to see.
That's it for now.
I installed a new, not rebuilt, 4.0. The block is a 53010341 NVH stamped unit (will have to look at the date stamps), the cylinder head is a "7120". I obtained this engine from Hesco, last of their new crate motors. It was used on a dyno to test computers, so it has had about 10 gallons of fuel run through it.
There are lots of 4.0 swap threads, and they are all different. I am going to highlight some of the issues that come up during this swap that are unique to my swap.
For the record, my swap is kind of backwards in several ways:
1.) I am going to use all my 4.2 front accessories; brackets, pulleys, fan (including my old Hesco crank sensor if possible)
2.) Re-install my Hesco 4.2 MPI kit on the new 4.0 engine
3.) Re-use my old 4.2 bellhousing, starter, flywheel;, clutch, clutch linkage
It would have been more straight forward to swap in a complete 4.0/AX15. But, my current transmission is not a Jeep AX15, it has better ratios. So, I am keeping it. Also, I prefer my mechanical clutch linkage, versus the hydraulic set ups (less stuff to go wrong IMO). The newer 4.0 front accessories/serpentine belt set up might be preferred by some, but all my old stuff is in great shape. Also, I do not have a donor vehicle to obtain all the front accessories, so cheaper/easier for me to keep what I have.
Anyway, on to some pictures/information.
I wanted to make sure my transmission input shaft/pilot bearing/ bellhousing/flywheel stuff would work with the newer engine/crank shaft, so I broke out some steel rulers/caliper and took some measurments:
Sorry for the poor hand writing/hard to read diagram, this was mainly for my own benefit. I did not have an old 4.2 laying around the house to compare, so I took a bunch of measurements to see where the pilot bearing would fall on the input shaft. It all appears to be good.
One issue I noticed, the bolts I was using to hold the flywheel to the crank in my old 4.2 seemed a bit too long on the 4.0 engine. It might be the same on the 4.2, I never checked, but worth noting:
Just using the bolts, with no washers, I only had 2mm clearance. So, I added a washer behind the head of each bolt, increased the clearance to 4mm.
The picture below will show what I am talking about, hard to see. The lower bolt in the picture has no washer, it is close to the block. The upper bolt has the washer, more clearance, and the bolt still threads through the back of the crank.
So, the old 4.2 flywheel bolted up to the 4.0 crank no problem, besides adding the washers.
I installed a new Wrangler AX15 pilot bearing into the outer crank step. I would assume this is how AX15 Wranglers come. I actually used the same part number pilot bearing in my old 4.2 crank the last time I pulled it apart to swap out the Center Force clutch.
I would have preferred an oilite bushing, but good luck finding one of those at a local part store the day after Christmas. I should have planned ahead.
One other interesting note, ties into pilot bearing/bushing to input shaft stuff and my first detailed drawing above. On my AX15, with the bellhousing bolted up to the front of the transmission, the input shaft only sticks out past the bellhousing 5/16". So, if I would have used the cranks inner step, only the very tip of the input shaft would have been supported. Using the larger outer step, the entire input shaft is supported a bit further back from the tip. See where I am going with this? I kept breaking T5's using the recommended pilot bushings, installed in the cranks inner step. I never measured to see how far the T5's input shaft was actually going inside the back of the crank. Maybe using a different bushing/bearing that rides in the cranks outer step, like the one I am now using, would have kept my T5's alive????!!!!! When I pull apart my Green Scrambler (4.2/T5) I am going to take some measurements and see. But, IIRC, the T5 input shaft might be longer, so maybe the T5 riding in the inner step is correct. Well, it will be interesting to see.
Sorry for the detour, more pictures. The old 4.2 flywheel installed on to the 4.0 crank, note the washers behind the bolt heads to allow for additional bolt/block clearance:
The flywheel was resurfaced 30,000 miles ago when I "rebuilt the whole Scrambler except for the engine". It was still in great shape, no hot spots, ridges, grooves, etc. So, I reused it. I also reused the new clutch I put in earlier this year, it only had about maybe 75 miles on it. If my stuff would have had wear/more miles I would have put in new stuff. But, since everything is in good shape, I reused it. Besides, gives me an excuse to pull the transmissionout again in a few months LOL. Anyway, picture with the disc/pressure plate bolted up. I am using a stock 4.2/T5 clutch kit, works perfect with my version AX15. Note the "dowels" (bolts with the heads cut off) I installed in the block to help with re-installation. My bellhousing (T176) bolts to the front of the transmission from INSIDE. So, bellhousing stays with transmission, block must be bolted to bellhousing.
Picture of my block casting number, followed by a picture of the head casting number:
And, without further ado, the freshly installed Hesco 4.0:
It went in fairly easy. I matched the transmission's upward angle by angling the engine down the same. The dowls helped, too. But, I still had to kind of gently push the engine up/down a bit to get it all to go home. Pretty sure my home made clutch disc alignment tool does not exactly center the disc. Anyway, some gentle rocking/pushing, it slid in.
The above picture shows the engine hoist still hooked up. It is still hooked up because of this:
I guess this is the first "quirk" I have run into. On the 4.2, all the threaded holes in the block for the engine mounts are 3/8". On this 4.0 block, all 3 passenger side holes are 3/8". On the driver side, two of the holes are 3/8" thread. This one is metric. From internet research, it should be M12-1.25 thread. So, except for this one threaded hole, so far, no surprises.
But, the above was the "easy part". I am going to tackle some more "easy" stuff next, i.e. intake and exhaust manifolds, water pump, and thermostat housing. I am going to leave the "hard" stuff, i.e. all the front accessories, till last. All the front end stuff "should" bolt on, I will have to see.
That's it for now.
- City
- Biloxi
- State
- MS
Small update.
I drilled out the one hole in the driver side engine mount bracket with a 31/64 bit, cut down a M12-1.25 thread bolt to roughly 25mm in length, and finished the engine install.
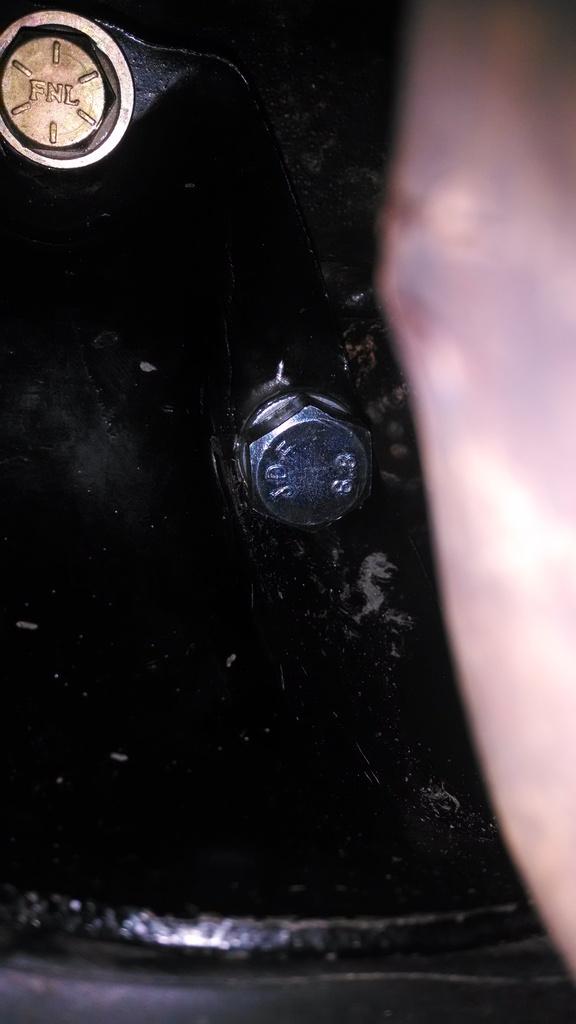
From the picture above, no room for a flat washer, the shape of the bracket at this hole location prevents it. A lock washer was used. IIRC, it takes a 19mm socket/wrench to tighten the M12 headed bolt. The socket will not clear the bracket after a few turns. Its tight, but a box end wrench can be used to tighten this bolt.
So, that "fixed" the one minor issue I had with bolting in the 4.0 to the stock CJ motor mounts/brackets/frame.
I decided to "jump ahead" to my next potential "issue". I am using a 4.0 engine, with Mopar MPI injection, but using a stock CJ flywheel and bell housing. So, I need to mount up a front mounted harmonic balancer/crank sensor. I plan on using the one off my old 4.2. I want to stick with my V-belts because I have all the correct brackets, pulleys, accessories, etc. And, I already have the expensive Hesco v-belt damper/crank sensor.
Now, the issue is, as far as I know, NO 4.0 ever came with V-belts, and even if they did they would not be made to use as a crank sensor. Hesco does not make a V-belt 4.0 vibration damper.
So, unless I want to track down a complete 4.0 front engine system, i.e. brackets/accessories/pulleys/new Hesco serpentine vibration damper crank sensor/plus all the wiring and PS plumbing changes, what to do? It would be very expensive to convert my Scrambler to a 4.0 serpentine set up because I have NONE of the correct parts.
After a bit of research, it appears that the major difference between the 4.0 vs 4.2 crank, with regards to the front where the dampers attach, is "snout" length. The mid 80's crank which I had is approximately 10mm longer then the currently installed 4.0's crank snout. All the other dimensions are the same. For some reason, when they switched over to the 4.0 cranks (and some late 80's 4.2 cranks) they shortened the snout by 10mm.
After a bunch of measurements, I came up with a crude "Redneck Ray" machinist drawing to show what I am talking about. I also wanted to make sure that my current 4.2 vibration damper would not interfere with the 4.0 timing chain cover. Here is my Mississippi CAD drawing
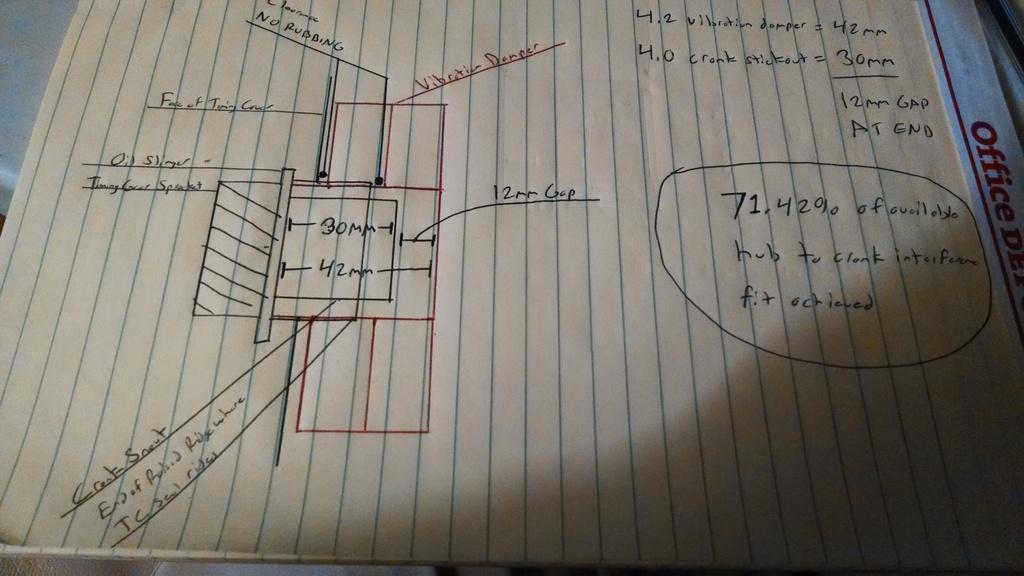
So, my 4.2 vibration damper will fit on the 4.0 crank snout and it will not rub the cover. That is good. It looks like the only difference is that when the damper is full seated on the crank, the end face of the crank shaft will be approximately 12mm back from the end face of the dampers hub. So, I will only have 30mm of damper hub to crank snout interference fit, where as the damper has the potential to have 42mm of fit. But, from what I remember/read, you don't ever want the hub face of the damper to be flush with the crank, there is usually like a 2mm set back.
The picture below, where the bottom of the little metal triangle is inserted into the hub bore, shows where the end of the crank snout will be, by using the 4.2 damper on the 10mm shorter 4.0 crank snout.
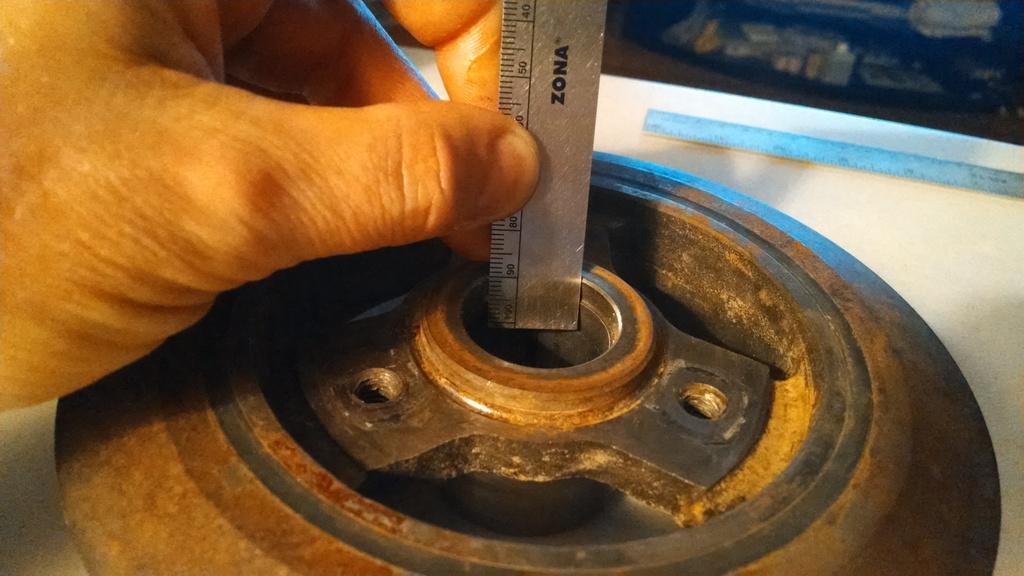
I was a little bit concerned about this 10mm gap, but after looking at the face of a 4.0 damper, I am not too worried. When they cut down the snout length on the 4.0 crank by 10mm, they also modified the 4.0 damper. The picture below, shows my 4.2 damper. The red pin is pointing to the excess 10mm damper hub bore.

If we look at the face of a 4.0 damper, you can see where they just shortened this hub. The hub actually stops short of the face of the damper:
https://www.amazon.com/Harmonic-Balancer-Replacement-Jeep-33002920/dp/B007TYHTOU
Sorry for the "copy/paste", I don't have a picture of a 4.0 damper. You can see where they machined the hub snout back into the center "meat section" of the damper approximately 10mm. The large OD circle is for the big thick damper bolt washer to sit in.
So, I am going to assume I will be OK. On a 4.0 stock damper, you only have 30mm of interference fit. I will have the same fit using my 4.2 damper. But, instead of machining back my 4.2's damper hub to match a 4.0 damper hub, I will just have a 10mm "air gap" at the end. I will be careful to use a correct length bolt to ensure full thread engagement into the crank. And, I will use the 10mm thick damper bolt washer.
I talked to Hesco about this, they don't think it will be an issue, either.
And in reality, this is my only option if I want to keep all my current brackets, accessories, and expensive damper/crank position sensor. I would guess to swap on a whole 4.0 front accessory package, PLUS a new damper kit, will easily cost around $700.
So, I am going to try my current set up, and live with the excess "10mm air gap".
I googled pretty hard, I could not find anyone else being "backward" like me, i.e. swapping on a 4.2 v-belt system on to a 4.0.
Any comments, concerns, criticisms welcome
I drilled out the one hole in the driver side engine mount bracket with a 31/64 bit, cut down a M12-1.25 thread bolt to roughly 25mm in length, and finished the engine install.
From the picture above, no room for a flat washer, the shape of the bracket at this hole location prevents it. A lock washer was used. IIRC, it takes a 19mm socket/wrench to tighten the M12 headed bolt. The socket will not clear the bracket after a few turns. Its tight, but a box end wrench can be used to tighten this bolt.
So, that "fixed" the one minor issue I had with bolting in the 4.0 to the stock CJ motor mounts/brackets/frame.
I decided to "jump ahead" to my next potential "issue". I am using a 4.0 engine, with Mopar MPI injection, but using a stock CJ flywheel and bell housing. So, I need to mount up a front mounted harmonic balancer/crank sensor. I plan on using the one off my old 4.2. I want to stick with my V-belts because I have all the correct brackets, pulleys, accessories, etc. And, I already have the expensive Hesco v-belt damper/crank sensor.
Now, the issue is, as far as I know, NO 4.0 ever came with V-belts, and even if they did they would not be made to use as a crank sensor. Hesco does not make a V-belt 4.0 vibration damper.
So, unless I want to track down a complete 4.0 front engine system, i.e. brackets/accessories/pulleys/new Hesco serpentine vibration damper crank sensor/plus all the wiring and PS plumbing changes, what to do? It would be very expensive to convert my Scrambler to a 4.0 serpentine set up because I have NONE of the correct parts.
After a bit of research, it appears that the major difference between the 4.0 vs 4.2 crank, with regards to the front where the dampers attach, is "snout" length. The mid 80's crank which I had is approximately 10mm longer then the currently installed 4.0's crank snout. All the other dimensions are the same. For some reason, when they switched over to the 4.0 cranks (and some late 80's 4.2 cranks) they shortened the snout by 10mm.
After a bunch of measurements, I came up with a crude "Redneck Ray" machinist drawing to show what I am talking about. I also wanted to make sure that my current 4.2 vibration damper would not interfere with the 4.0 timing chain cover. Here is my Mississippi CAD drawing
So, my 4.2 vibration damper will fit on the 4.0 crank snout and it will not rub the cover. That is good. It looks like the only difference is that when the damper is full seated on the crank, the end face of the crank shaft will be approximately 12mm back from the end face of the dampers hub. So, I will only have 30mm of damper hub to crank snout interference fit, where as the damper has the potential to have 42mm of fit. But, from what I remember/read, you don't ever want the hub face of the damper to be flush with the crank, there is usually like a 2mm set back.
The picture below, where the bottom of the little metal triangle is inserted into the hub bore, shows where the end of the crank snout will be, by using the 4.2 damper on the 10mm shorter 4.0 crank snout.
I was a little bit concerned about this 10mm gap, but after looking at the face of a 4.0 damper, I am not too worried. When they cut down the snout length on the 4.0 crank by 10mm, they also modified the 4.0 damper. The picture below, shows my 4.2 damper. The red pin is pointing to the excess 10mm damper hub bore.
If we look at the face of a 4.0 damper, you can see where they just shortened this hub. The hub actually stops short of the face of the damper:
https://www.amazon.com/Harmonic-Balancer-Replacement-Jeep-33002920/dp/B007TYHTOU
Sorry for the "copy/paste", I don't have a picture of a 4.0 damper. You can see where they machined the hub snout back into the center "meat section" of the damper approximately 10mm. The large OD circle is for the big thick damper bolt washer to sit in.
So, I am going to assume I will be OK. On a 4.0 stock damper, you only have 30mm of interference fit. I will have the same fit using my 4.2 damper. But, instead of machining back my 4.2's damper hub to match a 4.0 damper hub, I will just have a 10mm "air gap" at the end. I will be careful to use a correct length bolt to ensure full thread engagement into the crank. And, I will use the 10mm thick damper bolt washer.
I talked to Hesco about this, they don't think it will be an issue, either.
And in reality, this is my only option if I want to keep all my current brackets, accessories, and expensive damper/crank position sensor. I would guess to swap on a whole 4.0 front accessory package, PLUS a new damper kit, will easily cost around $700.
So, I am going to try my current set up, and live with the excess "10mm air gap".
I googled pretty hard, I could not find anyone else being "backward" like me, i.e. swapping on a 4.2 v-belt system on to a 4.0.
Any comments, concerns, criticisms welcome


- City
- Biloxi
- State
- MS
Will there be any excessive "Crank Walk" with the 10mm air gap when engine exceedes 8,000 RPM on Test Hill?
Shouldn't be any crank walk
The balancer hub will be pushed tight up against the crank timing gear, the thick washer with the correct length 1/2" diameter bolt will hold the balancer to the timing gear tight, no room for any movement
Basically, the hub of the 4.2 vibration damper is 10mm longer then it needs to be for the shorter 4.0 crank
I don't think this one will hit 8,000 RPM, if it does, I imagine I will picking up components from the bottom of Test Hill
- City
- Biloxi
- State
- MS
Got any junkyards you can just go buy the $700 worth of front engine accessory stuff for about $25?
Won't be that cheap down here
The biggest expense would be the new Hesco 4.0 vibraion damper/crank position sensor set up, about $330.
Then, conversion PS lines for the 4.0 pump to CJ box, and I am sure a little bit of alternator rewiring.
And, a new 4.0 reverse flow water pump.
Not impossible, not cheap, but is all that really needed for a damper hub that is 10mm too long
- City
- Biloxi
- State
- MS
This is on a newer high performance Corvette, but the same issue:
http://www.corvetteforum.com/forums...-pulley-not-sit-flush-with-crank-snout-2.html
I think one of the guys here said the factory calls for a 2.4-4mm set back. I will have closer to 10mm.
http://www.corvetteforum.com/forums...-pulley-not-sit-flush-with-crank-snout-2.html
I think one of the guys here said the factory calls for a 2.4-4mm set back. I will have closer to 10mm.
- City
- Cobourg, Ontario, Cana
- State
- da
And, if I run into problems, I will blame Mike
I never knew Alabama was part of Canada
Make sure you run this in that high quality piece of Canadian hardware.

- City
- Biloxi
- State
- MS
I was able to get the install about 95% completed. I have a bunch of pictures to post of certain details particular to my 4.0 engine swap. Bare with me, Photobucket really sucks. I will let the pictures do most of the talking.
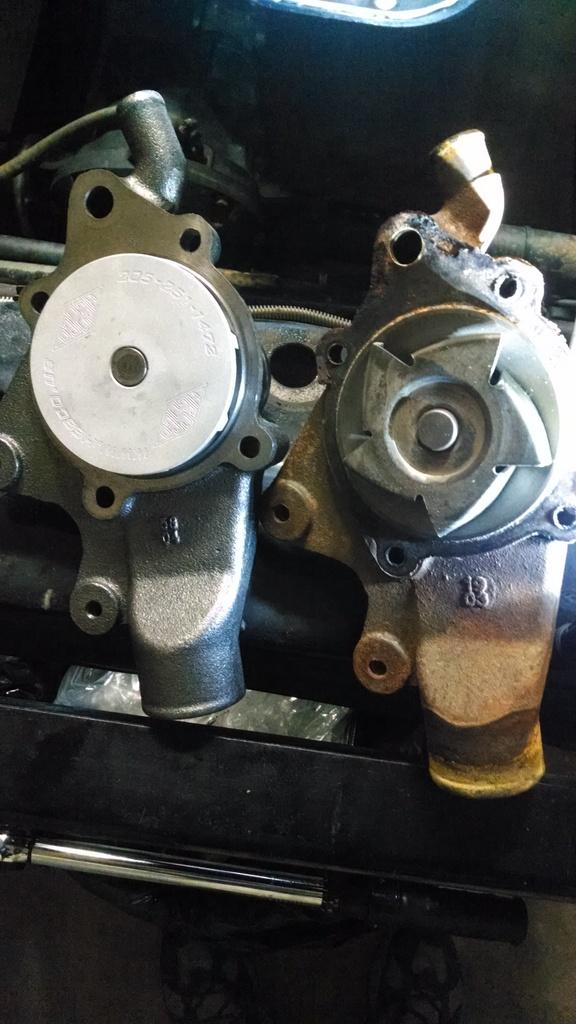
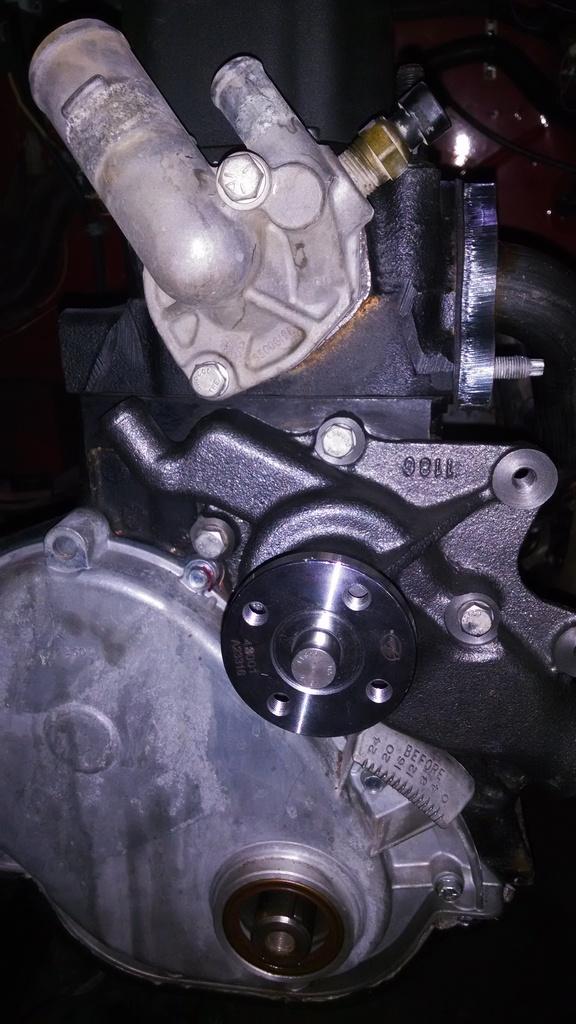
Since I am reusing my 4.2 v-belt system, I have to use a 4.2 water pump. The 4.0 serpentine set up is reverse flow. So, I am using a Hesco sourced higher flow 4.2 water pump. Picture next to a regular 4.2 pump showing they spin the same way:
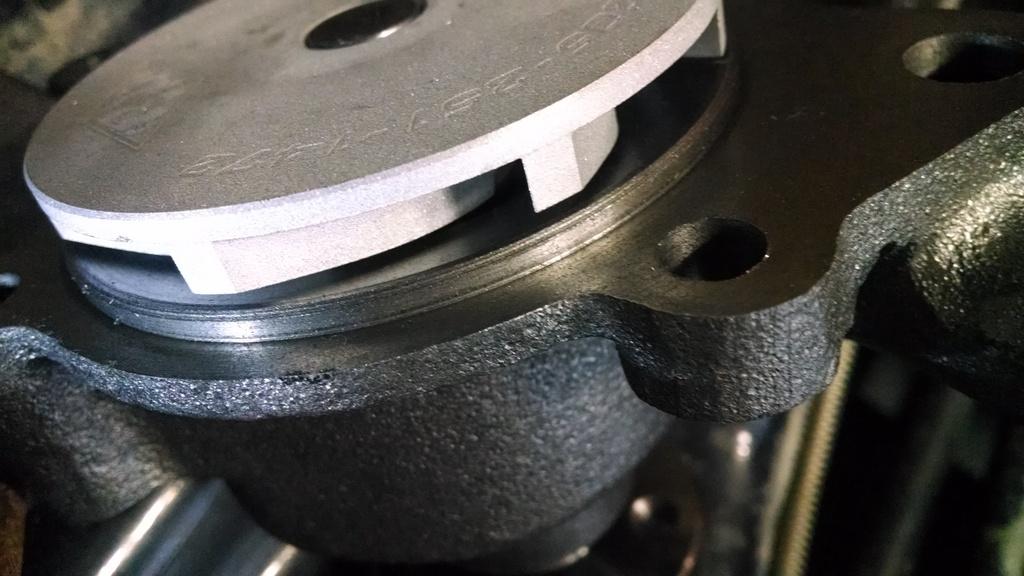
Close up of the impeller that supposedly makes it a higher flow pump:
New water pump installed, and the Hesco MPI kit thermostat housing. This housing will bolt up to both the 4.2 and 4.0 heads:
New 4.0 exhaust header in place, does not work with the original 4.2 down pipe that I was using with a stock 4.2 exhaust manifold.
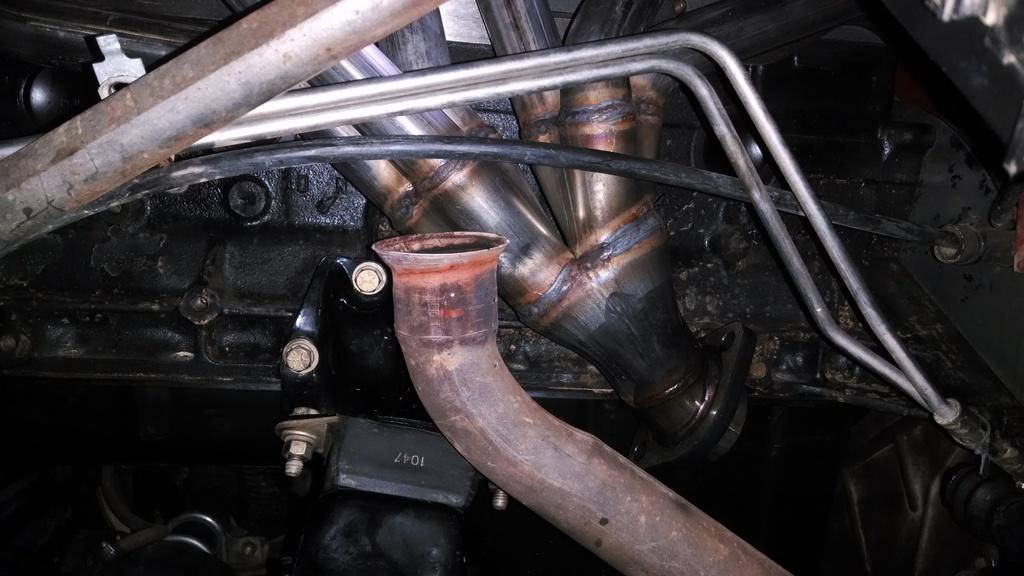
The exhaust is the only thing I have left to finish. I ordered a part that I hope I can modify to be a bolt on solution. More on this later.
New 4.0 exhaust header and gasket in place:
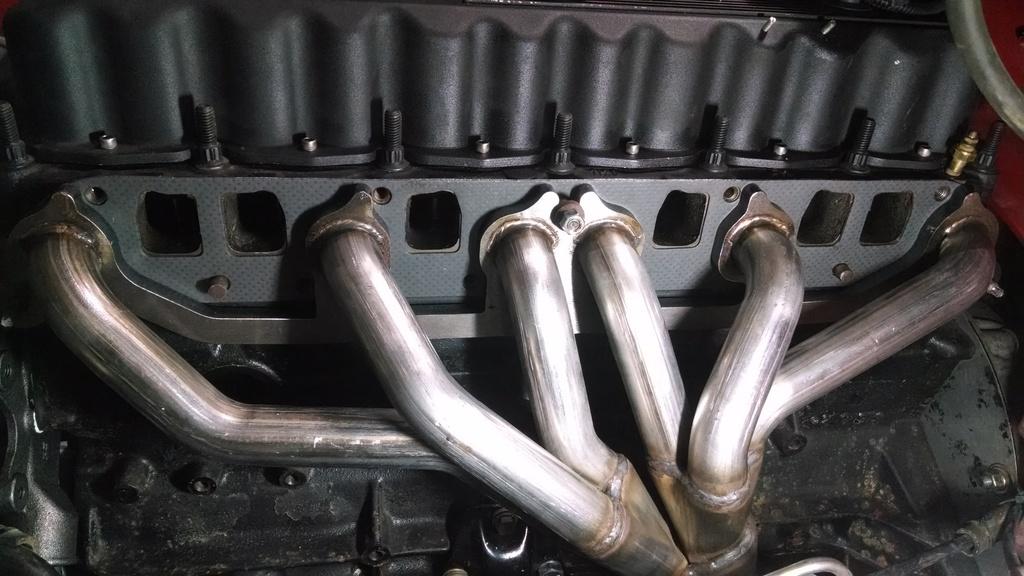
I did have a slight problem with my 4.0 intake. The exhaust and intake manifold are secured with the same bolts, using thick washers. The problem I encountered, the intake flange is not as thick as the header flange:
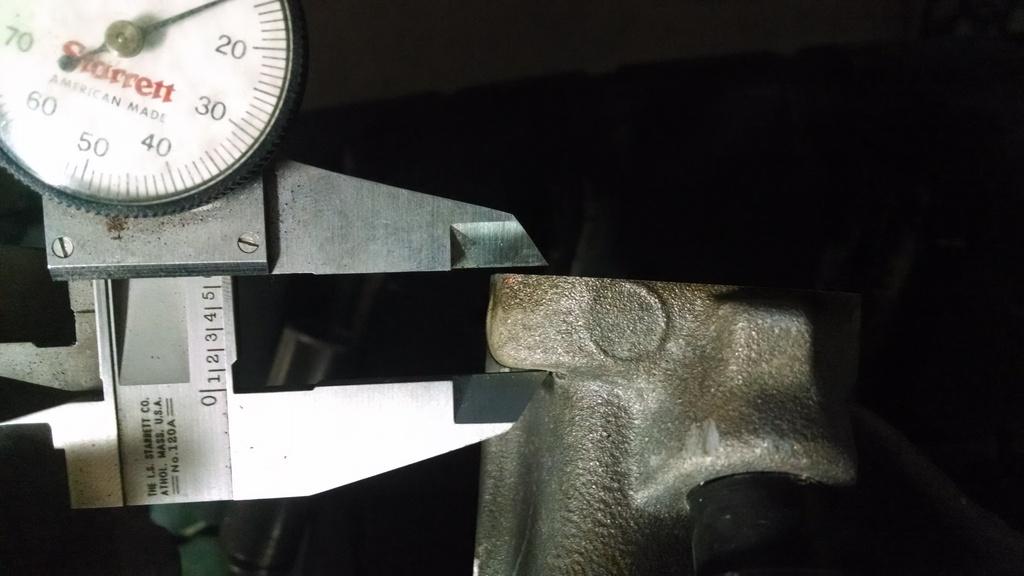
So, I reinstalled the 4.0 intake manifold with a 4.2 intake manifold gasket to make the flanges even:
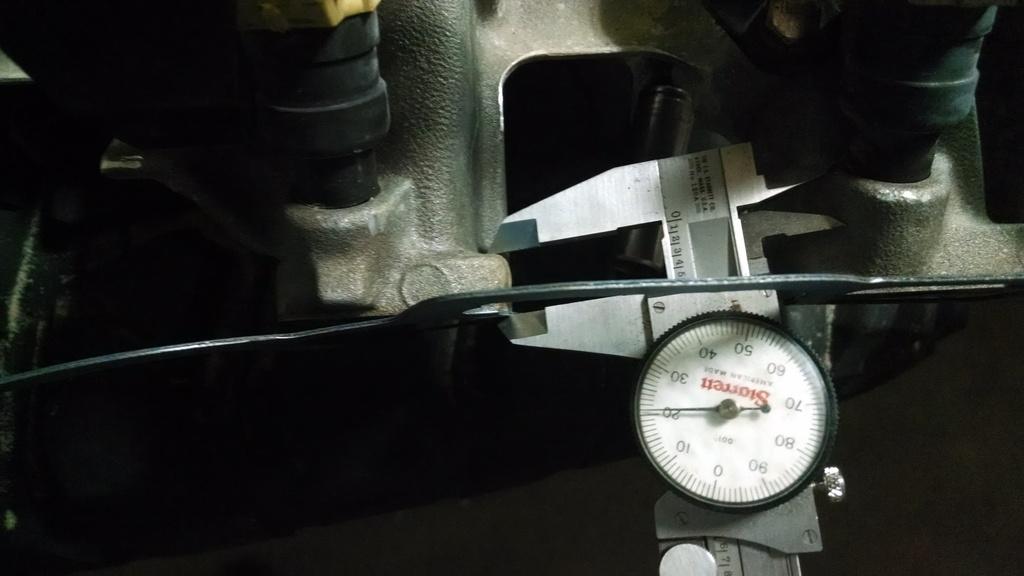
As you can see, a 4.0 and 4.2 head are identical on the intake ports/spacing:
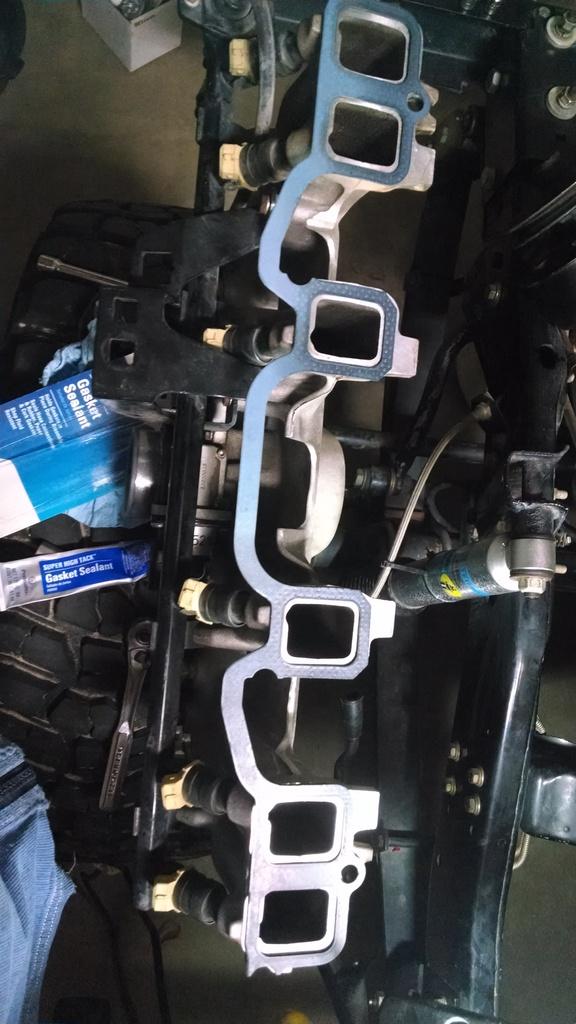
One big difference, the 4.0 intake ports sit higher on the head then a 4.2. As you can see, the holes in the 4.2 gasket will not slide on to the dowels in the 4.0 head:
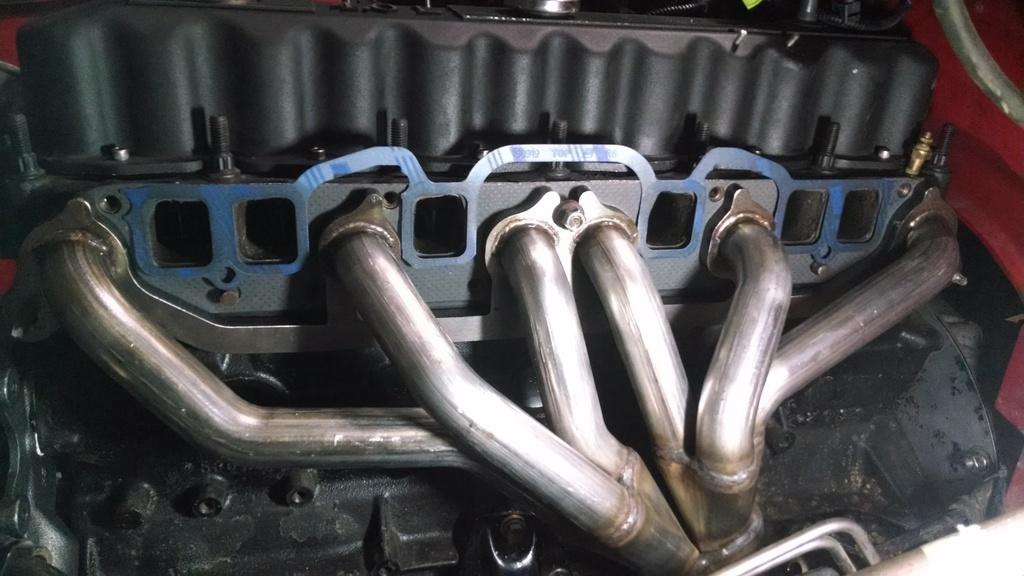
So, I glued the gasket to the intake manifold to keep it in place during installation:
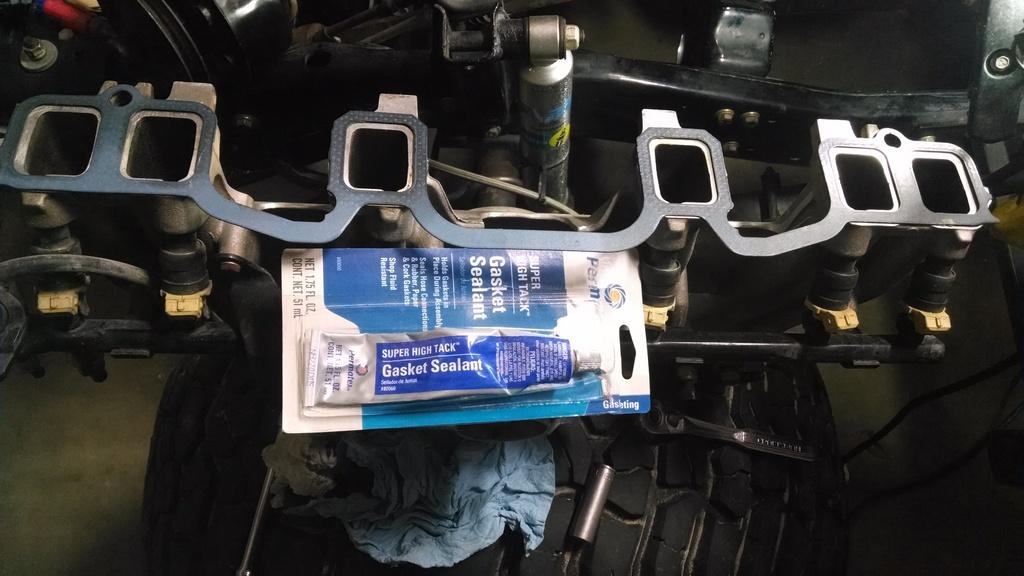
Since I am reusing my 4.2 v-belt system, I have to use a 4.2 water pump. The 4.0 serpentine set up is reverse flow. So, I am using a Hesco sourced higher flow 4.2 water pump. Picture next to a regular 4.2 pump showing they spin the same way:
Close up of the impeller that supposedly makes it a higher flow pump:
New water pump installed, and the Hesco MPI kit thermostat housing. This housing will bolt up to both the 4.2 and 4.0 heads:
New 4.0 exhaust header in place, does not work with the original 4.2 down pipe that I was using with a stock 4.2 exhaust manifold.
The exhaust is the only thing I have left to finish. I ordered a part that I hope I can modify to be a bolt on solution. More on this later.
New 4.0 exhaust header and gasket in place:
I did have a slight problem with my 4.0 intake. The exhaust and intake manifold are secured with the same bolts, using thick washers. The problem I encountered, the intake flange is not as thick as the header flange:
So, I reinstalled the 4.0 intake manifold with a 4.2 intake manifold gasket to make the flanges even:
As you can see, a 4.0 and 4.2 head are identical on the intake ports/spacing:
One big difference, the 4.0 intake ports sit higher on the head then a 4.2. As you can see, the holes in the 4.2 gasket will not slide on to the dowels in the 4.0 head:
So, I glued the gasket to the intake manifold to keep it in place during installation:
- City
- Biloxi
- State
- MS
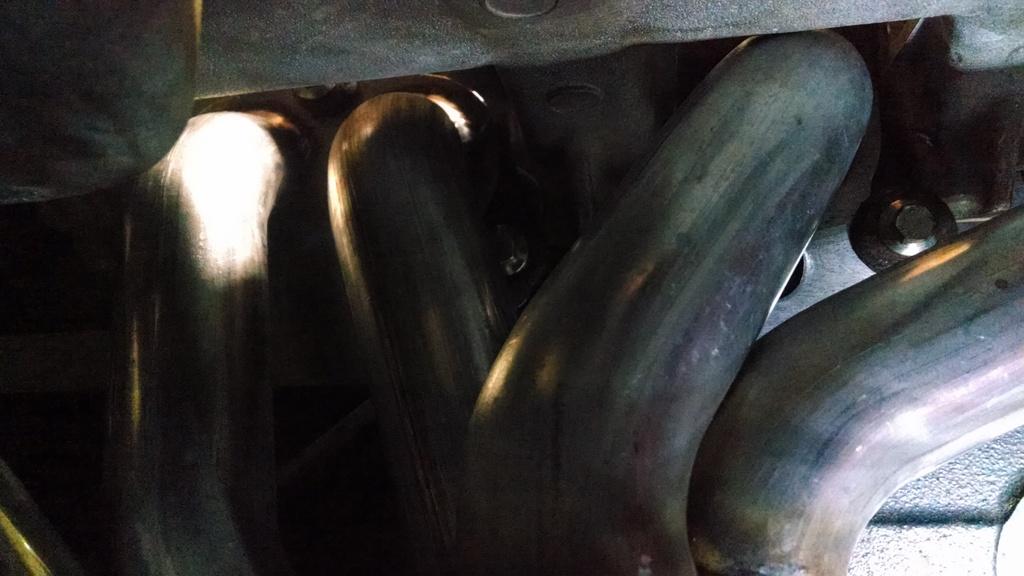
After gluing the gasket to the intake, I bolted up the intake/exhaust manifold. Even with the DS fender/grill removed, some of these bolts are a PIA to get to. Especially bolt #1, located directly behind on of the exhaust tubes. I remember this SOB from when I helped a buddy bolt up a Banks header to a 97 TJ, took forever to install/tighten this one bolt!!!!!!!!!!!!!!
Hard to see it, but it is the bolt behind the second tube from the left:
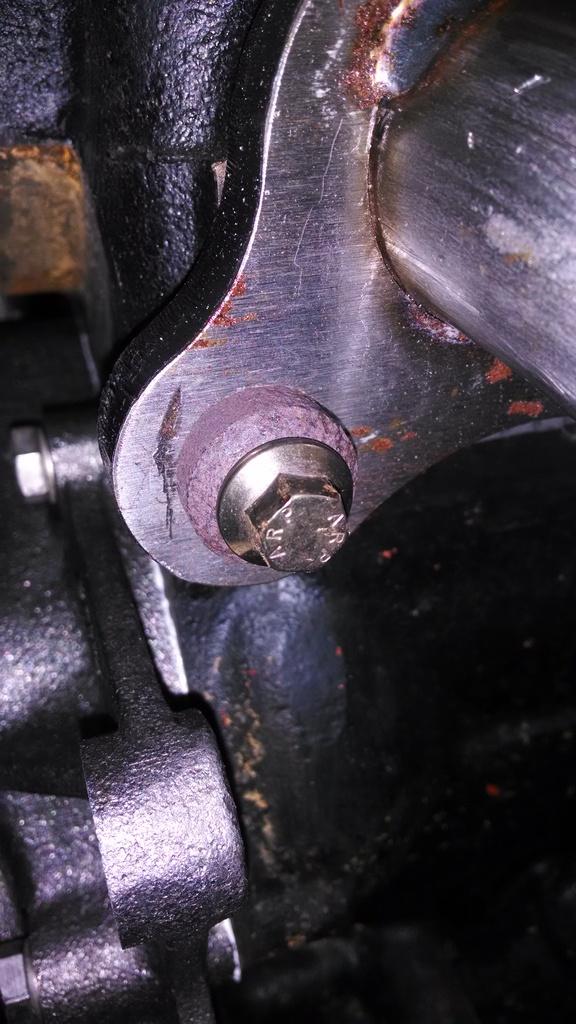
Thick small washers used on the very front and very back exhaust manifold bolts:
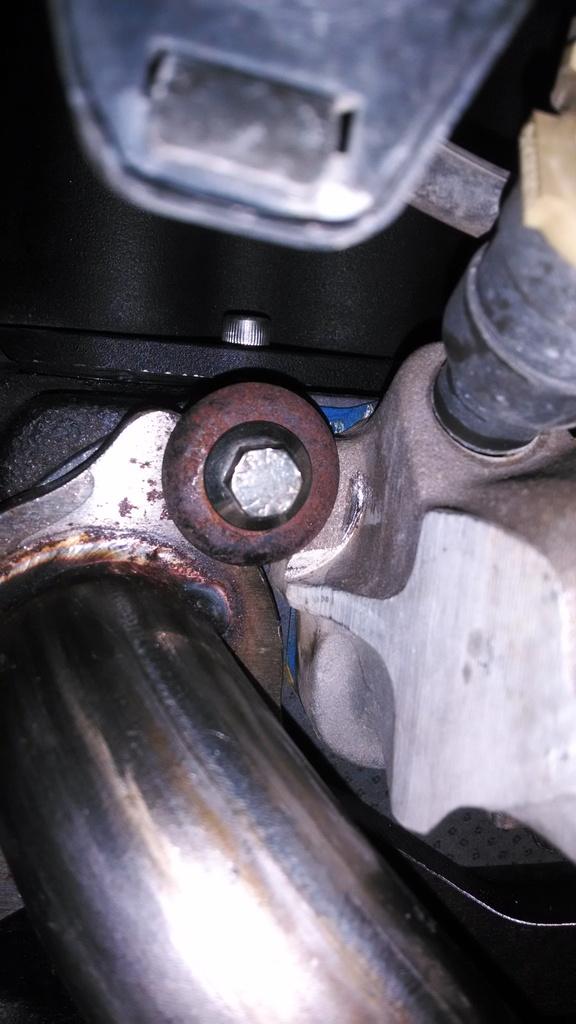
And the thick wider washers used on all the other bolts. I am reusing the same bolts/washers from my 4.2 head, same stuff, except the 4.0 uses one less bolt:
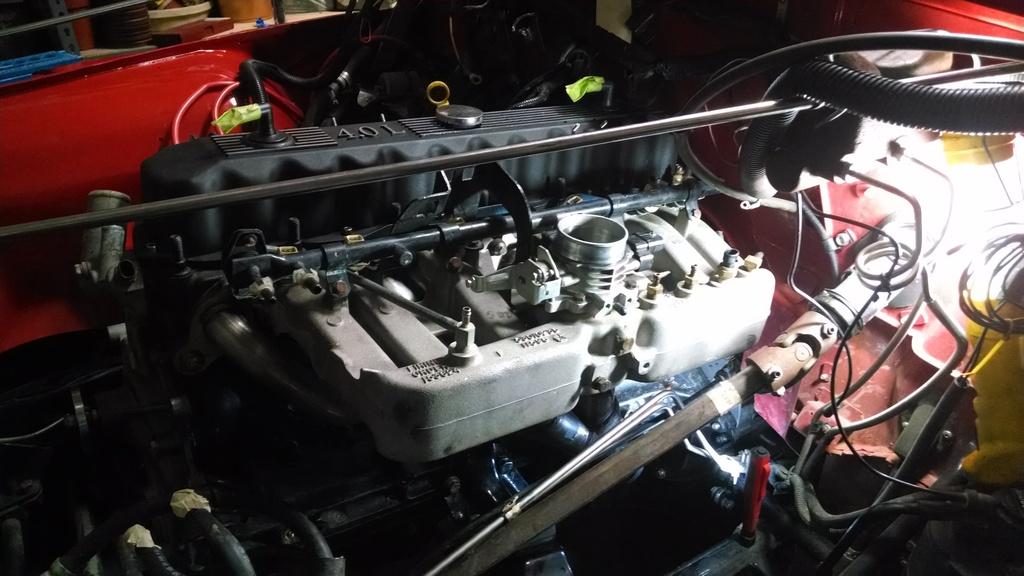
And the intake/exhaust manifolds installed:
Maybe leave it like this for the "Mad Max" look:
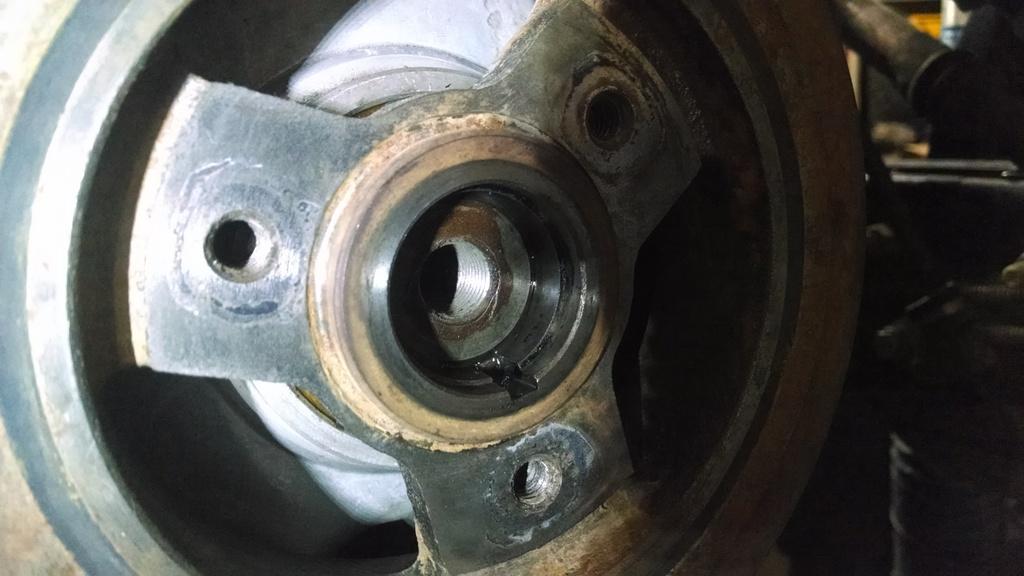
Harmonic balancer installed, notice the gap left at the end from using the thicker 4.2 harmonic balancer hub on the shorter 4.0 crank snout:
I am using a longer bolt, with the thick washer to ensure I am getting full thread engagement into the crank:
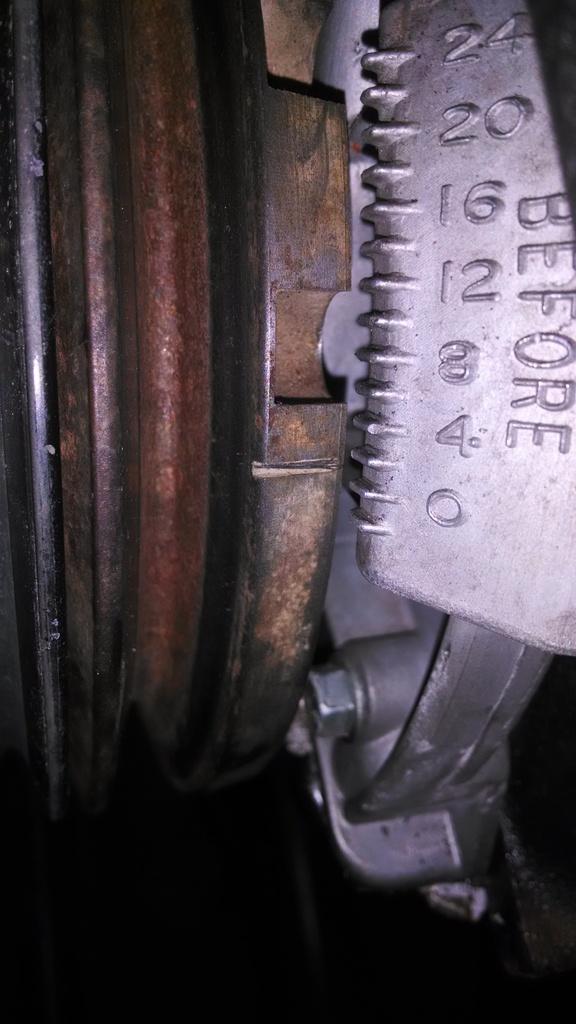
Next, I put everything at TDC to ensure I installed the distributor correctly.
Harmonic Balancer at TDC:
Oil pump slot turned roughly to the 11 o'clock position:
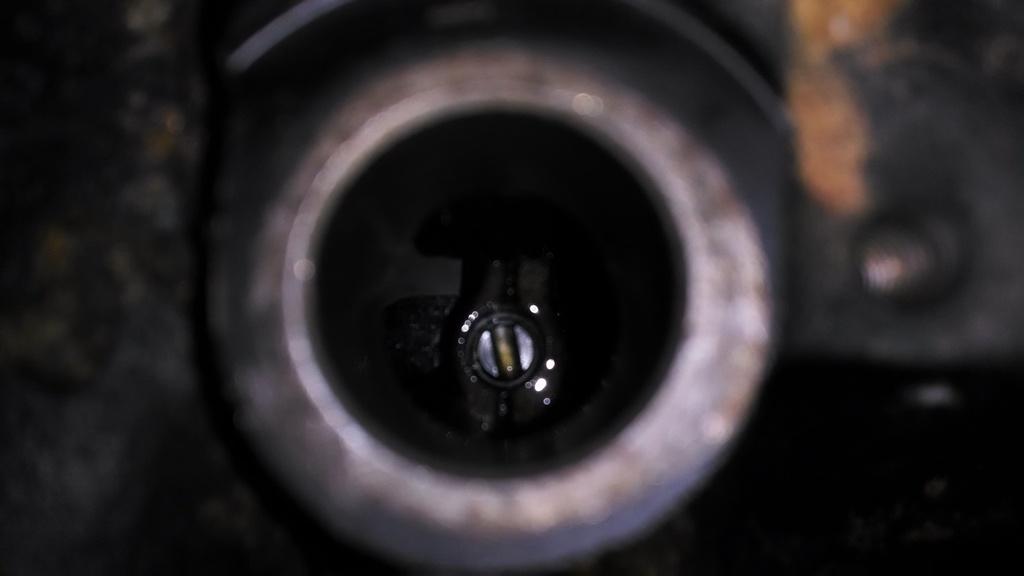
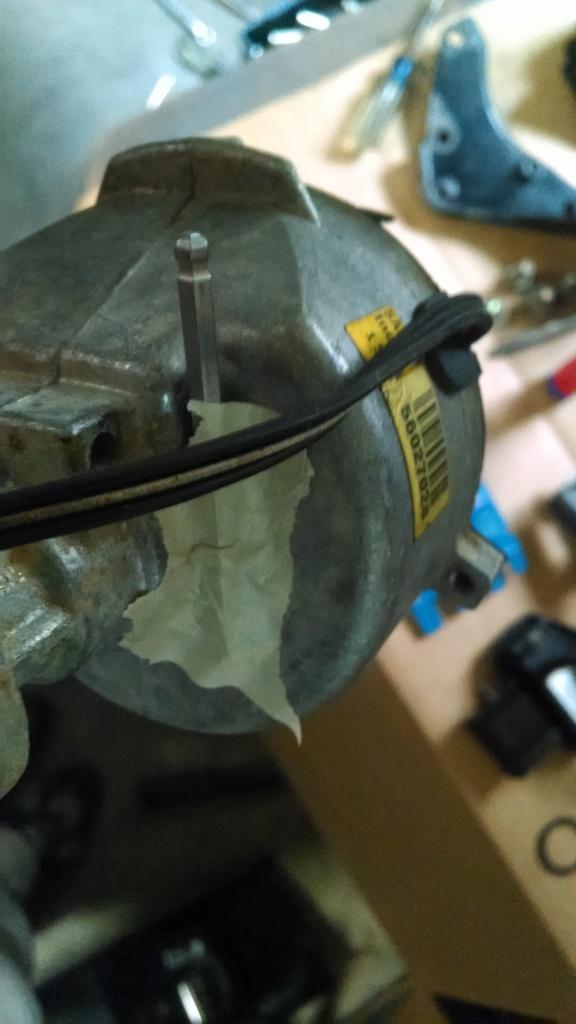
The 4.0 distributor that came from Hesco, sure its similar to stock ones, came with a plastic pin installed to hold it the #1 TDC position. I lost this pin a long time ago. So, I used an allen wrench of the correct diameter taped into place to hold everything in place, worked perfect. More "Redneck Ray" engineering at its finest:
Hard to see it, but it is the bolt behind the second tube from the left:
Thick small washers used on the very front and very back exhaust manifold bolts:
And the thick wider washers used on all the other bolts. I am reusing the same bolts/washers from my 4.2 head, same stuff, except the 4.0 uses one less bolt:
And the intake/exhaust manifolds installed:
Maybe leave it like this for the "Mad Max" look:
Harmonic balancer installed, notice the gap left at the end from using the thicker 4.2 harmonic balancer hub on the shorter 4.0 crank snout:
I am using a longer bolt, with the thick washer to ensure I am getting full thread engagement into the crank:
Next, I put everything at TDC to ensure I installed the distributor correctly.
Harmonic Balancer at TDC:
Oil pump slot turned roughly to the 11 o'clock position:
The 4.0 distributor that came from Hesco, sure its similar to stock ones, came with a plastic pin installed to hold it the #1 TDC position. I lost this pin a long time ago. So, I used an allen wrench of the correct diameter taped into place to hold everything in place, worked perfect. More "Redneck Ray" engineering at its finest: