• Notice for iPhone users: DO NOT use the image size reduction option when uploading photos to the forum. This causes portrait images to post as landscape. We have added a warning to the image insert pop-up as well.

'Mater - '77 Cherokee S 4-door

bigwalton

Alaskan Postal nutjob
FORUM MANAGER
SOA Member
City
Dexter
State
MI
Winning, albeit slowly... too damn cold for this time of year. I took my torpedo heater to the basement on one of the last really warm days, that was a mistake :banghead:

the three piece bumper was fun, clocked myself in the head hard with the center section and ended up cutting one bolt loose.

I may pull the outer fender to get the core support back in, definitely not intended to pull it without them off but I was not going to be denied

now onto pulling the (already thinned) engine bay wiring and EFI. I also have to swap the steering box while it’s apart, probably pull this one and leave it out until after the new engine is in.

getting there!

C92EF584-95EA-400F-82E5-DF3F45ECE8A4.jpeg
 

bigwalton

Alaskan Postal nutjob
FORUM MANAGER
SOA Member
City
Dexter
State
MI
Got almost everything off the motor yesterday before stopping for the night. Was able to pop the TBI on the windshield without removing the fuel lines (taped the base to protect it)

BE6EA820-DC46-4276-98E6-9DB571755398.jpegToday is everything underneath. Motor now completely free, working on trans, tcase and driveshafts next.

Seller said the only issue with the 401 was an occasional lifter tick, so I’m biting the bullet and doing a Crane 863901 cam/lifter/spring set before I put it in. Got a recommendation from a local AMC builder for a basic, mild RV cam to wake it up a bit.

new gaskets and driveshaft joints ordered with the cam stuff... I’m sure I’ve forgotten all kinds of things I’ll end up needing. Using my local independent part store for everything, no online orders, trying to do right by him for being there through this crap.

I have despised the exhaust on this since I got it. Some PO hacked it together. It pained me to put the O2 bung in it without dealing with it properly but I didn’t want to put the money in at the time. Cut it apart with my new favorite power tool, this thing kicks ass for under Jeep work!

The new 401 has a newer side-dump exhaust using Thorley headers that will work perfectly with my auxiliary Aero Tank in the spare tire hole. I’m as excited about the exhaust as I am about the motor! (Yes, I know side dump isn’t ideal and headers have their problems, but screw it, it’s going to sound sick!)

B3C5761E-C4A1-4144-8B16-4DFF9DEEA6AF.jpeg

Back to work!
 

bigwalton

Alaskan Postal nutjob
FORUM MANAGER
SOA Member
City
Dexter
State
MI
Ok, everything is loose and out of the way. It’s just the crossmember bolts and engine mounts that are left. :headbang:

Both driveshafts and all the joints feel good but I’ll rebuild both while everything’s apart anyway.

FE481E72-DA99-4792-AD53-487FBA70A008.jpeg

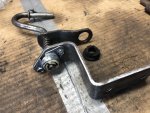
If anyone knows the replacement part for the white bushing on the trans linkage, I’d love to know. I found the black rubber bushing but can’t track down any info or numbers on suitable replacements for the white one in the cage. It’s not awful and a damn sight better than the rubber one that fell apart when I pulled it, but I’d love to knock it out before painting and reinstalling this.

1C6FB2DC-8A41-4B50-A22B-9F993B01DE73.jpeg

Cherry bombs or magnaflow or what to finish it?

Believe it was a flowmaster, but I don’t really care. He sent me a video of it running and it sounds SICK.
 

Randyzzz

Blown Budget
BENEFACTOR
Gold Member
Lifetime Member
SOA Member
City
Redmond
State
OR
I’ve got a couple of extra O2 sensor bungs if you need them. Just let me know and I’ll Priority Mail them tomorrow.
 

bigwalton

Alaskan Postal nutjob
FORUM MANAGER
SOA Member
City
Dexter
State
MI
Well, this just happened.

As I found it this morning in the Z code 77 Chief that is getting an LT drivetrain.
D33013D5-00A4-4831-8915-4026A139C76C.jpeg

I think these decals will have to happen (likely in a smaller size)
FD0F9EB9-80C5-4BDF-8F46-213D0688F205.jpeg

ready to roll out
44FAFC67-501B-4A5B-9FC8-2A65F4826062.jpeg


thought he said it was a side dump exhaust, but a flowmaster set up to dump in front of the rear axle made of some SERIOUS tubing. Mater has an auxiliary tank that I’m using as the main in the spare tire hole, so this size exhaust would never fit out the back. Getting this setup was a key part of making the call to do this. The y-pipe is a little funky, apparently going under the front driveshaft, but the Jeep this came off has a lift, so clearance shouldnt be a problem. Worst case is I have to have the y-pipe reworked. I’ll likely cut the pipe just before the muffler and use a long sleeve-clamp to make this removable without dropping the trans crossmember. Seller found that part out the hard way. 7A4D2DC5-C10F-4A44-97E0-4E75D093DCF0.jpeg
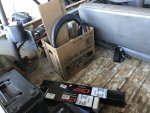
Pulling out to head home! Great neighbor lent me a hand, his truck, trailer and engine lift. Would have been a nightmare to make work otherwise
15134ED6-3434-447D-AF6F-AFCE8B4E9294.jpeg

And the money shot, I waited until it was in my garage :headbang:
F0844089-5525-4AEC-950F-C4C559DE3E2E.jpeg

Mater, meet 401. 401, meet Mater. Y’all are going to get VERY friendly soon! :smokin:
EC1B5FE3-3796-4557-B5F7-4EB759A8FC30.jpeg
 

bigwalton

Alaskan Postal nutjob
FORUM MANAGER
SOA Member
City
Dexter
State
MI
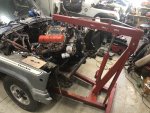
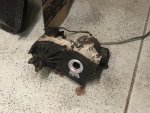
Big day today. Socially distanced solo 360 drivetrain pull. Based on the 401 extraction yesterday, I decided to bench press the Quadratrac off of the trans before pulling it. That, combined with using the rearward hole on the carb plate put the engine/trans at the near perfect angle to come out.

IMG_7947.JPG

IMG_7950.JPG

With the arm on the lift shortened up, I had just enough room with the trans attached. In this shot, you can see the angle that things sat at, I had to watch the oil breather tube as I lifted it up enough to clear the trans cooler lines on the passenger engine mount, but it worked perfectly.

IMG_7948.JPG

I realized I should have gotten a photo, but the neighbor who helped with the 401 retreival had a custom AMC V-8 engine cart that he lent me. His dad worked at AMC and he grabbed a number of the carts when they surplussed them. Works like a charm.

I separated the trans for ease of moving/storage until I can find a new home for the 360. I was shocked to find that there's only three flexplate bolts behind the 360. I'll be moving the HEI and Edelbrock intake over to the 401. Possibly the alternator too.
IMG_7949.JPG

There's now a gaping hole just begging for the 401. Lots of cleaning and painting to do. Things will slow down now as I wait for the cam/lifter/etc to come in. I ordered everything through my local part store to give him all the business I can through this mess. He had to special order the cam/lifter/springs (Crane 260H cam, part #863901) so it will be a bit. That's fine as it forces me to clean/prep the engine bay. If it was sitting here, I'd be stabbing it into the motor and getting it installed ASAP, sort of like I did with this 360 when I put it in. Planning to run wiring and fabricate some mounts to finally install the Marchal driving lights I have sitting in a box on the bumper when this goes back together.

IMG_7951.JPG
 

Kim Dawson

CJ-8 Member
Member
City
Molalla
State
Or
401 decals like you have shown would be nice. There is the 401 emblems used on AMX or Javelin that would be another choice. Lots of new ones on Ebay from 52 a pair to 450 a pair and in between. I got some 304 emblems for my Scrambler I'm putting the 304 in. Just keeping it AMC.
 

bigwalton

Alaskan Postal nutjob
FORUM MANAGER
SOA Member
City
Dexter
State
MI
401 decals like you have shown would be nice. There is the 401 emblems used on AMX or Javelin that would be another choice. Lots of new ones on Ebay from 52 a pair to 450 a pair and in between. I got some 304 emblems for my Scrambler I'm putting the 304 in. Just keeping it AMC.

New emblems on Mater would look wrong IMO, too much patina. I have something in the works, we’ll see how it turns out.
 

bigwalton

Alaskan Postal nutjob
FORUM MANAGER
SOA Member
City
Dexter
State
MI
Very excited about a couple small things.

I found these Marchal’s on Craigslist about an hour away for a great price years ago. I actually drove Mater down to pick them up.

I assumed there would be factory brackets for mounting them over the 3-piece bumper that I could find, but I was wrong, that was never an option. I’ve had them in the box on the shelf since, never having taken the time to fab mounts that will work.

I NEED to take breaks from cleaning because I hate it so much, so this got done. I’ll cut to length and drill the mounting holes when I get the bumper back on properly with the front clip in place. I can’t wait to see it with these on there, I dream about it all the time when I come across the box on the shelf.
FEEC80E7-7705-49E8-BB77-86DB462F58F5.jpeg

The other huge news is that I picked up the speedometer cables from the Chief I pulled the drivetrain from. Mater has cruise, but it’s never been hooked up and that means that I have to keep the control box on the fender. The main speedo cable from the tcase goes to the box and then a small one goes from it to the speedo. That short one was screeching horrifically and I couldn’t manage to fix it, so I simply pulled the speedo cable off the box and drove by RPM.

The donor’s worked fine, so I’ll now have a working speedo again! (Never worried about the odometer because someone swapped the speedo in the cluster somewhere along the line, so it wasn’t correct anyway.)

I also finally removed all the vacuum and wiring associated with the cruise from the engine bay and dash just to clean things up more. In the pic, I have the cluster pulled out, so the cable doesn’t reach. I’m going to replace the dash bulbs with LEDs while I have it apart.
image.jpg
 

bigwalton

Alaskan Postal nutjob
FORUM MANAGER
SOA Member
City
Dexter
State
MI
before:
67FD5F66-89FC-4467-ADB5-CAE54B4562DF.jpeg


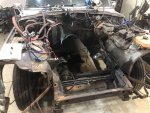
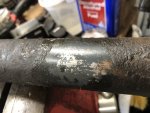
during, the to-be-replaced steering stabilizer, just to show the crud that was most everywhere below the middle of the inner fender C3CAB743-569F-491E-9BFD-AB99C32350A8.jpeg

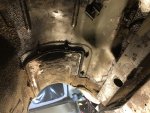
during, scraping the undercoating from the inner frame rail and trans tunnel
BB799C1A-FC46-44E4-B6CA-576D553777D7.jpeg
B550A9C5-3B1B-4935-91D0-3A4A886F490D.jpeg

after wire wheeling and three coats of semi gloss
CF723327-3F5D-496A-AB3C-DE776476274F.jpeg

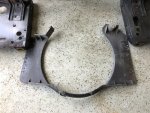
I found that the driver side bumper had taken a hit at some point. Someone used a spacer to get the bumper end back to square and I wasn’t going to accept that. Pulled the bumper bracket apart on that side to bend things back.

Houston, we have a problem:3E08B27D-49B2-41AB-BAA9-7DAE6A75A10F.jpeg

I had to use my grandpas giant adjustable wrench with a cheater bar and wedge my knee against the bench top to get enough force to bend it back.
478FA089-273C-470A-83D7-437BC8F5B5B4.jpeg

got to finish straightening out the wiring and get it bundled back up. I realized I have a relay that I used for an electric fuel pump with the carburetor that happens to be a dual-output KC light relay. It’s mounted and I can rework the wiring easily to add a switch for the Marchals. :smokin:
 

bigwalton

Alaskan Postal nutjob
FORUM MANAGER
SOA Member
City
Dexter
State
MI
I got dumb lucky on the wiring for the Marchals. I had an electric fuel pump on this when I was running the carb and I happened to have/use a KC dual-output relay I had handy at the time. When I went to EFI, I left the relay and wiring and just disconnected it all. So guess what got repurposed for the fog lights? :headbang:

I made up the power wiring harness and will terminate it at the lights when everything is back together. I'll do a separate ground harness from the battery directly, less wire needed that way and I'll just do them in series. Need to figure out a good period-correct looking switch for them now and run that to the relay hookup. I still have the auxiliary fuel tank DPDT switch mounted under the dash above the ebrake pedal. I may repurpose that since it's there and not doing anything. I could use the second set to run an indicator light for the fogs...

Also finally threw paint on the J10 brake booster, I always berated myself for not doing that before I put it in.
IMG_8012.JPG

Finished thinning out and cleaning up the wiring. Got everything loomed up and secured as best I can without the engine being in place. I think I've 100% decided to keep on running my HEI on the 401 rather than wiring up his TFI setup that's on it now. I just can't bring myself to re-clutter the engine bay I finally fully de-cluttered. Part of me really wants to go ahead and pull the heater box out since we rarely drive this that far into the cold weather. I just have this feeling that it's more likely to start leaking coolant than we are to actually make any use of it :shrug:
IMG_8013.JPG

Today the guy I got the 401 from is coming out here to get out of the house for a while and is dropping off the fan shroud that I forgot to grab when I left his place. I'm also giving him back the shifter bracket off the TH400 in case he can manage to make use of it somehow on his new trans and giving him the D300 shifter "pin" that he needs to make the 300 shifter work in his Chief.

I'm going to decide if I'll do any more cleaning under the body (hard to convince myself to go through more of that misery) and get the 401 separated and on my stand to do the gaskets, cam/lifters, etc. I splurged and ordered a set of aluminum valve covers from Bulltear and have an order of stuff from BJ's. Haven't received shipping confirmations on either yet, I'm trying to be patient with all the crap going on.

Everything is in at my part store except for the cam, but I have PLENTY to do for a while yet...

Onward.
 

Belizeit

CJ-8 Member
Gold Member
City
River Ridge
State
La
Mine is looking a lot like yours right now. I did remove the fenders though. Engine, transmission and transfer case came out last Monday. Just cleaned and de-greased like you. Probably could use a little more cleaning, but 79 and humid already this morning.:mad:
 

bigwalton

Alaskan Postal nutjob
FORUM MANAGER
SOA Member
City
Dexter
State
MI
Mine is looking a lot like yours right now. I did remove the fenders though. Engine, transmission and transfer case came out last Monday. Just cleaned and de-greased like you. Probably could use a little more cleaning, but 79 and humid already this morning.:mad:

I was able to keep the fuel system intact by leaving the fenders on, so I figured I’d give it a go like this. If I pull them I’ve got to crack open the lines at the pressure regulator on the drivers fender :shrug:
 

bigwalton

Alaskan Postal nutjob
FORUM MANAGER
SOA Member
City
Dexter
State
MI
Jim, the seller of the motor, dropped by today to give me the fan shroud I forgot to grab when I was there. It’s broken at the top but will work fine with some metal and JB Weld once it’s installed. It will fit right in on Mater :rotfl:

image.jpg
 

bigwalton

Alaskan Postal nutjob
FORUM MANAGER
SOA Member
City
Dexter
State
MI
Not much to photograph today but Jim Repp (seller of the 401) stopped by to drop off the fan shroud he was looking at my engin bay and mentioned that the corner of the passenger side heat shield was very close to the header flange when he disassembled everything. So he recommended some cutty choppy and I took care of that.

Calling the prep on the Jeep itself done after more infuriating work underneath to scrape/wipe crud. Threw paint on the inner frame rails and that was IT. Now everything will be working on the new drivetrain :smokin:

31ADE1E2-2DE6-46A6-9B8E-0AA306F43BDC.jpeg
 
Top