• Notice for iPhone users: DO NOT use the image size reduction option when uploading photos to the forum. This causes portrait images to post as landscape. We have added a warning to the image insert pop-up as well.

Meet Red, my 81 Restomod Build

So, I mentioned rust. Ok, just surface rust but here it is!
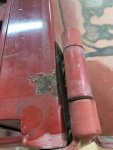
366B42CA-7527-4B8E-9727-04CC3D4B931F.jpegThis is above the passenger window hinge. Looks like the weatherstrip didn’t quite seal there. Here’s what it looked like when I removed the hinge-
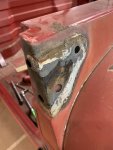
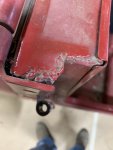
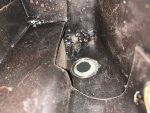
5F487E38-C7AB-40D1-BF3E-AB6A57F0823B.jpegInteresting. Caulking sealed fairly well. But on the back side of the cowl...B8D5FF74-20E7-4FCF-BF0A-A8818500E368.jpegLots of surface rust for about 10”. How did that get there? Maybe through one of the hinge screws?
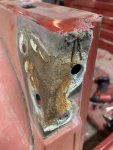
The other side held a bigger surprise.
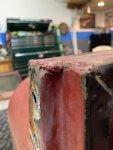
68B51001-03CF-4D23-BF38-3641784C932F.jpeg50BE1A56-42FE-4330-9621-4C77377EFACC.jpegC806DD99-3FDD-4ED0-9DAF-08B8F41DE4A2.jpegSo...it looks like it was amazingly crappily welded- a hole filled. It looks like it has been touched up but the paint all looks original. I’m guessing it was a hole found on the assembly line and filled by a less than skilled welder? But that doesn’t explain the appearance of touch-up. Maybe a rejected body that was then repaired and pressed into service? Funny part is the backside looks like the repair was done before final paint...67AAE4CA-1CF3-4324-BC7F-78EFAED61E1A.jpegAll the paint under the cowl looks to have been sprayed at the same time. So, this might just remain a mystery. But- it won’t go unrepaired. I’ll grind, reinforce, and re-weld.
That is one lousy repair!
 
Randy I always wanted to take my hinges off on the windshield. What is behind there holding the Torxhead screws ? I'd like to catch any rust from the metal to metal non painted parts before becoming fatal. Do you need to remove the dash to get back there or something else ?
 
Randy I always wanted to take my hinges off on the windshield. What is behind there holding the Torxhead screws ? I'd like to catch any rust from the metal to metal non painted parts before becoming fatal. Do you need to remove the dash to get back there or something else ?

All that’s on the backside is non-captured nuts. You will need to get a socket on the nuts and a torx driver on the front. I have done it before without removing the dash. Not much fun but it can be done. Easier if you have one person holding the socket on the backside and another working the torx bit. I suppose you could use a box wrench on the inside, I just found that a socket on a small breaker bar was easier.
 
I couldn't agree more. ;)

I know one thing, it will get fixed correctly. :cheers: it's interesting that Jeep never figured out how to really seal the windshield / cowl area well. But they probably never thought people would be driving these 30 plus years later.

You know, I think most of the leaks in previous Jeeps I have owned are from the cowl seal. I think that might be why Jeep put the rolled lip on the backside of the cowl- so drips could run off to the sides instead of drop on the gauges. Too bad someone hasn’t come up with a seal designed for those of us who never fold our windshields. Maybe more rubber than foam...without that lip on the outside that catches debris and causes rust. With all the poor quality aftermarket seals that have been built, it’s a shame no one has tried to build one “better” instead of “cheaper”. Maybe hard rubber or even composite with a rubber seal track embedded in it something like the LS intake gaskets. Now that would hold up and not deform. I know I wouldn’t mind paying for a quality leak-proof seal!
While I’m on the soapbox about products that don’t exist, I’d sure like to see some closed cell adhesive backed gaskets for the windshield hinges. Maybe for other hinges too. Fender mounting strips...hood hinges...I might be on to something here!
 
Last edited:
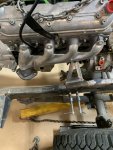
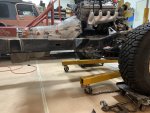
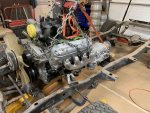
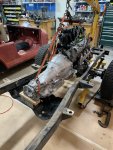
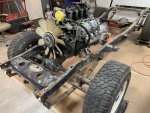
Today’s progress was rather minimal due to lack of time- but I did get the engine and trans set into the frame. These mounts sit the assembly about an inch or so higher than the ones I used on Copper. As long as everything clears the hood, that’s all good.
7906AAF2-DBD7-4D9E-AF32-24E39B770E37.jpeg982C137D-B6CA-427E-86D0-8FEDF3C687EF.jpegD97633DC-5F2D-4E5A-A3D6-DD4B002058D9.jpeg039B3AE6-8CE4-477C-AFAF-407180849953.jpegAE30013D-FB6D-4EB4-900F-86A603AED885.jpeg1C79A59D-75D9-4B37-A73D-1B3C33D827B0.jpeg
 
Which motor mounts did you use on Copper? Any advantage you see in these mounts locating everything higher?

On Copper I used M.O.R.E. Mounts for a Gen2 Chevy. I then modified them with an adapter plate to fit the LS. I figured I’d try the Dave’s mounts as they were direct bolt to the LS. I’m only going to use a 2” lift on Red, so hopefully the higher mounts give some more clearance. It actually looks like everything clears even with stock springs. The transfer case will not hang as low either. The only concern I have is hood clearance. It may be tight around the steering shaft too. That’s the advantage of a drivers drop axle- moving the engine to the pass side gives more room for all the stuff on the drivers side. But I’m keeping the stock D30 so I’ll have to make it all work together.
 
Yes! Steering will clear, everything looks good. The mounts are slotted and I moved everything to a somewhat centered position. Drilled the mounts and threw a couple of bolts in, they will get burned in later. Now I need to get a 32 spline input and a SYE for the 241C. 8F338B8C-9AC1-4054-A01B-72492DA38B06.jpeg5252840D-DF6F-4DD1-899A-6384F286AF54.jpegC94F0E3A-5F9F-483D-8B16-233038B267F0.jpeg
 
My steering shaft ran afoul of my power steering hard line out of the pump, took quite a bit of persuasion to get it routed out of the way. There's also a tiny rub on one of the spark plug wires.
 
Yeah, it looks like it might be close to the return line. I’ll probably find a different reservoir with a shorter return fitting. And go with AN lines for pressure, and banjo fittings on the gearbox. I have a MORE +1 gearbox mount and figured I might as well use it in case the front axle needs an upgrade at some point. Banjo fittings on the gearbox eliminate the need to cut the crossmember.
 
http://www.purechoicemotorsports.co...ct_id=192/category_id=99/mode=prod/prd192.htm

prd_zm_192.jpg


http://www.purechoicemotorsports.co...ct_id=189/category_id=99/mode=prod/prd189.htm

prd_zm_189.jpg
​


​
 
Do you have your 241 yet? I checked car-part.com around Oregon, there is one in Portland for $200 B and R auto wrecking (stock #WIH373). That had a 3 speed, so it should be the th400 with 32 spline output. Since its an 89 it would have cable drive speedo, so you would need a pass through VSS to make your engine/trans happy. If you went with a 90 plus it would have the electric speedo output.
 
Do you need the narrow bearing or wide bearing input? I have a narrow bearing (I think) that I won't be using. I'll check when I get back home tonight.

Also have a 27 spline input that I won't be using too, but it is the opposite bearing size as the 32 spline.

Narrow 32 spline, wide 27 spline.

20191216_164623.jpg

You are welcome to it if it will work for you.
 
Last edited:
Do you need the narrow bearing or wide bearing input? I have a narrow bearing (I think) that I won't be using. I'll check when I get back home tonight.

Also have a 27 spline input that I won't be using too, but it is the opposite bearing size as the 32 spline.

Narrow 32 spline, wide 27 spline.

View attachment 78127

You are welcome to it if it will work for you.
I need a narrow bearing 32 spline! (I have read that as long as you us the correct bearing on the input they are interchangeable) I would love to have it! Let me know what you want-
 
Back
Top