• Notice for iPhone users: DO NOT use the image size reduction option when uploading photos to the forum. This causes portrait images to post as landscape. We have added a warning to the image insert pop-up as well.

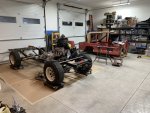
Meet Red, my 81 Restomod Build

Do you have your 241 yet? I checked car-part.com around Oregon, there is one in Portland for $200 B and R auto wrecking (stock #WIH373). That had a 3 speed, so it should be the th400 with 32 spline output. Since its an 89 it would have cable drive speedo, so you would need a pass through VSS to make your engine/trans happy. If you went with a 90 plus it would have the electric speedo output.
Thank you for checking! I already have a drivers side 241c. It’s 27 spline, but I need to tear it down to do a SYE, so I might as well just swap the inputs.
I was moving my transfer case “collection” around to make room. I have a 21 spline 231J, a S-10 231C, a PSD 208 32 spline Chev, a DSD 27 spline 241c, a DSD 32 spline 241c, and the one PSD 241c. I might be a hoarder...
 
I hear ya, I have a couple D300s, a 241d passenger drop and a 208d passenger drop.

The 208 was a mercy save, got it in a pick n pull yard just before the ramcharger was crushed. Think I paid about $40 for it plus a couple hours labor. Wish I had grabbed the tail housing from the trans too, but I was hot and tired at the time.

Just PM me your address and I'll get it in the mail.
 
Ag4ever- thank you so much! That’s amazing. If you ever need anything just let me know!

I just posted in Copper’s build thread- Copper officially sold today. I had not advertised, it all came from a reply to a random thread on Facebook. Gonna leave a hole in my heart that only another Scrambler can fill. So- full speed ahead on Red!
 
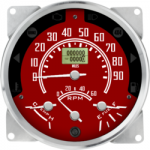
Well, Merry Christmas to me. Just ordered a set of Speedhut gauges. Red/white during the day, blue backlight with red needle at night. I’ll post pics when they show up.

Also, the input gear from ag4ever came yesterday. Thank you so much!8AF51362-F1C7-497A-BFA0-217E5589181F.png
 
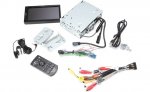
Not a lot of picture-worthy progress, but I did get some parts ordered. Like a set of BDS 2” Wrangler springs and spring plates, MORE shackle mounts, and a 241C seal and gasket kit. Plus I found a real problem-solver stereo. Pioneer makes a stereo where the double-din faceplate mounts separately from the electronic unit. It’s only 1” deep. So no clearance issues with the Vintage Air unit. Looks like I’ll have Logan’s Metal Products build a custom dash panel. He quoted $220 for whatever I could draw.
http://www.logansmetal4x4.com/jeepcj.html
Here’s the head unit-
https://www.crutchfield.com/p_130DMC2550/Pioneer-DMH-C2550NEX.html


1577590396628.jpeg
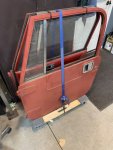
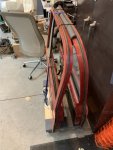
Plus I rigged up a hard door storage cart. A cheap movers dolly, a couple of zip ties , a chunk of foam, and a ratchet strap. Works great!
F55E016E-0FE7-4AAB-8726-99C2F2A2DE0C.jpeg83A95A86-8AB3-41F5-B0E2-59D14391E85E.jpeg
 
Last edited:
The other time consuming project was getting the engine assembly level and centered where I wanted it. The slotted mounts added a lot of adjustability, but something just didn’t look right. Got out the levels and found the drivers side sat 3/8 lower than the passenger side. Measured all points on the frame- perfectly square. I had the same type of issue on my 82 also. I have no idea why the engine would not sit level. My solution was to lower the slot in the drivers engine bracket, raising that side. I think I had that bracket in and out over 20 times! Finally got it within 1/16 of being level. Lots of fun welding the slot up and then re-creating a smaller slot 3/8” lower. My OCD is now satisfied. ?
 
The other time consuming project was getting the engine assembly level and centered where I wanted it. The slotted mounts added a lot of adjustability, but something just didn’t look right. Got out the levels and found the drivers side sat 3/8 lower than the passenger side. Measured all points on the frame- perfectly square. I had the same type of issue on my 82 also. I have no idea why the engine would not sit level. My solution was to lower the slot in the drivers engine bracket, raising that side. I think I had that bracket in and out over 20 times! Finally got it within 1/16 of being level. Lots of fun welding the slot up and then re-creating a smaller slot 3/8” lower. My OCD is now satisfied. ?
So which LS swap engine mounts do you think are the best?
 
So which LS swap engine mounts do you think are the best?
Both the MORE and Dave’s mounts use spring bushing type mounts. MORE mounts are $277, Dave’s are $199. MORE block plates have 2 positions, Dave’s are slotted. Both are weld in, the older MORE mounts bolted and welded. Dave’s positioned my engine 1” higher than the MORE mounts, but again, I used the older MORE mounts, not their newer ones. So... I like the idea of the slots in Dave’s mounts, and the 1” increased height works well for clearances. I ended up drilling the Dave’s mounts to bolt into 2 of the existing frame holes, I’ll burn them in once I pull it all apart. I’d buy the Dave’s mounts again and save the $75 for other stuff.
 
Randy, I am in the middle of an LS swap into my 84 Scrambler. I too went with Dave's mounts. I tried using some corvette LS7 exhaust manifolds but the big "D" shaped collector hits the motor mount. My truck manifolds clear motor mounts but don't know how they will interact with the firewall. My body is off the frame at a body shop getting some rust repair so I cant really check any firewall interference issues until i get it back. Any recommendations on exhaust manifold/headers?
thanks, Brent
 
Last edited:
Randy, I am in the middle of an LS swap into my 84 Scrambler. I too went with Dave's mounts. I tried using some corvette LS7 exhaust manifolds but the big "D" shaped collector hits the motor mount. My truck manifolds clear motor mounts but don't know how they will interact with the firewall. My body is off the frame at a body shop getting some rust repair so I cant really check any firewall interference issues until i get it back. Any recommendations on exhaust manifold/headers?
thanks, Brent
Corvette C6, mid-2000s are generally recommended for avoiding the firewall.
 
I’m planning to use C6, LS2 manifolds:

d237a031-8f12-4030-b6b9-381b0b9f6689-jpeg.68817
 
I used those C6 LS2 manifolds on Copper, and they worked great. I think the manifolds I’m using on Red came off a Camaro. They are rear dump and tight on the drivers side. I’ll probably work on some down pipes this weekend and we’ll see. I’ll run the numbers and try and find an original application.
OK... did a quick search and found they were off a 2010-2015 Camaro LS3. Stay tuned to see if they will work. ??
 
Last edited:
I used those C6 LS2 manifolds on Copper, and they worked great. I think the manifolds I’m using on Red came off a Camaro. They are rear dump and tight on the drivers side. I’ll probably work on some down pipes this weekend and we’ll see. I’ll run the numbers and try and find an original application.
OK... did a quick search and found they were off a 2010-2015 Camaro LS3. Stay tuned to see if they will work. ??
Thanks
Corvette C6, mid-2000s are generally recommended for avoiding the firewall.
Thanks, that seems to be the hot set up. I like the O2 sensor location of those as well.
 
Last edited:
I used those C6 LS2 manifolds on Copper, and they worked great. I think the manifolds I’m using on Red came off a Camaro. They are rear dump and tight on the drivers side. I’ll probably work on some down pipes this weekend and we’ll see. I’ll run the numbers and try and find an original application.
OK... did a quick search and found they were off a 2010-2015 Camaro LS3. Stay tuned to see if they will work. ??
Really appreciate the info. Trying different approaches can get expensive.
 
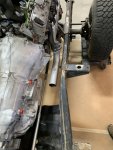
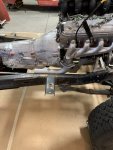
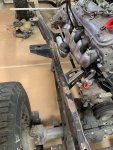
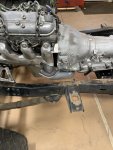
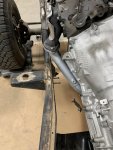
Did a little fit checkIng on the exhaust. While the C6 LS2 manifolds are a great fit, especially if you want to cross over in front of the oil pan, I am really happy with how my LS3 2010-2015 Camaro manifolds worked out. I cut up the crossover pipe I made for the J-20 and used what I could. The passenger side is a great fit. I’ll have to play a bit with the drivers side angle but it all fits. Just a FYI on firewall fit. I try to keep everything frame level or below behind the front body mount outriggers. That way it should all clear without a body lift. Here’s a few pics. Drivers side first.
11F4D785-6BE0-4F94-9D93-7022607D2D1F.jpeg9D164B7D-6AFA-49AA-87D8-273AE31DED15.jpeg166A69F3-7651-4226-A713-7971371F2348.jpegOn to the passenger side. The engine is sitting in the far left position so clearance is much less here. The manifold dumps slightly over the frame. A quick bend cleared that, now I just have to work out the angles for max clearance between the hot pipe and the trans pan and frame mounted lines. I will most likely add a welded on heat shield, along with providing heat shielding for the brake lines and prop valve. I’ll run the fuel lines up the trans like I did on Copper.
1ADD880B-DE56-45C2-BA99-ACD5F2515B59.jpeg25282CBC-B951-409A-B1B1-89C9AA272792.jpeg76D9C468-85CB-4712-A5C0-CF116C5AB70D.jpegFrom there I’ll run a H-pipe crossover behind the transfer case, turbo mufflers, and duals our the back corners. Should sound great.
 
Back
Top