• Notice for iPhone users: DO NOT use the image size reduction option when uploading photos to the forum. This causes portrait images to post as landscape. We have added a warning to the image insert pop-up as well.

New Scrambler owner! YeeHaa!

Pman

Busted Knuckles
Lifetime Member
City
Mount Pleasant
State
SC
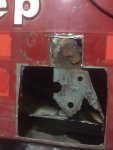
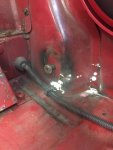
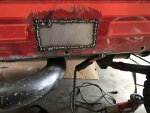
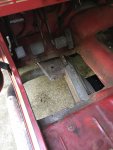
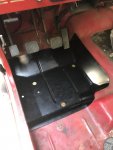
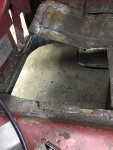
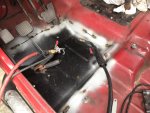
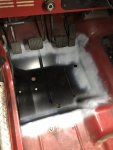
Would have been a perfect opportunity to give the inner fenders a good scrub and maybe even reach in there and cut and polish? One (two) of those areas which, when clean, can really make the engine bay sparkle, especially with all your original enginey stuff in there. What's the go with that thing beside the brake booster? Is that to do with your park brake?

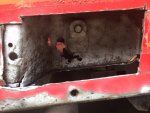
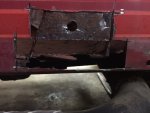
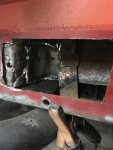
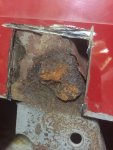
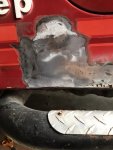
You read my mind, Gazzo! Hitting those inner fenders with degreaser today and will clean them up. The lower inside of the grille has a bit of rust. I'm going to repair that area (hopefully today if the Interior Minister doesn't have a fit) also before buttoning it all back up. The radiator could use a little paint love as well.

Are you talking about the proportioning valve next to the booster? This is an aftermarket booster the PO put on. Not real wild about it as it interfered with the stock air cleaner and the mechanic that did the upgrade had to modify the cleaner housing. Let me know if that's what you're asking about.
 

Pman

Busted Knuckles
Lifetime Member
City
Mount Pleasant
State
SC
Oh crap. Go everything bolted back on today. Cranked it up and....oh boy...I'm hearing some ticking. Not happy right now and scratching my head. I'm worried I'm a tooth off. I'll update later,:mad:
 

Pman

Busted Knuckles
Lifetime Member
City
Mount Pleasant
State
SC
Posted the tick noise on Jeep Forum. One guy that knows his schnizzel seems to think it's ok. It did seem to run/idle just fine for the short period I had it cranked this a.m., and he confirmed if it was even one tooth off it would run horrible. Maybe I'm out of the woods, but I simply don't remember the ticking being that noticeable before. :shrug: I'm not done sniffing this out yet.
 

Pman

Busted Knuckles
Lifetime Member
City
Mount Pleasant
State
SC
I see that you like that general color palette, red mistress! :rotfl:

I need to stalk some of your posts so I can see your rigs (I do think I ran across a pic or two of at least one of yours recently). The next time my wife complains about having 4 Jeeps, I'm going to take a screen shot of your current inventory. You need a warehouse for all of those!!!
 

Pman

Busted Knuckles
Lifetime Member
City
Mount Pleasant
State
SC
Sweet mother of pearl HALLELUJAH!!! After hearing some confident advice that I had not skipped a tooth on the timing gear repair, I mustered some courage and cranked the Scrambler up tonight. No noises and ran smooth as silk. Put the timing light on it and it was dead on 8'degrees BTDC. :cheers:
 

Pman

Busted Knuckles
Lifetime Member
City
Mount Pleasant
State
SC
Jersey, my "theory" is this: during the removal/ install process, I turned the crank quite a bit with the wrench (before the chain removal to line up the marks and after the new chain and gearset install to also line things up and then to check to make sure everything still rotated smoothly). I'm thinking that maybe the oil that normally rests in the cavity of the lifters (which acts as a cushion for the pushrods from what I've read) was removed when I did this slow procedure, and on initial start up, caused the noise. I am not an engine builder, so I may be completely wrong, but it's the only thing I can think of. It sounds completely normal now.
 

Pman

Busted Knuckles
Lifetime Member
City
Mount Pleasant
State
SC
I’m finding it hard to believe that it’s been over 5 years since I posted, but here we are! Roughly 3 years ago, I finally decided to tackle the rocker rust bubbles that were slowly getting worse. Also, I noticed the floorpans (which has been poorly patched by the PO) and B pillars were also in dire need of attention. Upon removing the rocker trim, I was a bit surprised to see that things were worse than originally thought!
 

Attachments

  • 44C615CB-35A1-4876-9613-B500B9306481.jpeg
    44C615CB-35A1-4876-9613-B500B9306481.jpeg
    95.7 KB · Views: 17
  • 87255B74-81DE-4A15-BE80-98FCFC9C5D0A.jpeg
    87255B74-81DE-4A15-BE80-98FCFC9C5D0A.jpeg
    98.7 KB · Views: 16
  • D154506F-F6D3-4E8A-B949-6042D9D2A3F2.jpeg
    D154506F-F6D3-4E8A-B949-6042D9D2A3F2.jpeg
    94.2 KB · Views: 16
  • E22D7E32-220F-4415-B08B-2BFCE1F9172B.jpeg
    E22D7E32-220F-4415-B08B-2BFCE1F9172B.jpeg
    120.8 KB · Views: 16

Pman

Busted Knuckles
Lifetime Member
City
Mount Pleasant
State
SC
The driver side wasn’t as bad as the passenger side, so I opted to start with it first. I used a crappy HF sandblaster (slow, but it was somewhat effective), to probe for good metal. I ended up needing to patch a few areas. The B pillar was horrendous and looked like Swiss cheese.
 

Attachments

  • D8E15B3F-7467-4A6C-B09F-C8B6A2BCC24C.jpeg
    D8E15B3F-7467-4A6C-B09F-C8B6A2BCC24C.jpeg
    118.5 KB · Views: 21
  • AAA8F553-00F5-49D1-8D88-4A3127AC6923.jpeg
    AAA8F553-00F5-49D1-8D88-4A3127AC6923.jpeg
    104.6 KB · Views: 21
  • A9FEF110-5C82-401C-B576-B1717264F97F.jpeg
    A9FEF110-5C82-401C-B576-B1717264F97F.jpeg
    100.6 KB · Views: 21
  • B08A25B1-622E-4462-A8F8-2F3DFF2B85F9.jpeg
    B08A25B1-622E-4462-A8F8-2F3DFF2B85F9.jpeg
    87.3 KB · Views: 21
  • 5C4AC629-B901-4675-8682-7427F41F8EDC.jpeg
    5C4AC629-B901-4675-8682-7427F41F8EDC.jpeg
    115 KB · Views: 21
  • 97E47A46-E048-454C-AAEB-B5FF12008480.jpeg
    97E47A46-E048-454C-AAEB-B5FF12008480.jpeg
    133.5 KB · Views: 21

Pman

Busted Knuckles
Lifetime Member
City
Mount Pleasant
State
SC
Stitched in the new pieces and formed up a new section for the pillar. I also ordered a new “cowl reinforcement from Classic Enterprises and cut that to fit. It’s still in a rough stage at the moment but I’ll get it smoothed out and looking nice later.
 

Attachments

  • A04F03EF-84D8-498B-965B-F410EB18ED11.jpeg
    A04F03EF-84D8-498B-965B-F410EB18ED11.jpeg
    133 KB · Views: 19
  • 471DC4B9-182B-4564-A17B-098EF7362140.jpeg
    471DC4B9-182B-4564-A17B-098EF7362140.jpeg
    116.9 KB · Views: 18
  • 48777DD4-4866-4EBB-A3AC-D9E892B6F2DA.jpeg
    48777DD4-4866-4EBB-A3AC-D9E892B6F2DA.jpeg
    79.2 KB · Views: 17
  • 0DCC178D-BEA7-4353-8696-E28B9AC9856D.jpeg
    0DCC178D-BEA7-4353-8696-E28B9AC9856D.jpeg
    119.9 KB · Views: 18
  • 31733104-4BC5-4FB3-BDBF-DE2C2F64E1ED.jpeg
    31733104-4BC5-4FB3-BDBF-DE2C2F64E1ED.jpeg
    113.9 KB · Views: 19
  • B21C9270-35CA-4A28-AE73-8196FD5A8680.jpeg
    B21C9270-35CA-4A28-AE73-8196FD5A8680.jpeg
    101.5 KB · Views: 19
  • 21555BB7-133C-4B37-91C6-BECB3AC3A6AE.jpeg
    21555BB7-133C-4B37-91C6-BECB3AC3A6AE.jpeg
    110.6 KB · Views: 18

Pman

Busted Knuckles
Lifetime Member
City
Mount Pleasant
State
SC
The floor pans were a pain due to the curves. I hate lap welds, and am butt welding everything so that you won’t be able to tell a repair has been made. I found that Key Parts makes great factory reproduction pans, so I ordered those from Quadratec. This is where an air saw shines. I tried getting by with a cheapo HF saw, but it was garbage. I ordered an “Astro” saw off of Amazon, and it has been flawless. I also used this opportunity to clean up the areas under the floorpans and paint them with POR-15. I also repaired the captive nut cage for the body mount while it was exposed.
 

Attachments

  • B8BBDAA0-625F-463B-98D9-5DED015FC9F5.jpeg
    B8BBDAA0-625F-463B-98D9-5DED015FC9F5.jpeg
    148 KB · Views: 23
  • B61941E0-A583-444A-AB05-0AC50BB0FEF1.jpeg
    B61941E0-A583-444A-AB05-0AC50BB0FEF1.jpeg
    96.9 KB · Views: 23
  • C4D7C4AC-98CA-4E11-8E12-BA29489636B5.jpeg
    C4D7C4AC-98CA-4E11-8E12-BA29489636B5.jpeg
    137.8 KB · Views: 24
  • EC1878CE-2B43-4F14-9DBE-404B7324A9B7.jpeg
    EC1878CE-2B43-4F14-9DBE-404B7324A9B7.jpeg
    140.2 KB · Views: 24
  • 22803124-CE5D-4086-A886-6E28A27A796E.jpeg
    22803124-CE5D-4086-A886-6E28A27A796E.jpeg
    160.1 KB · Views: 23

Pman

Busted Knuckles
Lifetime Member
City
Mount Pleasant
State
SC
After cutting the pans down to replace the rusted section, I stitched everything in. At this point, other life priorities got in the way (i.e. I lost interest), and “Edgar” sat in the garage, neglected, for two years.
 

Attachments

  • 671CFE18-5A4B-4AEC-8A21-53916EE711CC.jpeg
    671CFE18-5A4B-4AEC-8A21-53916EE711CC.jpeg
    154.8 KB · Views: 25
  • BF6C9CE1-DF95-4EB3-B39B-51AF7108CD3B.jpeg
    BF6C9CE1-DF95-4EB3-B39B-51AF7108CD3B.jpeg
    106.7 KB · Views: 24
Last edited:

Pman

Busted Knuckles
Lifetime Member
City
Mount Pleasant
State
SC
With my newfound energy to finish this Jeep up, I started on the passenger side. The rust was much worse on this section, and I felt like I was playing whack-a-mole! The deeper I dug, the more rust I found.
 

Attachments

  • F9FEB72E-5AD7-4CD9-9DFB-8762813E2C15.jpeg
    F9FEB72E-5AD7-4CD9-9DFB-8762813E2C15.jpeg
    219.2 KB · Views: 15

Pman

Busted Knuckles
Lifetime Member
City
Mount Pleasant
State
SC
This side was more technical, as the spot welds holding the rocker to the floorpan had rusted and “sucked in” the metal of the rocker, making that whole panel wavy. I decided to order a whole rocker section from Classic Enterprises. They have quality stuff and the panel replicates the rolled lip at the bottom. I purchased a spot weld cutter; this made it MUCH easier to separate the rocker from the floorpan.
 

Attachments

  • 704A41B5-5E86-4108-BF0D-F2ACD0C8B3D6.jpeg
    704A41B5-5E86-4108-BF0D-F2ACD0C8B3D6.jpeg
    102.1 KB · Views: 10

Pman

Busted Knuckles
Lifetime Member
City
Mount Pleasant
State
SC
I used an air chisel to separate the whole shooting match once I’d cut the spot welds. I suspected that I would find the “lip” section of the rear floorpans to be rotted out. This was a problem I would need to fix, as the new rocker would need to be spot welded to this lip for structural reasons.
 

Attachments

  • 46AE7D4D-32E4-44E5-8101-B47FF4EABFAA.jpeg
    46AE7D4D-32E4-44E5-8101-B47FF4EABFAA.jpeg
    115.6 KB · Views: 15
  • 2B556B68-DDEE-4BBE-88BE-2D8708BBA6E6.jpeg
    2B556B68-DDEE-4BBE-88BE-2D8708BBA6E6.jpeg
    124.7 KB · Views: 14
  • 5E43B87B-7728-46BB-8816-5161DEC7A1DB.png
    5E43B87B-7728-46BB-8816-5161DEC7A1DB.png
    597.5 KB · Views: 13

Pman

Busted Knuckles
Lifetime Member
City
Mount Pleasant
State
SC
I cut out the rusted section, fashioned a replacement piece and welded it in. It worked better than I anticipated!
 

Attachments

  • 2432D002-4A63-47D6-B692-685E644A695D.jpeg
    2432D002-4A63-47D6-B692-685E644A695D.jpeg
    126.9 KB · Views: 13
  • 8C782159-2CED-4D40-87C3-CDA4DC3E926A.jpeg
    8C782159-2CED-4D40-87C3-CDA4DC3E926A.jpeg
    111 KB · Views: 16
  • 1711DEB5-1D14-4E5E-BC94-2B72F8639405.jpeg
    1711DEB5-1D14-4E5E-BC94-2B72F8639405.jpeg
    69 KB · Views: 15

Pman

Busted Knuckles
Lifetime Member
City
Mount Pleasant
State
SC
On New Years Day, nursing a hangover that felt like I had spent the previous night spawning satans child, I cut out the remainder of the rocker panel and cut the Classic Enterprises replacement piece to fit (actually, I always cut the replacement piece first and use that as a template on the section I’m about to cut out). Oh, I now have a (drum roll) PLASMA CUTTER. Man I love this thing. It sounds counterintuitive, but the cutting puts out very little heat on the panel so there is no warping. Total game changer!!!
This weekend I “hope” to finish the B pillar on the passenger side, clean everything up and weld in this rocker panel. At that point, I’ll clean everything up and get ready for paint. I’m only 3 years late!!
 

Attachments

  • FB0F3051-1634-4CE7-B6DB-63345231128B.jpeg
    FB0F3051-1634-4CE7-B6DB-63345231128B.jpeg
    153.4 KB · Views: 23
  • 570D539A-A45B-482F-9F14-D54C855DD0CA.jpeg
    570D539A-A45B-482F-9F14-D54C855DD0CA.jpeg
    171 KB · Views: 28
  • 86058875-42FA-4094-A413-A0DFEEFD03AE.jpeg
    86058875-42FA-4094-A413-A0DFEEFD03AE.jpeg
    85.8 KB · Views: 27

Pman

Busted Knuckles
Lifetime Member
City
Mount Pleasant
State
SC
Thanks brotha! Glad to see you still kicking around here too! I’m a bit ashamed it’s taken me this long to restart, but the last couple of weeks have really been motivating. I just need to step up to a bigger compressor now (still using my 5hp 30 gallon Craftsman) so my air tools can run longer! ?
 
Top