

You are using an out of date browser. It may not display this or other websites correctly.
You should upgrade or use an alternative browser.
You should upgrade or use an alternative browser.
OT: Retro Wrangler/Willys Pickup (long)
- Thread starter jscherb
- Start date

- City
- Cincinnati
- State
- Oh
Next project: grille mod
Yeah! Bring on the pointy grille.
 Although, I am sure you don't want to just mimic the original.

jscherb
CJ-8 Member
- City
- Elmira
- State
- NY
Yeah! Bring on the pointy grille.
In case you guys didn't see it in the thread about the Jeff Daniels Jeep Show, the Retro pick up
"picked up" two trophies this weekend - one for best in class for Modified Wranglers, and Runner-Up for People's Choice.
I think the design is just fine as it is.


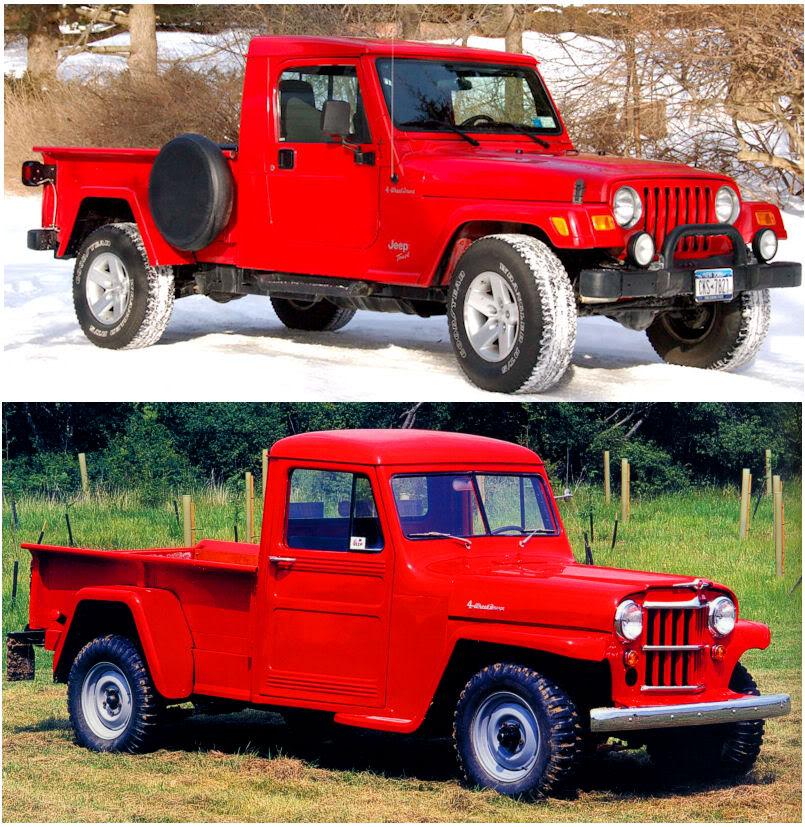
- City
- Cincinnati
- State
- Oh
I have a Willys Aero hood ornament you can slap on that puppy, if you are interested.
Looks like this
http://www.flickr.com/photos/nyctreeman/3141222885/in/set-72157622052175235/
Looks like this
http://www.flickr.com/photos/nyctreeman/3141222885/in/set-72157622052175235/
jscherb
CJ-8 Member
- City
- Elmira
- State
- NY
I have a Willys Aero hood ornament you can slap on that puppy, if you are interested.
Looks like this
http://www.flickr.com/photos/nyctreeman/3141222885/in/set-72157622052175235/
Probably the Retro is best without a hood ornament
- City
- Cincinnati
- State
- Oh
Just funnin' ya. I buy my sense of taste at Walmart when it's on sale.

- City
- East Norriton
- State
- PA
This Jeep is NICE. I met Jeff and his "retro' at the Jeff Daniels show on Saturday. Man is it nice(Jeff is also very nice). His Jeep looks like it could have been factory made by an army of men at a factory making sure all the details where perfect(expect for the rear fenders ). He beat out all the other TJ's (some sporting the whole Quadratec catalog of add-ons). Pretty impressive if you ask me.
- City
- Dexter
- State
- MI
It's a whole different thing to see it in person, you're exactly rightThis Jeep is NICE. I met Jeff and his "retro' at the Jeff Daniels show on Saturday. Man is it nice(Jeff is also very nice). His Jeep looks like it could have been factory made by an army of men at a factory making sure all the details where perfect(expect for the rear fenders

jscherb
CJ-8 Member
- City
- Elmira
- State
- NY
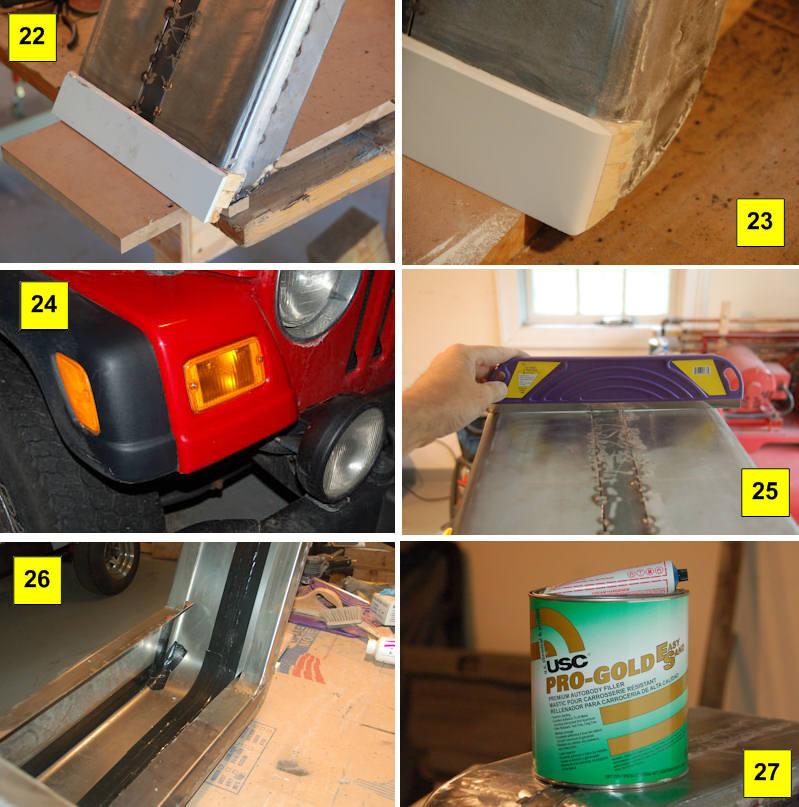
These photos (22,23) show how I'm doing the body line detail on the bottom of the fender, I made from a strip of fiberglass sheet left over from a bathroom remodel, and some pieces of wood to fill in the corners, and used epoxy to secure the parts to the fender. If I were building a "real fender" of course I would use metal for this, but for a mold master the fiberglass and wood is very easy to work with and sand to nice corners. On the original Retro fenders I made this body line from 1/4" x 1 1/2" steel, bent around the corners and tapered with a grinder. I used a woodworking belt sander to round the corners to the roughly finished curve in 23. I'll fair this in with filler to match the look of the TJ front fender body line, shown in photo 24.
In photo 25, I'm showing with a 12" wide paint edge guide as a straightedge that I've made the surfaces slightly concave. This was to make it easy to get perfectly flat surfaces with the filler - there aren't any high spots in the metal since it's concave. For making a "real fender", I'd have made the surfaces flat and used minimal filler on them, but for the mold master it doesn't matter how much filler is on there, as long as I get perfect surfaces. I'll use this paint edge guide to trowel on the filler instead of small plastic spreaders. This more rigid and wide tool makes it easy to trowel on a pretty flat surface which will require minimal sanding.
Recall that I didn't finish weld the seams when I welded all of the sheet metal together, today in preparation for smoothing the surfaces with filler, I've backed up the seams with duct tape, shown in photo 26. With the tape is in place I can lay filler on the outside surfaces and the tape will provide enough support for the filler. Don't do this on "real" parts on your Jeep! - this shortcut is only for making the mold master.
I'm using Pro Gold Easy Sand filler (27), my friends at Elmira Auto Paint recommended it as being the easiest sanding product on the market. I don't care a durability here, since this is a "use once" mold master. They say this sands as easily as drywall mud... we'll see. The next post will show photos of the fender with filler...
In photo 25, I'm showing with a 12" wide paint edge guide as a straightedge that I've made the surfaces slightly concave. This was to make it easy to get perfectly flat surfaces with the filler - there aren't any high spots in the metal since it's concave. For making a "real fender", I'd have made the surfaces flat and used minimal filler on them, but for the mold master it doesn't matter how much filler is on there, as long as I get perfect surfaces. I'll use this paint edge guide to trowel on the filler instead of small plastic spreaders. This more rigid and wide tool makes it easy to trowel on a pretty flat surface which will require minimal sanding.
Recall that I didn't finish weld the seams when I welded all of the sheet metal together, today in preparation for smoothing the surfaces with filler, I've backed up the seams with duct tape, shown in photo 26. With the tape is in place I can lay filler on the outside surfaces and the tape will provide enough support for the filler. Don't do this on "real" parts on your Jeep! - this shortcut is only for making the mold master.
I'm using Pro Gold Easy Sand filler (27), my friends at Elmira Auto Paint recommended it as being the easiest sanding product on the market. I don't care a durability here, since this is a "use once" mold master. They say this sands as easily as drywall mud... we'll see. The next post will show photos of the fender with filler...
jscherb
CJ-8 Member
- City
- Elmira
- State
- NY
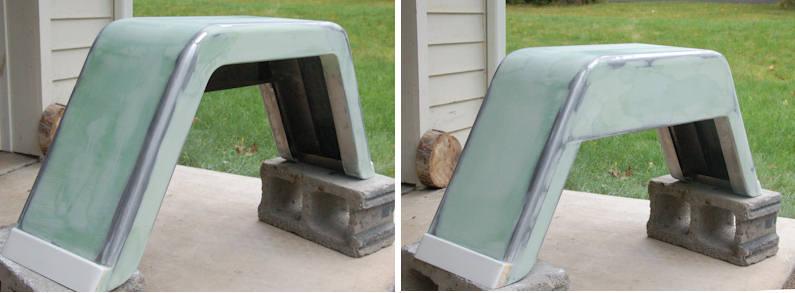
The goal for the filling process is to get perfectly flat surfaces, and the only way to do that to perfection (at least that I know of) is with a long board. The long boards I use are in photo 28. The short one is about 15" long, and the long one is 30". I use PSA (pressure sensitive adhesive) sandpaper on these, it comes in rolls and you just stick it to the bottom of the board. I made both of these sanders out of scrap wood, plastic and fiberglass sheet I had laying around.
In 29, I'm checking the flatness of the top of the fender with a straightedge, you can't see any light under the edge so the long board sanders are doing their job.
Photo 30 shows the detail at the bottom edge of the fender and 31 shows the fender as it is at the moment. Still needs another skim coat of filler to catch the low spots, but I'm taking a break from sanding now, I'll continue tomorrow. The Pro Gold Easy Sand filler does sand quite nicely, all of the work you see here was hand sanding with the long boards for maybe 30 minutes of work total.
jscherb
CJ-8 Member
- City
- Elmira
- State
- NY
The basic bodywork is done on the new fender, the next step is spraying with a high-build primer followed by block sanding with fine grit sandpaper. All of the bodywork so far has been done with the two long boards I showed in earlier photos, it's been all manual work. The Pro Gold Easy Sand filler really does sand very nicely by hand. I hope to do the primer tomorrow.
jscherb
CJ-8 Member
- City
- Elmira
- State
- NY
Here's where the Retro fender molding process will get interesting... the mold will have to be a three-piece mold because of the return on the edge of the outside face of the fender - in other words, the fender wraps in a bit at the edge of the face. If I tried to make it a one-piece mold, the master would never come out of the mold (and if my some miracle it did, the finished fenders would never come out either).
So when I make the mold, I'll first make the mold of the gray parts that are visible in this first photo, and I'll overlap the mold onto these dams about 2". Then I'll remove the dams, and make the side pieces of the mold, using mold release so the side pieces do not stick to the top piece. Then I'll take it all apart, remove the master, and I'll have a three-piece mold that will be bolted together at the flange which will be defined by these dams.
The lower right photo is for the woodworkers among us - I wanted these dams to be very strong, and I didn't feel like filling a lot of nail or screw holes in the dam from assembling it, so I assembled it using biscuit joinery - no nails, just biscuits and glue. (I'm a life-long woodworker, metal fabrication is just something I picked up in the last two years. And fiberglass fabrication is something I'm learning right now as I do it )
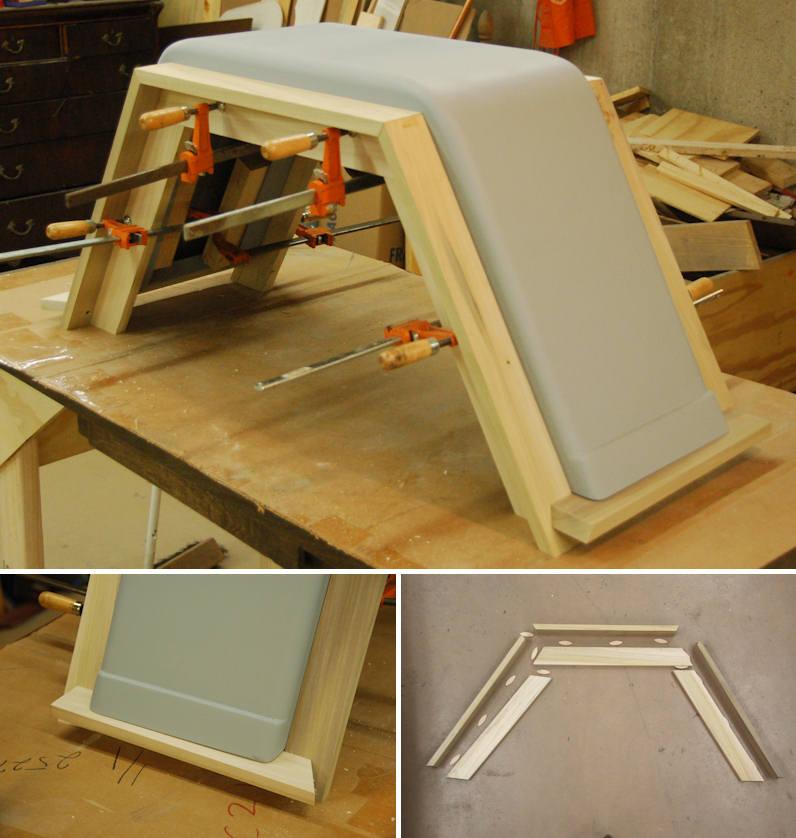
These dams will have to be smoothed and epoxy-primed just like the fender master, which is why I built them now - I'm surely going to have to do more coats of primer on the fender as I block sand it and perfect it, so I might as well have these ready to spray at the same time.
So when I make the mold, I'll first make the mold of the gray parts that are visible in this first photo, and I'll overlap the mold onto these dams about 2". Then I'll remove the dams, and make the side pieces of the mold, using mold release so the side pieces do not stick to the top piece. Then I'll take it all apart, remove the master, and I'll have a three-piece mold that will be bolted together at the flange which will be defined by these dams.
The lower right photo is for the woodworkers among us - I wanted these dams to be very strong, and I didn't feel like filling a lot of nail or screw holes in the dam from assembling it, so I assembled it using biscuit joinery - no nails, just biscuits and glue. (I'm a life-long woodworker, metal fabrication is just something I picked up in the last two years. And fiberglass fabrication is something I'm learning right now as I do it
)
These dams will have to be smoothed and epoxy-primed just like the fender master, which is why I built them now - I'm surely going to have to do more coats of primer on the fender as I block sand it and perfect it, so I might as well have these ready to spray at the same time.
Last edited:

jscherb
CJ-8 Member
- City
- Elmira
- State
- NY
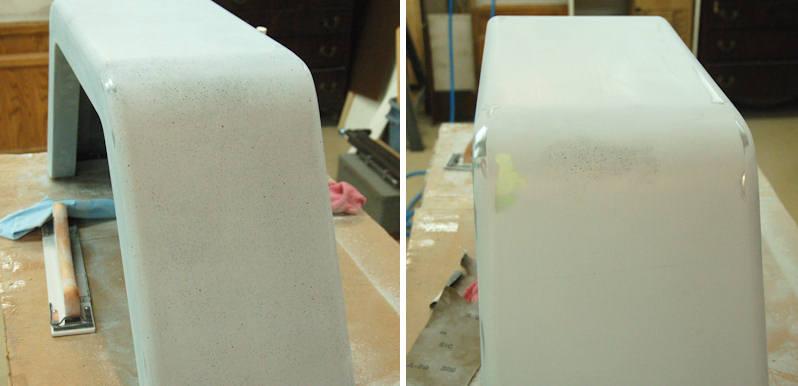
Almost there with the block sanding. If you look closely at the left photo, you can see a light sprinkling of rattle-can black spray on the fender, and on the left is the result after a few minutes block sanding with a long board with 220 grit paper. There's one small low spot, you can see near the top of the fender, so back to the "paint booth" for a few more coats of high build primer/surfacer and it'll be perfect. The rest of the fender block sanded perfectly flat, just this one area to remedy.
jscherb
CJ-8 Member
- City
- Elmira
- State
- NY
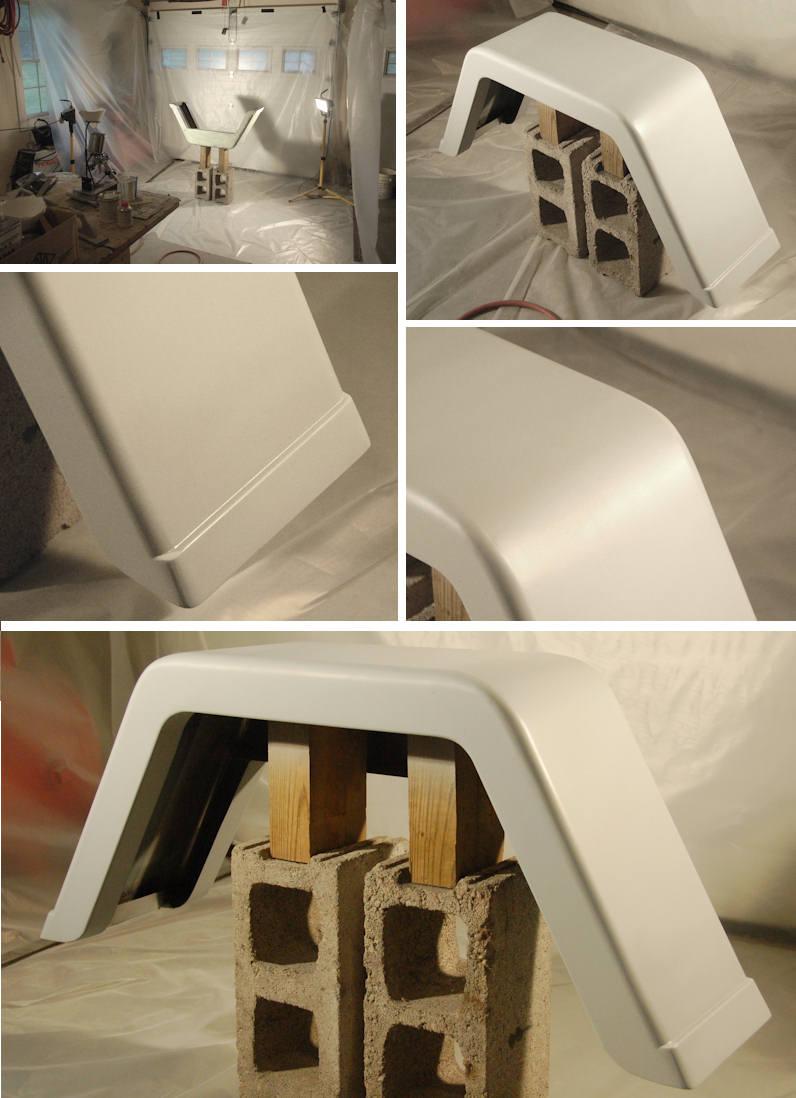
The mold master fender is done and ready for the molding process to begin. Unfortunately, two things will be taking all my time this coming week, so I won't get to the mold work for at least a week.
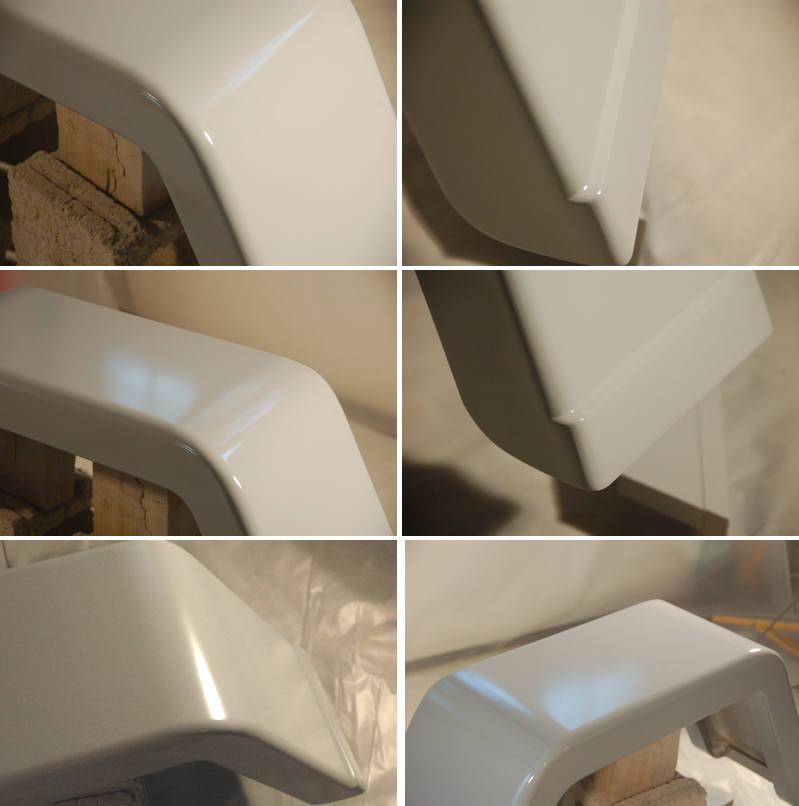
I think it was about 8 hours work to get the fender from raw metal to this point. Several applications of the "Easy Sand" filler to get the surfaces basically flat, followed by two multi-coat applications of high build primer/surfacer, with sanding up to 250 grit in between coats, and now two coats of epoxy primer, which will be impervious to the solvents in the polyester resin. All of the sanding was done by hand with long boards, no power tools were involved.
Here are some detail photos of the finished fender; the epoxy primer is pretty much a satin finish so it doesn't really show off how nice the surfaces turned out.
I think it was about 8 hours work to get the fender from raw metal to this point. Several applications of the "Easy Sand" filler to get the surfaces basically flat, followed by two multi-coat applications of high build primer/surfacer, with sanding up to 250 grit in between coats, and now two coats of epoxy primer, which will be impervious to the solvents in the polyester resin. All of the sanding was done by hand with long boards, no power tools were involved.
Here are some detail photos of the finished fender; the epoxy primer is pretty much a satin finish so it doesn't really show off how nice the surfaces turned out.
jscherb
CJ-8 Member
- City
- Elmira
- State
- NY
Having successfully learned and tested my mold-making skills on the mold for the Gaucho fuel filler insert, I'm now preparing to make the mold for the Retro fenders. I'm doing this one before the Gaucho fenders because even though it is a three-piece mold, it's a bit simpler in shape than the Gaucho fender so I think it will be a bit easier.
Below I've got the master prepared for the first part of molding, the side dams are clamped in place and sealed to the fender with modeling clay. I'm in the process of waxing it in these photos, and when that's done I'll spray over the wax with PVA mold release. I'll let the several coats of PVA dry overnight, and tomorrow morning I can shoot the gelcoat and do the fiberglass lamination.
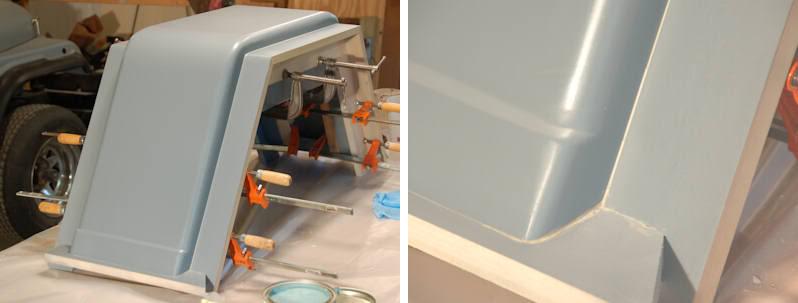
Once tomorrow's gelcoat/fiberglass work is cured, on Tuesday I'll remove the side dams and make the side parts of the mold.
Below I've got the master prepared for the first part of molding, the side dams are clamped in place and sealed to the fender with modeling clay. I'm in the process of waxing it in these photos, and when that's done I'll spray over the wax with PVA mold release. I'll let the several coats of PVA dry overnight, and tomorrow morning I can shoot the gelcoat and do the fiberglass lamination.
Once tomorrow's gelcoat/fiberglass work is cured, on Tuesday I'll remove the side dams and make the side parts of the mold.